Meraki - iOS Configuration Guide
The following contains procedures for deploying Meraki for iOS.
Note
Blocksi supports iOS 13.1 and higher.
Sign in to your Apple School Manager account with your Administrator credentials.
Click your name in the bottom left of the sidebar.
Go to Preferences > Enrollment Information.
Locate your Organization ID and Company Name.
Send this information to Blocksi to add your organization to the approved list of customers who can use Blocksi's filtering app.
Sign in to your Apple School Manager account with your Administrator credentials.
Click your name in the bottom left of the sidebar.
Click Preferences at the bottom of the sidebar.
Click Enrollment Information.
Scroll down to the Customer Apps section.
Click Enable in the Custom Apps row.
Click License Management in the Main Menu.
Click Synchronize VPP.
Go to Systems Manager.
Click Apps in the Manage section.
Click Add app.
Click iOS in the App platform section.
Select App Store app in the App type section.
Click Next.
Click Blocksi for iPad.
Select Blocksi from the Device tags field in the Targets section.
Click Save.
Go to Systems Manager.
Click Profiles list and click Add profile.
Click Device profile (default) and click Continue.
Add the profile name and a description under Profile configuration and click Add settings.
Click iOS and then select Managed App Config.
Select iOS and then select the Blocksi for iPad app.
Fill in the key value form according to the following table:
Key
Type
Value
adminPassword
Text
123PasswordExample
organizationId
Text
admin@blocksi.net
policyServer
Text
34.41.17.164:2800
filteringDNS
Text
104.155.190.120:81
showDisclaimer
Text
false
ttl
Text
60
userAuthEnabled
Text
false
Click Save.
Sync profiles.
Click the Add Settings button.
Click the Device Type - iOS button, and select Cisco Umbrella.
Configure the settings as follows:
Use Certificate - unchecked
App Bundle Id - com.blocksi.dnsproxy
Provider Bundle Id - com.blocksi.dnsproxy.ext
Per-App DNS - empty
Fill in the key value form according to the following table:
Key
Type
Value
adminPassword
Text
123PasswordExample
organizationId
Text
admin@blocksi.net
policyServer
Text
34.41.17.164:2800
filteringDNS
Text
104.155.190.120:81
showDisclaimer
Text
false
ttl
Text
60
userAuthEnabled
Text
false
Note
This needs to be performed on the target device.
Open the Settings app.
Navigate to General > VPN & Device Management.
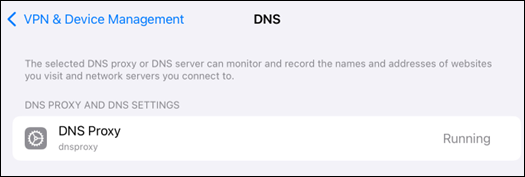
Click the DNS row under Restrictions and Proxies. The DNS Proxy profile should be Running, as shown below.
To create the filtering policy, please see Configuring the iOS Filtering Policy on the BMEE Admin Dashboard.