Windows Group Policy Deployment
The following procedures outline the configuration steps needed for the Group Policy Object to deploy Blocksi for Windows in your environment.
Prerequisites
Ensure the following prerequisites are in place before setting up Blocksi:
Windows Server with the following roles configured: Active Directory Domain Services, DNS, and File and Storage Services.
A file share accessible with Read permissions by all Windows users assigned the Group Policy Object created for Blocksi.
A properly organized Active Directory environment (users, computers, organizational units, etc.).
Network usernames in Active Directory must match the email username in Google Admin Console (e.g., Google user
john.doe@example-school.commust match Windows userexample.local\john.doe). If the usernames do not match, additional steps are required to filter Windows users with Blocksi.Devices running Windows 7 or later.
Blocksi Enterprise MSI file, available from the User > Downloads on the Blocksi Admin Dashboard.
All domain names, sub-domains, and aliases used by your district must be included under Domains and Subdomains in the Settings menu on the Blocksi Admin Dashboard.
Open Group Policy Manager on your Windows Server.
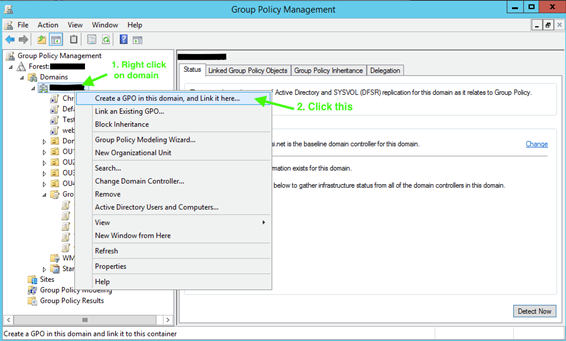
Navigate to the organizational unit(s) where you will deploy Blocksi, right-click the Organizational Unit Name, and select Create a GPO on this domain, and Link it here…. The New GPO window opens.
Note
In most cases, this Group Policy should be linked and enforced to an Organizational Unit that contains user accounts that will be filtered or monitored with Blocksi.
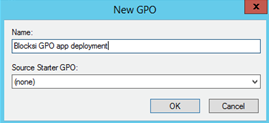
Type a name for the GPO deployment, such as Blocksi GPO app deployment in the Name text field and click OK.
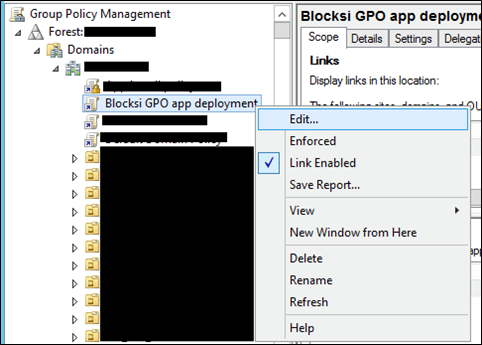
Right-click the newly created GPO and select Edit from the drop-down menu.
When installing Blocksi software with GPO, all required MSI files must reside in a shared folder accessible by all users subject to the GPO with Read access. This article outlines steps to create a shared folder and add the necessary applications.
Select a shared folder on your network. If a shared folder does not exist yet, create it under the file path C:/.
Upload the required MSI files to the shared folder. These can include the following:
BlocksiWebFilter.msiand/orBlocksiClassroom.msi, orBlocksiEnterprise.msi
Note
If installing BlocksiEnterprise.msi, no other application files are required.
Right click the shared folder and select Properties from the list. The Properties window opens.
Click the Sharing tab, then click Share… under the Network File and Folder Sharing section. The File Sharing window opens.
Click Add from the File Sharing window, and enter the appropriate Users or Groups. (This includes all users subject to the GPO created for Blocksi.)
Go back to the drop-down list and select the Find people… option. The Select Users and Groups window opens.
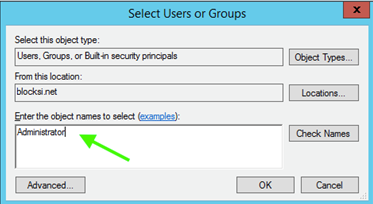
Type Administrator in the Enter the object names to select text box and click the Check Names button. A new window opens.
Select the Admin account that controls the Windows server and click OK. You are returned to the Select Users and Groups window.
Click OK. After these steps, the table in the File Sharing window should have the next accounts inside: Administrator, Administrators, and Everyone.
Add permissions for the accounts. Administrators need Read/Write and Owner permissions, and Everyone needs to have Read permission.

Click the Share button to complete the sharing process.
Verify that the sharing process was successful, go to File Explorer, click the search field at the top, and type \\SERVERNAME\SHARED_FOLDER_NAME. See the following example.

Note
If you don’t know the name of your Windows server, find it in the Server Manager. If the shared apps are listed at this location, then you have successfully configured the folder sharing.
In the GPO Management Editor, navigate to User Configuration > Policies > Software Settings and click Software installation.
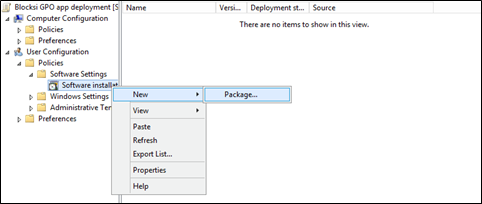
Right-click Software Installation and select New > Package. The Open window opens.
Navigate to the shared folder you created in the Adding the Application File to a Shared Folder section of this article. Do this by searching for it with the string: \\SERVERNAME\SHARED_FOLDER_NAME. See example below.

Select the Blocksi installation file from the folder and add it to the list.
In the GPO Management Editor, navigate to User Configuration > Policies > Administrative Templates > All Settings.
Configure/Set the following for the app.
To enable this setting, do the following:
Right-click the setting and select Edit from the drop-down menu.
Click Enabled.
Click Apply. The BlocksiEnterprise Properties window opens.
Select Assigned under Deployment type.
Select the Install this application at logon checkbox under Deployment options.
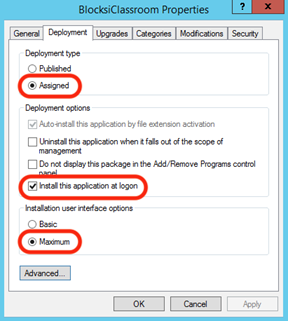
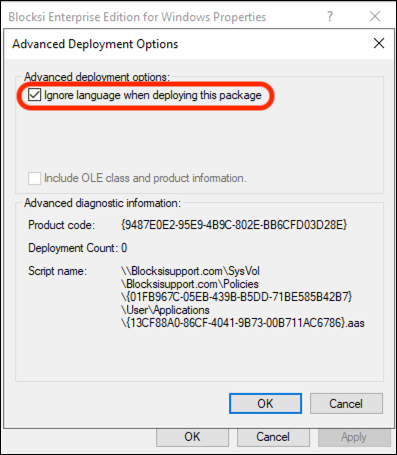
Click the Advanced… button. The Advanced Deployment Options window opens.
Select the Ignore language when deploying this package checkbox.
The Blocksi browser extension is supported on either Google Chrome or Microsoft Edge. The administrator must force-install the extension to the browser through the Group Policy. The Blocksi Enterprise agent detects the device's default browser automatically. Classroom features such as assessments correctly launch in whichever browser (Chrome or Edge) the student has set as default.
Important
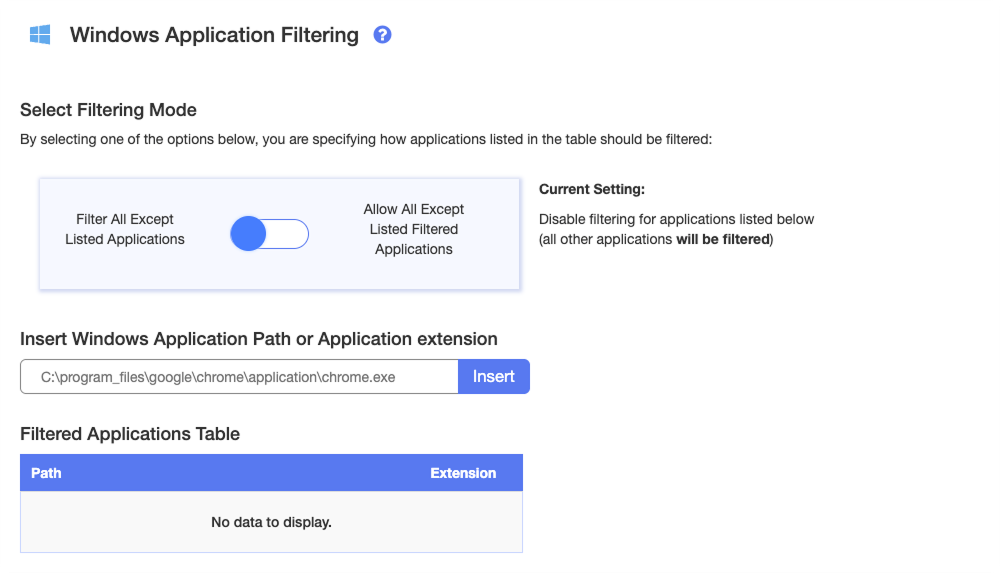
Blocksi filters content in the browser with the extension installed. To filter content in other browsers and applications, an Application Filter must be assigned to the policy. Refer to the Filtering Windows Applications section for more information.
Important
If a Group Policy Object for managing Google Chrome is already enforced for the same users subject to the Blocksi GPO, ensure the following steps are incorporated into the existing Google Chrome GPO rather than creating a separate one. Adding the Google Chrome settings listed here in a separate GPO can result in deployment errors.
Note
If Classic Administrative Templates is not visible, you may need to download and unzip the GoogleChromeEnterpriseBundle64.zip file. Click here to download the file.
Ensure that you are on User Configuration > Policies > Administrative Templates In your Group Policy Management Editor.
Select the Action tab and click Add/Remove Templates.
Click Add in the new window.
Locate the GoogleChromeEnterpriseBundle64 folder you’ve unzipped at Configuration > adm > en-US, select Chrome.adm, and click Open.
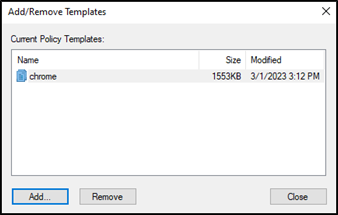
Close the window and go to User Configuration > Policies > Administrative Templates > Classic Administrative Templates > Google > Google Chrome.
Double-click Continue running background apps when Google Chrome is closed.
Go to User Configuration > Policies > Administrative Templates > Classic Administrative Templates > Google > Google Chrome > Extensions.
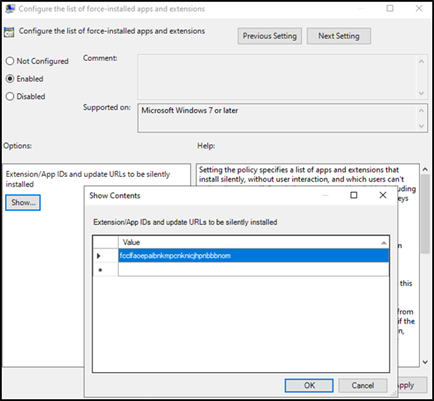
Double-click Configure the list of force-installed apps and extensions.
Select Enabled and click Show.
Return to the Blocksi Admin Dashboard Downloads window and copy the Blocksi Enterprise Edition Windows ID.
Paste the ID (fcclfaoepaibnkmpcnknicjhpnbbbnom) into the Value field and click OK.
Click OK in the next window.
Open your Group Policy Management Editor.
Navigate to the following path: User Configuration > Policies > Administrative Templates > Microsoft Edge > Extensions.
Look for the policy named: Control which extensions are installed silently.
Double-click this policy and select Enabled.
Click the Show... button.
Paste the following extension ID in the Value column and click OK:
fcclfaoepaibnkmpcnknicjhpnbbbnom;https://clients2.google.com/service/update2/crxClick Apply, and then click OK again.
Navigate to User Configuration > Policies > Administrative Templates > Microsoft Edge > Startup, home page and new tab page.
Look for the policy: Continue running background extensions when Microsoft Edge is closed.
Double-click this policy and select Enabled.
Click OK, then Apply, and OK again.
After completing the configuration, force a policy refresh on target devices.
Open an elevated Command Prompt on a target device.
Run the following command in the prompt:
gpupdate /force.Restart the device. The Blocksi Enterprise agent will install on next boot, and the browser extension will appear in Chrome and/or Edge once the browser is opened.
The Blocksi Enterprise version dropdown in the Downloads dialog controls how the agent updates on your Windows devices.
Auto-update to newest version - Devices automatically update to the latest released version as it becomes available.
A specific version (e.g., 1.2.3 released in April 2026) - Pins all devices to that version. Auto-update remains active, but only up to the version you select.
Auto-update OFF - Disables auto-updates entirely. Devices remain on their currently installed version until you update them manually.
Sign in to the Blocksi Admin Dashboard.
Open the Downloads dialog and select the Windows tab.
Under Blocksi Enterprise, open the dropdown and select the desired option: Auto-update to newest version, a specific version, or Auto-update OFF.
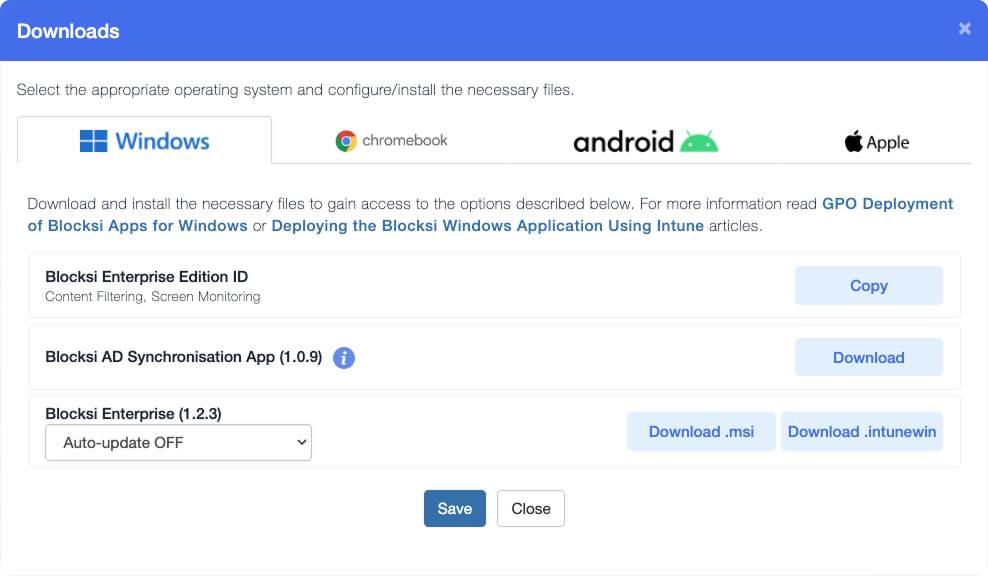
Click Save.
Click Confirm auto-update change to apply the new setting to your devices.
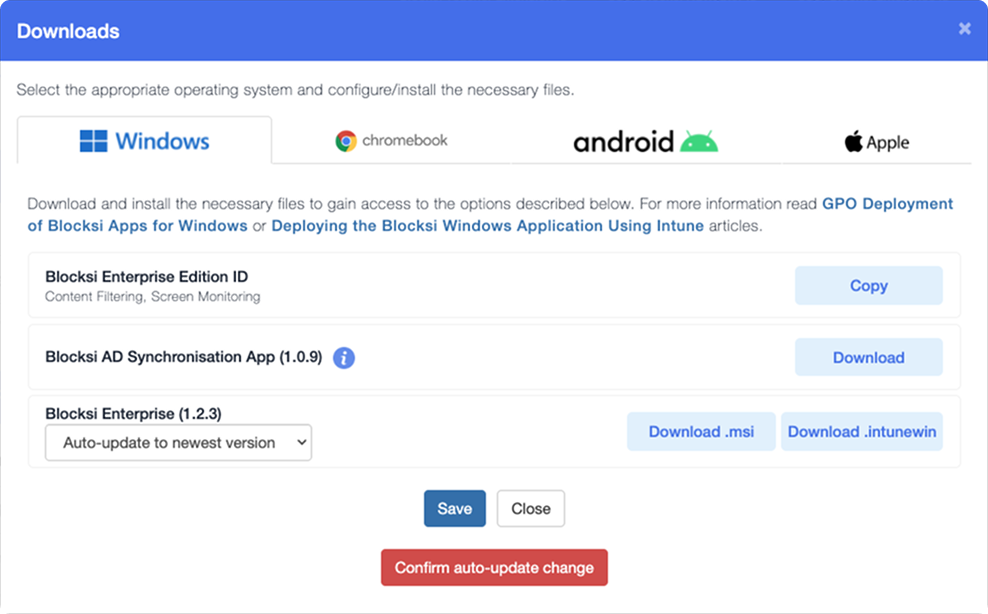
With the auto-update feature enabled, manual app updates for the Blocksi agent are no longer required. The Blocksi-Updater service handles version upgrades automatically. This service runs alongside the existing WebFilter and BlocksiClassroom services, keeping your agent software on the latest version without requiring manual MSI redeployments.
Sign in to the Blocksi Admin Dashboard.
Open the Downloads dialog and select the Windows tab.
Select Auto-update to the newest version and download the .msi files.
Deploy the auto-update version to the devices following the configuration guide above. Refer to the Adding the Application File to a Shared Folder and Adding the Blocksi Application to the Group Policy sections for help.
Sign in to the Blocksi Admin Dashboard.
Open the Downloads dialog and select the Windows tab.
Select the target version from the list of available releases and download the .msi files.
Place the new version of the app in the shared folder.
Delete the previous (older) version from the shared folder.
Re-add the new version of the app to the GPO configuration.