FileWave - iOS Configuration Guide
The following contains procedures for deploying FileWave for iOS.
Note
Blocksi supports iOS 13.1 and higher.
Sign in to your Apple School Manager account with your Administrator credentials.
Click your name in the bottom left of the sidebar.
Go to Preferences > Enrollment Information.
Locate your Organization ID and Company Name.
Send this information to Blocksi to add your organization to the approved list of customers who can use Blocksi's filtering app.
Sign in to your Apple School Manager account with your Administrator credentials.
Click your name in the bottom left of the sidebar.
Click Preferences at the bottom of the sidebar.
Click Enrollment Information.
Scroll down to the Customer Apps section.
Click Enable in the Custom Apps row.
Click License Management in the Main Menu.
Click Synchronize VPP.
Click Filesets in the Main Menu, and expand iOS Apps - Paid & One-Off's.
Locate Blocksi for iPad, right-click, and select Create Associations.
In the Create New Association(s) window, select the organizational units.
Click Create Associations.
Click Blocksi for iPad, and select the Remove App when MDM profile is removed checkbox.
Click the Kiosk tab, scroll down and click Important in the Category section, and click OK.
Click Update Model in the upper left-hand corner of the screen.
Click Update Model in the Update Server Model window.
Right-click Blocksi for iPad and select Show All Associations of this Fileset.
Select each association and select the Kiosk Association checkbox in the Edit Association window.
Click Update Model in the upper left-hand corner of the screen.
Click Update Model in the Update Server Model window.
Go back to Filesets in the Main Menu, and right-click Blocksi for iPad.
Select Properties, click the Configuration tab, and add the following configuration:
<dict>
   <key>adminPassword</key>
   <string>123PasswordExample</string>
   <key>organizationId</key>
   <string>admin@blocksi.net</string>
   <key>policyServer</key>
   <string>34.41.17.164:2800</string>
   <key>filteringDNS</key>
   <string>104.155.190.120:81</string>
   <key>showDisclaimer</key>
   <string>false</string>
   <key>ttl</key>
   <string>60</string>
   <key>userAuthEnabled</key>
   <string>false</string>
</dict>
Note
The PLIST file is also part of these instructions for easier import. Replace the value of the password example 123PasswordExample with any string. Replace the admin@blocksi.net value with the super-admin email address you are using with Blocksi.
Note
If you will be filtering by serial number, you must include the following in the configuration:
<key>serialNumber</key>
<string>%SerialNumber%</string>
Click Update Model in the upper left corner of the screen.
Click Update Model in the Update Server Model window.
Go back to Filesets in the Main Menu.
Click New Mobile Fileset.
Click Apple > Profile.
Name the profile Blocksi Policy. All other fields are optional.
Search for DNS Proxy, and select Configure.
Type com.blocksi.dnsproxy for the App Bundle ID.
Type com.blocksi.dnsproxy.ext for the Provider Bundle ID.
Under Provider Configuration, click Upload File... and upload a .plist file with the following configuration:
<dict>
   <key>adminPassword</key>
   <string>123PasswordExample</string>
   <key>organizationId</key>
   <string>admin@blocksi.net</string>
   <key>policyServer</key>
   <string>34.41.17.164:2800</string>
   <key>filteringDNS</key>
   <string>104.155.190.120:81</string>
   <key>showDisclaimer</key>
   <string>false</string>
   <key>ttl</key>
   <string>60</string>
   <key>userAuthEnabled</key>
   <string>false</string>
</dict>
Note
The PLIST file is also part of these instructions for easier import. Replace the value of the password example 123PasswordExample with any string. Replace the admin@blocksi.net value with the super-admin email address you are using with Blocksi.
Note
If you will be filtering by serial number, you must include the following in the configuration:
<key>serialNumber</key>
<string>%SerialNumber%</string>
Provider Configuration should look like this once complete:
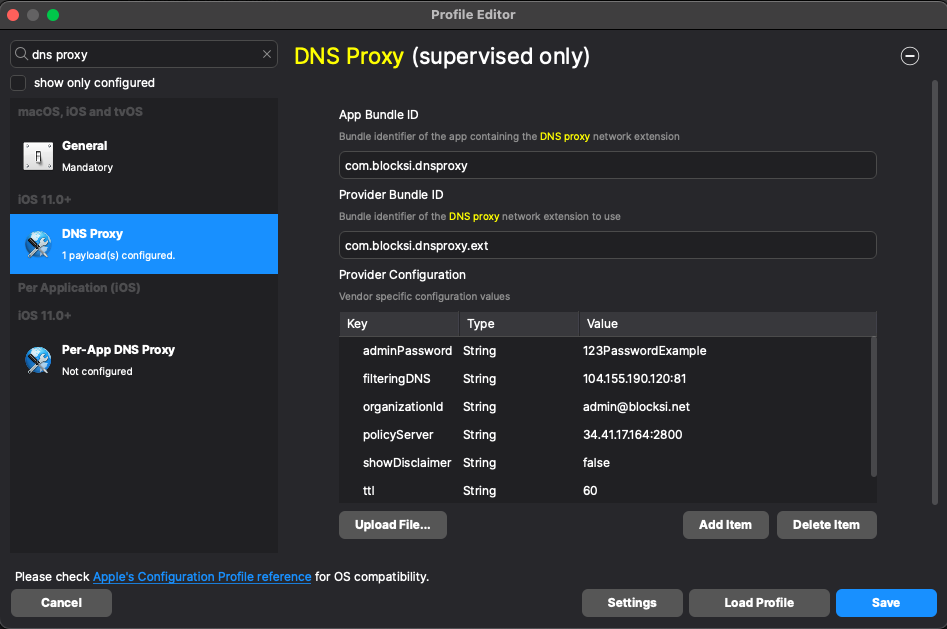
Ensure that this configuration is the same as the one you configured in the Creating the Configuration Profile step.
Click Save.
Associate that fileset with the device or devices.
Click Update Model.
Note
This needs to be performed on the target device.
Open the Settings app.
Navigate to General > VPN & Device Management.
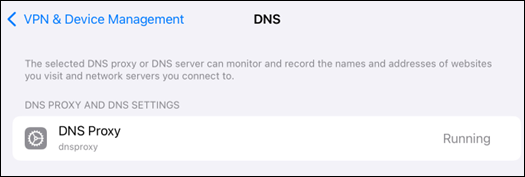
Click the DNS row under Restrictions and Proxies. The DNS Proxy profile should be Running, as shown below.
To create the filtering policy, please see Configuring the iOS Filtering Policy on the BMEE Admin Dashboard.