AI Context Filtering
AI Context Filtering  actively evaluates the page a student is viewing and blocks or allows it based on its content. It serves as a second layer of category filtering and supports the web filter. It functions as a last-resort filter and, as such, takes the lowest priority and can be overridden.
The filter evaluates the contents of each page and determines its category. For example, if you block Gaming using the AI Context Filter, and the web filter categorizes the page as News and Media, the AI Context Filter will analyze the page’s contents. If it detects gaming-related content, the page will be blocked.
Important
To use AI Context Filtering, you must first set up an initial layer of filtering by creating and applying a Web Filter. You need at least five blocked categories in this first layer before AI Context Filtering takes effect.
The category types in AI Context Filtering are similar to those in web filters. AI Context Filtering presents eighty-five unique categories, which are organized under the following category types:
Security Risk
Unethical
Adult/Mature Content
Bandwidth Consuming
Business
Personal
Tip
This filter introduces many new categories, which additionally enhance filtering, including the Artificial Intelligence and Technology category, found under the Business section.
Create as many AI context filters as you need.
Click Content Filtering from the Main Menu and then click Filters from its sub-menu.
Locate the AI Context Filter, which is found under Context Filters.
Type the name of the filter in the Enter filter name text field.
Click Create Filter + to add the filter. The Edit screen appears. You are presented with a list of filter types to add to the AI context filter. Each filter type may contain one or more web page categories. For instance, if you click the Security Risk type, it expands to show Dynamic DNS, Malicious Websites, Phishing, and Spam URLs filter types. Choose to allow, block, or allow with a warning to the student for one or more of the filter types.
Click each filter type to expand it, and make your selections.
Click Save Changes when you have finished. A confirmation prompt appears indicating the save was successful.
Click Close to remove the prompt.
Note
After creating a new AI Context Filter or making changes to an existing one, click Update Policies on All Clients at the top right to save your changes.
Rename your AI context filter as needed.
Click Content Filtering from Main Menu and then click Filters from its sub-menu.
Locate the AI Context Filter, which is found under Context Filters.
Locate the filter to rename, and click the filter name. A box opens to allow you to rename the filter. Note that Blocksi added Save and Cancel buttons to the right of the name, as shown below.
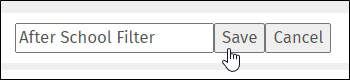
Rename the filter, and click the Save button.
Modify an AI context filter as needed.
Click Content Filtering from Main Menu and then click Filters from its sub-menu.
Locate the AI Context Filter, which is found under Context Filters.
Locate the name of the filter to modify, and click the
 icon to the right of the filter name. The Edit screen appears.
Make the necessary changes to the filter, and click Save Changes.
Note
After making changes to an existing AI Context Filter, click Update Policies on All Clients at the top right to save your changes.
Use an existing AI context filter to create a new one.
Click Content Filtering from Main Menu and then click Filters from its sub-menu.
Locate the AI Context Filter, which is found under Context Filters.
Locate the name of the filter to duplicate, and click the
 icon. The Duplicate Filter window opens.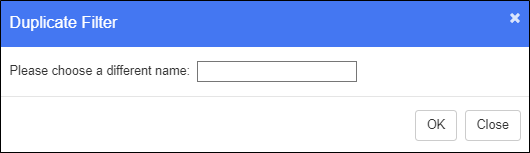
Type the name of the new filter in the text box.
Click OK to add the filter and close the window. The duplicated filter appears at the bottom of the list and it contains the same blocked, allowed, and warning sites as the original filter.
Make as many desired changes to the new filter using the procedure from Modifying an AI Context Filter.
Delete an AI context filter when you no longer need it.
Click Content Filtering from Main Menu and then click Filters from its sub-menu.
Locate the AI Context Filter, which is found under Context Filters.
Locate the name of the filter to delete, and click the
 icon. A confirmation prompt appears.
Click OK to delete the filter.
Warning
Deleting an AI Context Filter permanently removes it from your dashboard, and it cannot be retrieved.