Windows Intune Deployment
The following procedures outline the configuration steps needed for Intune to deploy Blocksi for Windows in your environment.
Prerequisites
Ensure the following prerequisites are in place before deploying Blocksi via Intune:
Access to Microsoft Intune (Endpoint Manager) with appropriate admin privileges.
Target Windows devices enrolled in Intune. For help, refer to the Enroll Windows devices in Intune article.
The Blocksi Enterprise installer package (.msi or .intunewin), downloaded from User > Downloads > Windows on the Blocksi Admin Dashboard.
Google Chrome, Microsoft Edge, or both installed on target devices. Microsoft Edge is preinstalled on Windows devices as the default browser. To install Google Chrome, refer to the Installing Google Chrome on Target Devices section.
All domain names, sub-domains, and aliases used by your district must be included under Domains and Subdomains in the Settings menu on the Blocksi Admin Dashboard.
Intune supports the installation of both the .msi and .intunewin application packages on Windows 10 Pro and higher. The following procedure adds the Blocksi app to Intune and assigns it to a user group so the app installs when users sign in.
Choose one of the following procedures to deploy the Blocksi Enterprise application with Intune.
Note
Deploy either the .msi package or the .intunewin package - never both.
Key differences between the two packages:
.msi package - Quicker procedure with fewer dependencies, but less control over the deployment.
.intunewin package - Longer procedure with more customization and the most control over the deployment.
Sign in to the Microsoft Intune Admin Center.
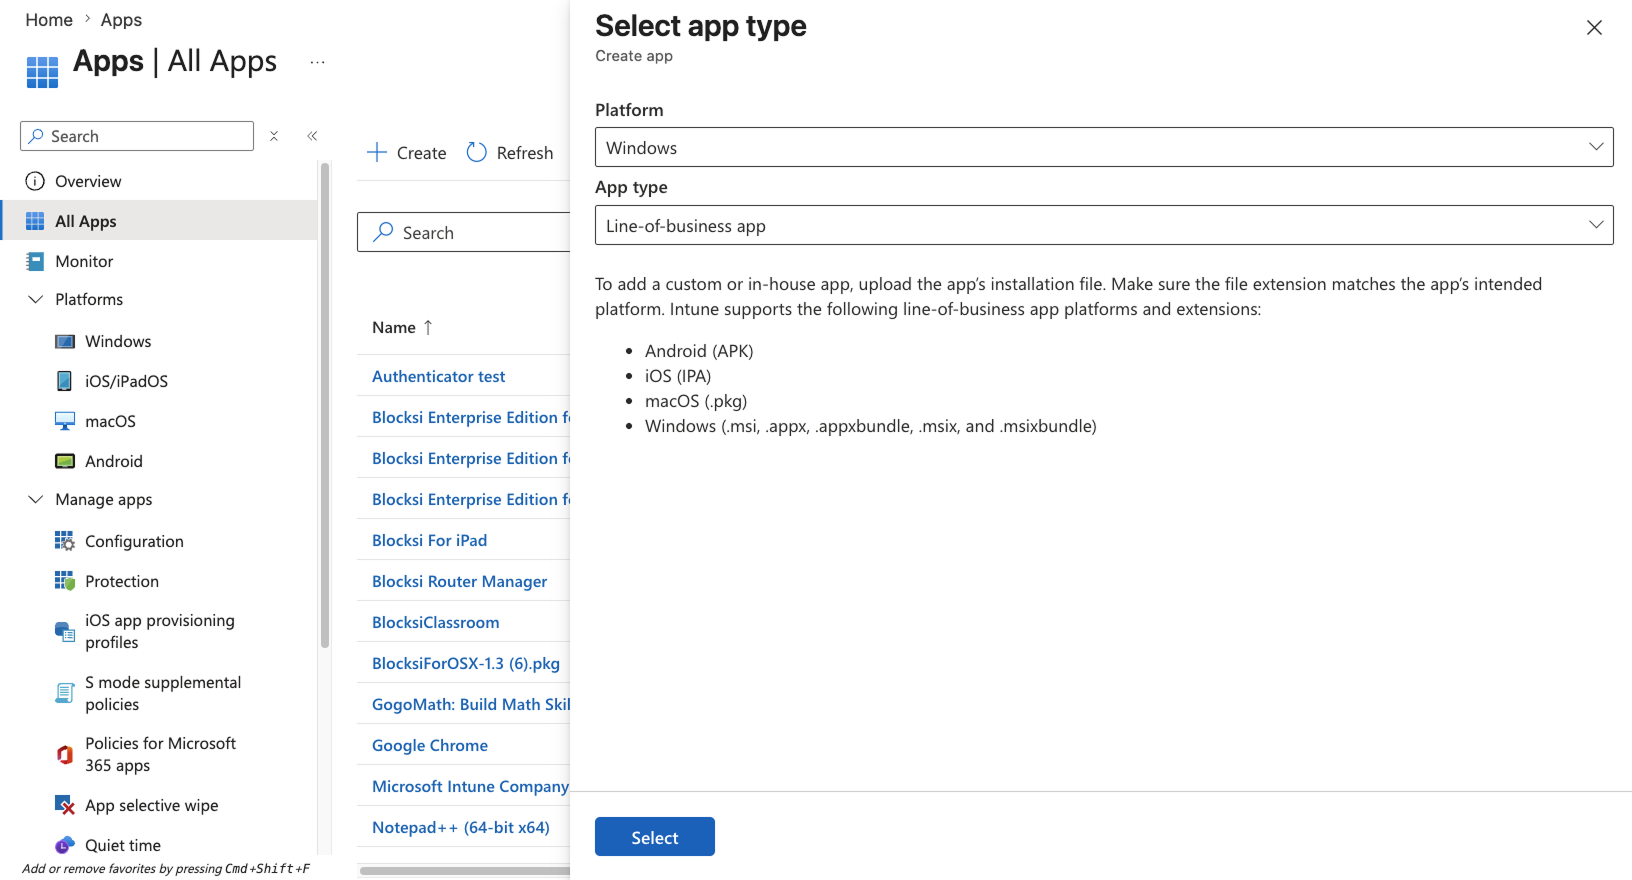
Navigate to Apps > All Apps, then click + Create at the top of the screen.
From the Platform drop-down list, select Windows. From the App type drop-down list, select Line-of-business app, then click Select.
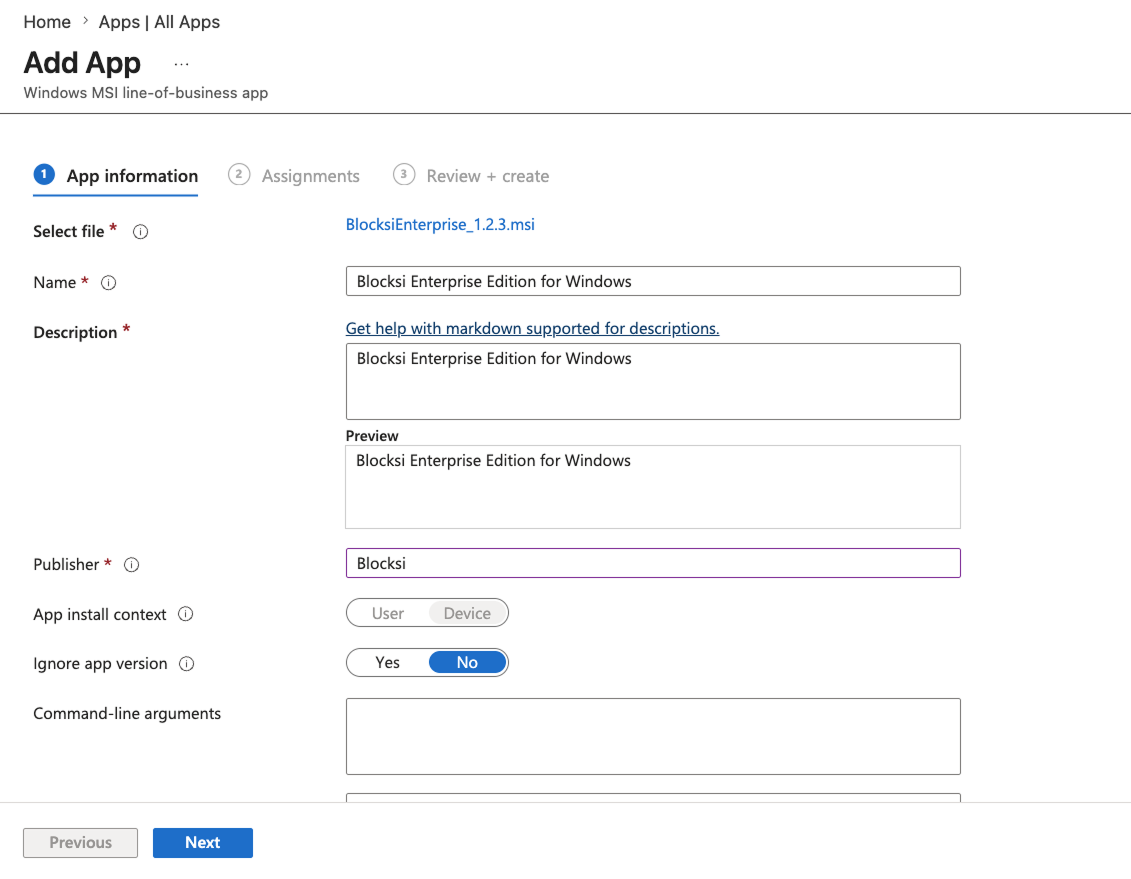
On the App Information tab, click Select app package file. Browse to the folder containing the Blocksi app installers, select the .msi file, and click OK.
Configure the package details:
Name - Leave the pre-filled value or edit as needed.
Description - Leave the pre-filled value or edit as needed.
Publisher - Enter
Blocksi.
All other fields are optional. Click Next once done configuring these settings.
On the Assignments tab, under the Required section, add the user group that should receive the app (e.g., All Users or Students):
+ Add all users - Assigns to all users.
+ Add group - Allows you to select specific groups to assign to.
Click Next.
On the Review + Create tab, review the app settings, then click Create. Wait for the file upload to finish before continuing.
Sign in to the Microsoft Intune Admin Center.
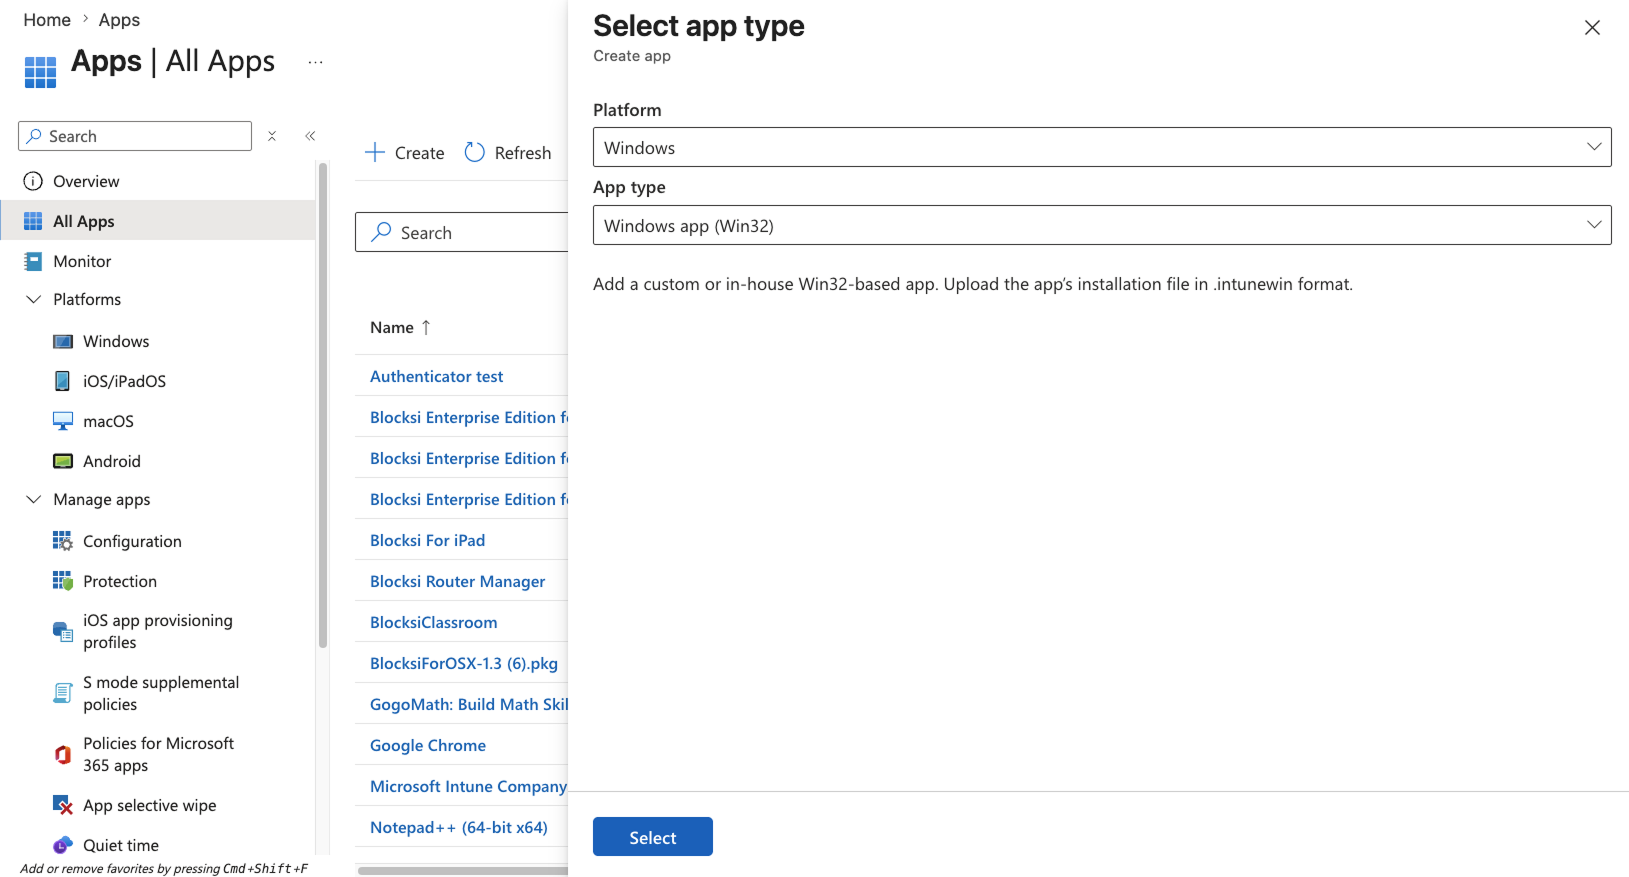
Navigate to Apps > All Apps, then click + Create at the top of the screen.
From the Platform drop-down list, select Windows. From the App type drop-down list, select Windows app (Win32), then click Select.
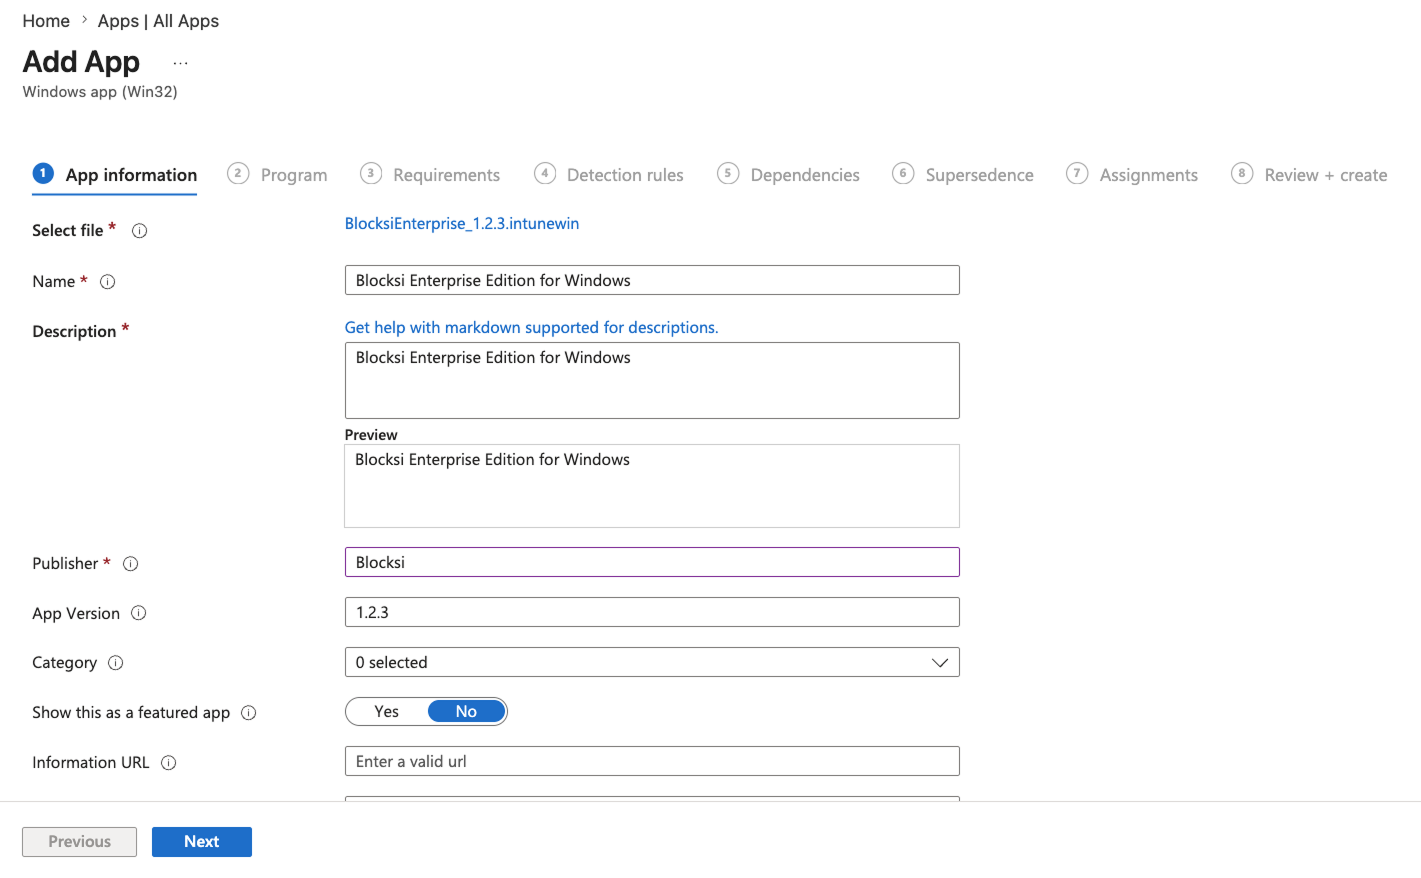
On the App Information tab, click Select app package file. Browse to the .intunewin file, and click OK.
Configure the app details:
Name - Leave the pre-filled value or edit as needed.
Description - Leave the pre-filled value or edit as needed.
Publisher - Enter
Blocksi.
All other fields can be left as default. Click Next.
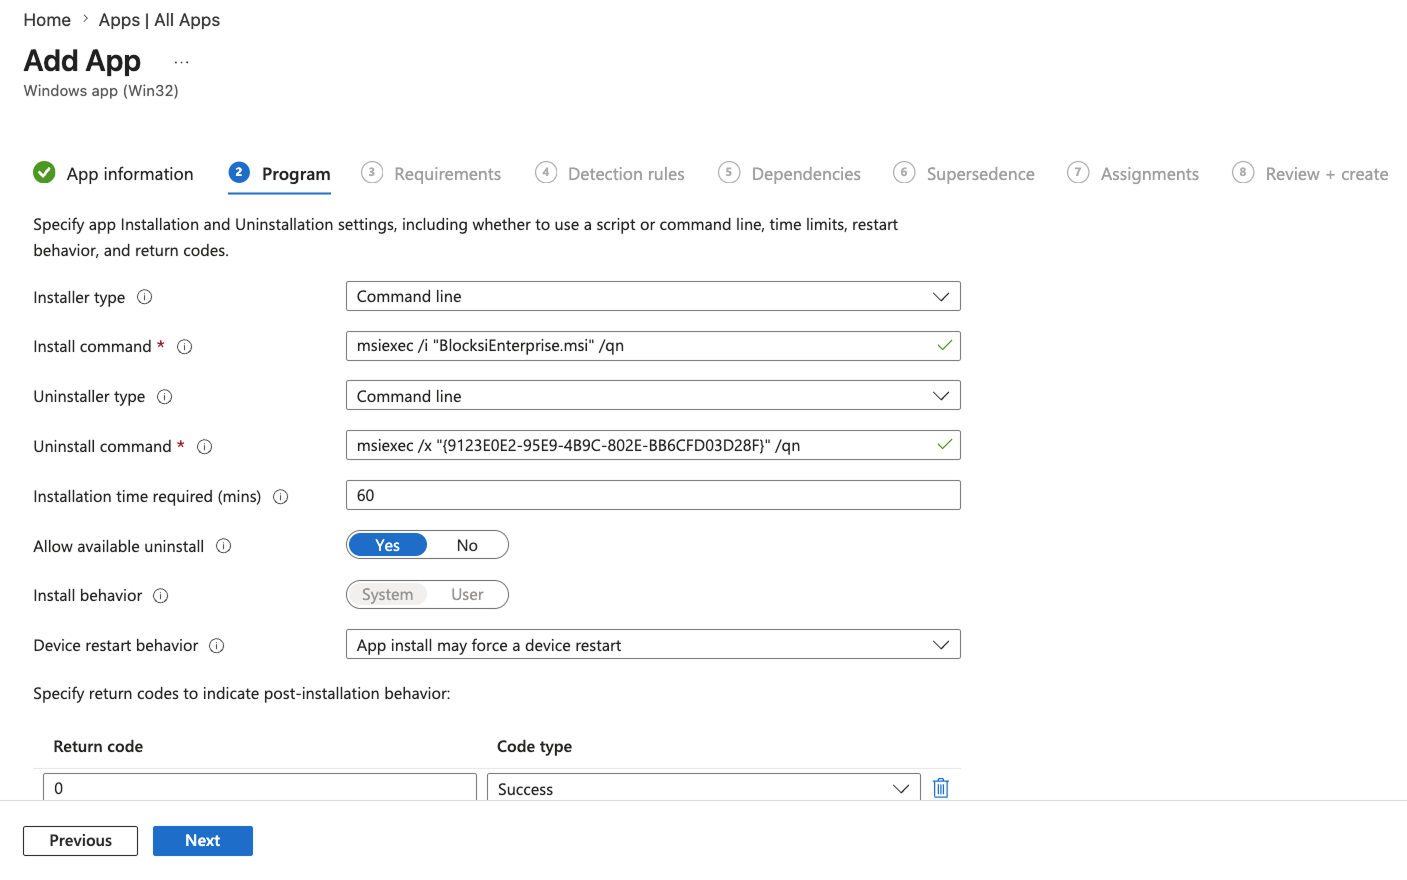
Fields in the Program tab can be left as default. Click Next.
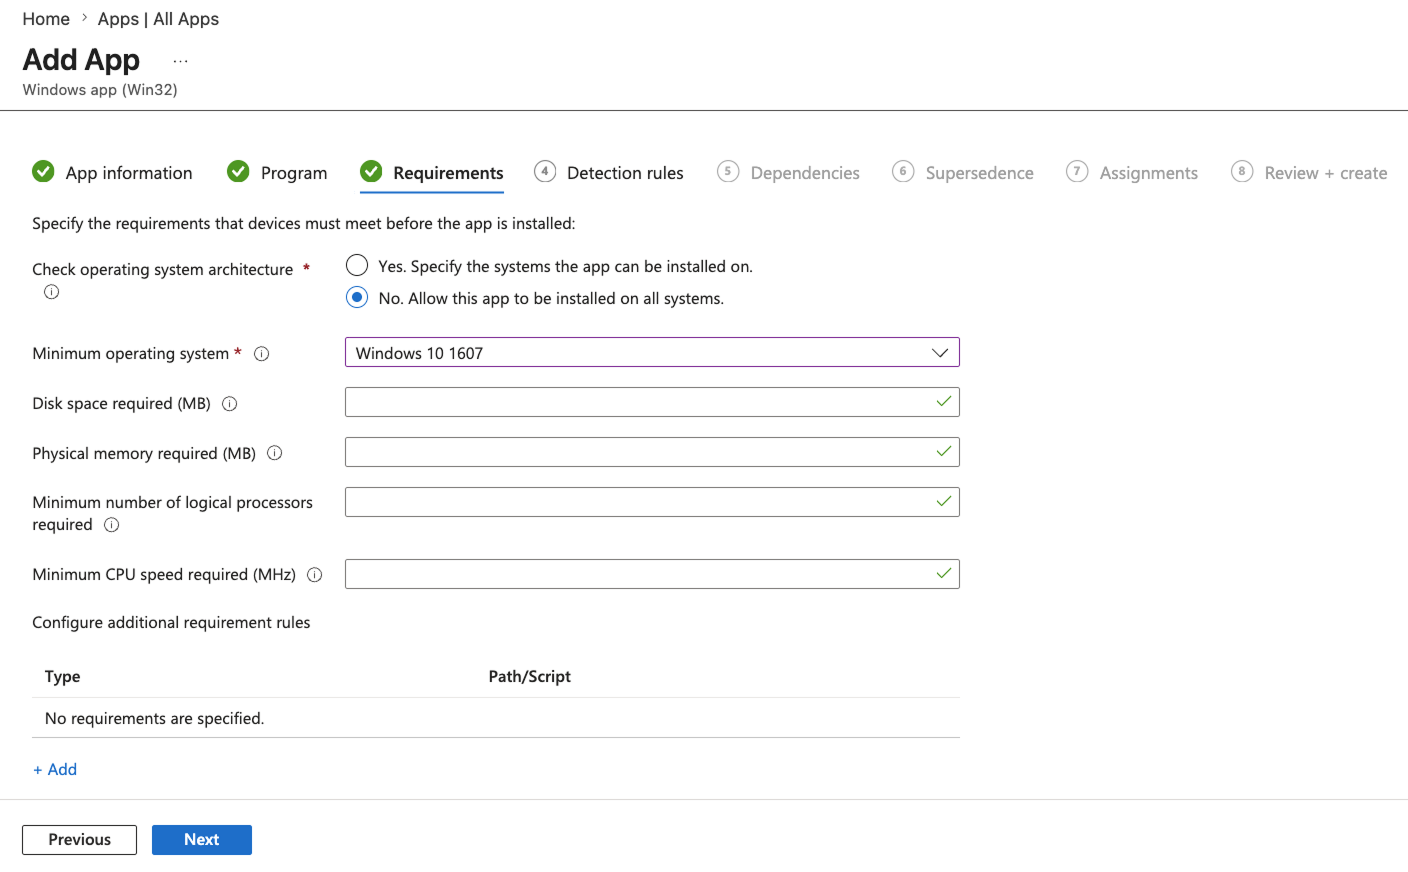
On the Requirements tab, configure the following:
Check operating system architecture - Select No. Allow this app to be installed on all systems.
Minimum operating system - Select Windows 10 1607.
All other fields can be left as default. Click Next.
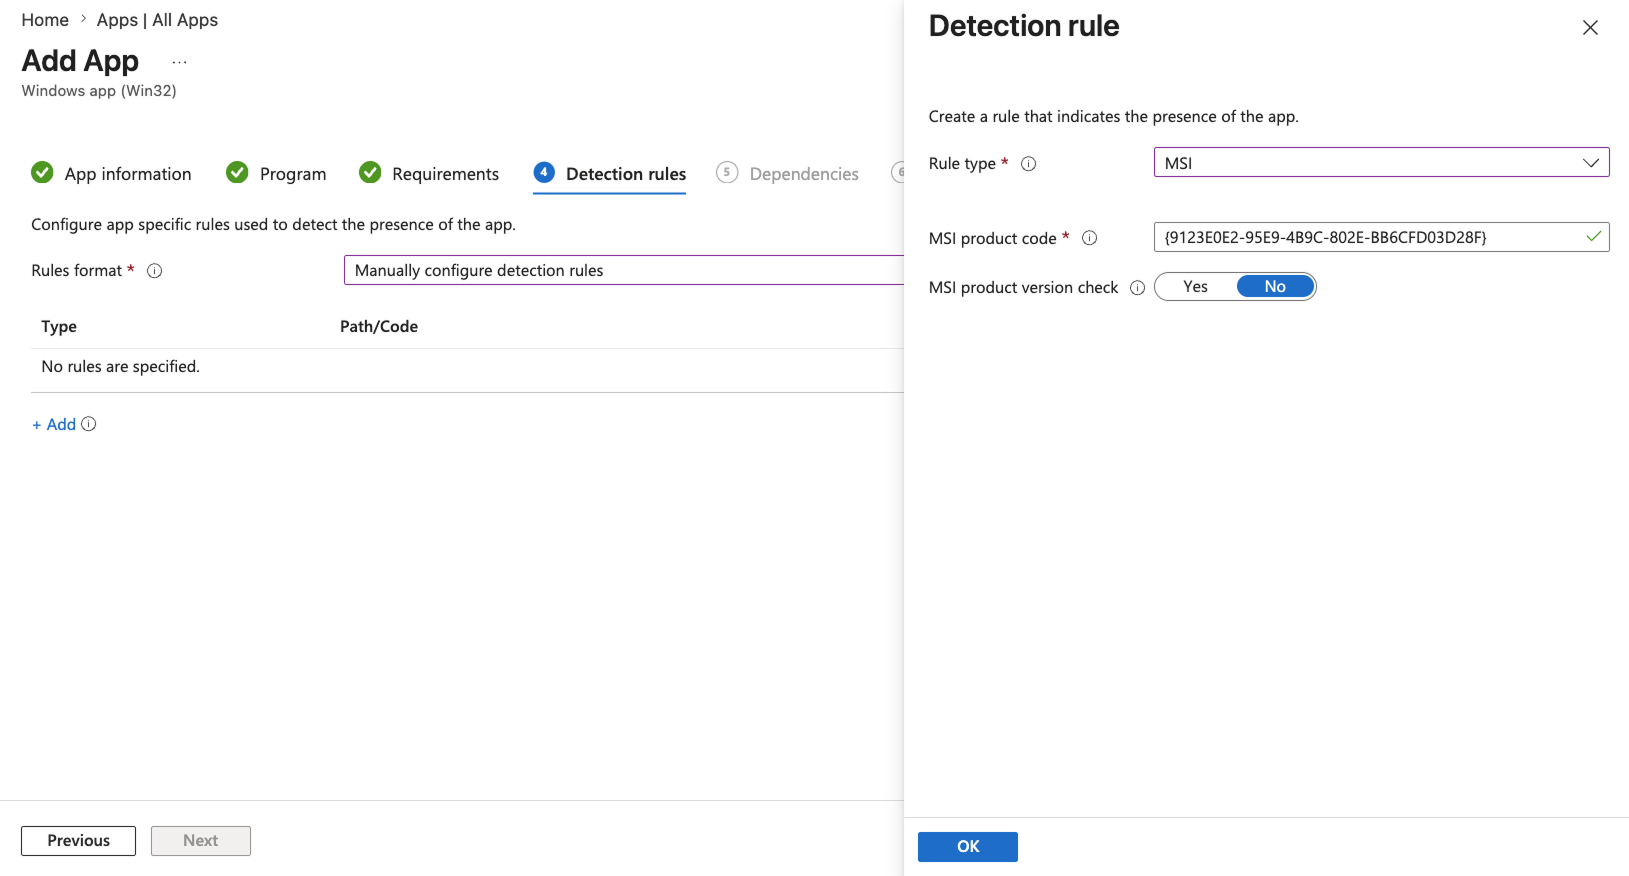
On the Detection Rules tab, from the Rules format drop-down list, select Manually configure detection rules. Click + Add and select MSI as Rule type. Both MSI product code and MSI product version check can be left as default. Click OK, then click Next.
The Dependencies and Supersedence tabs require no configuration - click Next on each.
On the Assignments tab, under the Required section, add the user group that should receive the app (e.g., All Users or Students):
+ Add all users - Assigns to all users.
+ Add group - Allows you to select specific groups to assign to.
Click Next.
On the Review + Create tab, review the app settings, then click Create. The app is installed on target devices the next time users sign in.
Blocksi Enterprise requires a Windows Defender Firewall rule to function properly. The following procedure creates an Endpoint protection profile in Intune that adds this rule.
Sign in to the Microsoft Intune Admin Center.
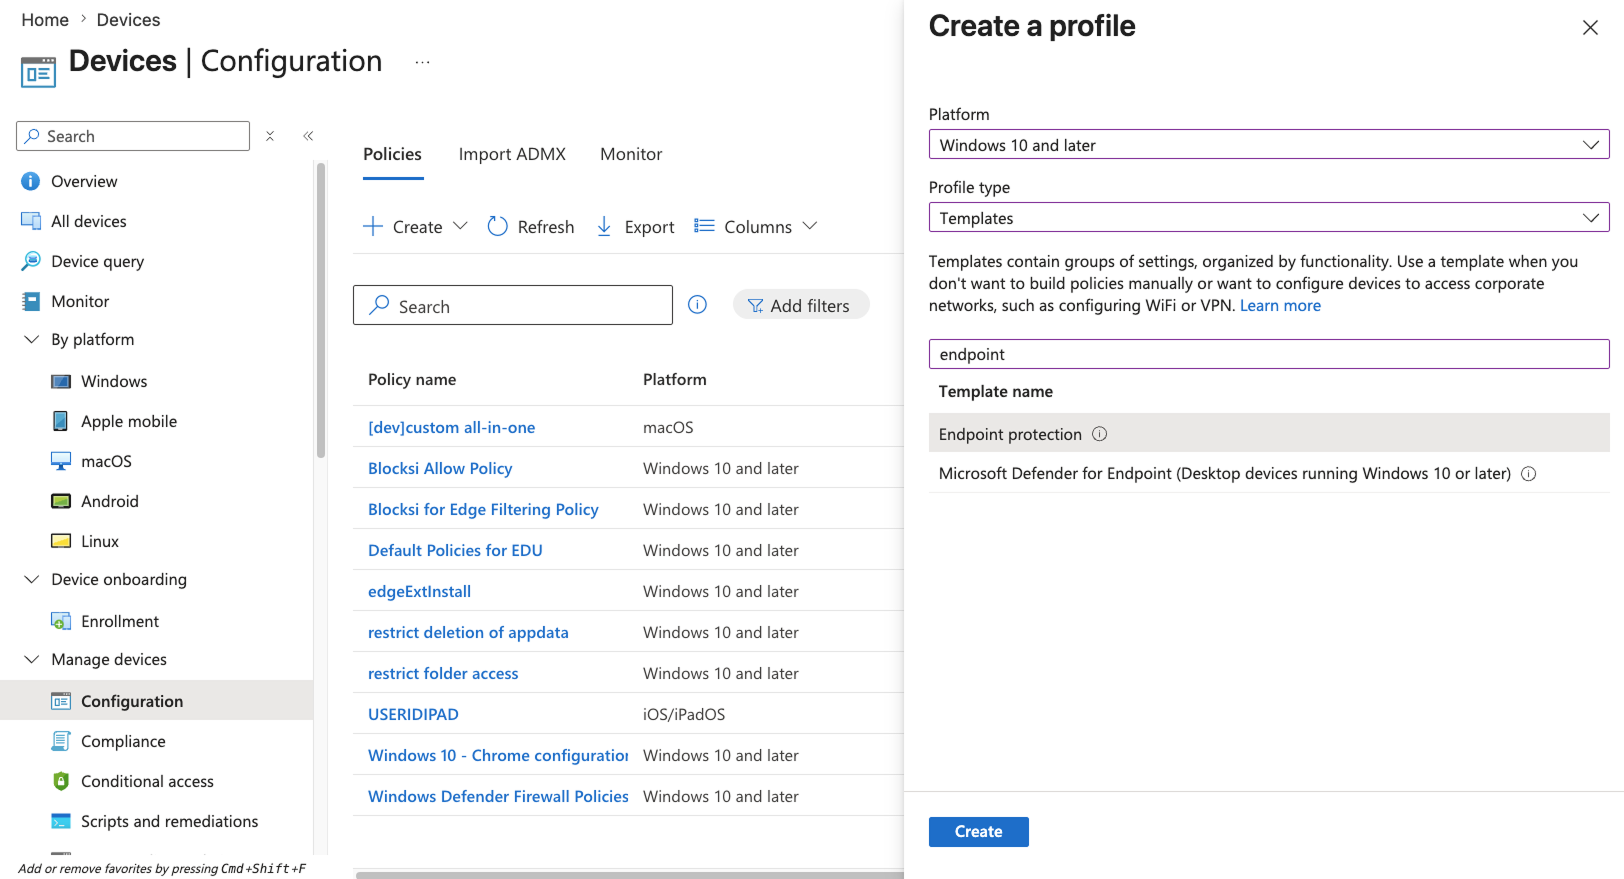
Navigate to Devices > Configuration, then click + Create at the top of the screen, and select + New Policy.
Configure the following, then click Create:
Platform - Select Windows 10 and later.
Profile type - Select Templates.
Template name - Select Endpoint protection.
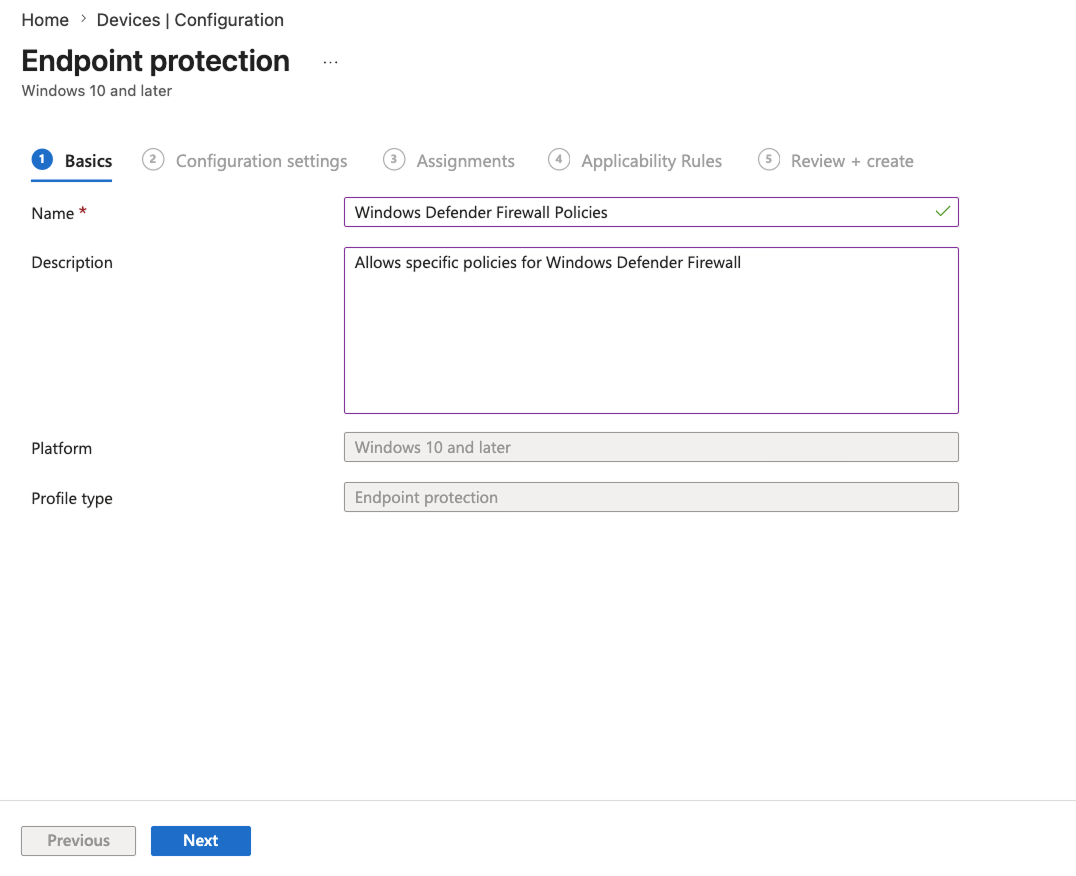
On the Basics tab, enter the following:
Name - Enter
Windows Defender Firewall Policies.Description - Enter
Allows specific policies for Windows Defender Firewall.
Click Next.
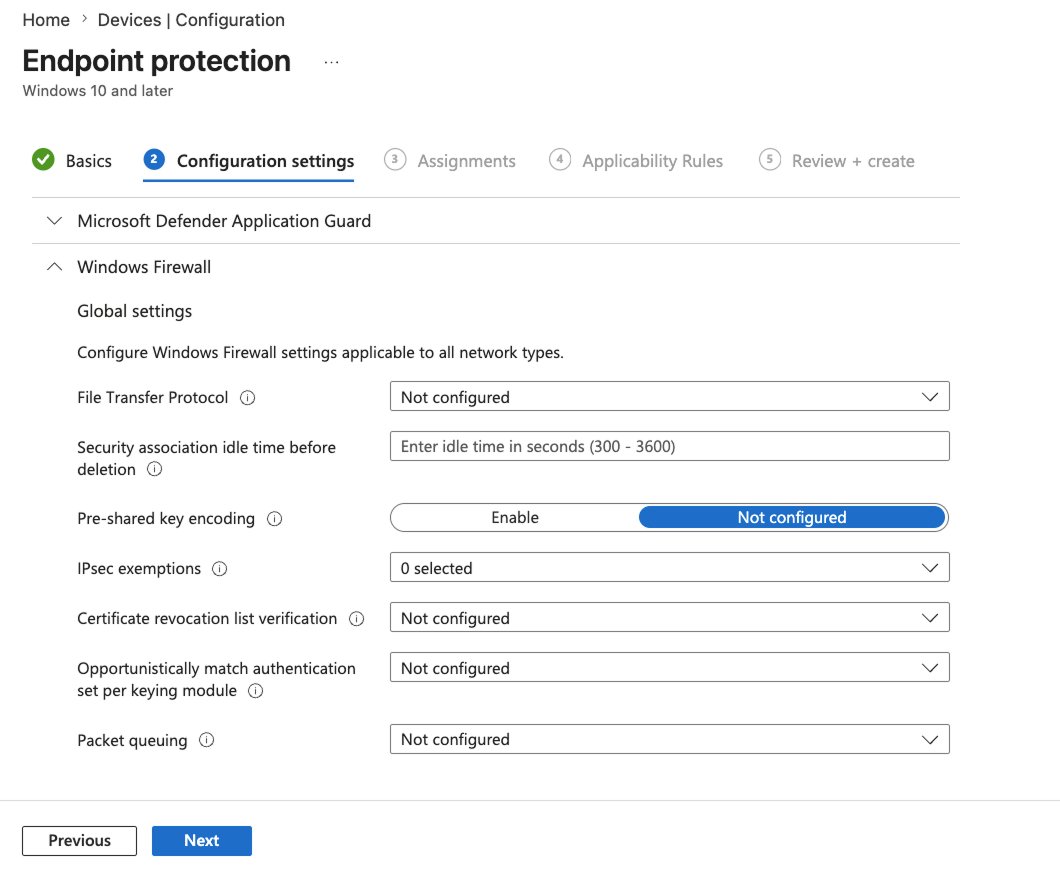
On the Configuration Settings tab, expand Windows Firewall, scroll down to the Firewall Rules section, and click Add.
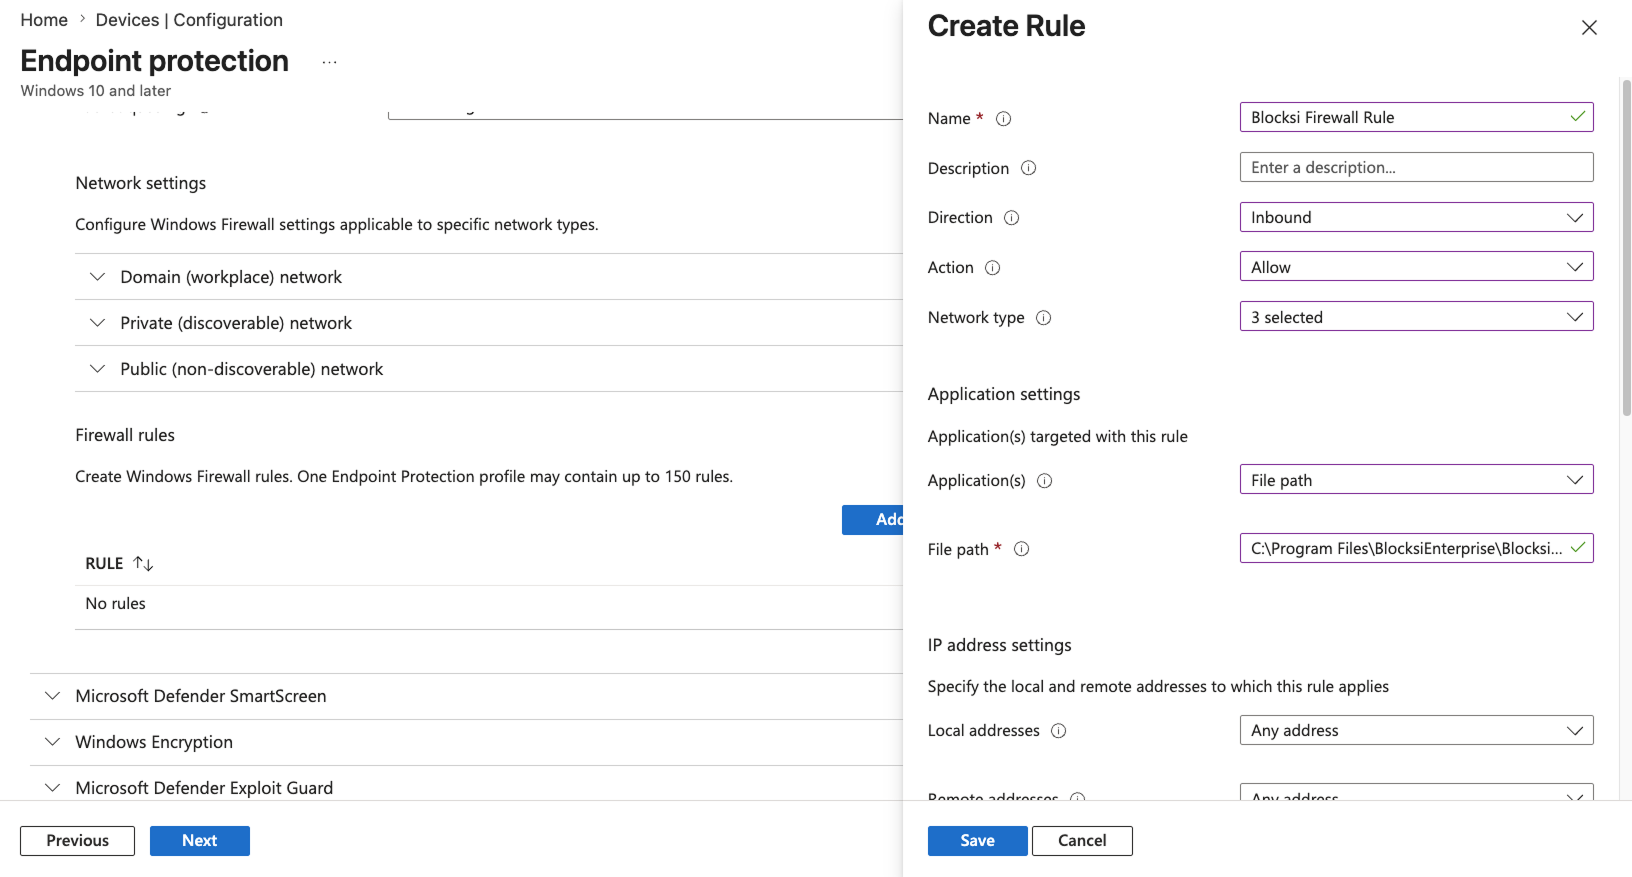
Configure the new rule:
Setting
Value
Name
Blocksi Firewall Rule
Description
Optional
Direction
Inbound
Action
Allow
Network type
Select all applicable options
Application(s)
File path
File path
C:\Program Files\BlocksiEnterprise\BlocksiEnterprise.exeIP address settings
Leave defaults
Protocol
TCP
Local ports
Specified Ports
Ports
9432 and 37163
Remote ports
All ports
Interface types
Select all applicable options (e.g., Wireless, LAN) if used
All other settings can be left as default. Click Save to add the rule, then click Next.
On the Assignments tab, under the Required section, add the user group that should receive the policy (e.g., All Users or Students):
+ Add all users - Assigns to all users.
+ Add group - Allows you to select specific groups to assign to.
Click Next.
On the Applicability Rules tab, leave the defaults and click Next.
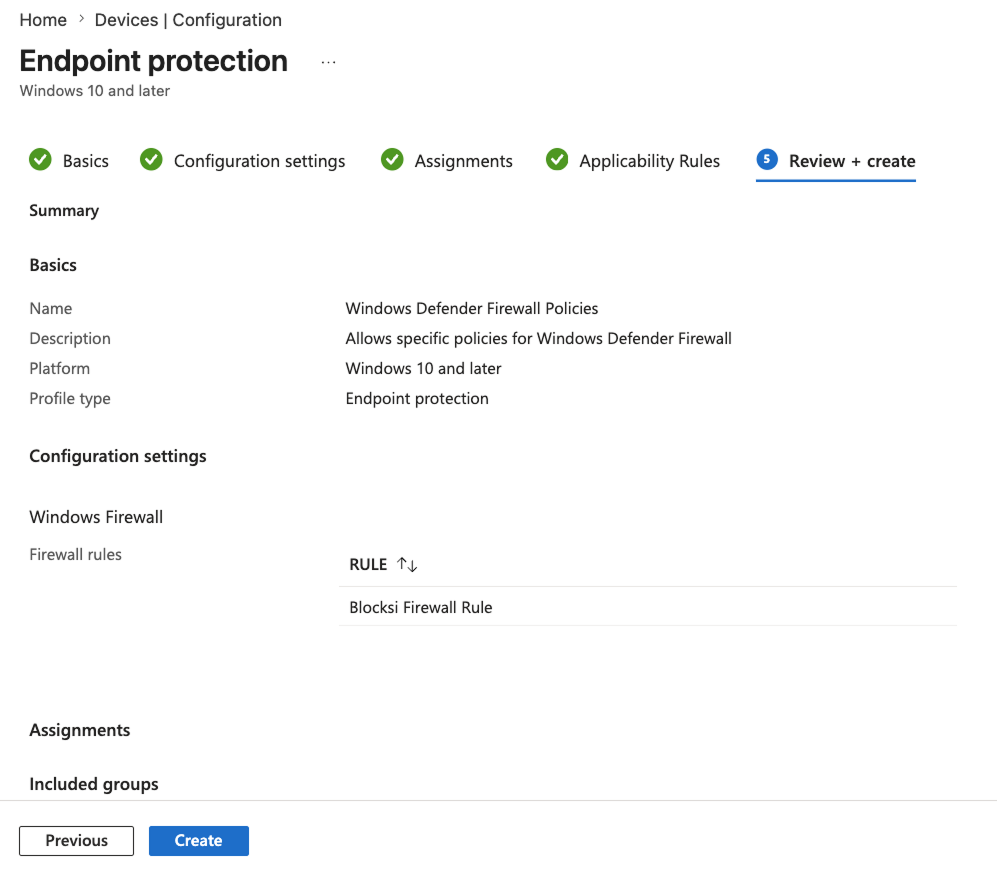
On the Review + Create tab, review the policy settings, then click Create. The new firewall policy appears in the Configuration Policies list.
Blocksi is supported on either Google Chrome or Microsoft Edge. To ensure classroom commands work properly, deploy the Blocksi Enterprise extension to the default browser on each device.
Important
Before deploying the Blocksi extension to Chrome, ensure that target devices have Google Chrome installed. Refer to the Installing Google Chrome on Target Devices section for help in doing so.
The Blocksi Enterprise agent detects the device's default browser automatically, so classroom features such as assessments launch in whichever browser (Chrome or Edge) the student has set as default.
Important
Blocksi filters content in the browser with the extension installed. To filter content in other browsers and applications, an Application Filter must be assigned to the policy. Refer to the Filtering Windows Applications section for more information.
In your browser, navigate to the Chrome Enterprise Browser Download page.
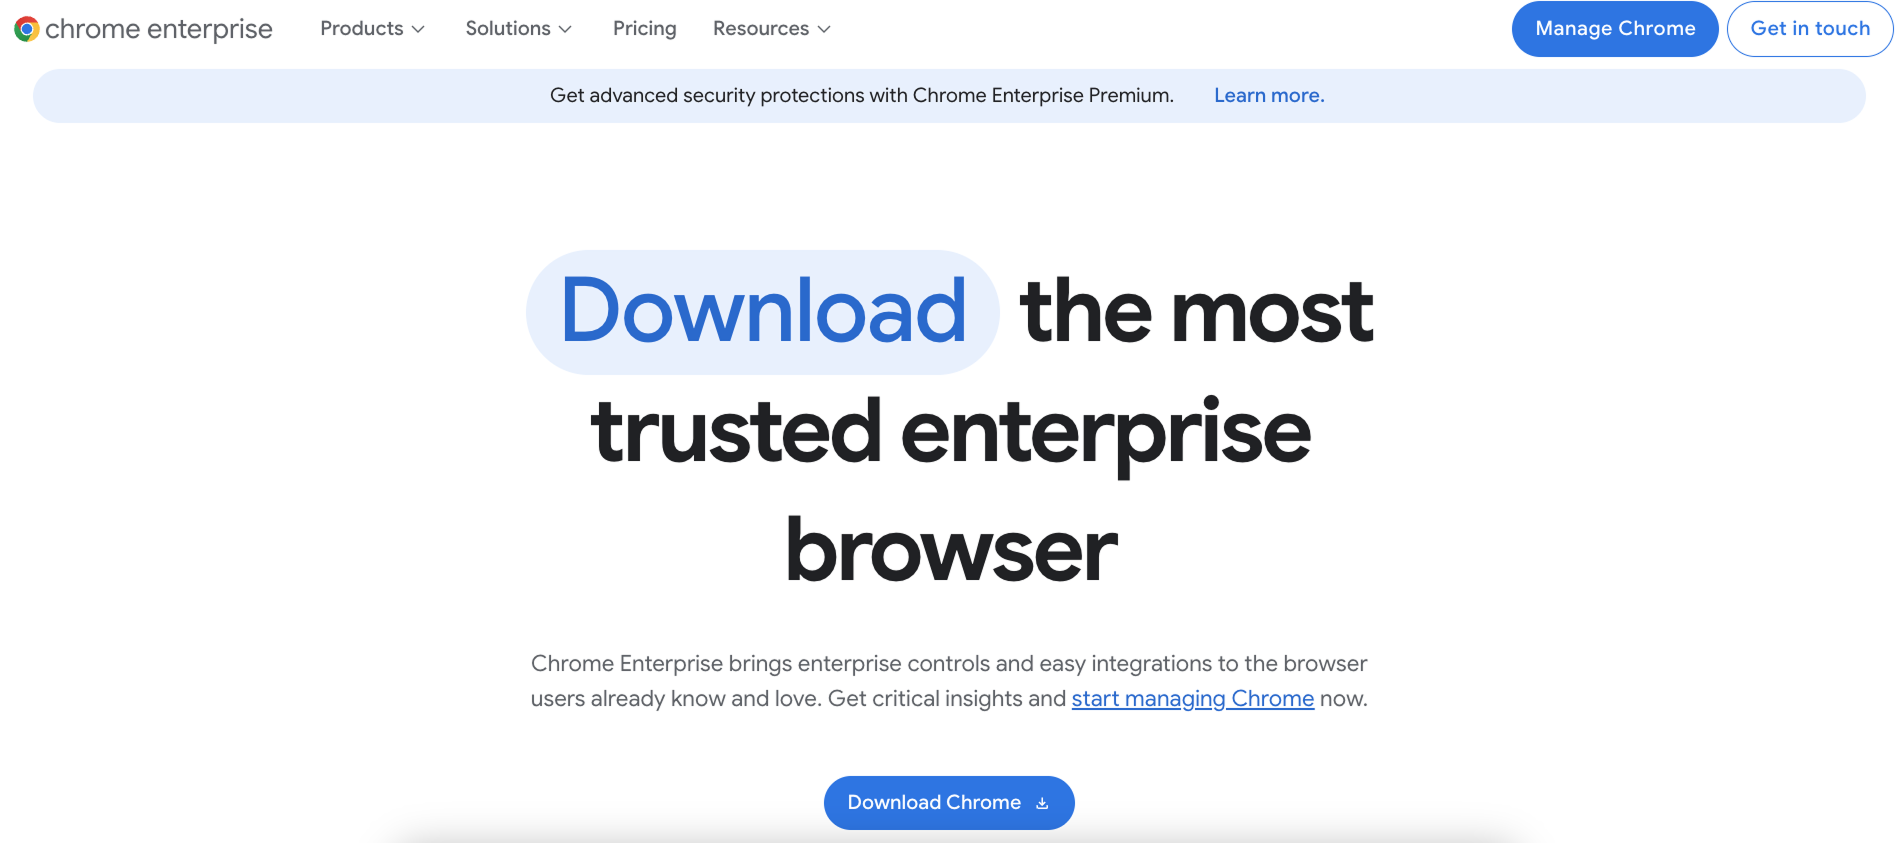
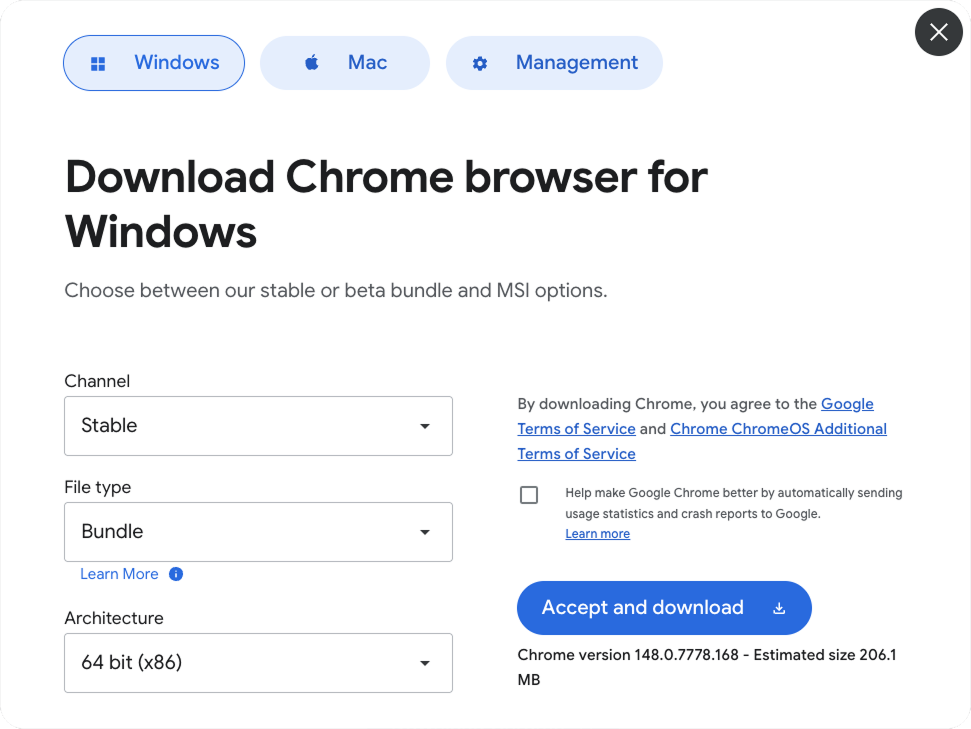
Click Download Chrome, configure the download options as needed, then click Accept and Download.
Tip
We recommend selecting Bundle under the File type.
Extract the downloaded ZIP file and locate the
GoogleChromeStandaloneEnterprise.msifile on the device.Tip
The .msi file is located in the
GoogleChromeEnterpriseBundle\Installers\folder.Sign in to the Microsoft Intune Admin Center.
Navigate to Apps > All Apps, then click + Create at the top of the screen.
From the Platform drop-down list, select Windows. From the App type drop-down list, select Line-of-business app, then click Select.
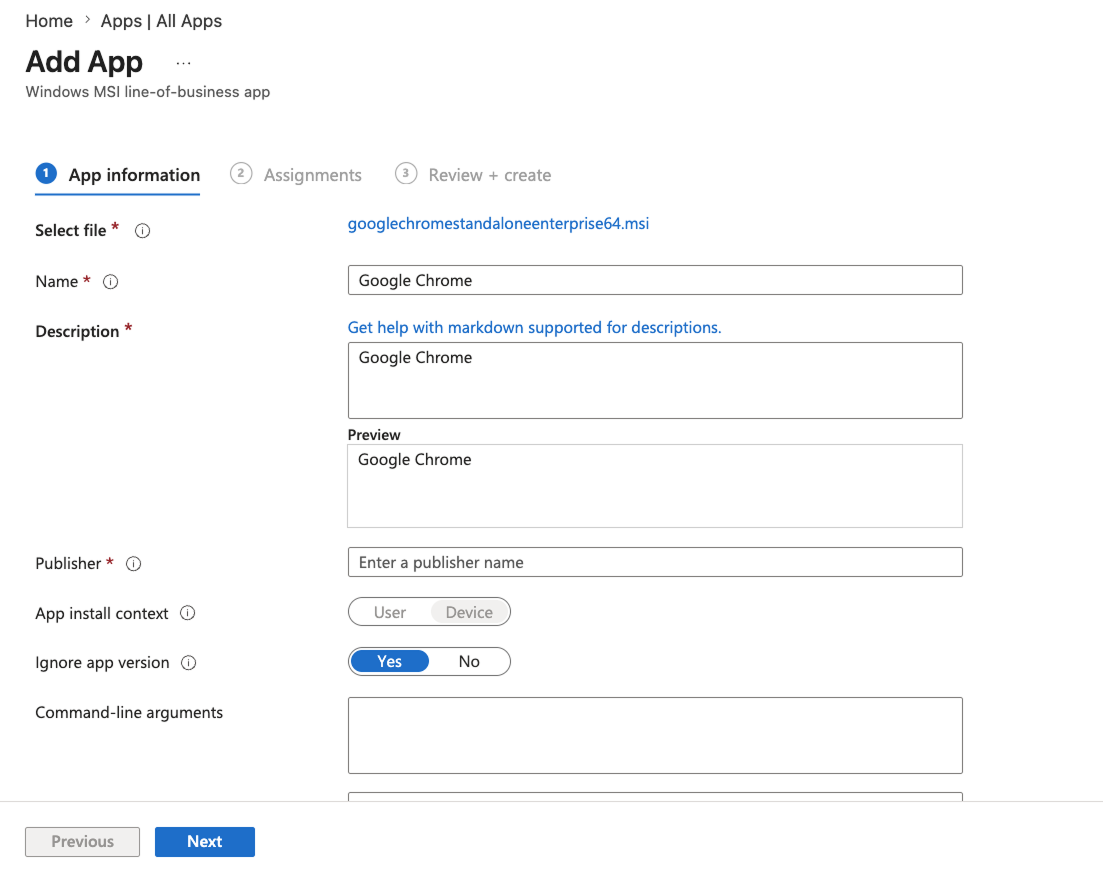
On the App Information tab, click Select app package file. Browse to the folder containing the
GoogleChromeStandaloneEnterprise.msifile, select it, and click OK.Configure the package details:
Name - Leave the pre-filled value or edit as needed.
Description - Leave the pre-filled value or edit as needed.
Publisher - Enter
Google LLC.
All other fields are optional. Click Next.
On the Assignments tab, under the Required section, add the user group that should receive Chrome (e.g., All Users or Students):
+ Add all users - Assigns to all users.
+ Add group - Allows you to select specific groups to assign to.
Click Next.
On the Review + Create tab, review the app settings, then click Create. Wait for the file upload to finish before continuing.
The following procedure creates a Settings catalog profile in Intune that force-installs the Blocksi extension in Chrome and allows Blocksi to keep running in the background.
Important
Google Chrome must be installed on target devices first. Refer to the Installing Google Chrome on Target Devices section for help.
Sign in to the Microsoft Intune Admin Center.
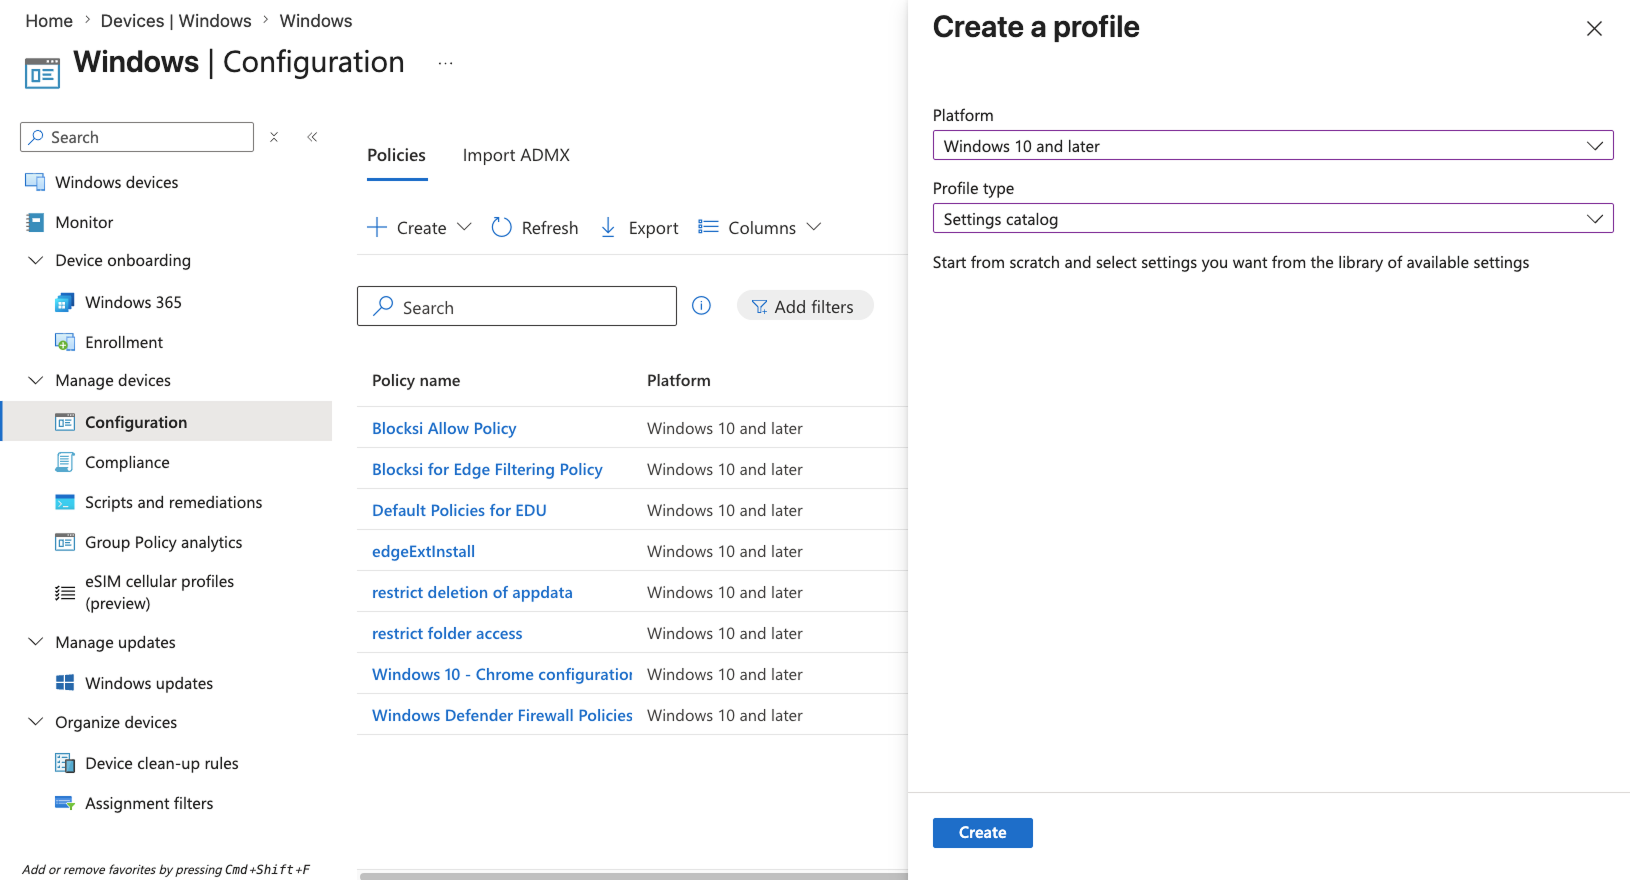
Navigate to Devices > Windows > Configuration, then click + Create at the top of the screen, and select + New Policy.
Configure the following, then click Create:
Platform - Select Windows 10 and later.
Profile type - Select Settings catalog.
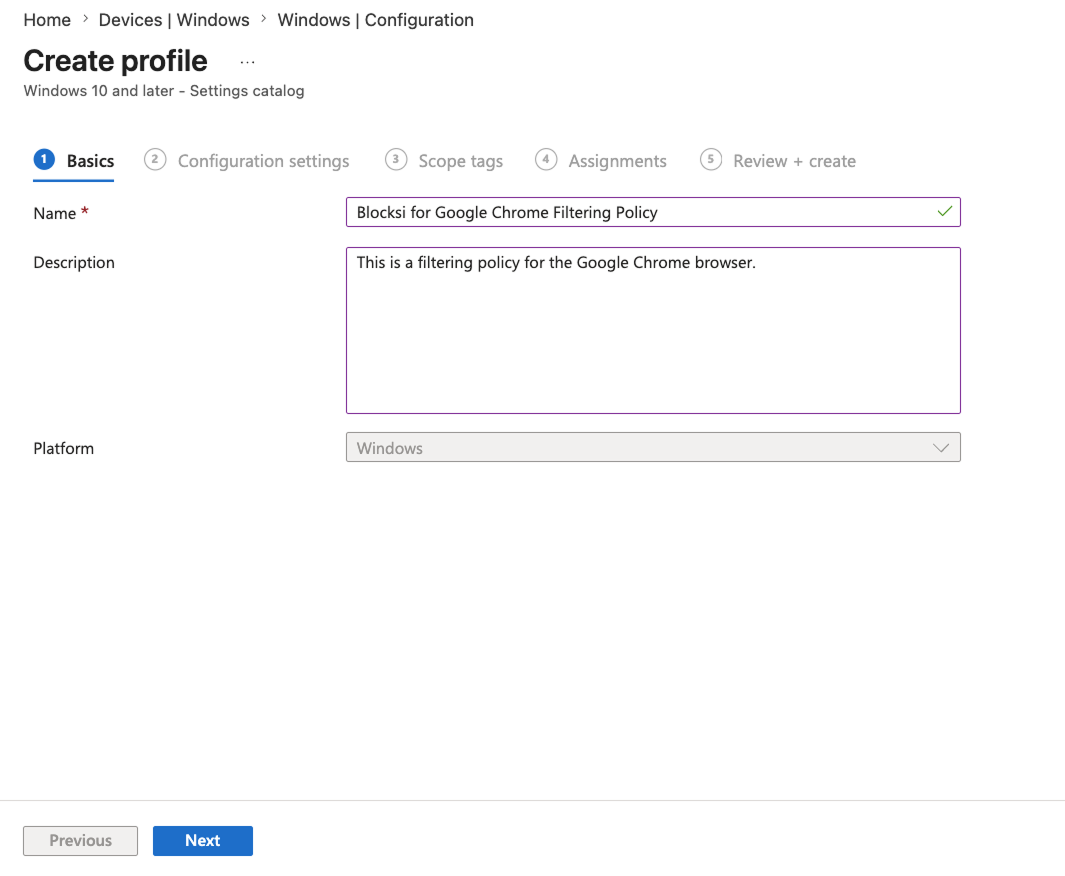
On the Basics tab, enter the following:
Name - Enter
Blocksi for Google Chrome Filtering Policyor another descriptive name.Description - Leave blank or enter a custom description.
Click Next.
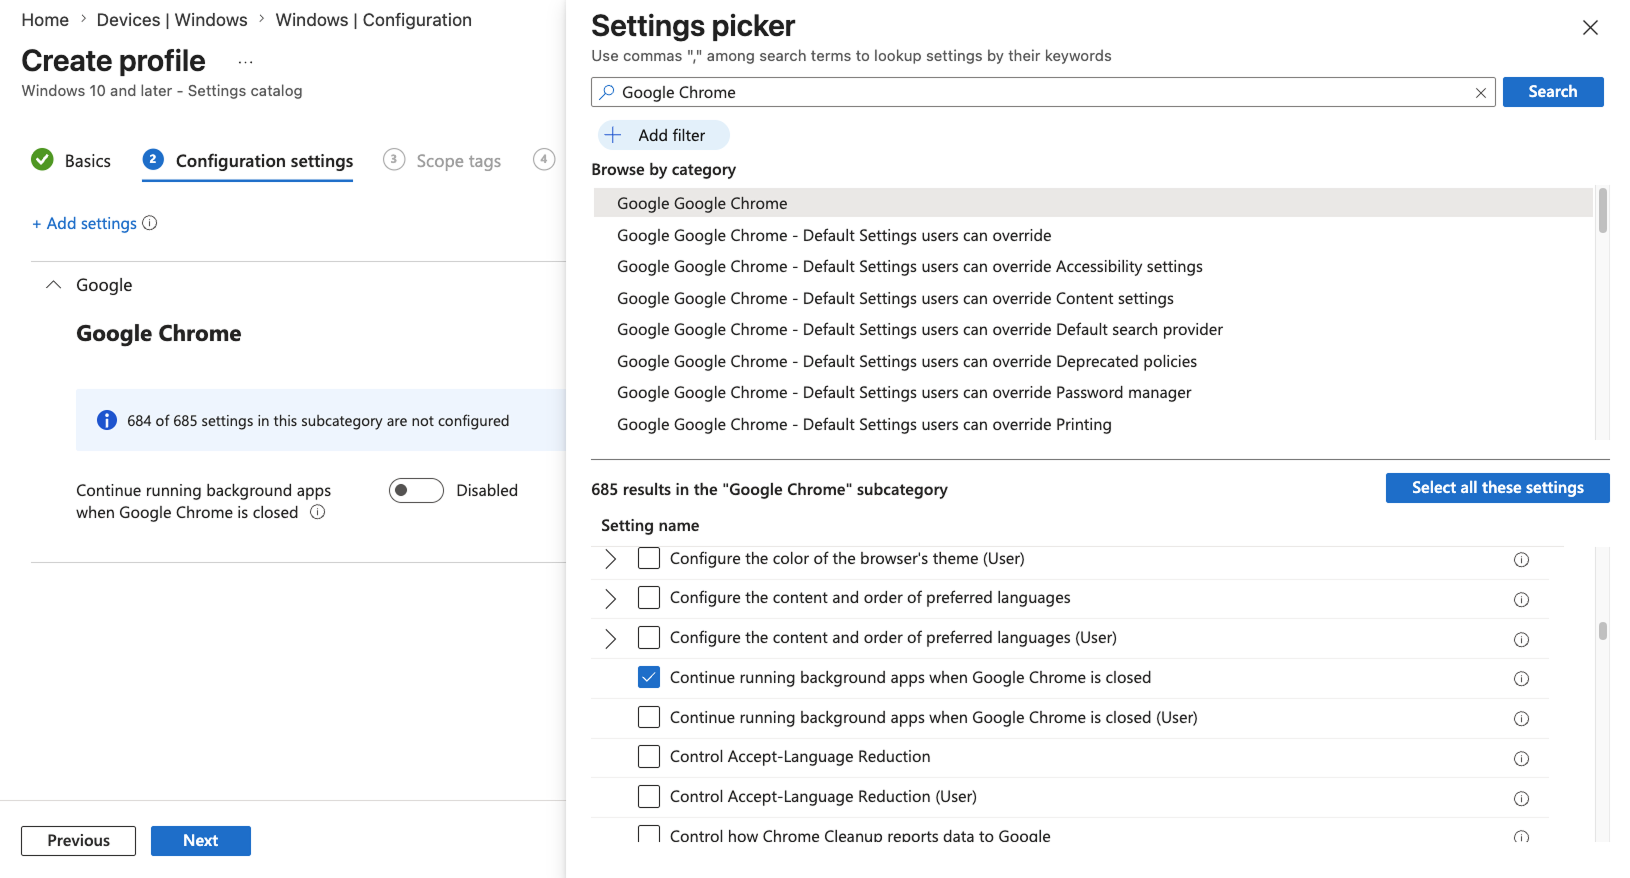
On the Configuration Settings tab, click + Add settings to open the Settings picker.
In the search bar, enter
Google Chrometo filter the available settings.Under the Google Chrome category, select Continue running background apps when Google Chrome is closed.
Under the Google Chrome Extensions category, select Configure the list of force-installed apps and extensions.
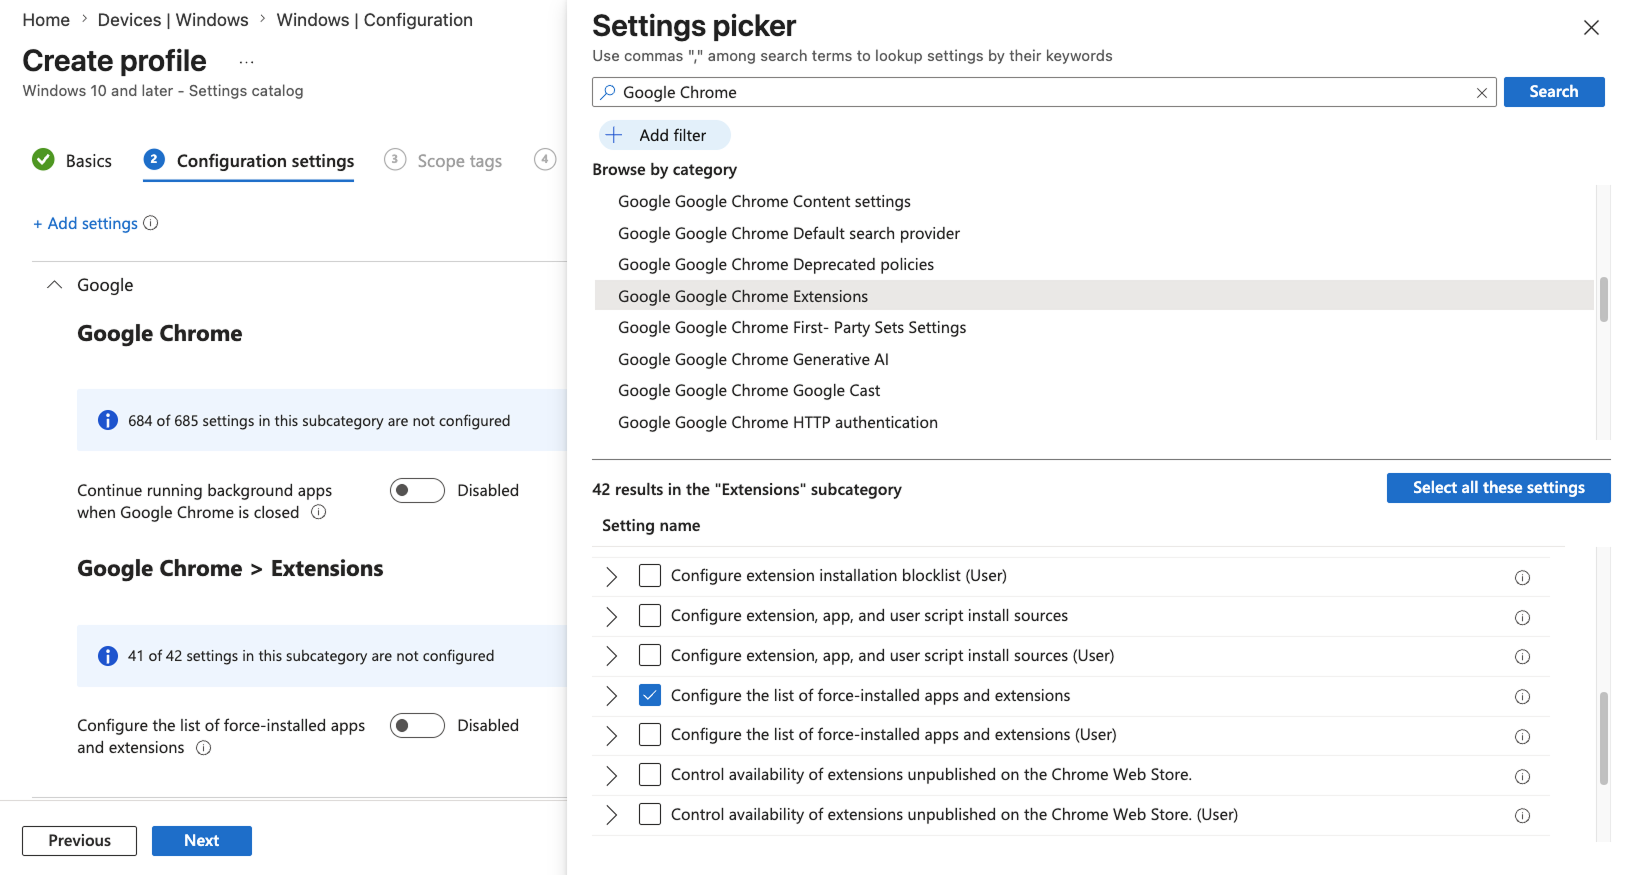
Close the Settings picker.
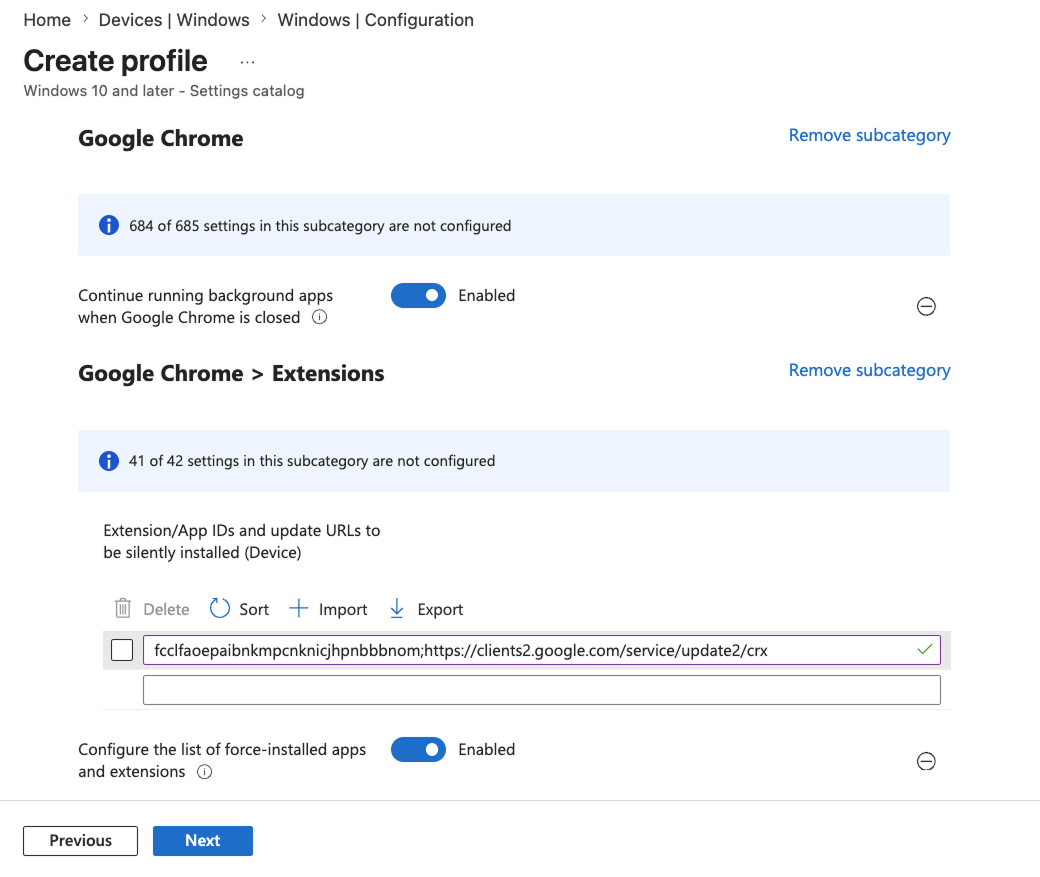
Configure both settings:
Toggle Continue running background apps when Google Chrome is closed to Enabled.
Toggle Configure the list of force-installed apps and extensions to Enabled, then enter
fcclfaoepaibnkmpcnknicjhpnbbbnom;https://clients2.google.com/service/update2/crxin the Extension/App IDs and update URLs to be silently installed (Device) field.
Click Next.
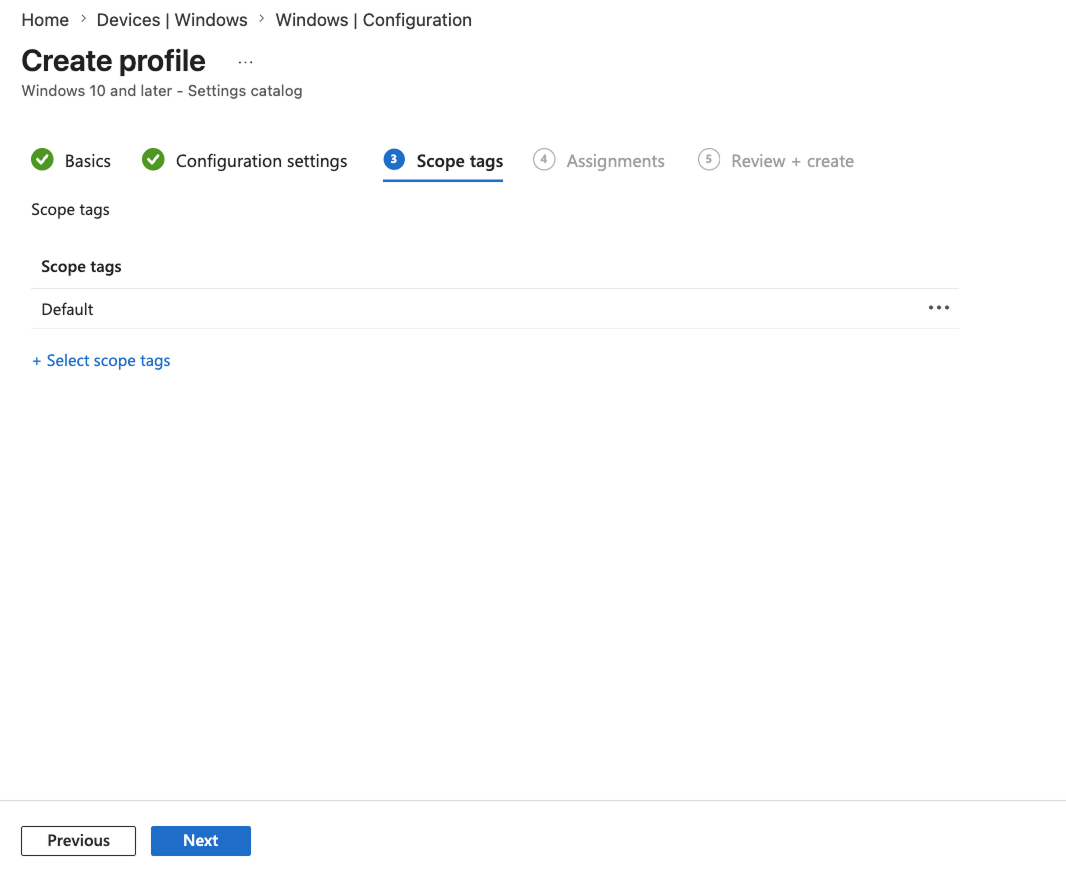
On the Scope Tags tab, click + Select scope tags and choose the appropriate scope tags for your environment. Click Next.
On the Assignments tab, under the Required section, add the user group that should receive the policy (e.g., All Users or Students):
+ Add all users - Assigns to all users.
+ Add group - Allows you to select specific groups to assign to.
Click Next.
On the Review + Create tab, review the policy settings, then click Create. The new policy is added to the Policies table.
The following procedure creates a Settings catalog profile in Intune that force-installs the Blocksi extension in Edge.
Note
Microsoft Edge is preinstalled on Windows 10 and later, so no separate installation is required.
Sign in to the Microsoft Intune Admin Center.
Navigate to Devices > Windows > Configuration, then click + Create at the top of the screen, and select + New Policy.
Configure the following, then click Create:
Platform - Select Windows 10 and later.
Profile type - Select Settings catalog.
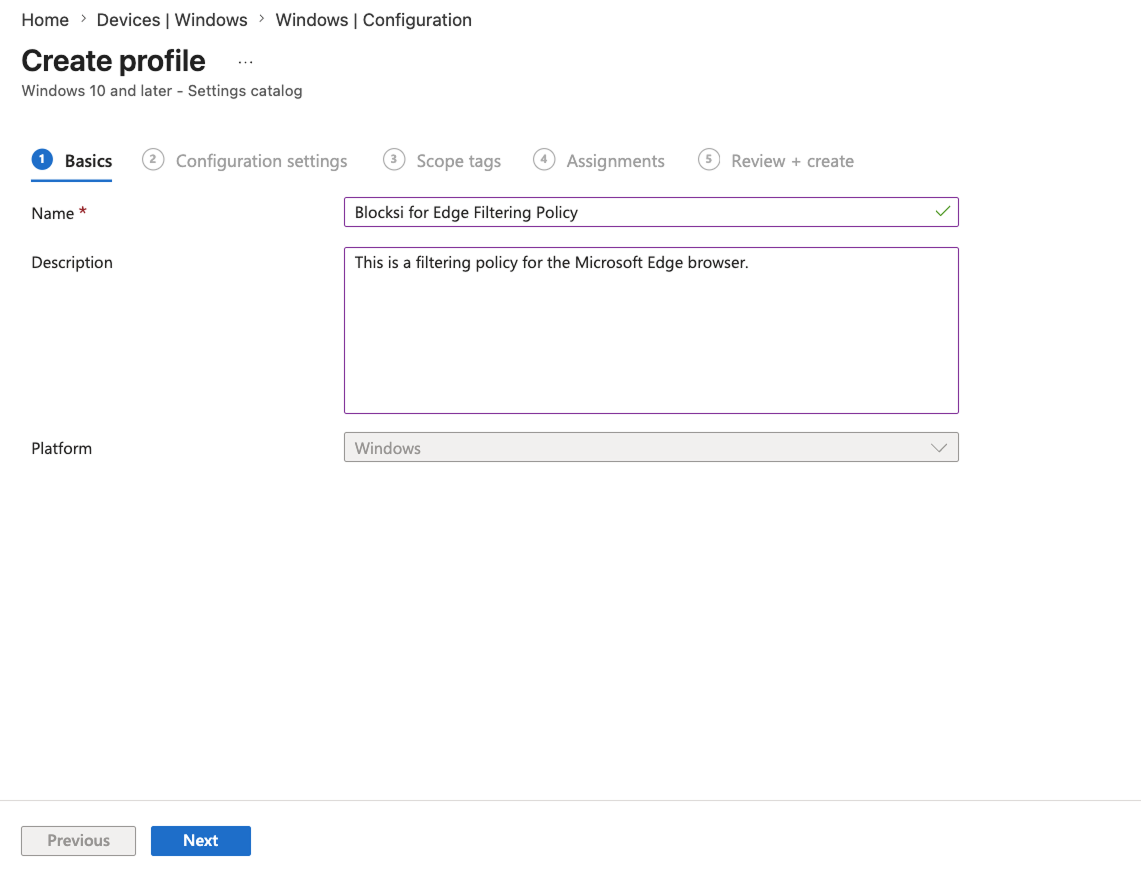
On the Basics tab, enter the following:
Name - Enter
Blocksi for Edge Filtering Policyor another descriptive name.Description - Leave blank or enter a custom description.
Click Next.
On the Configuration Settings tab, click + Add settings to open the Settings picker.
In the search bar, enter
Microsoft Edge, select the Microsoft Edge\Extensions category, then select the Control which extensions are installed silently setting. Close the Settings picker.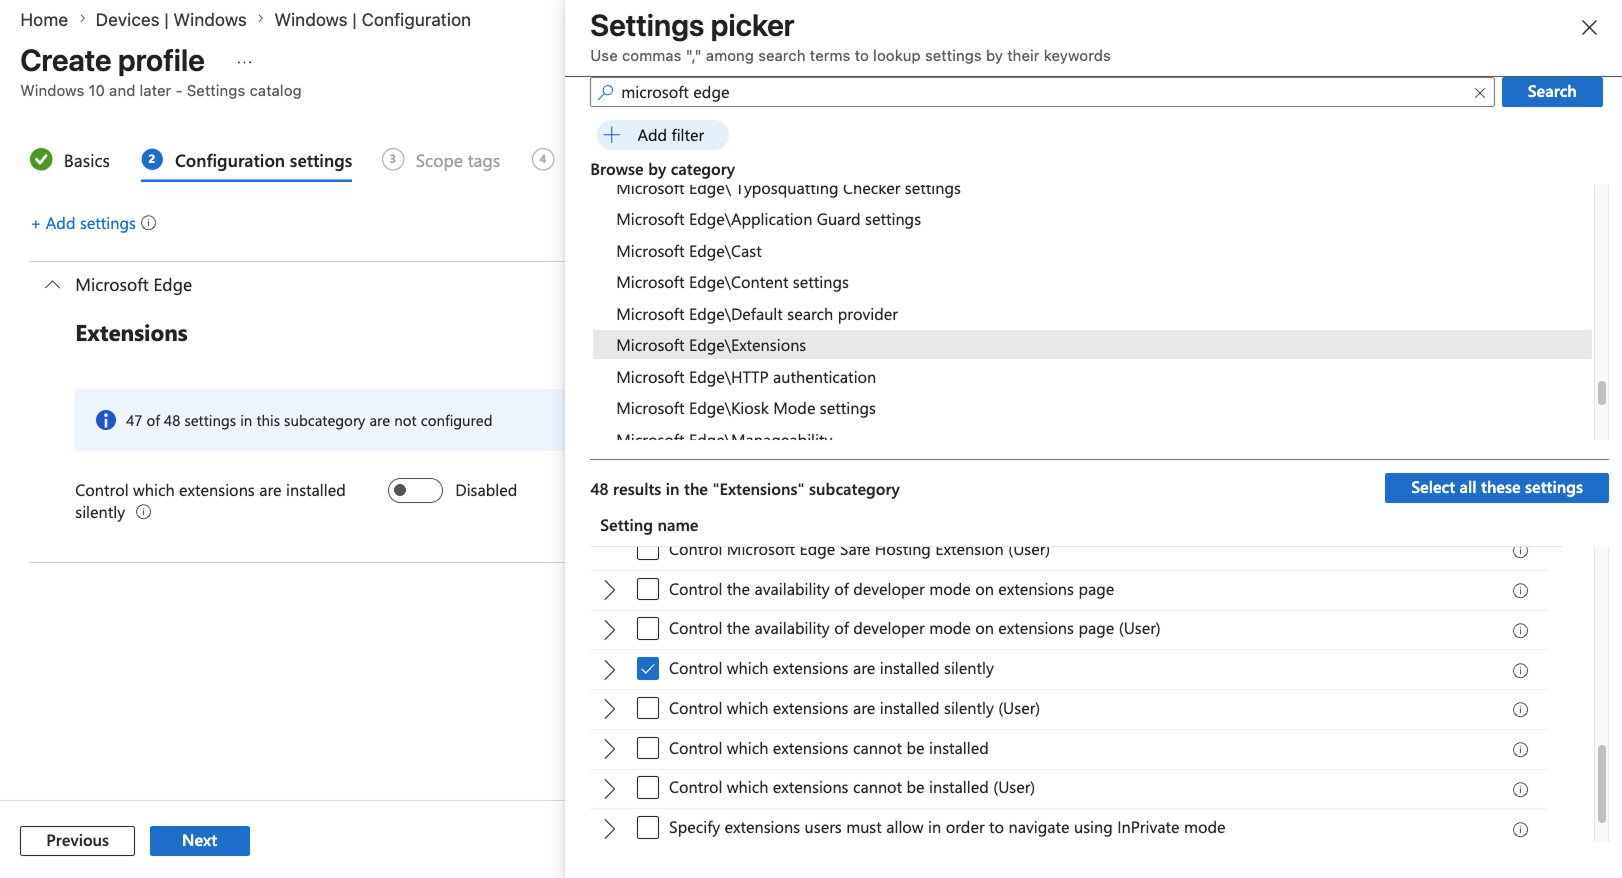
Toggle the setting to Enabled. In the Extension/App IDs and update URLs to be silently installed (Device) field, enter
fcclfaoepaibnkmpcnknicjhpnbbbnom;https://clients2.google.com/service/update2/crx. Click Next.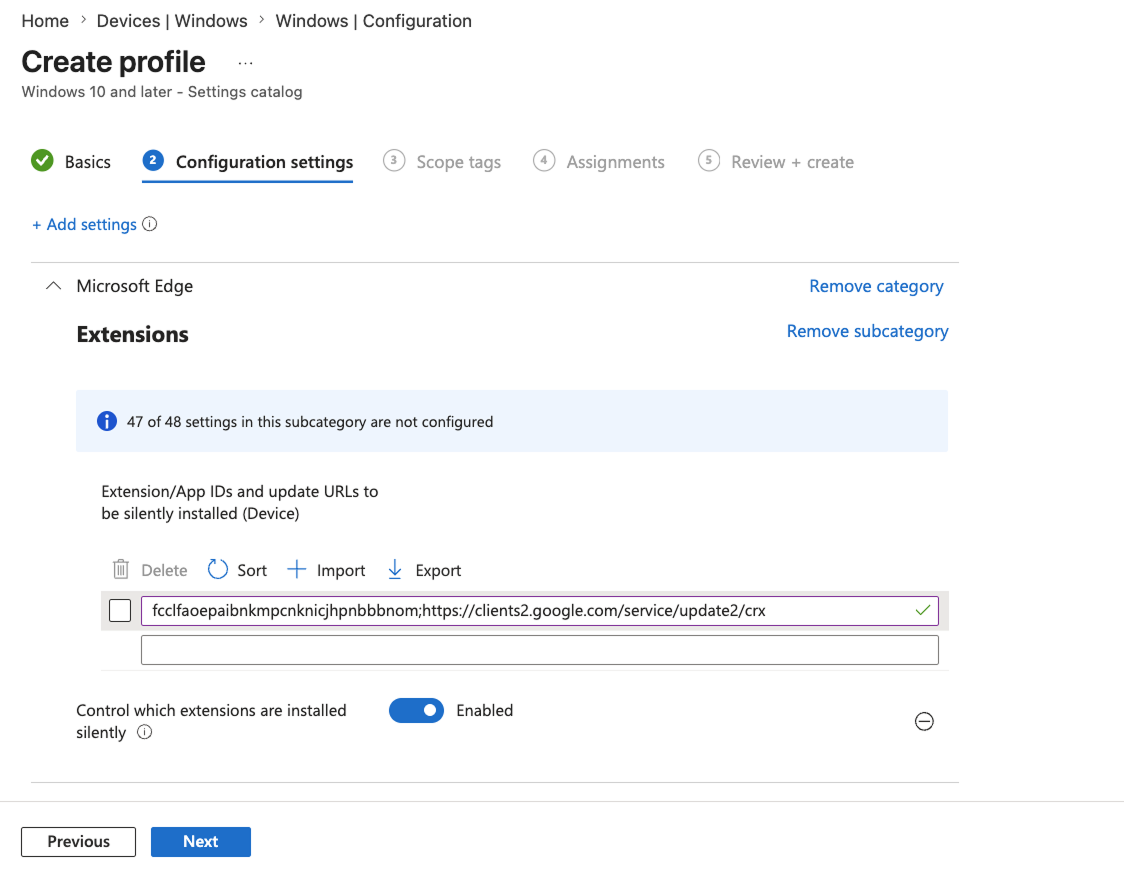
On the Scope Tags tab, click + Select scope tags and choose the appropriate scope tags for your environment. Click Next.
On the Assignments tab, under the Required section, add the user group that should receive the policy (e.g., All Users or Students):
+ Add all users - Assigns to all users.
+ Add group - Allows you to select specific groups to assign to.
Click Next.
On the Review + Create tab, review the policy settings, then click Create. The new policy is added to the Policies table.
The Blocksi Enterprise version dropdown in the Downloads dialog controls how the agent updates on your Windows devices.
Auto-update to newest version - Devices automatically update to the latest released version as it becomes available.
A specific version (e.g., 1.2.3 released in April 2026) - Pins all devices to that version. Auto-update remains active, but only up to the version you select.
Auto-update OFF - Disables auto-updates entirely. Devices remain on their currently installed version until you update them manually.
Sign in to the Blocksi Admin Dashboard.
Open the Downloads dialog and select the Windows tab.
Under Blocksi Enterprise, open the dropdown and select the desired option: Auto-update to newest version, a specific version, or Auto-update OFF.
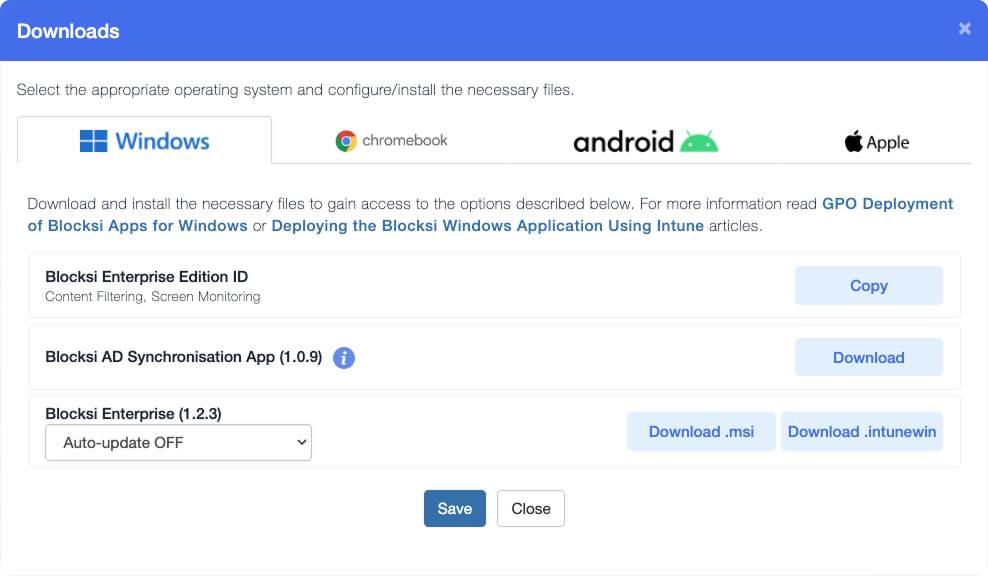
Click Save.
Click Confirm auto-update change to apply the new setting to your devices.
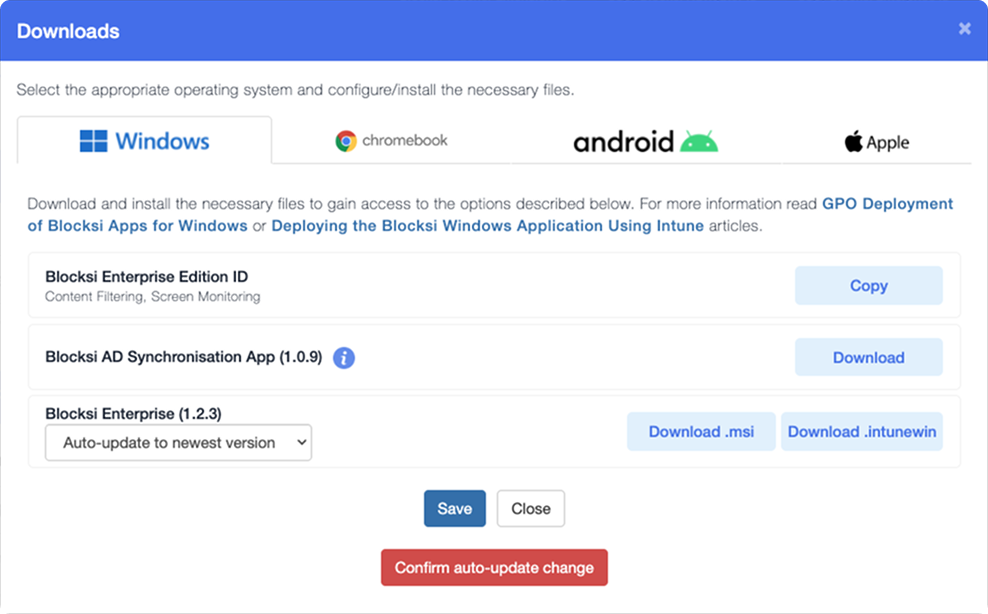
With the auto-update feature enabled, manual app updates for the Blocksi agent are no longer required. The Blocksi-Updater service handles version upgrades automatically. This service runs alongside the existing WebFilter and BlocksiClassroom services, keeping your agent software on the latest version without requiring manual MSI redeployments.
Sign in to the Blocksi Admin Dashboard.
Open the Downloads dialog and select the Windows tab.
Select Auto-update to the newest version and download the .msi or .intunewin files.
Deploy the auto-update version to the devices following the configuration guide above. Refer to the Installing the Blocksi Enterprise Application section for help.
Sign in to the Blocksi Admin Dashboard.
Open the Downloads dialog and select the Windows tab.
Select the target version from the list of available releases and download the .msi or .intunewin files.
Sign in to the Microsoft Intune Admin Center.
Navigate to Apps > All Apps and select the Blocksi Enterprise app.
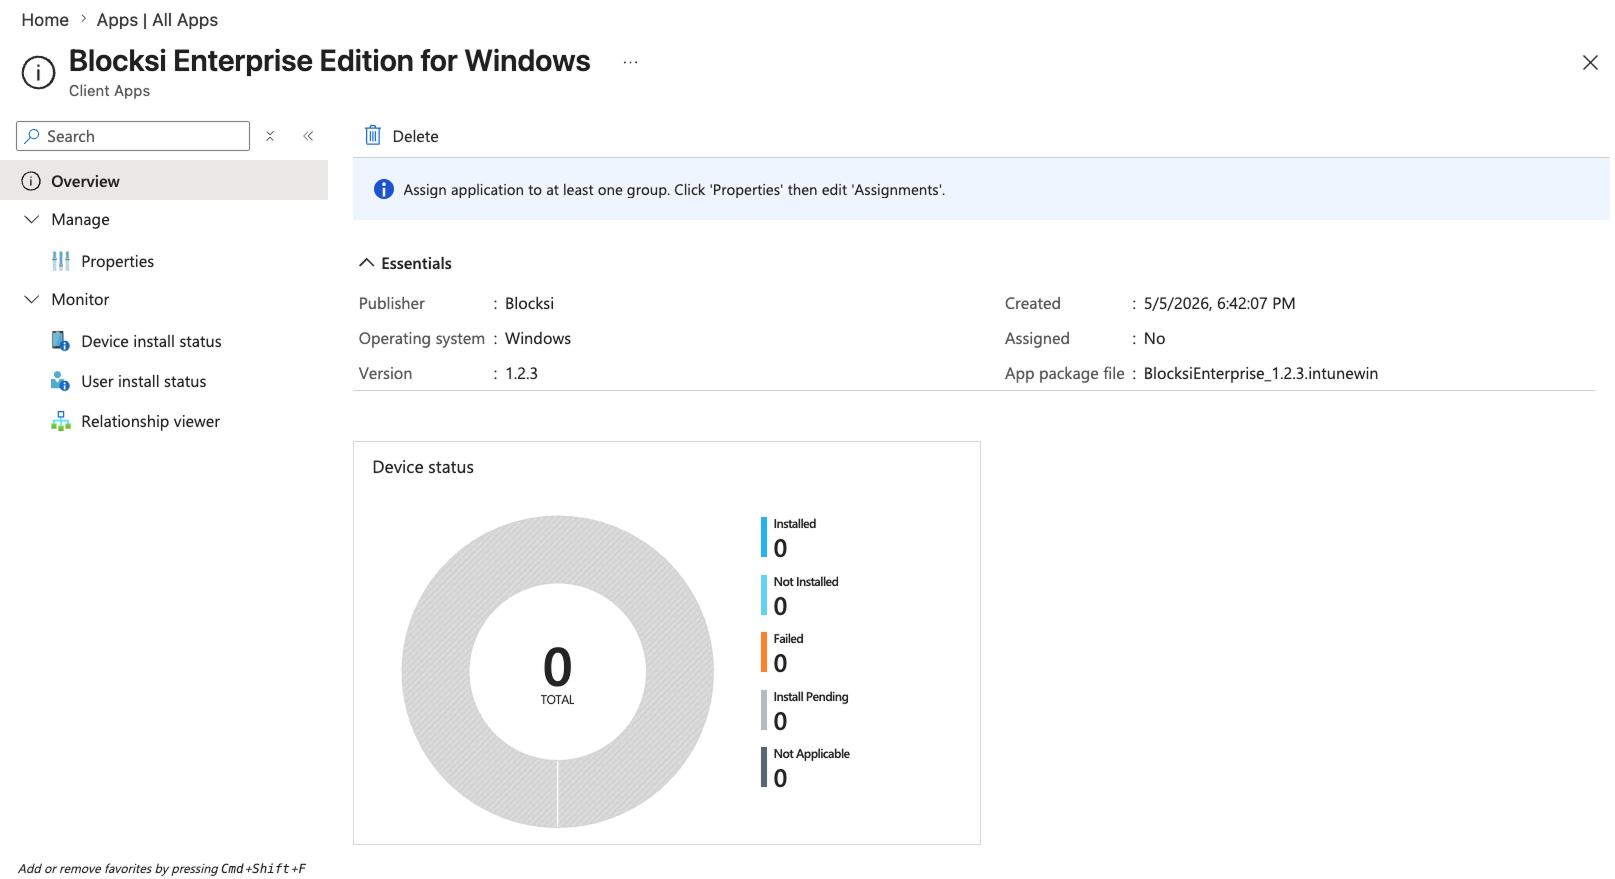
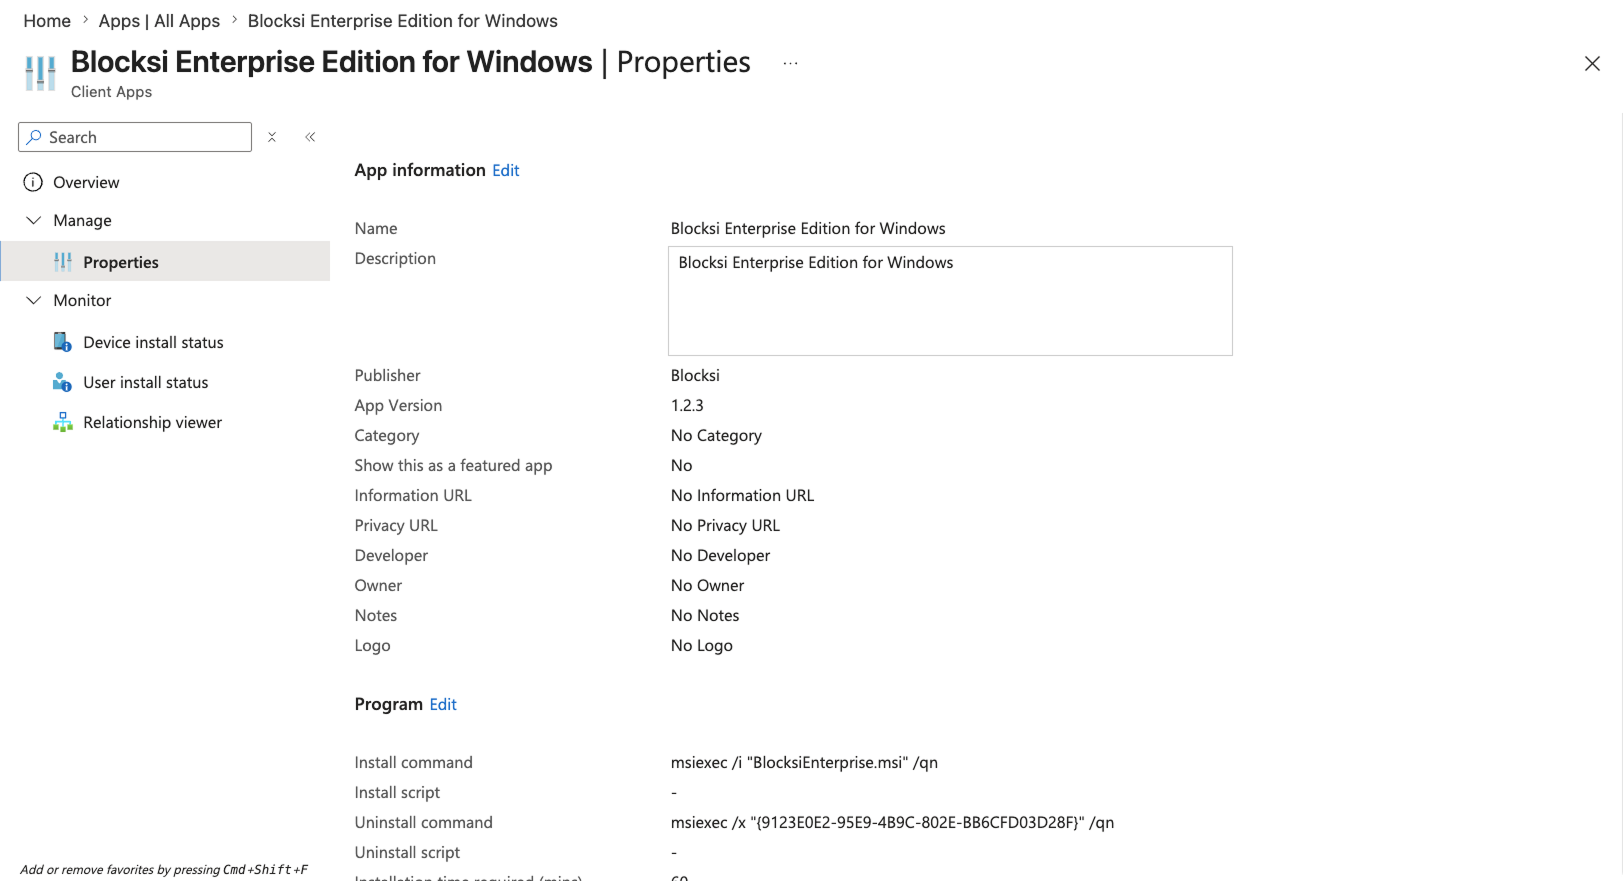
Click Properties, then click Edit next to App information.
Click the file listed next to Select file to update and upload the new app file.
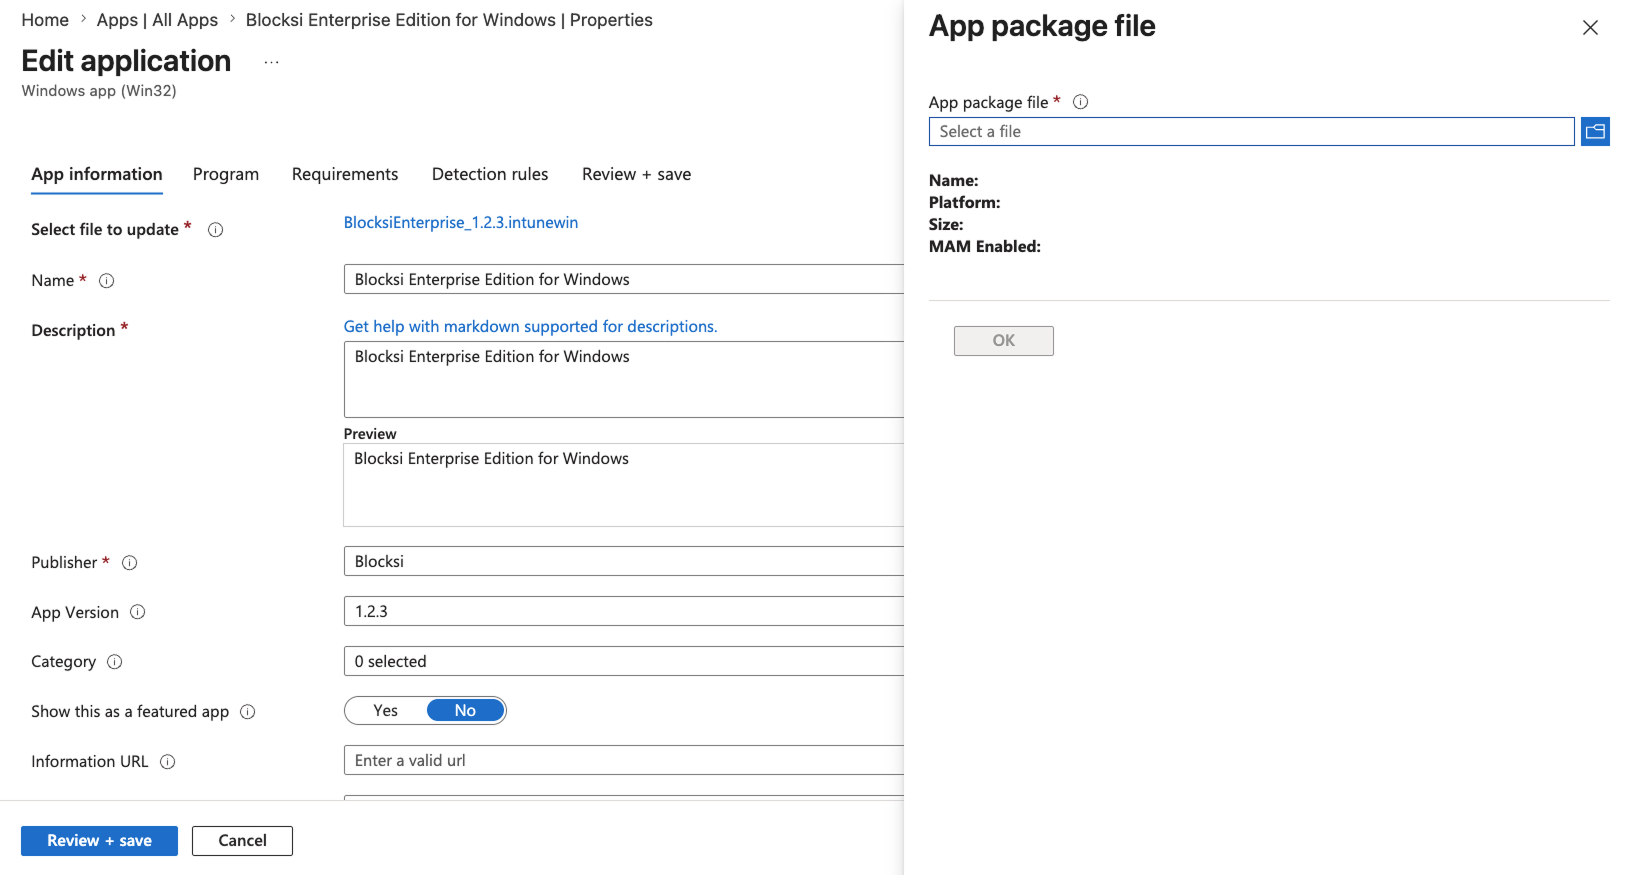
Click Review + Save. The updated package is pushed to assigned devices.