Sharing Policies, Assessments, Exception Lists, and Scheduler Templates
Use the Teacher Dashboard Settings to streamline workflow by distributing pre-configured resources directly to your staff. This section provides step-by-step instructions on how to share custom filtering policies, assessments, exception lists, and scheduler templates with specific teacher accounts or organizational units.
These settings are collected in the sharing hub section, which can be found by navigating to Dashboard Settings from the Main Menu, then selecting Teacher Dashboard from its sub-menu and scrolling down to the teacher email list. The section is located directly above the teacher email list.

Administrators can share pre-configured filtering policies with teachers for use during active class sessions. Once shared, these policies appear on the Teacher Dashboard and can be optionally applied by teachers to filter student content during class.
Tip
If you need help creating filtering policies, refer to the Content Filtering and Policies sections.
Filtering policies can be distributed to individual teacher accounts or entire organizational units. They can also be set as the default in-class policy for all teachers or specific organizational units, which will automatically override any previously configured in-class policies. Teachers can, however, manually change the active policy for any classes if needed.
Assign a default policy to ensure filtering is applied during class without requiring teacher selection.
Click Dashboard Settings from the Main Menu, then click Teacher Dashboard from its sub-menu. The Teacher Accounts screen appears.
Scroll down to the teacher email list. The sharing hub section appears directly above the teacher email list.
Select the desired policy by clicking the
 button and choosing a policy from the drop-down list.
Click the
 button to expand the following options: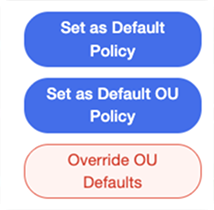
Set as Default Policy - Selecting this option makes the selected policy the default in-class policy for all teachers, overriding any previously assigned default policies.
Set as Default OU Policy - Selecting this option makes the selected policy the default policy for all teachers in the selected organizational unit. A window for selecting an organizational unit opens.
Note
The organizational units tree shows each organizational unit's current default policy. Selecting a new policy updates the view to reflect the replacement.
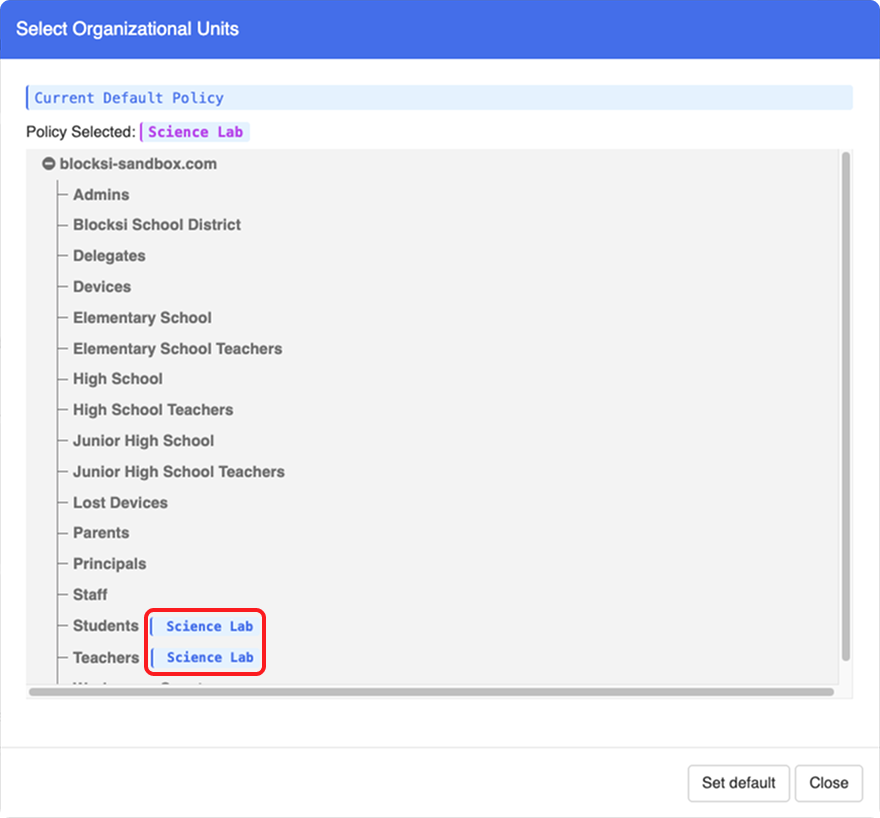
Warning
When selecting an organizational unit to share a policy with, make sure to select only organizational units that contain teachers, not students.
Override OU Defaults - Selecting this option overrides any default policies already set for teachers within the selected organizational unit.
Note
Teachers can still select a different policy for their classes, as long as they have other policies shared with them.
Share a filtering policy with one or more specific teacher accounts.
Click Dashboard Settings from the Main Menu, then click Teacher Dashboard from its sub-menu. The Teacher Accounts screen appears.
Scroll down to the teacher email list. The sharing hub section appears directly above the teacher email list.
Select the desired policy by clicking the
button and choosing a policy from the drop-down list.Search for the teacher or teachers you want to share the selected policy with using the search box, making sure to check the checkbox to the left of each email address.
Tip
If you need help searching for teacher accounts, refer to the Searching for a Teacher Account section.
Click the
 button. The selected policy is shared with the teachers you selected.
Note
To remove a shared policy from a teacher, repeat the steps above and click the
 button in place of the button.
Tip
To review the list of all policies shared with a specific teacher, locate the teacher in the teacher email list and click the Policies button in their row.

Share a filtering policy with an organizational unit.
Important
The difference between sharing a policy with an organizational unit and setting it as a default organizational unit policy (as described in the Setting the Default Policy section) is that sharing a policy adds it to the teacher's list of available policies, whereas setting it as a default policy automatically enforces it as the active in-class policy.
Click Dashboard Settings from the Main Menu, then click Teacher Dashboard from its sub-menu. The Teacher Accounts screen appears.
Scroll down to the teacher email list. The sharing hub section appears directly above the teacher email list.
Select the desired policy by clicking the
button and choosing a policy from the drop-down list.Click the
 button. A window for selecting an organizational unit opens upon selecting this option. Multiple organizational units can be selected at a time.
Warning
When selecting an organizational unit to share a policy with, make sure to select only organizational units that contain teachers, not students.
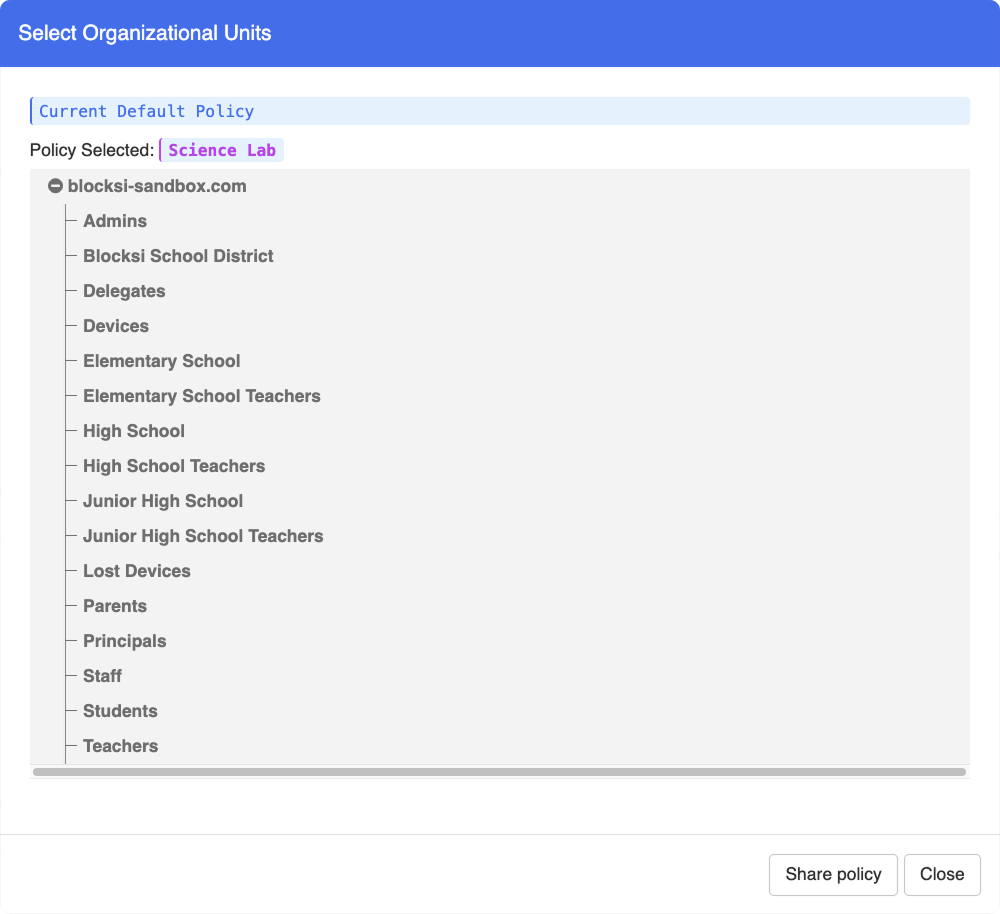
Select the organizational units you want to share the selected policy with, then click the Share Policy button. The selected policy is shared with the organizational units.
Note
To remove a shared policy from an organizational unit, repeat the steps above and click the
 button in place of the button.
Administrators can create and share assessment presets with teachers for use during active class sessions. Once shared, these presets appear on the Teacher Dashboard and can be optionally applied by teachers to push out a quiz, assessment, or LMS to students. When an assessment is active, students are locked to the designated environment and cannot access any other sites or search the web.
Assessment presets can be distributed to individual teachers or entire organizational units.
Note
Shared assessment presets can be found in the Shared presets section when pushing out an assessment on the Teacher Dashboard.
Create assessment presets to share with your teachers. These are useful for commonly used quizzes, assessments, or LMS environments, or to assist teachers who are unfamiliar with creating their own assessments.
Click Dashboard Settings from the Main Menu, then click Teacher Dashboard from its sub-menu. The Teacher Accounts screen appears.
Scroll down to the teacher email list. The sharing hub section appears directly above the teacher email list.
Click the
 button to create a new assessment preset. A blank Create Assessment window opens.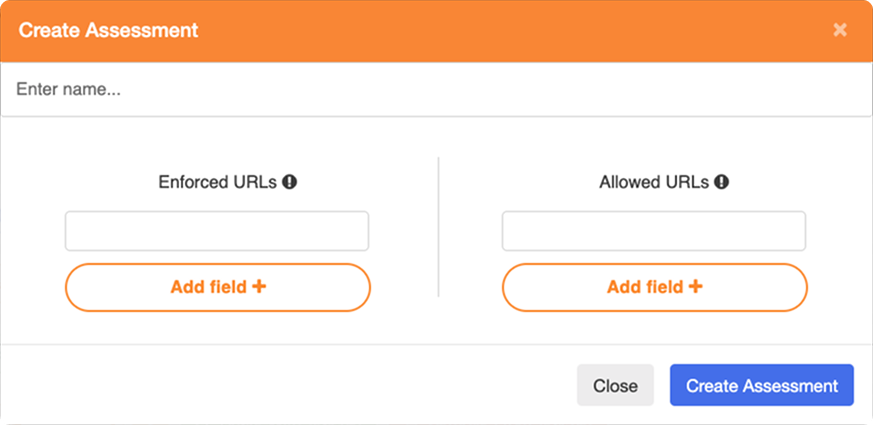
Type the name of the new assessment preset in the Enter name... text box.
In the Enforced URLs section on the left, enter the URL of the webpage you want to push out to students. Click the
 button to add multiple URLs.
Important
Enforced URLs are the sites that are pushed out and opened on student screens when an assessment is active.
In the Allowed URLs section on the right, allow the required domains by using a wildcard asterisk before and after each domain name (e.g., *Edgenuity*; *classroom*; *mathxl*). Click the
button to add multiple allowed URLs, then click Confirm.Important
Allowed URLs are the sites that are not pushed out to student screens directly, but that students can access while an assessment is active. Necessary redirects such as sign-in pages that require authentication (e.g., Google SSO) must also be added to this section.
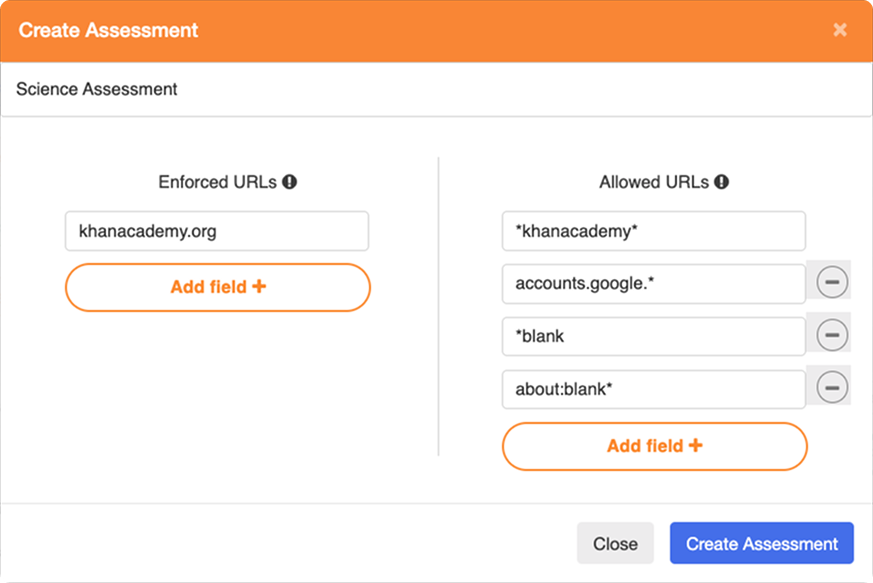
Click the Create Assessment button to create an assessment preset. The new assessment preset can now be found in the drop-down menu when clicking the
 button.
Click Dashboard Settings from the Main Menu, then click Teacher Dashboard from its sub-menu. The Teacher Accounts screen appears.
Scroll down to the teacher email list. The sharing hub section appears directly above the teacher email list.
Click the
button and select the assessment preset you want to edit from the drop-down menu, then click the  button. The Edit Assessment window opens.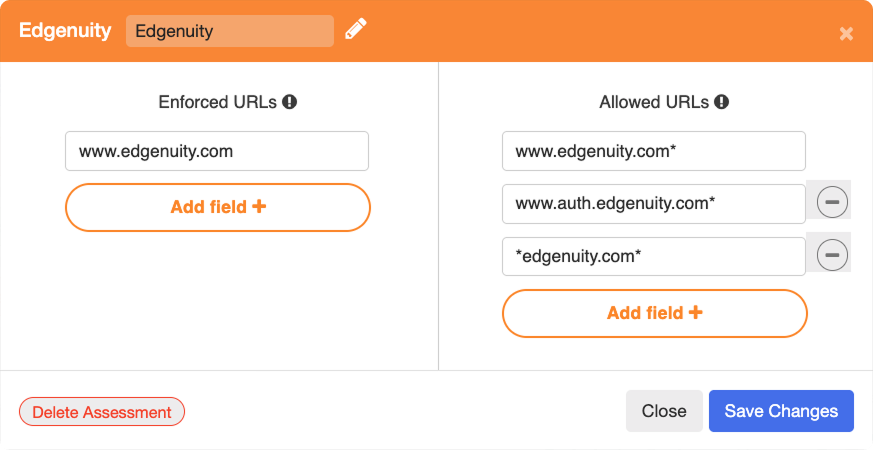
Make the necessary changes to the assessment preset by adding new fields or editing and removing existing entries. You can also rename the assessment preset at this stage.
Note
Edited assessments are updated in the Shared Presets drop-down menu on the Teacher Dashboard as soon as the changes are saved.
Click the Save Changes button when you are done editing the assessment preset.
Tip
To delete an assessment preset, access the Edit Assessment window using the procedure above and click the
 button to remove it from your list.
Share an assessment preset with one or more specific teacher accounts.
Click Dashboard Settings from the Main Menu, then click Teacher Dashboard from its sub-menu. The Teacher Accounts screen appears.
Scroll down to the teacher email list. The sharing hub section appears directly above the teacher email list.
Select the desired assessment preset by clicking the
button and choosing an assessment preset from the drop-down list.Search for the teacher or teachers you want to share the selected assessment preset with using the search box, making sure to check the checkbox to the left of each email address.
Tip
If you need help searching for teacher accounts, refer to the Searching for a Teacher Account section.
Click the
button. The selected assessment preset is shared with the selected teachers and can be found in the Shared Presets section on their Teacher Dashboard when pushing out an assessment.Note
To remove a shared assessment preset from a teacher, repeat the steps above and click the
button in place of the button.
Tip
To review the list of all assessment presets shared with a specific teacher, locate the teacher in the teacher email list and click the Assessments button in their row.

Share an assessment preset with an organizational unit.
Click Dashboard Settings from the Main Menu, then click Teacher Dashboard from its sub-menu. The Teacher Accounts screen appears.
Scroll down to the teacher email list. The sharing hub section appears directly above the teacher email list.
Select the desired assessment preset by clicking the
button and choosing an assessment preset from the drop-down list.Click the
button. A window for selecting an organizational unit opens upon selecting this option. Multiple organizational units can be selected at a time.Warning
When selecting an organizational unit to share an assessment preset with, make sure to select only organizational units that contain teachers, not students.
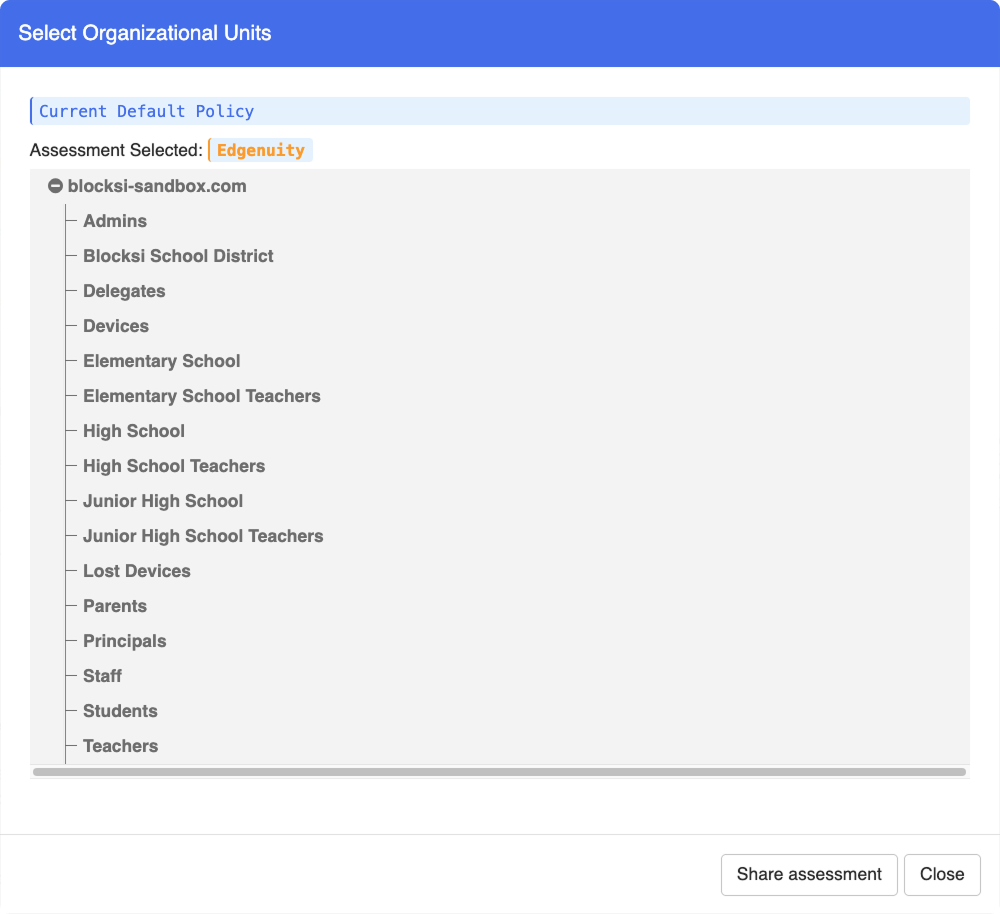
Select the organizational units you want to share the selected assessment preset with, then click the Share Assessment button. The selected assessment preset is shared with the organizational units.
Note
To remove a shared assessment preset from an organizational unit, repeat the steps above and click the
button in place of the button.
Administrators can share exception lists with individual teacher accounts or entire organizational units. Once shared, these exception lists appear in the Policies section on the Teacher Dashboard and can be used by teachers when creating their own content filtering policies for use during active class sessions.
Note
This feature is only available if the Advanced Filtering Tools setting is enabled. For instructions on how to enable it, refer to the Teacher Dashboard General Settings section.
Tip
If you need help creating exception lists, refer to the Exception Lists section.
Share an exception list with one or more specific teacher accounts.
Click Dashboard Settings from the Main Menu, then click Teacher Dashboard from its sub-menu. The Teacher Accounts screen appears.
Scroll down to the teacher email list. The sharing hub section appears directly above the teacher email list.
Select the desired exception list by clicking the
 button and choosing an exception list from the drop-down list.
Note
All exception lists created on your Admin Dashboard will appear in the drop-down list. To add or edit an existing exception list, click Content Filtering from the Main Menu, then select Filters and navigate to the Exception List section.
Search for the teacher or teachers you want to share the selected exception list with using the search box, making sure to check the checkbox to the left of each email address.
Tip
If you need help searching for teacher accounts, refer to the Searching for a Teacher Account section.
Click the
button. The selected exception list is shared with the selected teachers and can be found in the Exception Lists section under the Filters section on their Teacher Dashboard or in the Policies section.Note
To remove a shared exception list from a teacher, repeat the steps above and click the
button in place of the button.
Share an exception list with an organizational unit.
Click Dashboard Settings from the Main Menu, then click Teacher Dashboard from its sub-menu. The Teacher Accounts screen appears.
Scroll down to the teacher email list. The sharing hub section appears directly above the teacher email list.
Select the desired exception list by clicking the
button and choosing an exception list from the drop-down list.Note
All exception lists created on your Admin Dashboard will appear in the drop-down list. To add or edit an existing exception list, click Content Filtering from the Main Menu, then select Filters and navigate to the Exception List section.
Click the
button. A window for selecting an organizational unit opens upon selecting this option. Multiple organizational units can be selected at a time.Warning
When selecting an organizational unit to share an exception list with, make sure to select only organizational units that contain teachers, not students.
Select the organizational units you want to share the selected exception list with, then click the Share Assessment button. The selected exception list is shared with the organizational units.
Note
To remove a shared exception list from an organizational unit, repeat the steps above and click the
button in place of the button.
Administrators can create standardized bell schedule templates for teachers to utilize. Once you share these templates, teachers can simply drag and drop their specific classes into the shared framework. This process automatically configures a class scheduler that starts their Blocksi sessions at the designated times without further manual input.
Scheduler templates can be distributed to individual teacher accounts or entire organizational units.
Create scheduler templates to share with your teachers.
Click Dashboard Settings from the Main Menu, then click Teacher Dashboard from its sub-menu. The Teacher Accounts screen appears.
Scroll down to the teacher email list. The sharing hub section appears directly above the teacher email list.
Click the
button to the right of the  button to create a new scheduler preset. A blank Create Scheduler Bell Template window opens.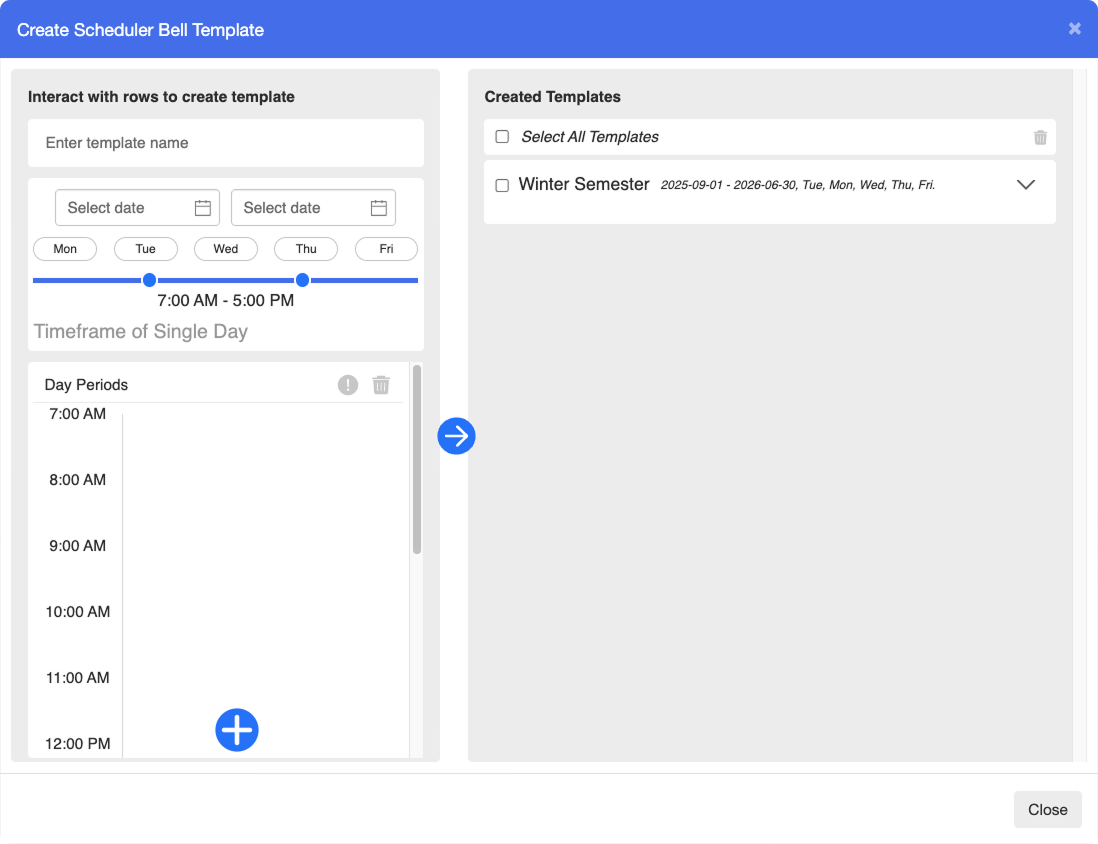
Type a name for the new scheduler template in the Enter template name field.
Select the start and end dates for your scheduler bell (e.g., a semester or the whole school year) by clicking the Select date boxes. A calendar selection opens upon clicking either box.
Select the days of the week by clicking on individual day tiles under the date selection. Selected days of the week will be highlighted in blue.
Important
Days of the week are displayed from Monday through Friday.
Define the school session day by dragging the blue slider under the weekday selection. This defines the time frame within which class sessions can be scheduled.
Note
Only full hour times can be selected. Make sure to round your school session end time up to the nearest full hour (e.g., set 5:00 PM if classes at your school end at 4:30 PM).
Click the
 button and choose one of the following options to add a new time block:
 - Adds a new class block.
Important
Class blocks appear as blank time blocks on the Teacher Dashboard that teachers can drag and drop their classes into. Refer to the image below for an example of how they appear on the Teacher Dashboard.
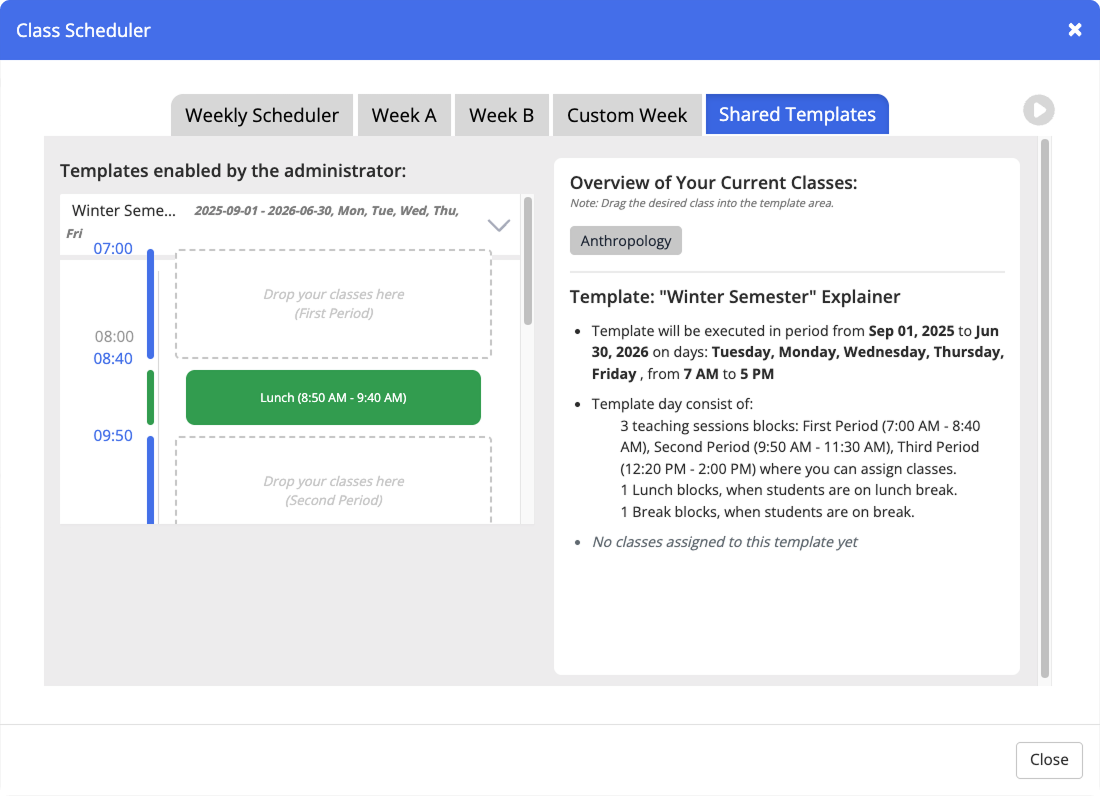
 - Adds a new pause block.
 - Adds a new lunch block.
Tip
Individual time blocks can be deleted by clicking the X inside the selected time block.
Once a block type is selected, it appears in the Timeframe of Single Day section. The default duration of an added block is 1 hour 40 minutes, which can be adjusted by clicking and dragging the lower edge of the time block.
Tip
When distributing time blocks, make sure to leave at least 5 minutes between two class blocks to avoid any possible overlap.
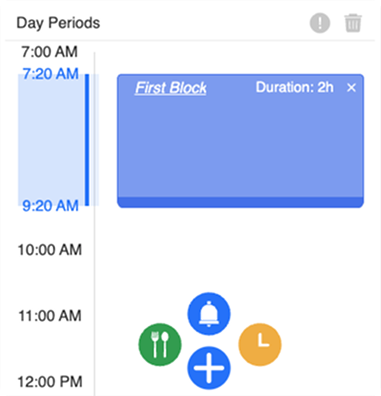
When you are done setting up your scheduler template, click the
 button. The saved template appears on the right-hand side of the window alongside any other previously created scheduler templates.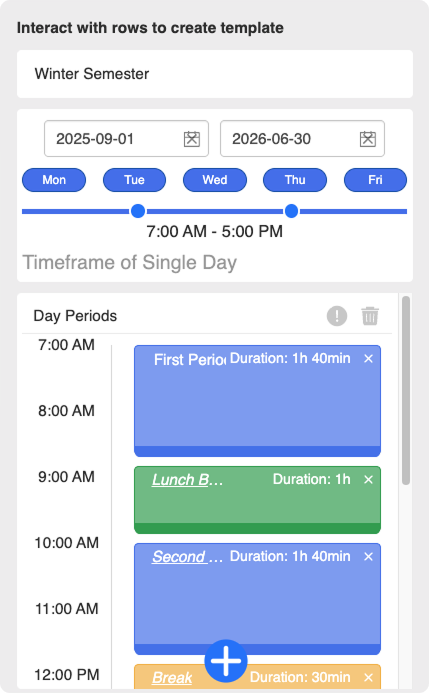
Note
You can manage your saved templates under the Created Templates section on the right-hand side of the window:
To edit a template, click the downward arrow on the far right of the template box you want to edit and apply your changes. Click Save Changes when you are done, or Discard Changes to discard any changes made.
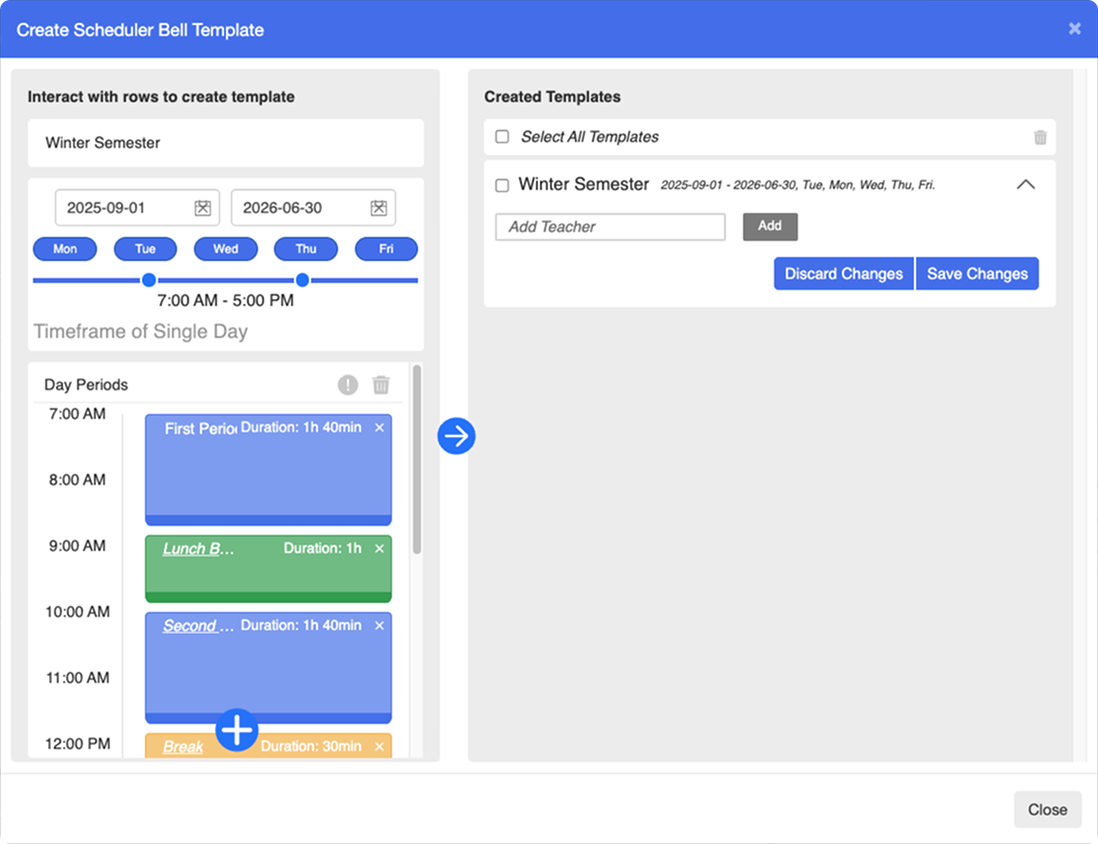
To delete a template, click the downward arrow on the far right of the template box you want to delete, then click the trash icon to the right of the Select All Templates section.
Tip
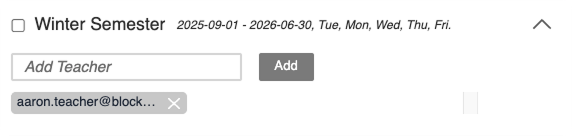
You can share a created template with a specific teacher directly from the Create Scheduler Bell Template window. Click the downward arrow on the far right of the template you want to share, then enter the teacher's full email address in the Add Teacher text box and click the Add button. To remove a teacher from the shared list, click the X button next to their email address.
Share a scheduler template with one or more specific teacher accounts.
Click Dashboard Settings from the Main Menu, then click Teacher Dashboard from its sub-menu. The Teacher Accounts screen appears.
Scroll down to the teacher email list. The sharing hub section appears directly above the teacher email list.
Select the desired scheduler template by clicking the
button and choosing a scheduler template from the drop-down list.Search for the teacher or teachers you want to share the selected scheduler template with using the search box, making sure to check the checkbox to the left of each email address.
Tip
If you need help searching for teacher accounts, refer to the Searching for a Teacher Account section.
Click the
button. The selected scheduler template is shared with the selected teachers and can be found in the Class Scheduler section by clicking the Show/Hide Schedule button and navigating to Shared Templates.Note
To remove a shared scheduler template from a teacher, repeat the steps above and click the
button in place of the button.
Share a scheduler template with an organizational unit.
Click Dashboard Settings from the Main Menu, then click Teacher Dashboard from its sub-menu. The Teacher Accounts screen appears.
Scroll down to the teacher email list. The sharing hub section appears directly above the teacher email list.
Select the desired scheduler template by clicking the
button and choosing a scheduler template from the drop-down list.Click the
button. A window for selecting an organizational unit opens upon selecting this option. Multiple organizational units can be selected at a time.Warning
When selecting an organizational unit to share a scheduler template with, make sure to select only organizational units that contain teachers, not students.
Select the organizational units you want to share the selected scheduler template with, then click the Share Assessment button. The selected scheduler template is shared with the organizational units.
Note
To remove a shared scheduler template from an organizational unit, repeat the steps above and click the
button in place of the button.