Bypassing the Blocksi Captive Portal on Apple Devices
The following contains procedures for configuring Apple devices to bypass the Blocksi captive portal through Jamf Pro, Jamf School, Mosyle, and Intune. The procedures apply to iOS and macOS devices. Only the navigation within each MDM differs between device types. Complete this configuration only if your network uses the Blocksi Appliance with the captive portal enabled.
The bypass is delivered as a DNS Settings configuration profile. The profile sends DNS queries from the device to your Blocksi Appliance over HTTPS. Its on-demand rules apply it only when the device is connected to the Wi-Fi networks that you specify.
Prerequisites
Ensure the following prerequisites are in place before proceeding:
Your Blocksi Appliance runs OPDNS version 1.2.7 or later. Refer to the Verifying the OPDNS Version on the Appliance section.
The captive portal DNS address of your Blocksi Appliance.
The name (SSID) of each Wi-Fi network on which the bypass should apply.
A Wi-Fi payload deployed through your MDM for each of these Wi-Fi networks.
Administrator access to your MDM.
iOS devices are supervised. Users can be prevented from disabling the DNS settings on supervised devices only.
Choosing a Server URL
The server URL sets the YouTube restriction level and SafeSearch enforcement that the bypass applies on the device. Each URL applies a different level. If you use Blocksi Filter, use the normaldns server URL. Blocksi Filter applies its own YouTube and SafeSearch filtering, so a stricter DNS level is not needed.
https://capportal.blocksi.net/dns-query/normaldnshttps://capportal.blocksi.net/dns-query/moderatednshttps://capportal.blocksi.net/dns-query/strictdns
OPDNS version 1.2.7 or later must be installed on the Blocksi Appliance before you deploy the bypass profile.
Open the terminal on the Blocksi Appliance.
Run the following commands:
dig @127.0.0.1 +https-get=/dns-query/normaldns +tls-hostname=capportal.blocksi.net youtube.com A
dig @127.0.0.1 +https-get=/dns-query/strictdns +tls-hostname=capportal.blocksi.net youtube.com A
dig @127.0.0.1 +https-get=/dns-query/moderatedns +tls-hostname=capportal.blocksi.net youtube.com A
Each command returns an IP address for youtube.com: the normal YouTube IP address, the strict IP address, and the moderate IP address, in that order.
Connect - Applies the DNS settings when the device is connected to a Wi-Fi network whose SSID is on the list.
Disconnect - Stops applying the DNS settings on every other network.
Jamf Pro and Jamf School take the rules as XML, shown in their sections. Mosyle and Intune set the same rules through their own settings.
To apply the bypass on more than one Wi-Fi network, add a <string> entry for each SSID inside the SSIDMatch array:
<string>SSID_name</string>
<string>SecondWifi</string>
<string>ThirdWifi</string>
The bypass also requires changes to the Wi-Fi payload that you already deploy for each network in the on-demand rules.
Configuring the bypass in Jamf Pro requires a DNS Settings profile and changes to the Wi-Fi payload for each network. Refer to the Configuring the Wi-Fi Settings in Jamf Pro section to learn about updating the Wi-Fi payload.
In Jamf Pro, navigate to the Configuration profiles page for your device type:
iOS - Devices > Content management > Configuration profiles.
macOS - Computers > Content management > Configuration profiles.
The Configuration profiles page opens.
Click + New.
On the General payload, enter a name for the profile in the Display Name text box (e.g., Blocksi Captive Portal Bypass).
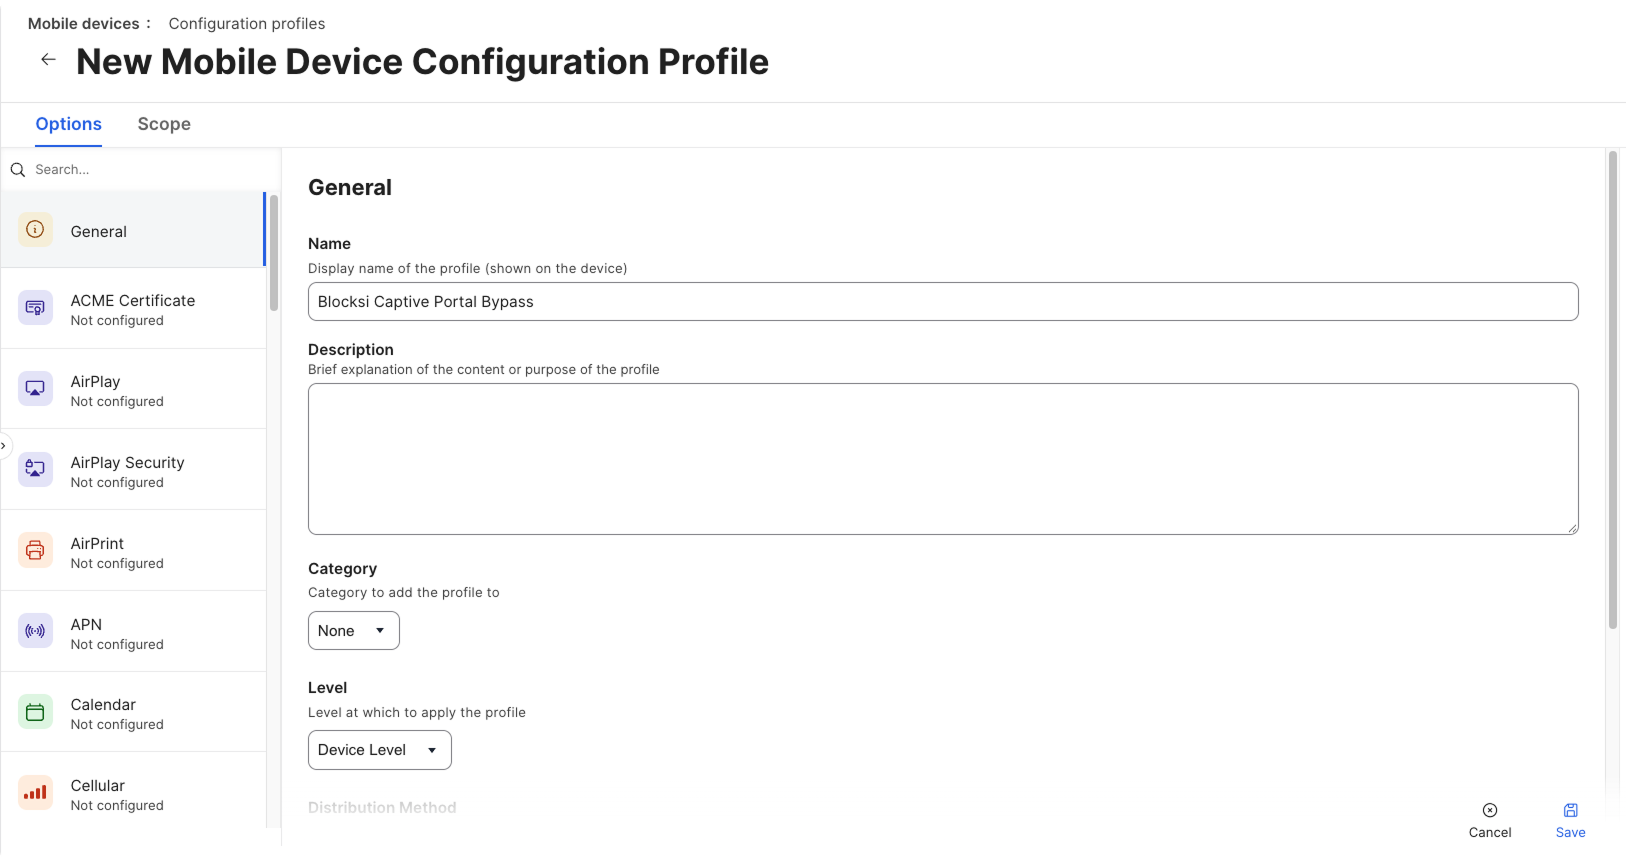
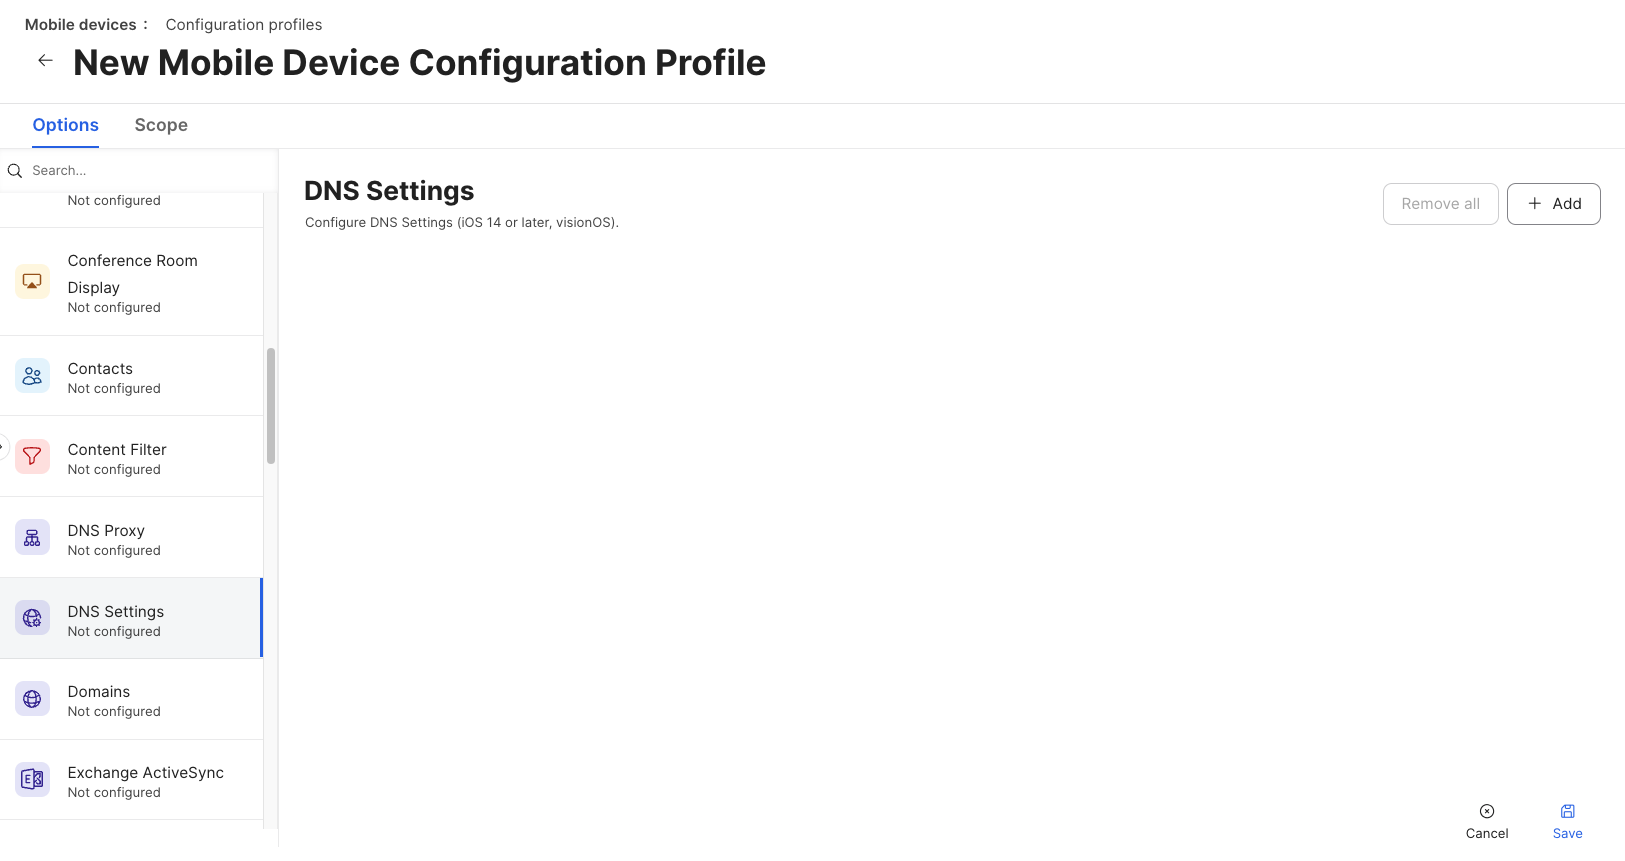
From the left-hand menu, select the DNS Settings payload and click + Add.
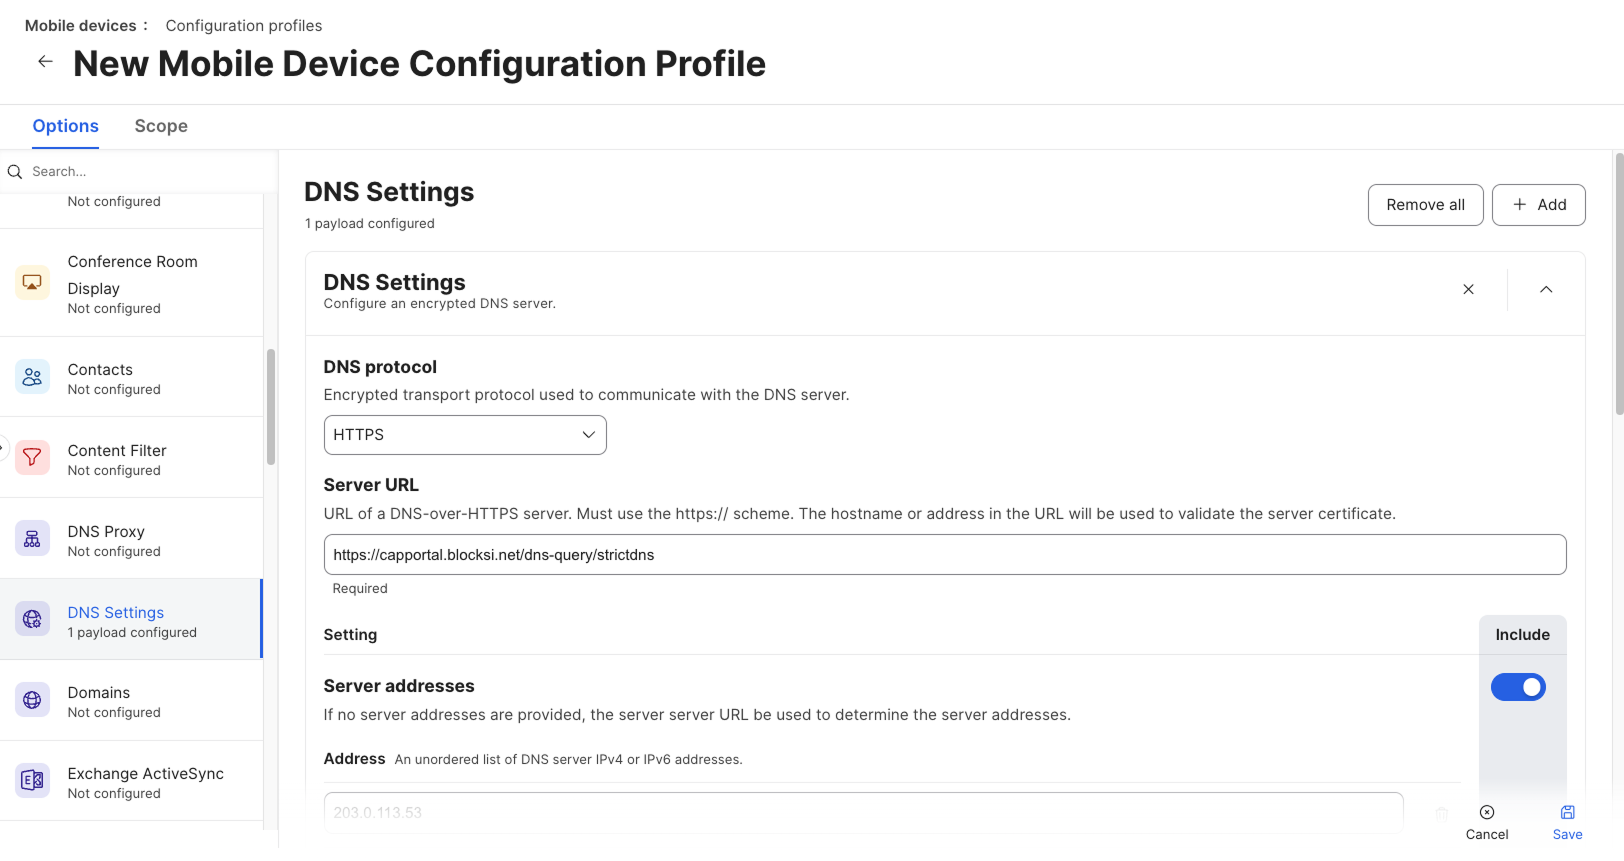
Configure the following:
DNS protocol - Select HTTPS.
Server URL - Enter one of the URLs listed in the Choosing a Server URL section.
Server addresses - Enter the captive portal DNS address of your Blocksi Appliance.
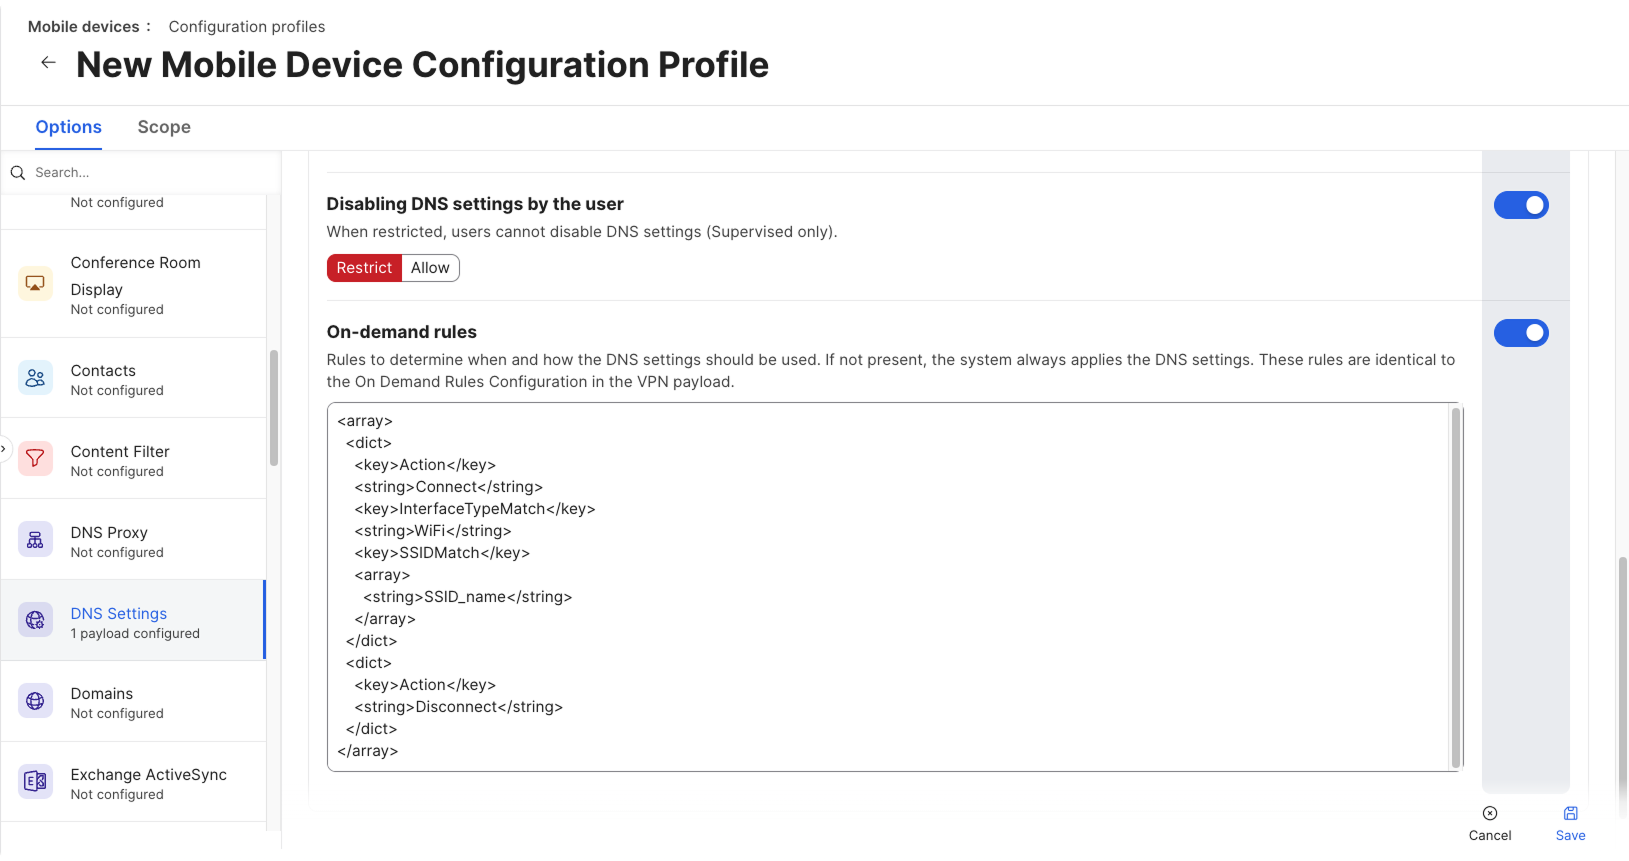
Disabling DNS settings by the user - Select Restrict.
On-demand rules - Enter the following XML, replacing
SSID_namewith the SSID of your Wi-Fi network:<array> <dict> <key>Action</key> <string>Connect</string> <key>InterfaceTypeMatch</key> <string>WiFi</string> <key>SSIDMatch</key> <array> <string>SSID_name</string> </array> </dict> <dict> <key>Action</key> <string>Disconnect</string> </dict> </array>
Click the Scope tab and select your target devices.
Click Save.
In Jamf Pro, navigate to the Configuration profiles page for your device type:
iOS - Devices > Content management > Configuration profiles.
macOS - Computers > Content management > Configuration profiles.
The Configuration profiles page opens.
Click the configuration profile that contains the Wi-Fi payload for your network, then click Edit in the bottom right corner. This is the profile that you already use to deploy the network, which is not necessarily the captive portal bypass profile.
Note
If you do not have a configuration profile with a Network/Wi-Fi payload for your network yet, create one before you continue.
From the left-hand menu, select the payload for your device type:
iOS - Wi-Fi.
macOS - Network.
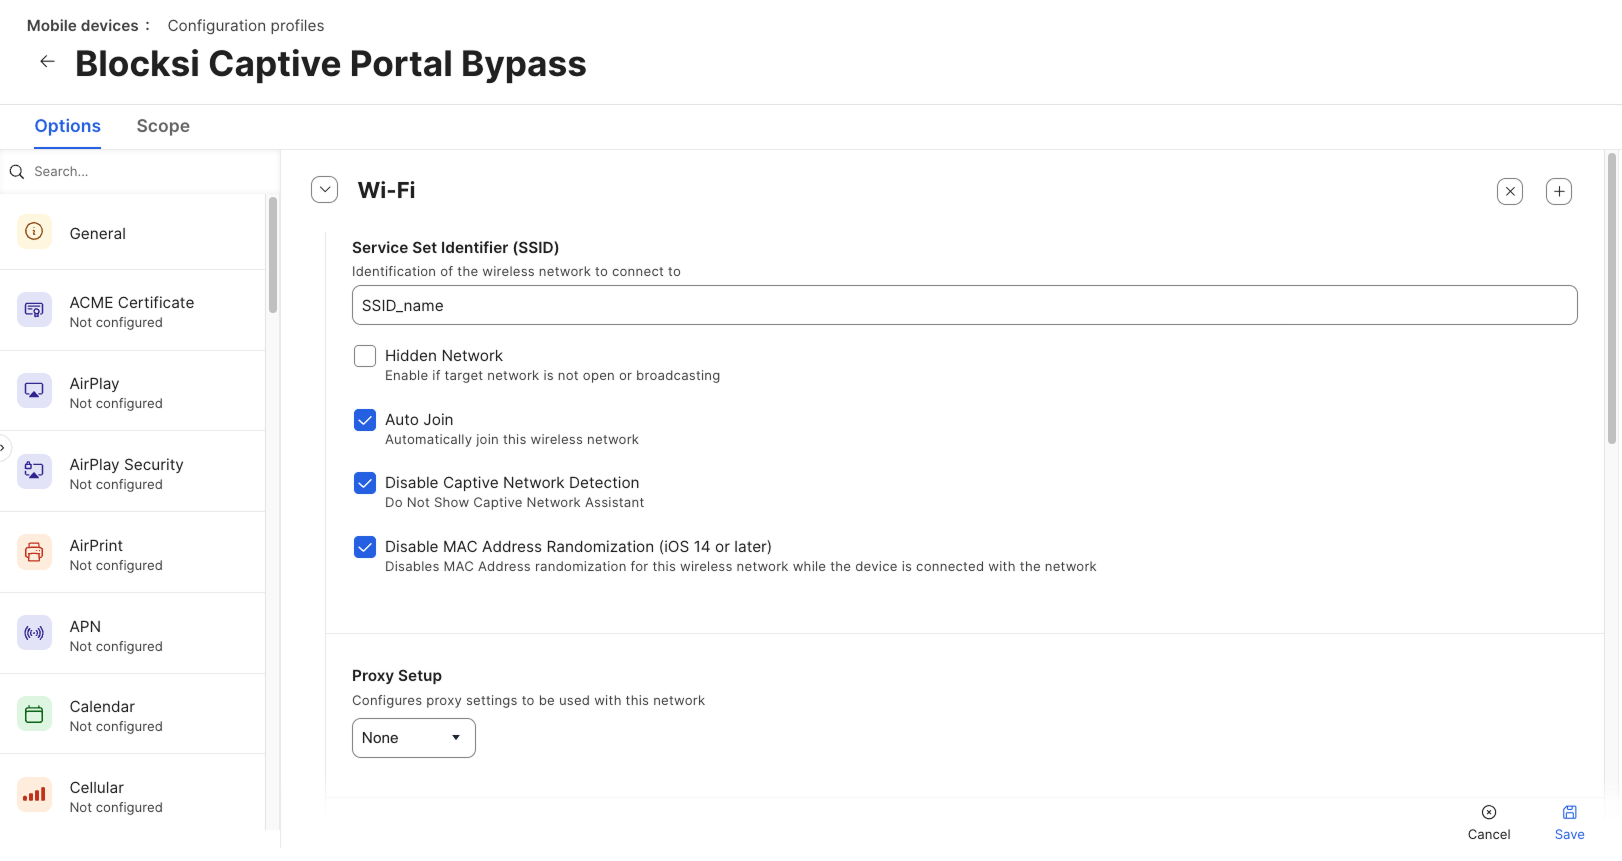
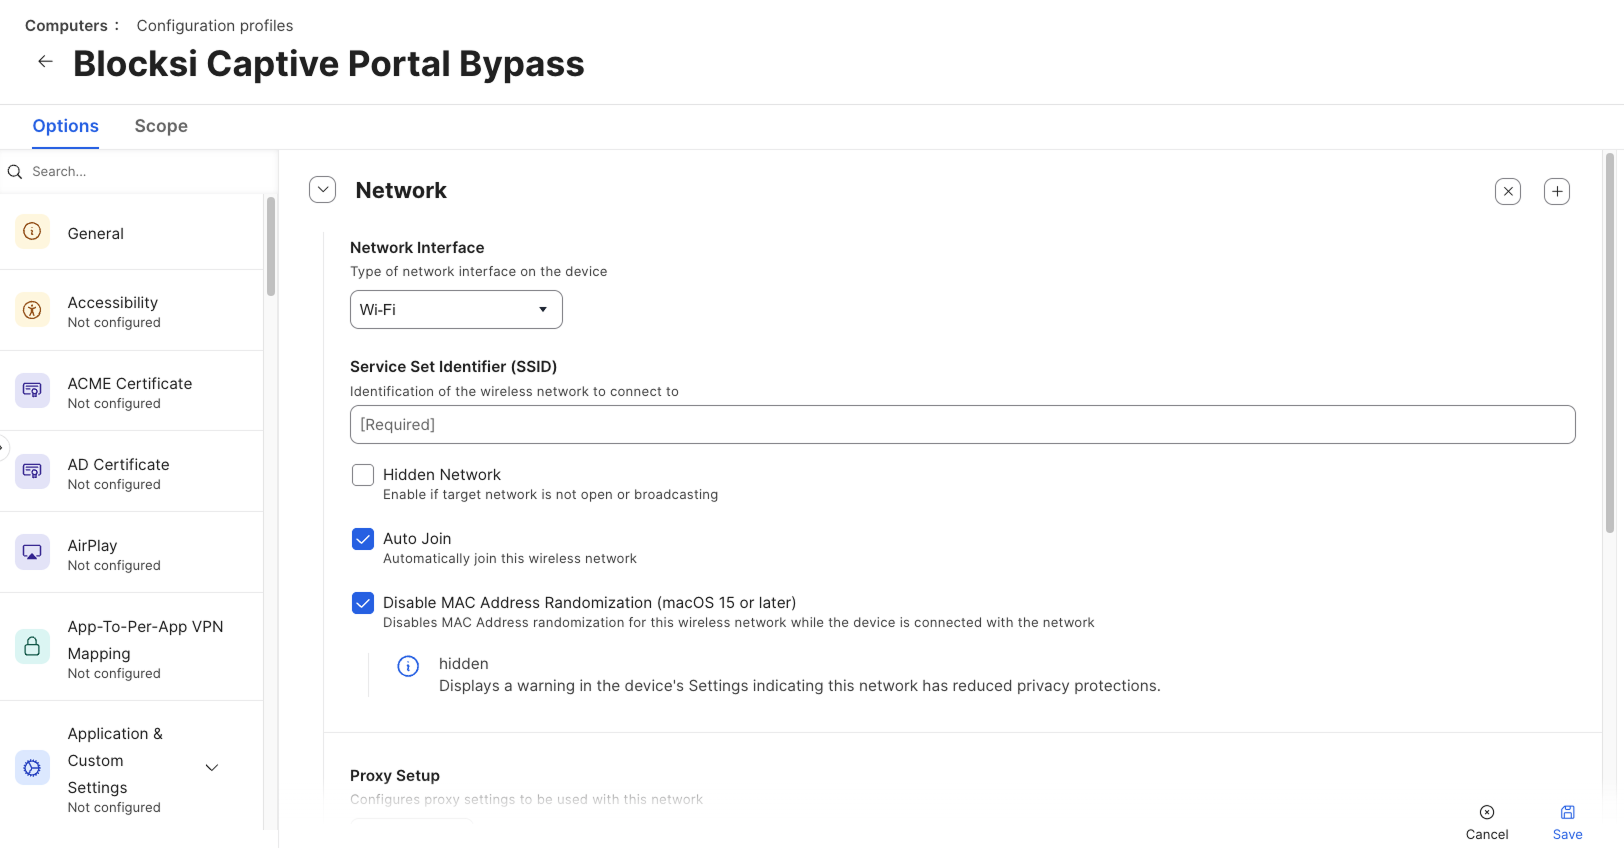
Configure the settings for your device type:
iOS - Configure the following:
Auto Join - Select the checkbox.
Disable Captive Network Detection - Select the checkbox.
Disable MAC Address Randomization (iOS 14 or later) - Select the checkbox.
Fast Lane Quality of Service (QoS) Marking - Select Mark all apps.
macOS -
Auto Join - Select the checkbox.
Disable MAC Address Randomization (macOS 15 or later) - Select the checkbox.
Fast Lane Quality of Service (QoS) Marking - Select Mark all apps.
Important
If the network uses a password, select the security type that the network uses under Security Type (e.g., WPA / WPA2 Personal) and enter the password, so that devices can join the network automatically. If the network has no password, select None as the security type.
Click Save.
Repeat steps 2 to 5 for each Wi-Fi network listed in the on-demand rules.
Configuring the bypass in Jamf School requires a DNS Settings profile and changes to the Wi-Fi payload for each network. Refer to the Configuring the Wi-Fi Settings in Jamf School section to learn about updating the Wi-Fi payload.
Important
Leave the Prohibit users from disabling DNS settings checkbox cleared. Jamf School sets this restriction through the ProhibitDisablement key in the on-demand rules XML instead.
In Jamf School, navigate to Profiles > Overview.
Click + Create Profile. In the Create Profile window, complete the following pages:
Platform - Select iOS or macOS and click Next. Select Device Enrollment as the Enrollment type and click Next.
Details - Enter a name for the profile in the Profile name text box (e.g., Blocksi Captive Portal Bypass) and click Next.
Time filter - Click Finish.
The profile opens with the General payload selected.
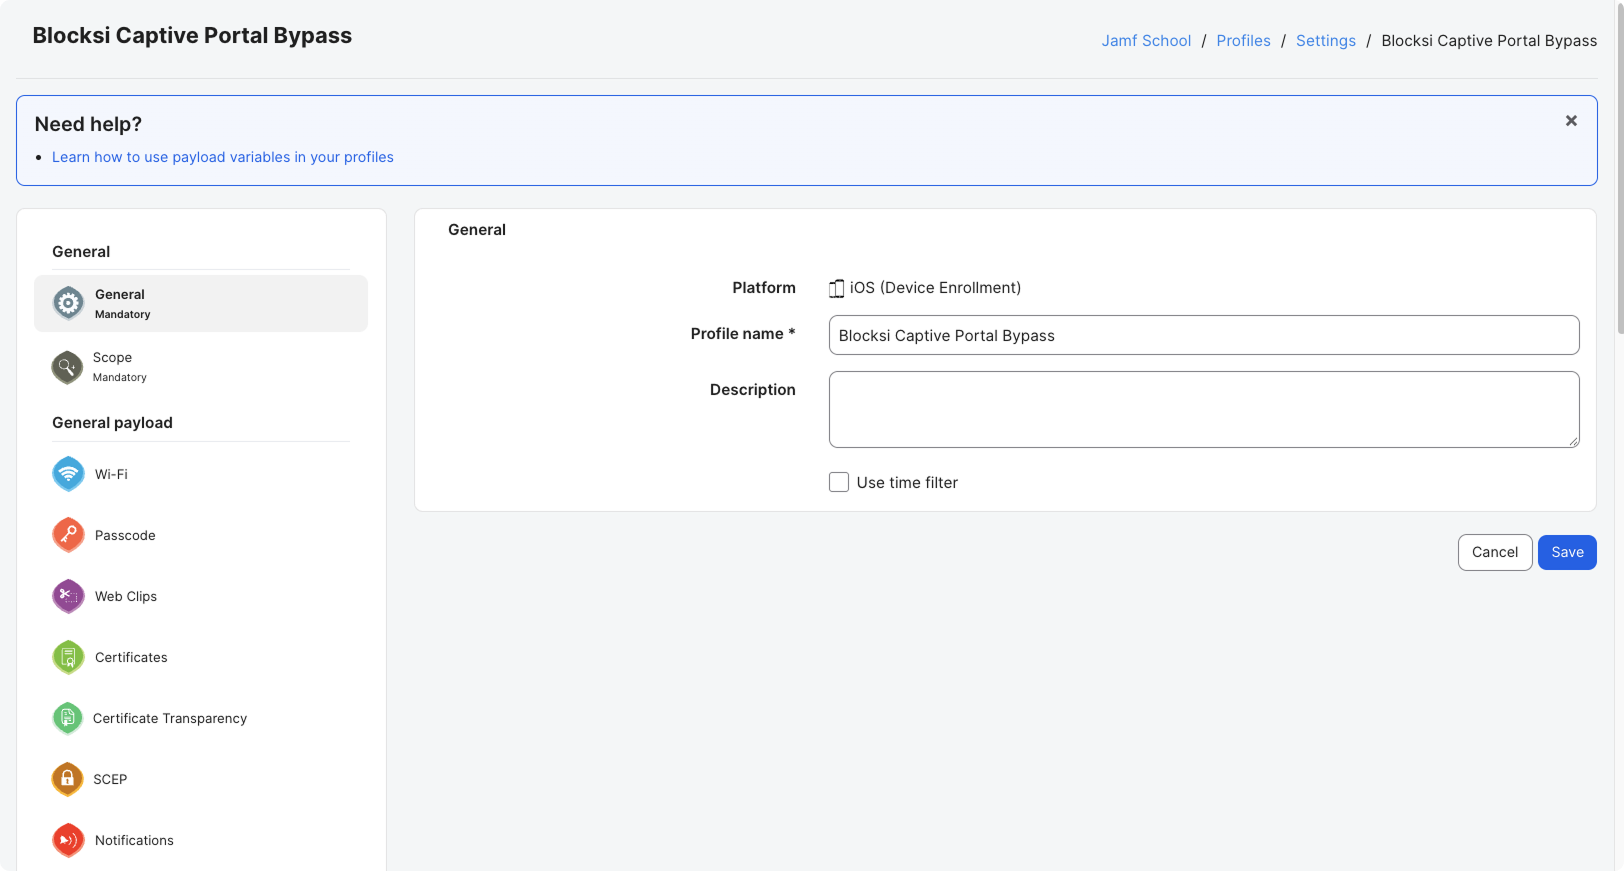
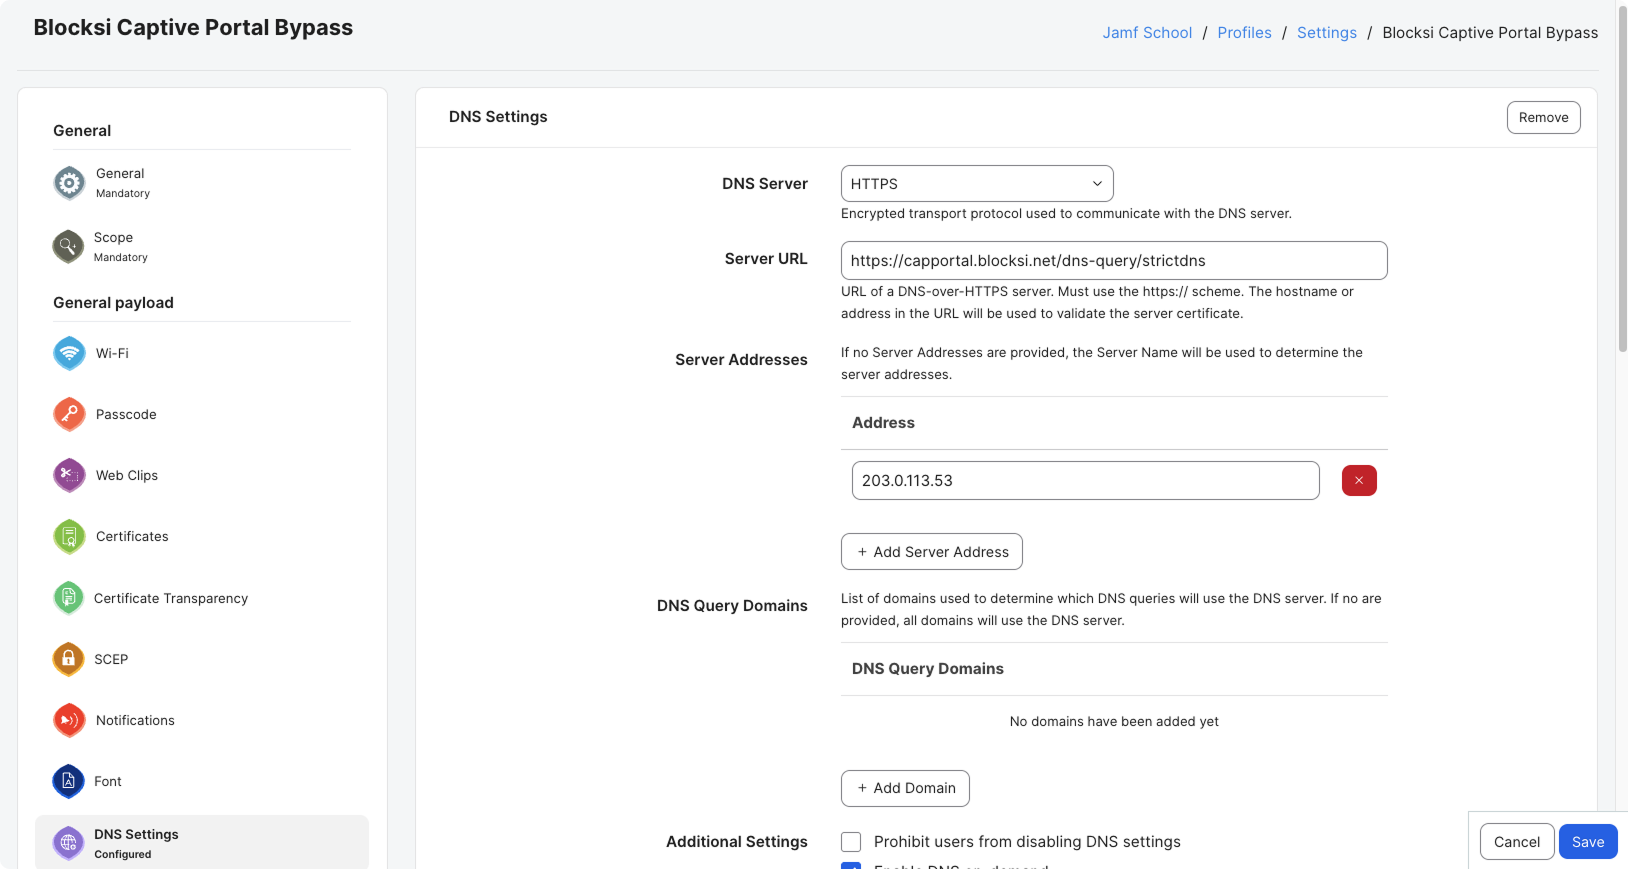
From the left-hand menu, select the DNS Settings payload under General payload and click Configure.
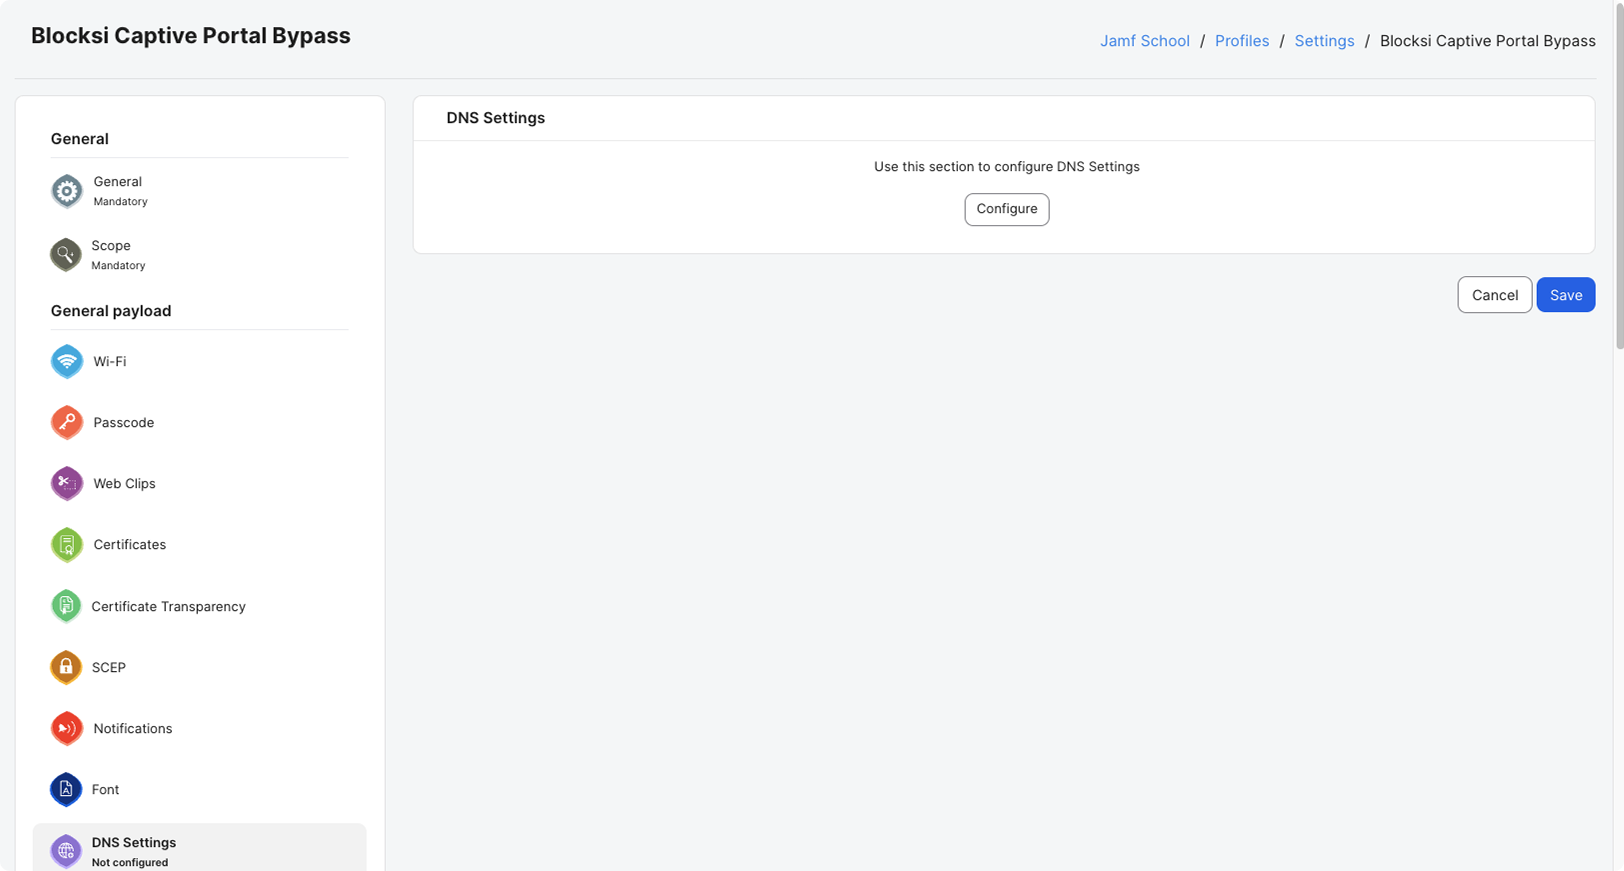
Configure the following:
DNS Server - Select HTTPS.
Server URL - Enter one of the URLs listed in the Choosing a Server URL section.
Server Addresses - Click + Add Server Address and enter the captive portal DNS address of your Blocksi Appliance.
DNS Query Domains - Leave empty.
Prohibit users from disabling DNS settings - Make sure the checkbox is cleared.
Enable DNS on-demand - Select the checkbox.
On-Demand Rules Configuration XML - Enter the following XML, replacing
SSID_namewith the SSID of your Wi-Fi network:<key>OnDemandRules</key> <array> <dict> <key>Action</key> <string>Connect</string> <key>InterfaceTypeMatch</key> <string>WiFi</string> <key>SSIDMatch</key> <array> <string>SSID_name</string> </array> </dict> <dict> <key>Action</key> <string>Disconnect</string> </dict> </array> <key>ProhibitDisablement</key> <true/>
From the left-hand menu, click Scope under General and assign the profile to your target device group.
Click Save.
In Jamf School, navigate to Profiles > Overview.
Click the profile that contains the Wi-Fi payload for your network. This is the profile that you already use to deploy the network, which is not necessarily the captive portal bypass profile.
Note
If you do not have a profile with a Networks/Wi-Fi payload for your network yet, create one before you continue.
From the left-hand menu, select the payload for your device type under General payload:
iOS - Wi-Fi.
macOS - Networks.
If the payload is not configured, click Configure.
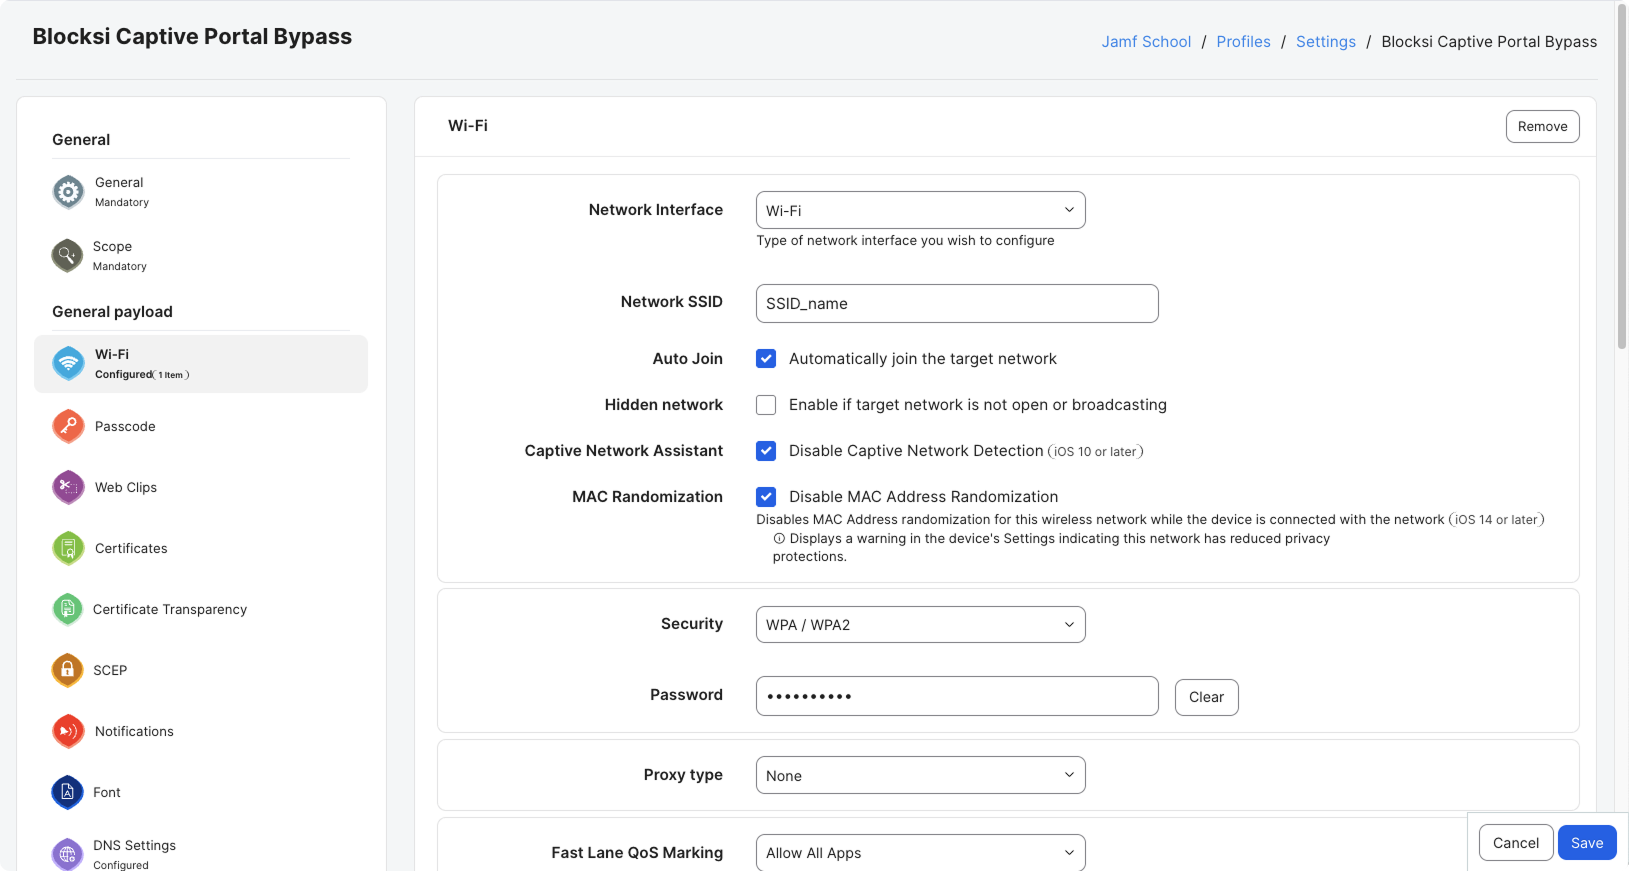
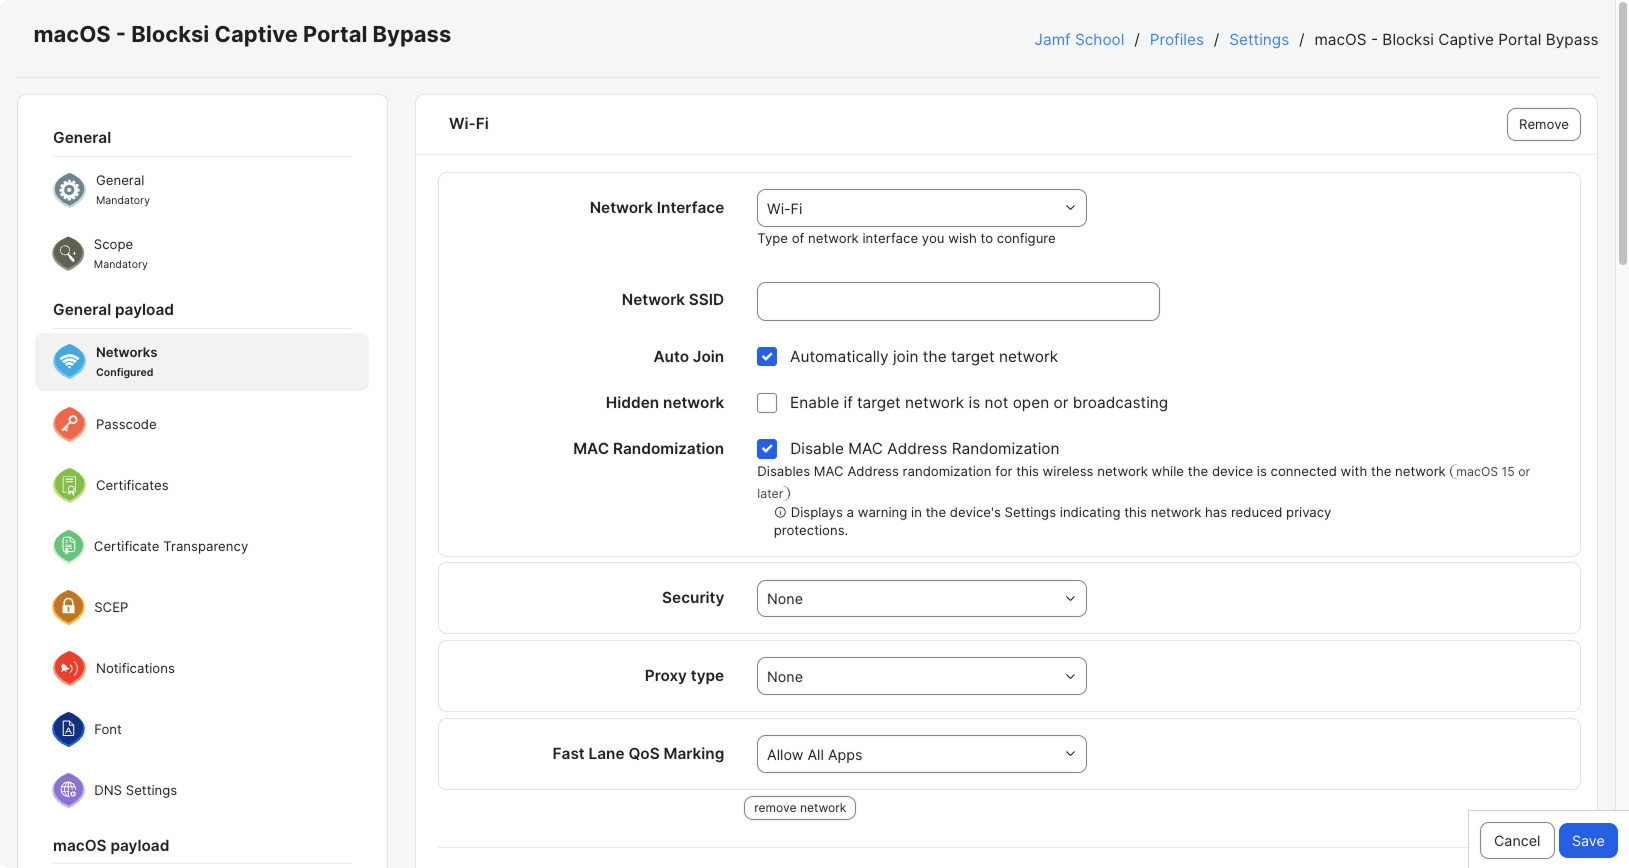
Configure the settings for your device type:
iOS - Configure the following:
Auto Join - Select the Automatically join the target network checkbox.
Captive Network Assistant - Select the Disable Captive Network Detection checkbox.
MAC Randomization - Select the Disable MAC Address Randomization checkbox.
Fast Lane QoS Marking - Select Allow All Apps.
macOS - Configure the following:
Auto Join - Select the Automatically join the target network checkbox.
MAC Randomization - Select the Disable MAC Address Randomization checkbox.
Fast Lane QoS Marking - Select Allow All Apps.
Important
If the network uses a password, select the security type that the network uses under Security (e.g., WPA / WPA2) and enter the password, so that devices can join the network automatically. If the network has no password, select None as the security type.
Click Save.
Repeat steps 2 to 5 for each Wi-Fi network listed in the on-demand rules.
Configuring the bypass in Mosyle requires a DNS Settings profile and changes to the Wi-Fi profile for each network. Refer to the Configuring the Wi-Fi Settings in Mosyle section to learn about updating the Wi-Fi profile.
Important
Test the profile on one device before you deploy it to the rest of your devices. A wrong DNS configuration can break all connectivity to a device. Once that happens, it cannot be fixed through the MDM.
In Mosyle, navigate to the management page for your device type:
iOS - Management > Manage iOS / iPadOS / watchOS.
macOS - Management > Manage macOS.
Then select DNS Settings from the Management Profiles menu on the left.
Note
If DNS Settings is not listed under Management Profiles, click Activate New Profile Type and activate it.
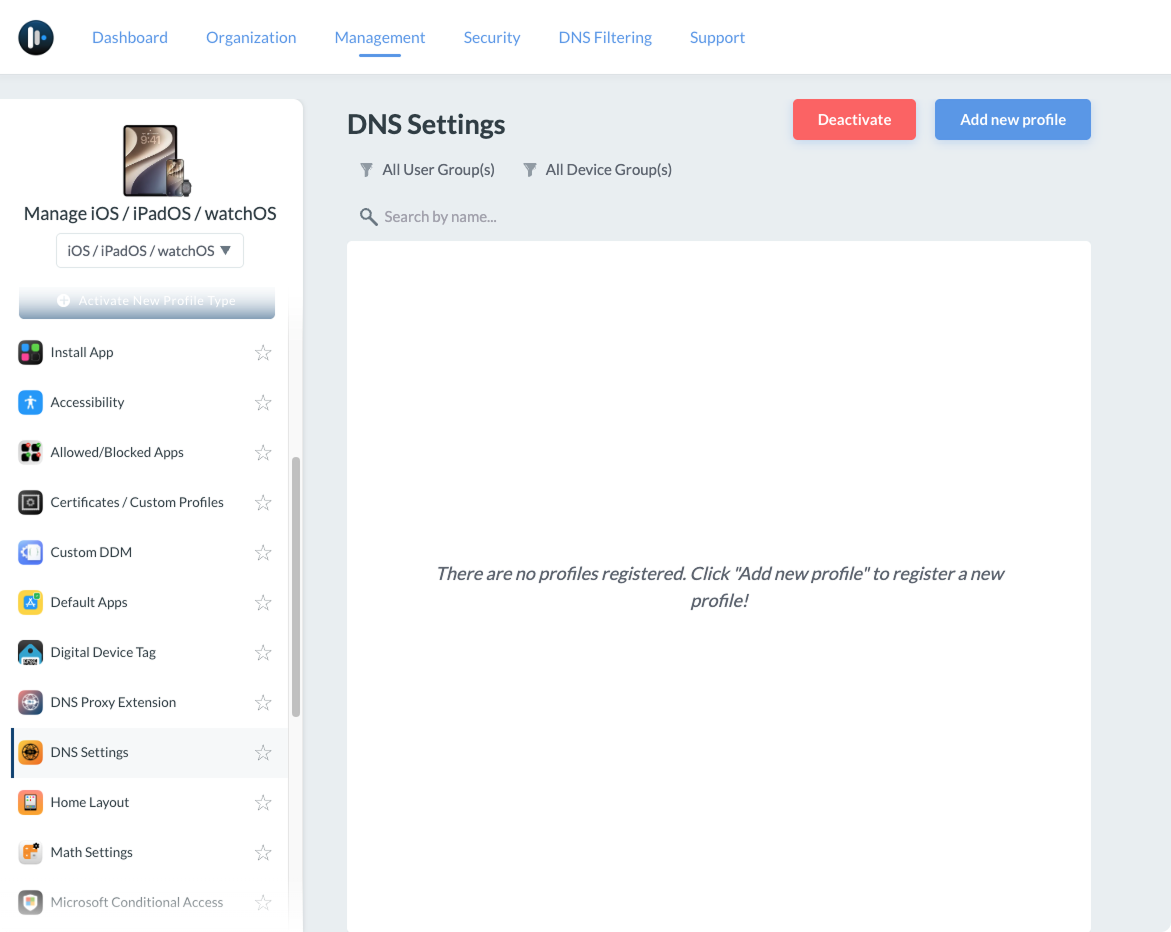
Click Add new profile. The DNS Settings window opens.
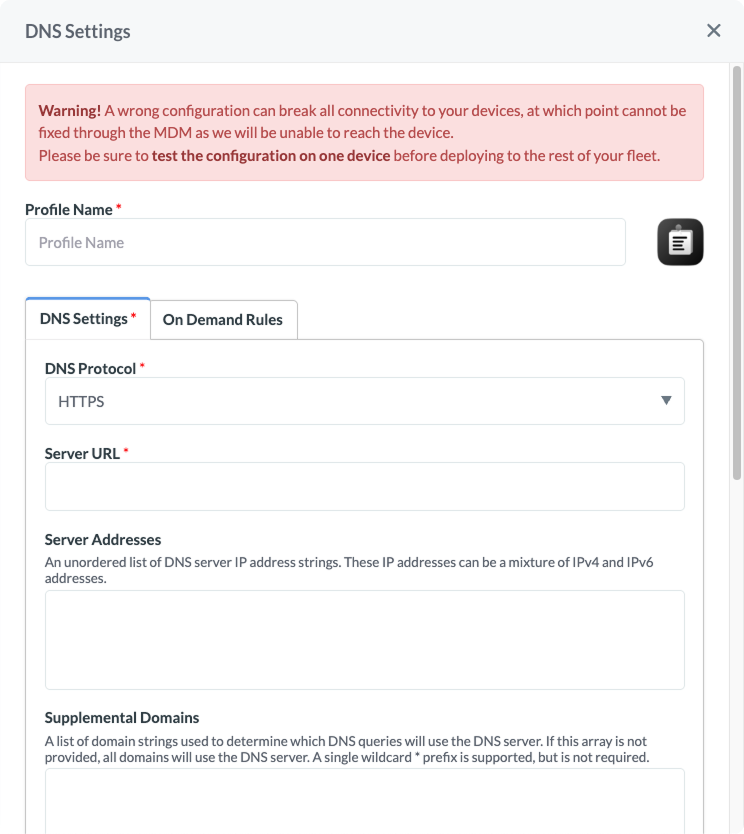
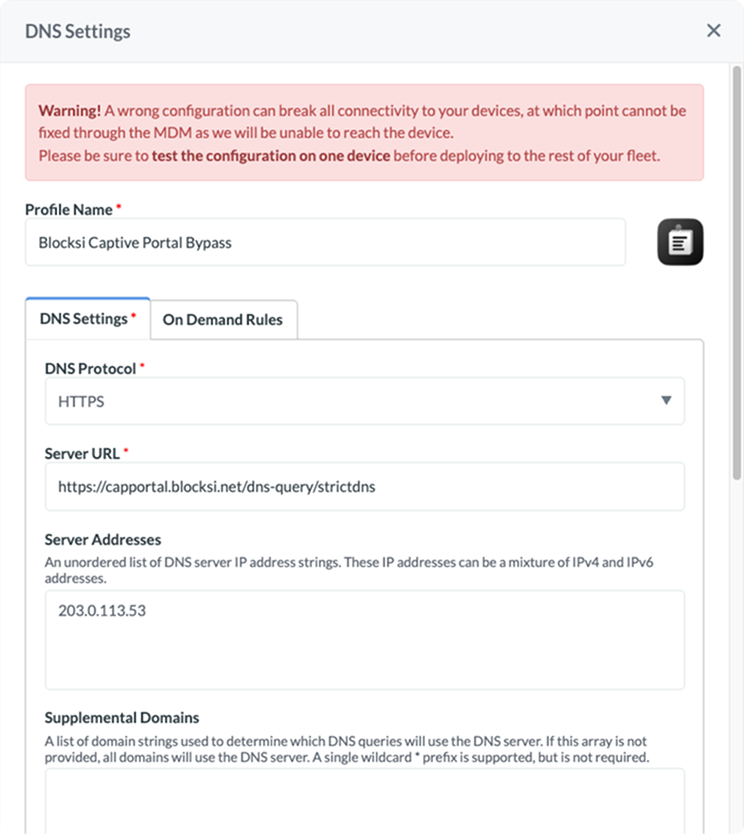
Enter a name for the profile in the Profile Name text box (e.g., Blocksi Captive Portal Bypass).
On the DNS Settings tab, configure the following:
DNS Protocol - Select HTTPS.
Server URL - Enter one of the URLs listed in the Choosing a Server URL section.
Server Addresses - Enter the captive portal DNS address of your Blocksi Appliance.
Supplemental Domains - Leave empty.
Allow failover to the default system DNS resolver (iOS/iPadOS 26+) - Make sure the checkbox is cleared.
Prohibit Disablement (Supervised Only) - Select the checkbox.
This DNS Resolver requires a certificate for Authentication (iOS/iPadOS 17+) - Make sure the checkbox is cleared.
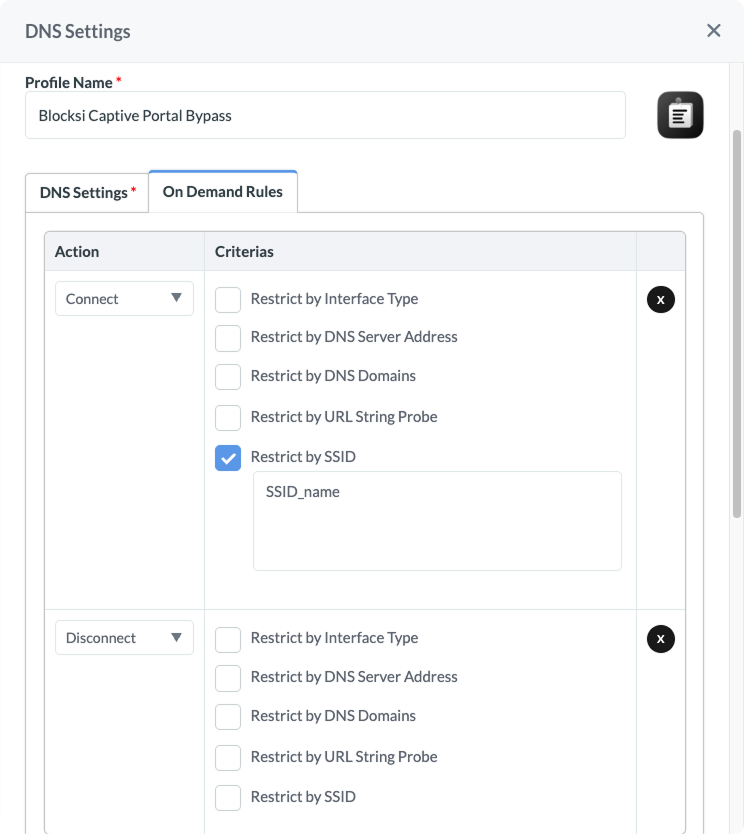
Click the On Demand Rules tab and configure the following rules, clicking New Rule to add each one:
Connect - Select Restrict by SSID and enter the SSID of each Wi-Fi network.
Disconnect - Leave all criteria cleared.
Click Save.
In Mosyle, navigate to the management page for your device type:
iOS - Management > Manage iOS / iPadOS / watchOS.
macOS - Management > Manage macOS.
Then select Wifi Authentication from the Management Profiles menu on the left.
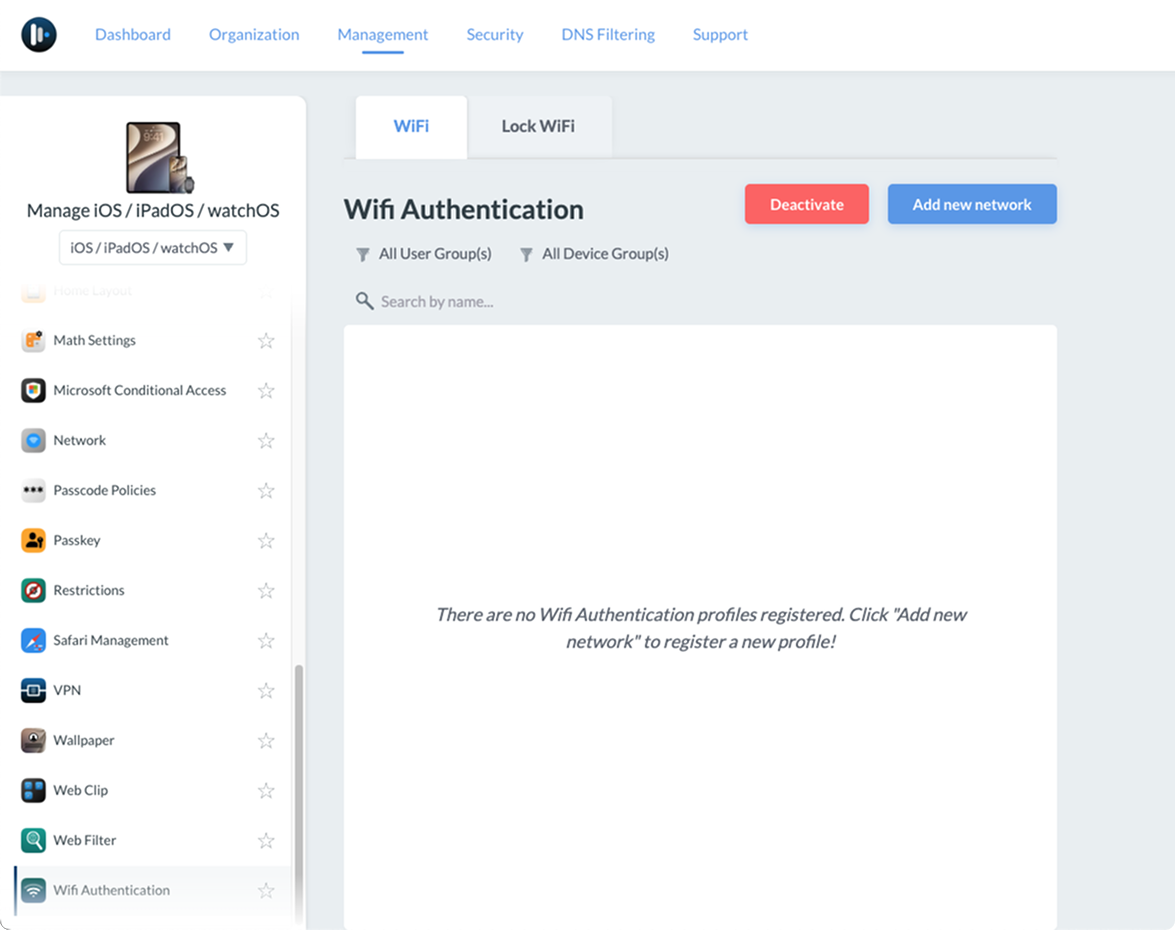
On the WiFi tab, click the profile for your network. The Network information panel opens.
Note
If you do not have a profile for your network yet, click Add new network to create one.
Configure the following:
Auto Join - Select the checkbox.
Disable Captive Network Detection (iOS only) - Select the checkbox.
Disable MAC Address Randomization - Select the checkbox.
Restrict Fast Lane QoS Marking - Select Allow All Apps.
Important
If the network uses a password, select the security type that the network uses under Security Type (e.g., WPA/WPA2 Personal) and enter the password, so that devices can join the network automatically. If the network has no password, select Open network as the security type.
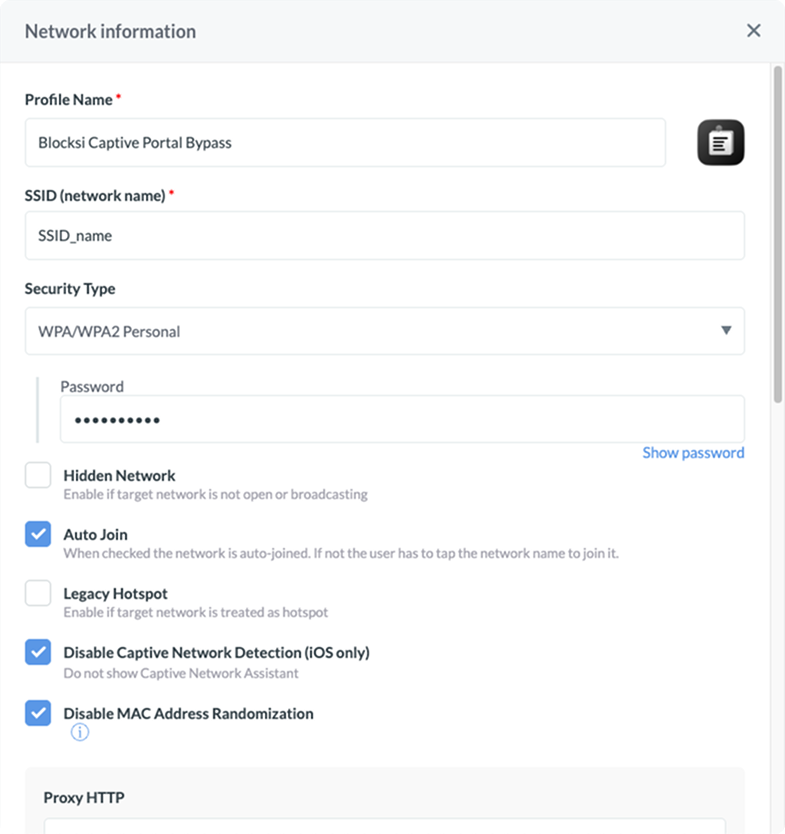
Click Save.
Repeat steps 2 to 4 for each Wi-Fi network listed in the on-demand rules.
Configuring the bypass in Intune requires a DNS Settings profile and changes to the Wi-Fi profile for each network. Refer to the Configuring the Wi-Fi Settings in Intune section to learn about updating the Wi-Fi profile.
In Intune, navigate to Devices > Manage devices > Configuration and select + Create > New Policy. A new panel appears on the right side of the page.
Enter the following properties:
Platform - Select iOS/iPadOS or macOS, depending on your device type.
Profile Type - Select Settings catalog.
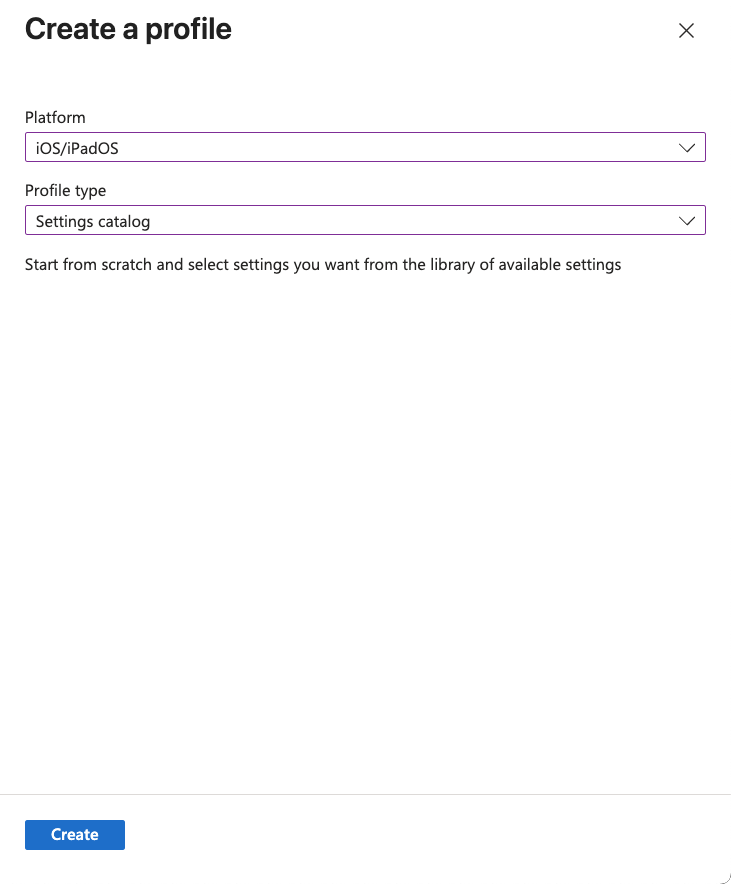
Click Create.
On the Basics tab, enter the following properties:
Name - Enter a name for the profile (e.g., Blocksi Captive Portal Bypass).
Description - Enter a description for the policy. This setting is optional but recommended.
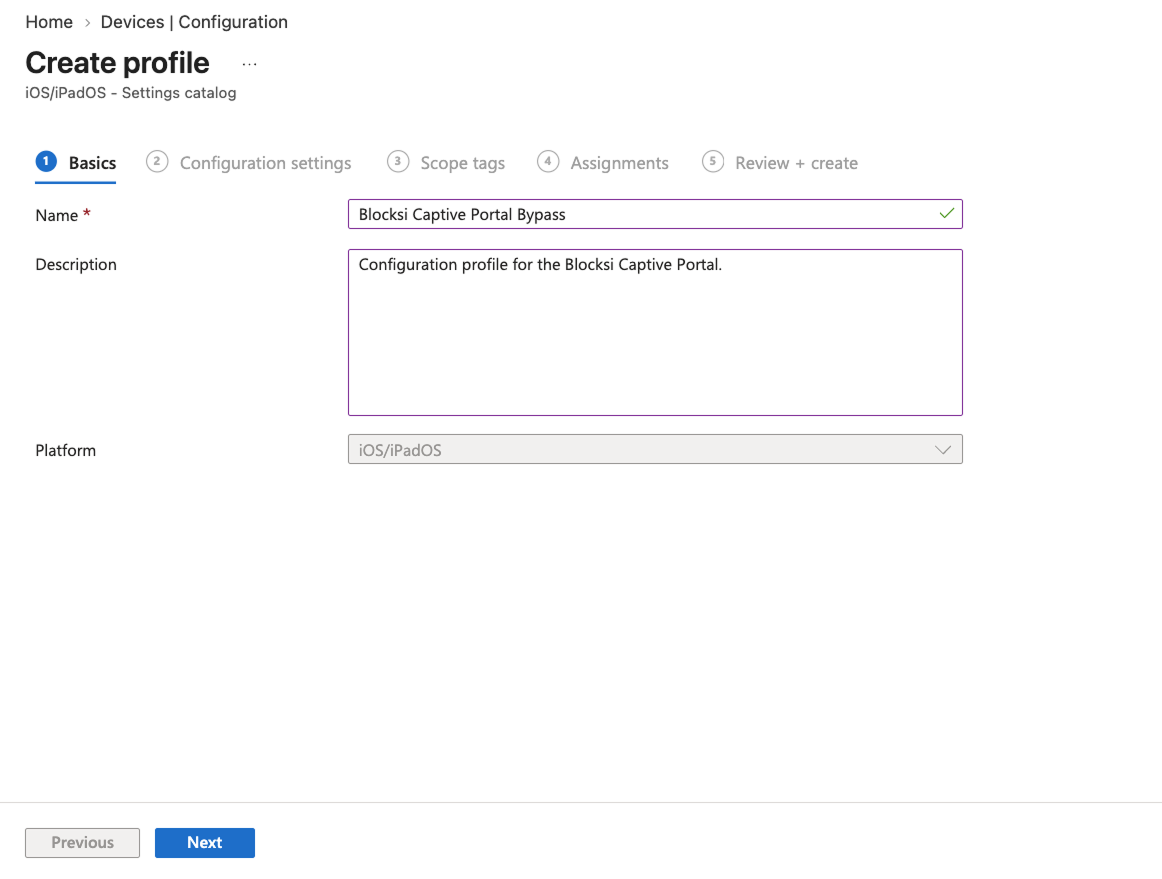
Click Next.
On the Configuration settings tab, click + Add settings. The Settings picker panel opens.
Select Networking > DNS Settings under Browse by category.
Select only the following settings, then close the Settings picker panel:
DNS Settings - Expand the section and select Server Addresses. DNS Protocol is selected automatically.
On Demand Rules - Expand the section, expand On Demand Rules inside it, and select Action, Action Parameters and SSID Match.
Prohibit Disablement - Select the checkbox.
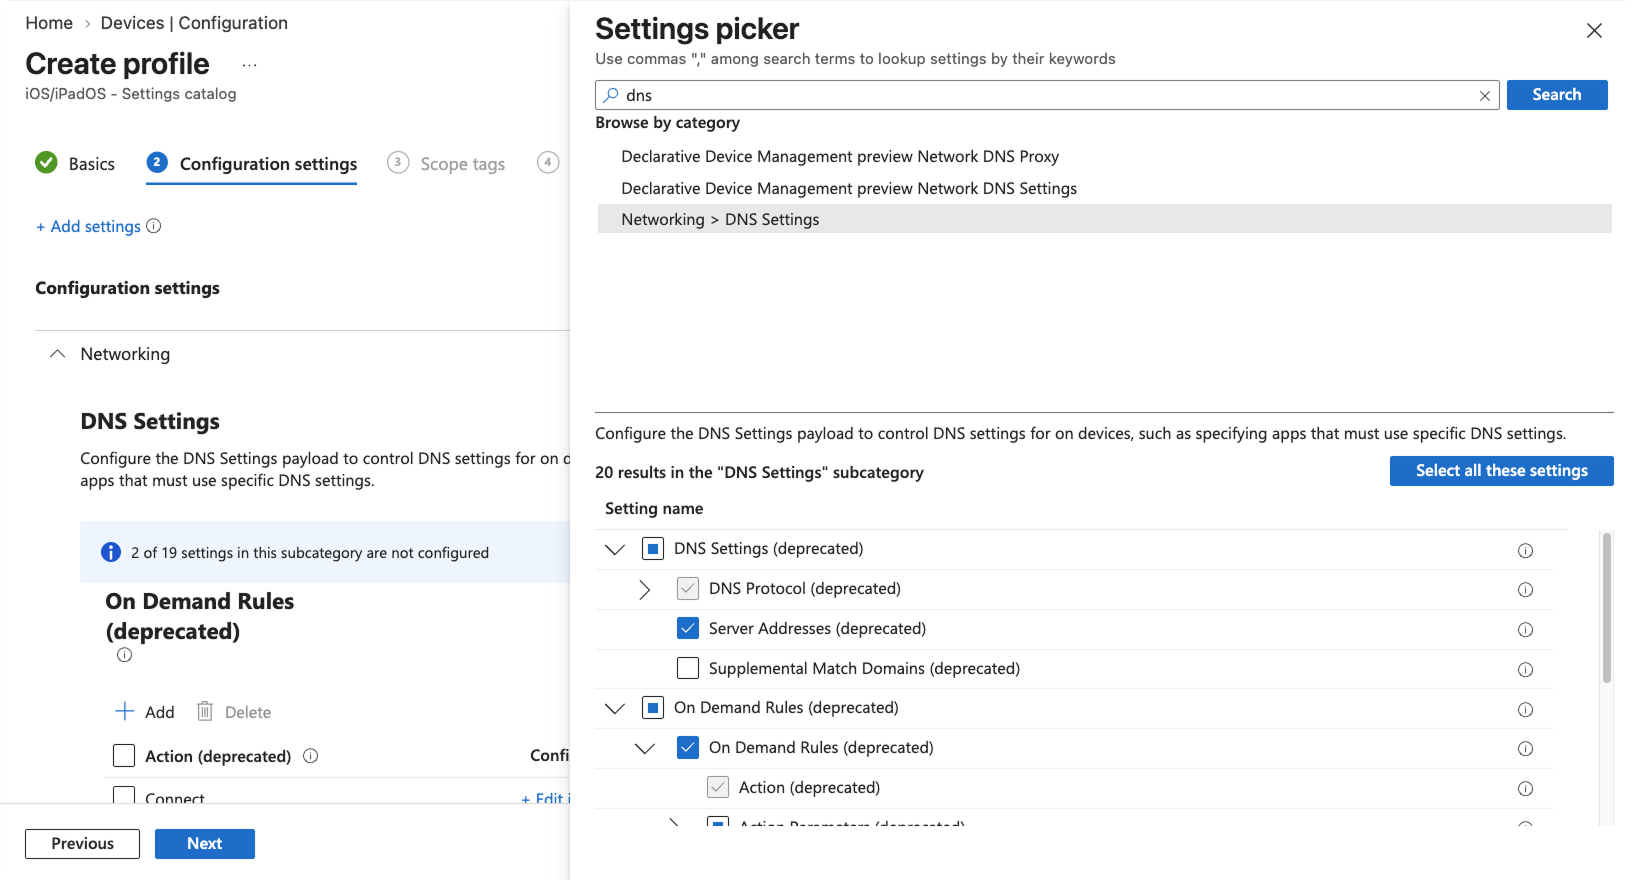
Configure the following:
Prohibit Disablement - Set the toggle to Enabled.
DNS Protocol - Select HTTPS.
Server URL - Enter one of the URLs listed in the Choosing a Server URL section.
Server Addresses - Enter the captive portal DNS address of your Blocksi Appliance.
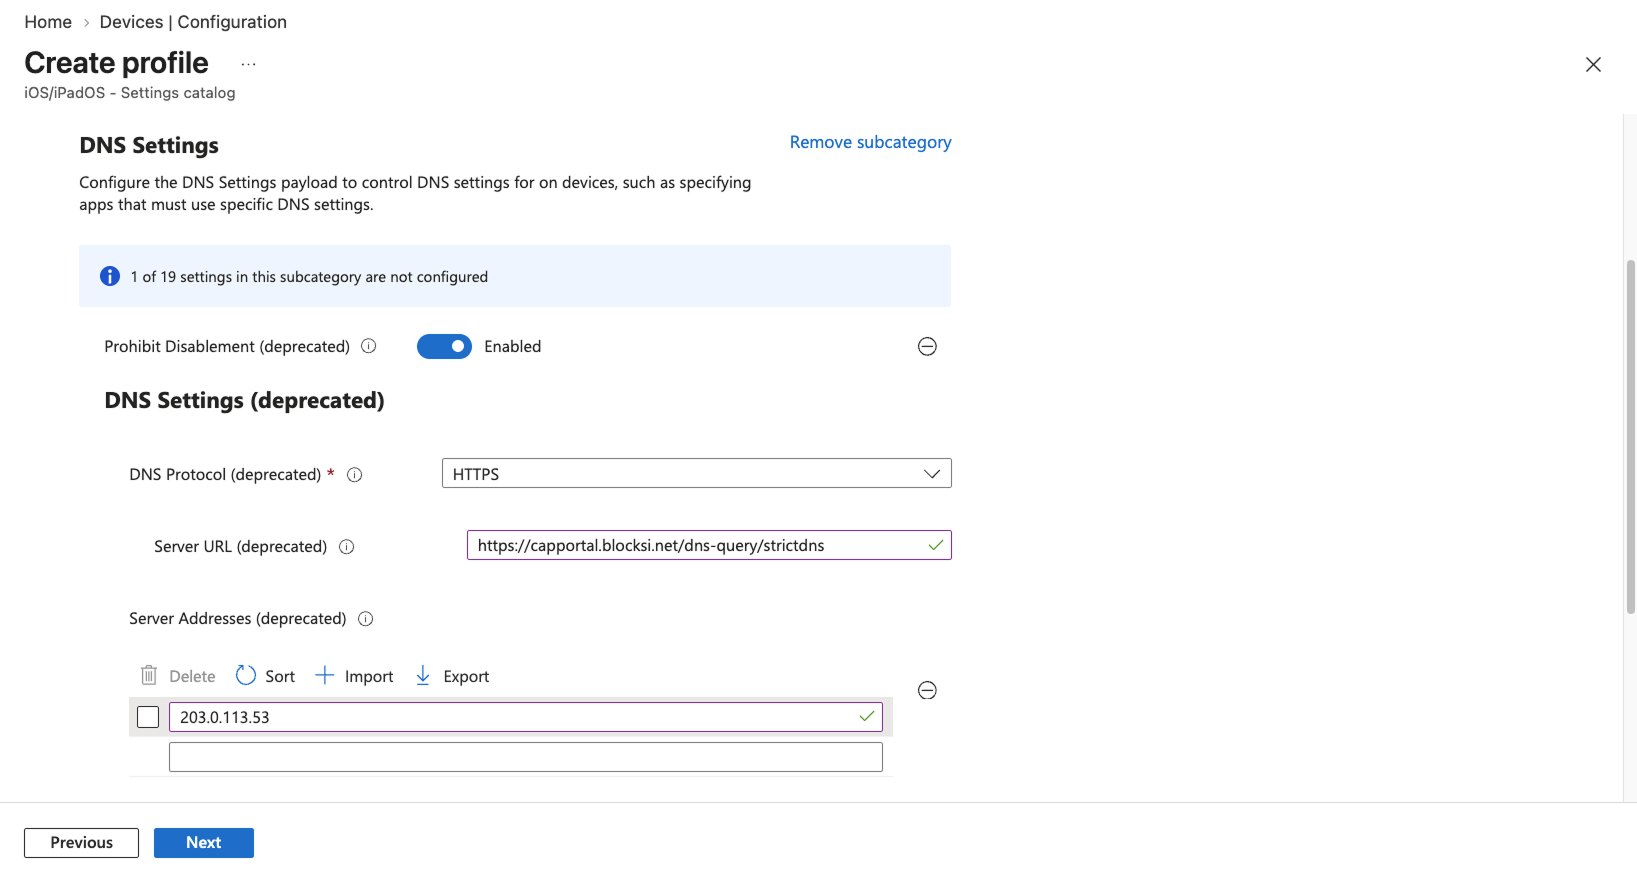
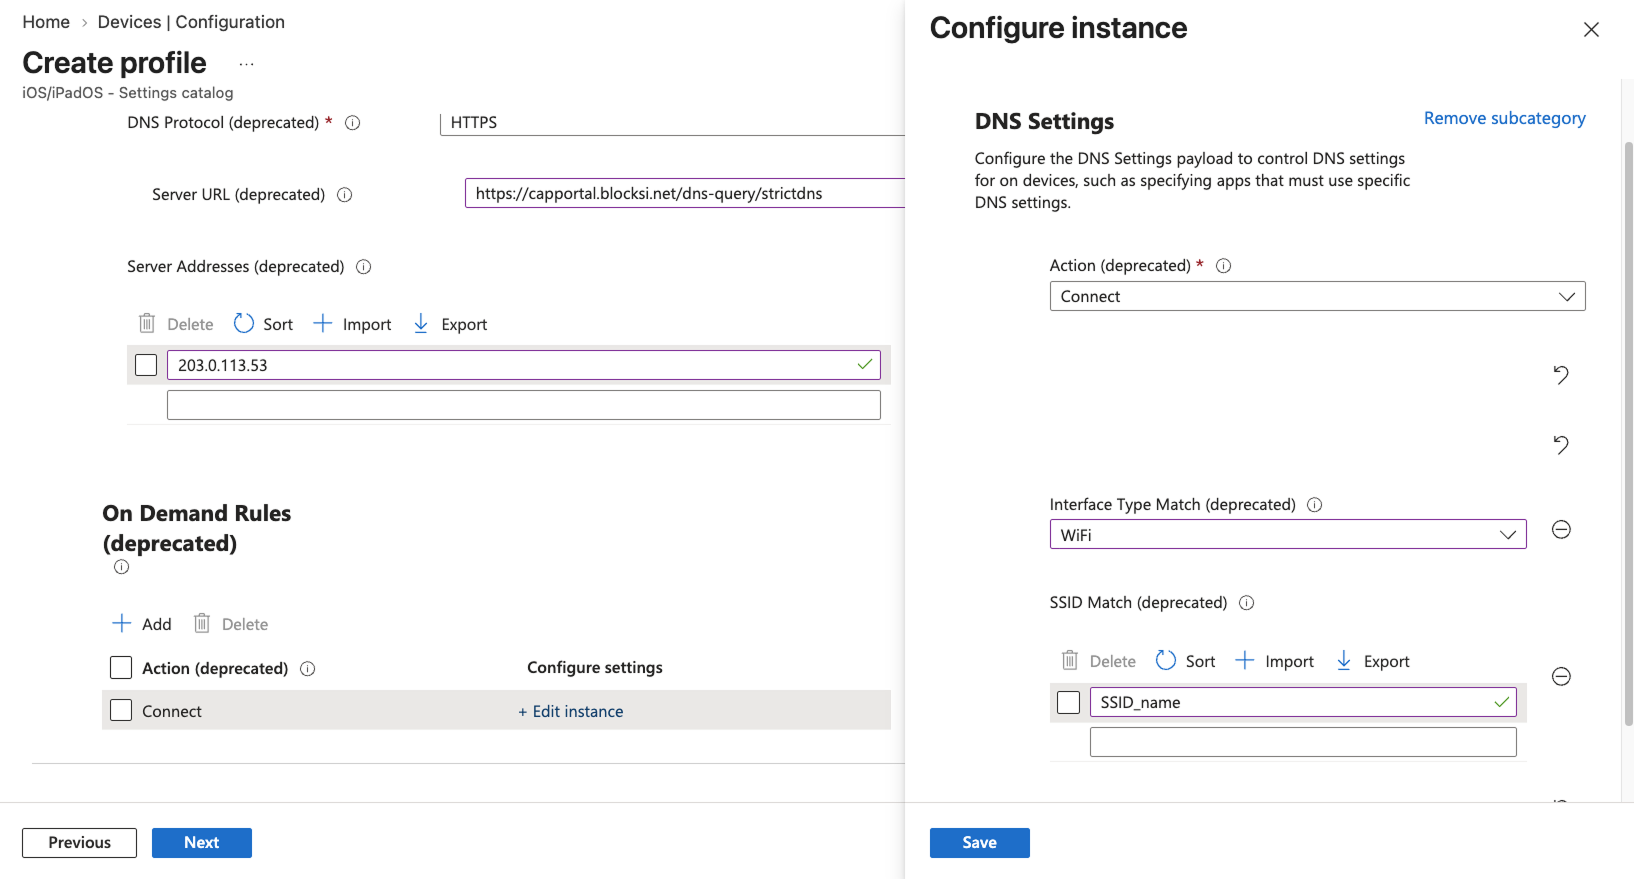
Under On Demand Rules, click + Edit instance next to the first rule. The Configure instance panel opens.
Configure only the following settings and remove every other setting from the rule, then click Save:
Action - Select Connect.
Interface Type Match - Select WiFi.
SSID Match - Enter the SSID of each Wi-Fi network.
Note
You can add multiple SSIDs in the SSID Match setting.
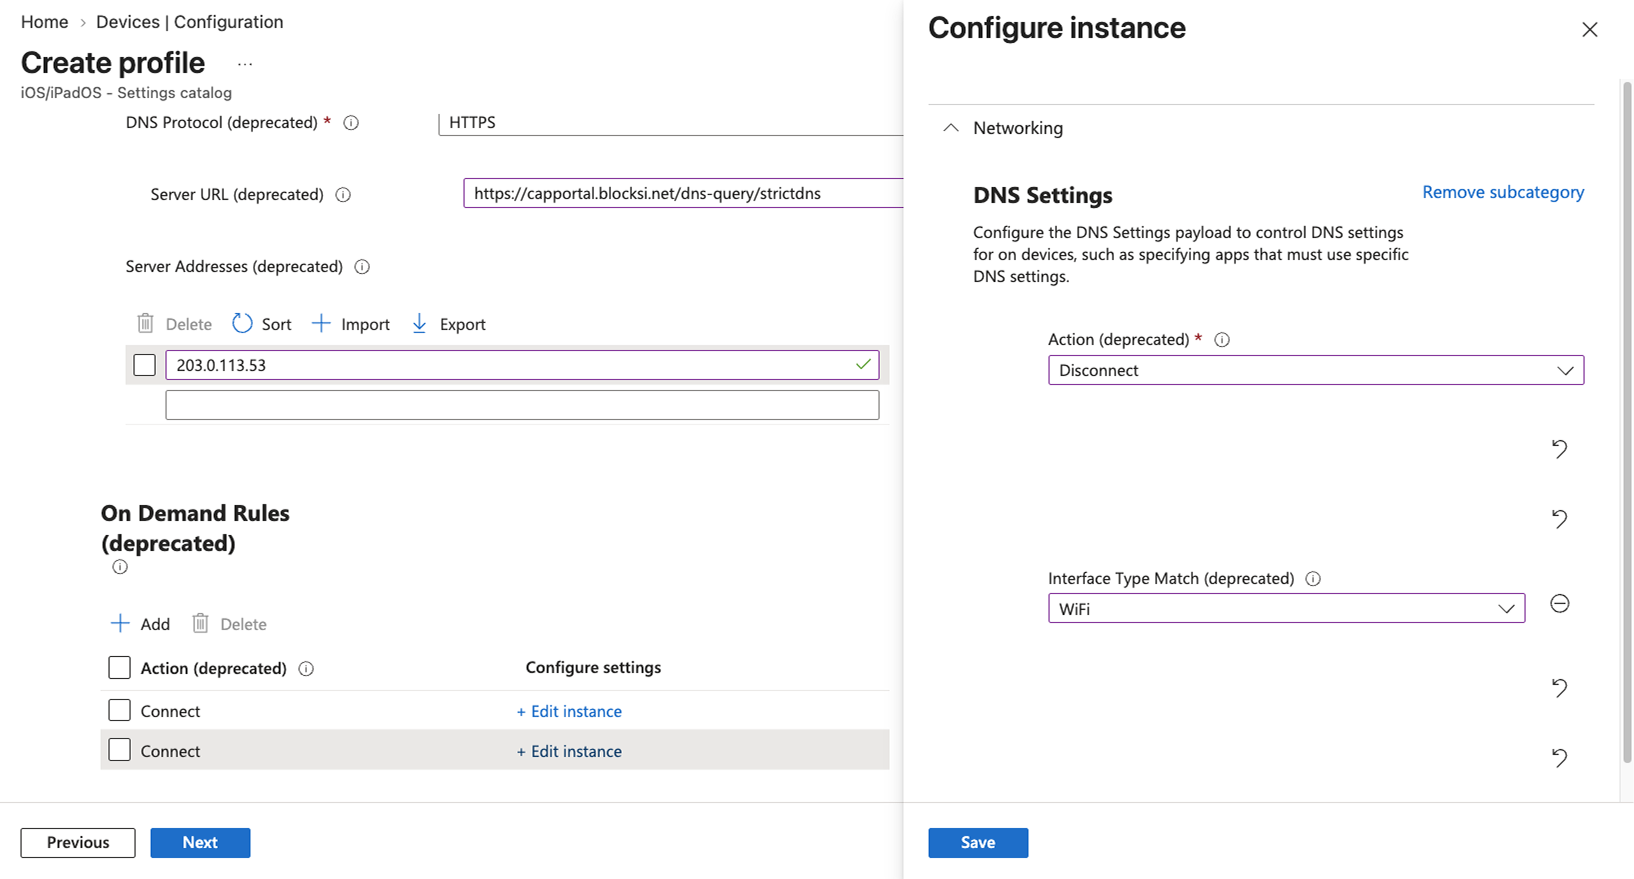
Under On Demand Rules, click + Add, then click + Edit instance next to the new rule. The Configure instance panel opens.
Configure only the following settings and remove every other setting from the rule, then click Save:
Action - Select Disconnect.
Interface Type Match - Select WiFi.
Click Next.
On the Assignments tab, assign the profile to your device groups and click Next.
On the Review + create tab, review your settings and click Create. Your changes are saved, the profile is assigned, and the policy appears in the profiles list.
In Intune, navigate to Devices > Manage devices > Configuration.
Click the Wi-Fi profile for your network.
Note
If you do not have a Wi-Fi profile for each Wi-Fi network listed in the on-demand rules yet, create one before you continue.
Select Properties, then click Edit next to Configuration settings.
Configure the following:
Disable MAC address randomization - Select Yes.
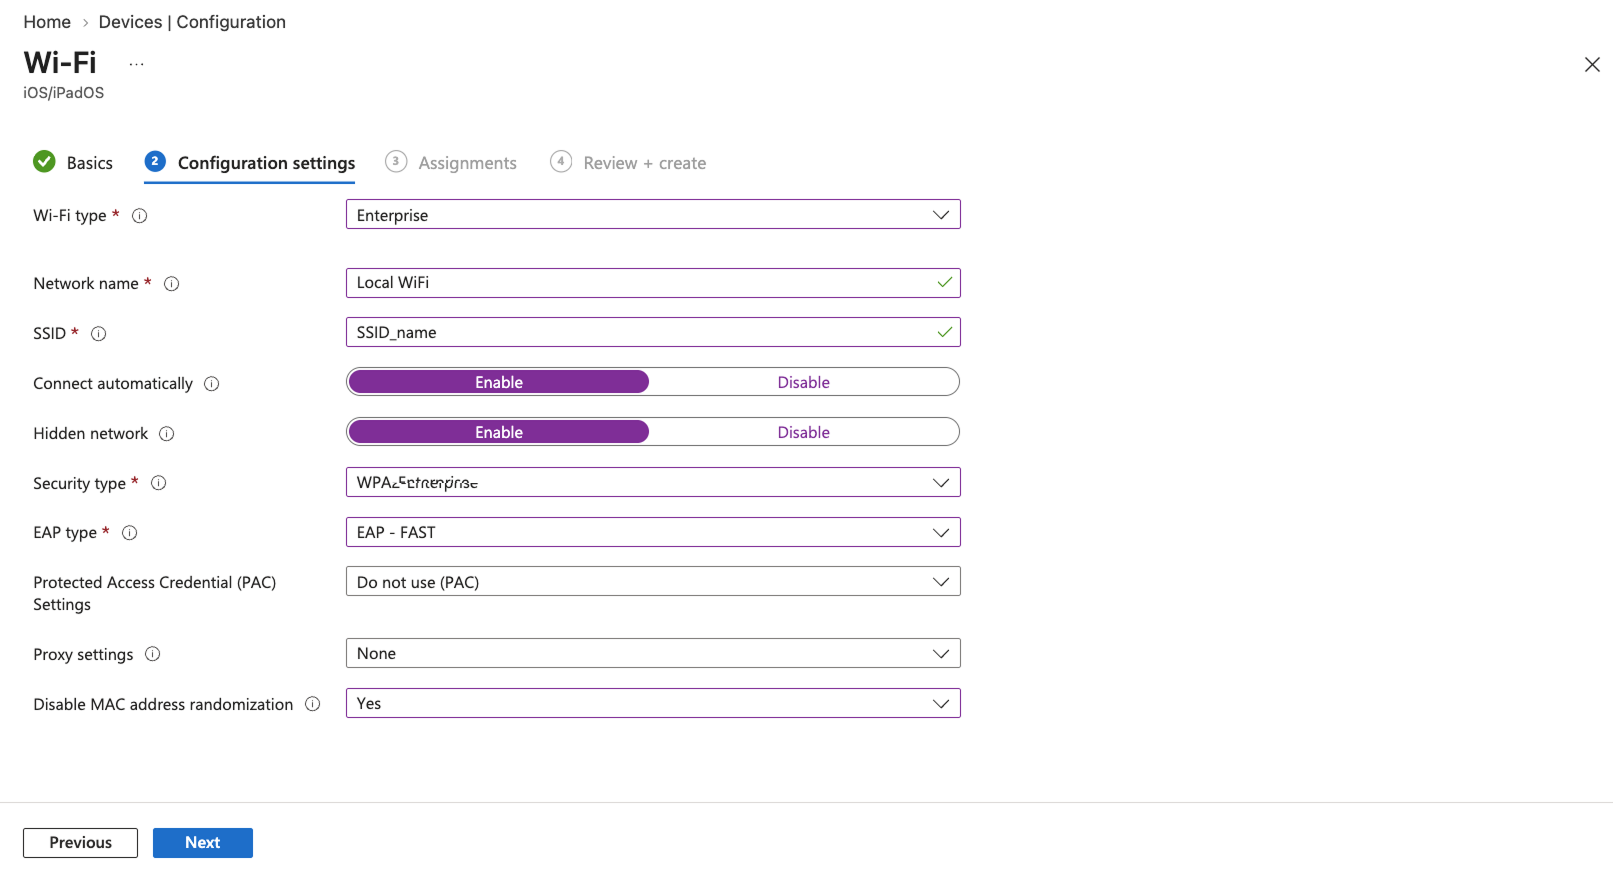
Click Review + save, then click Save.
Repeat steps 2 to 5 for each Wi-Fi network listed in the on-demand rules.