Blocksi Filter - Jamf Pro iOS Configuration Guide
The following contains procedures for deploying Blocksi Filter (full URL + granular YouTube filtering solution) through Jamf Pro.
Blocksi Filter app - The filter itself.
Blocksi certificate profile - Allows the filter to protect web traffic on the device.
Per-app VPN profile - Turns on filtering for the built-in Safari browser and provides the connection that managed apps are attached to.
Prerequisites
Ensure the following prerequisites are in place before proceeding with deployment:
Administrator access to Jamf Pro 10.x or later.
Your Blocksi Super-Admin account email address.
Send your Organization ID and organization name to Blocksi Support to authorize your district's use of the Blocksi Filter app. Refer to the Getting Your Organization ID and Name section for more information.
Ensure that Custom Apps and the Volume Purchase Program (VPP) are fully enabled and configured. Refer to the Configuring Volume Purchasing section for more information.
Supervised iPads or iPhones running iOS 16 or later are enrolled in Jamf Pro through Apple School Manager or Apple Business Manager. A smart or static mobile device group exists that contains the target devices.
A filtering policy must be created and configured on the Blocksi Admin Dashboard.
The Blocksi Filter app is assigned to the location that your MDM uses in Apple School Manager or Apple Business Manager, and has synced into Jamf Pro.
Sign in to your Apple School Manager account with your Administrator credentials.
Click your account name in the lower left-hand corner, and then click Preferences from the pop-up menu.
Go to Organization Information.
Locate your Organization ID and Organization Name.
Send this information to Blocksi. It is required to add your organization to the approved list of customers who can use Blocksi's filtering app.
Sign in to your company's account at business.apple.com (Apple Business Manager) or school.apple.com (Apple School Manager).
Click your account name in the top right corner, then click Settings from the drop-down menu.
Click Payments and Billing.
Under the Apps and Books tab, scroll to the Content Tokens section and click Download next to the correct server location token. The token is downloaded to the Downloads folder on your computer.
In Jamf Pro, navigate to Settings > Global > Volume purchasing. The Volume purchasing page opens.
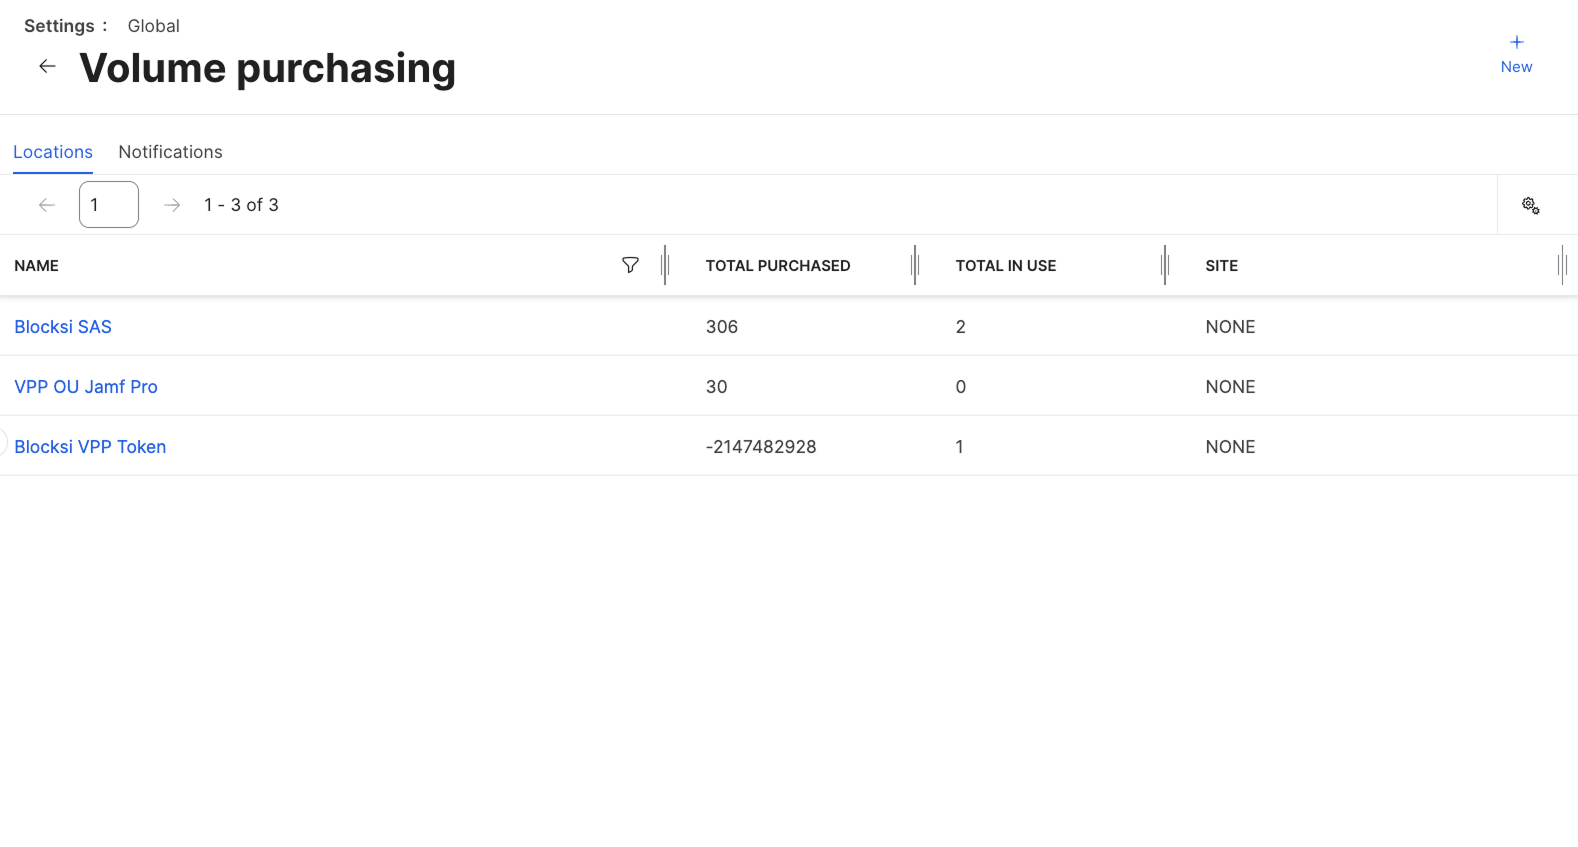
Click New and enter a name for the location in the Display Name text box.
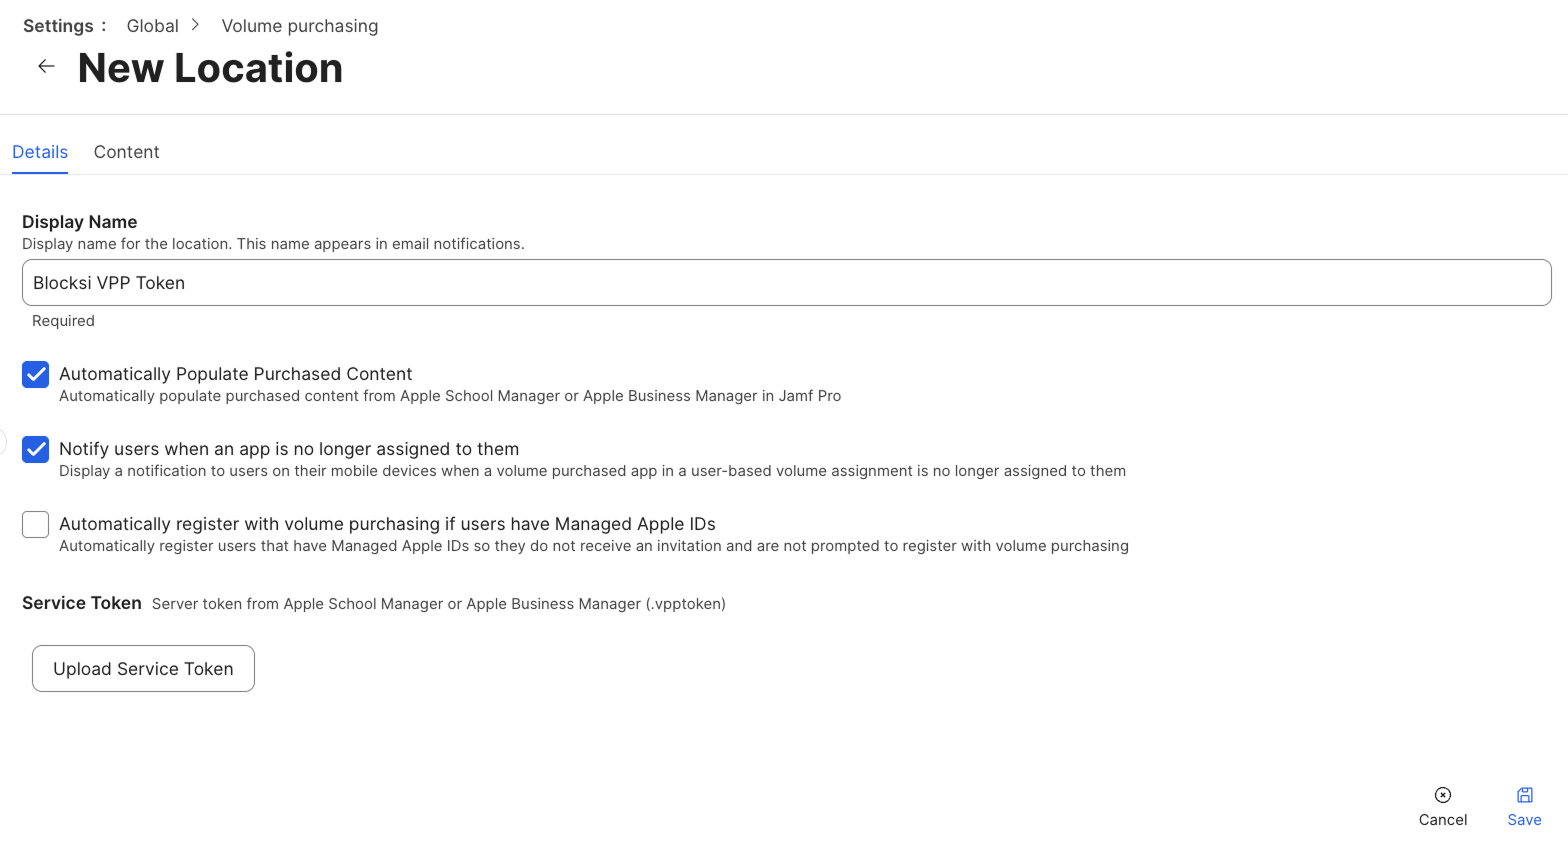
Click Upload Service Token and select the
.vpptokenfile that you downloaded.Tip
To register users who have Managed Apple IDs without prompting them, select Automatically register with volume purchasing if users have Managed Apple IDs.
Click Save.
In Jamf Pro, navigate to Devices > Content management > Mobile device apps. The Mobile device apps page opens.
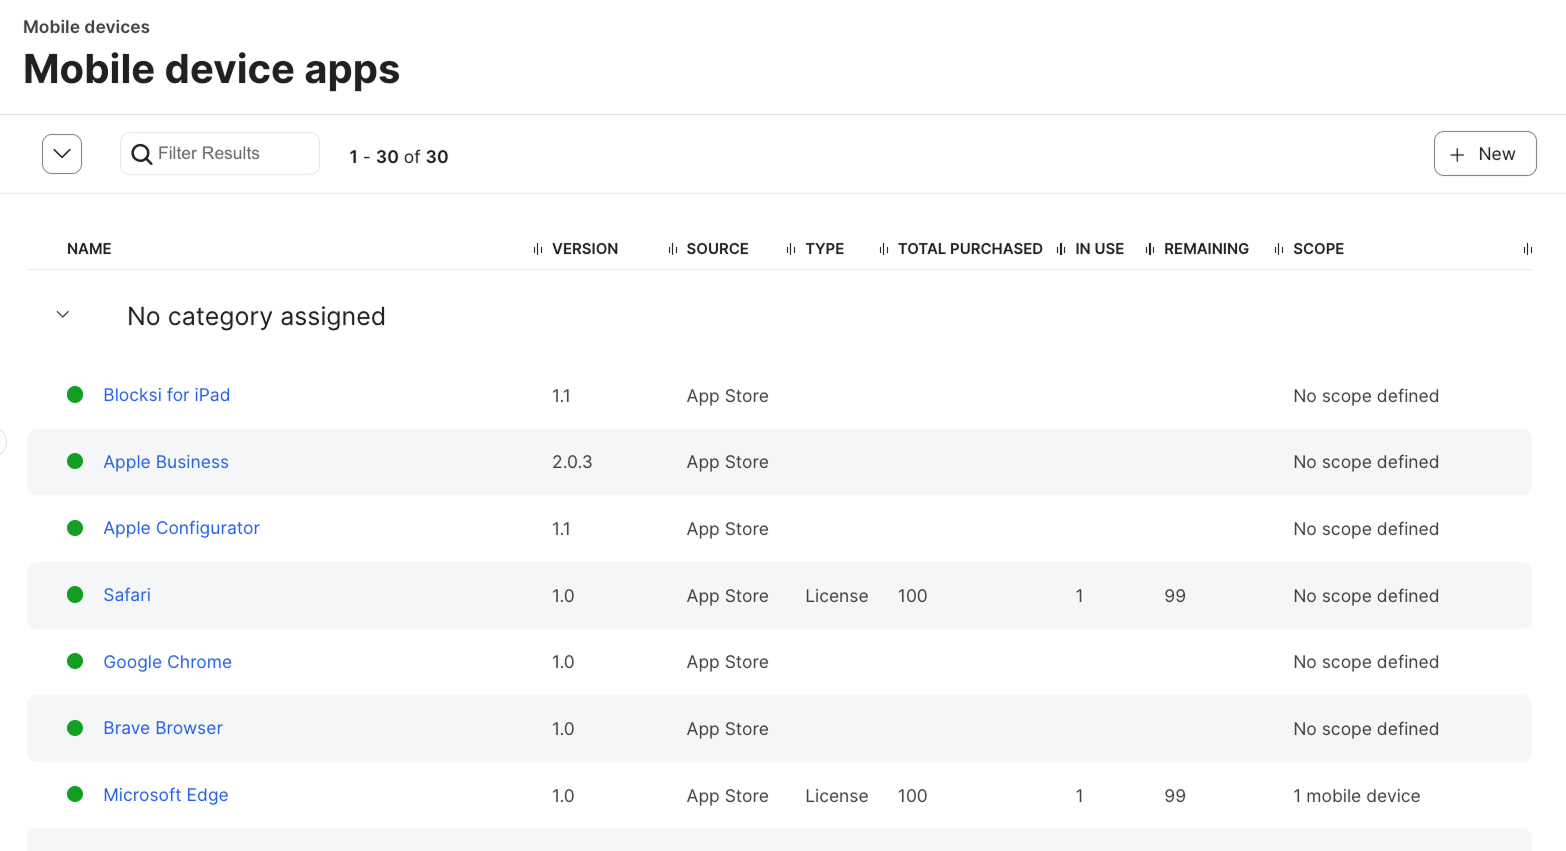
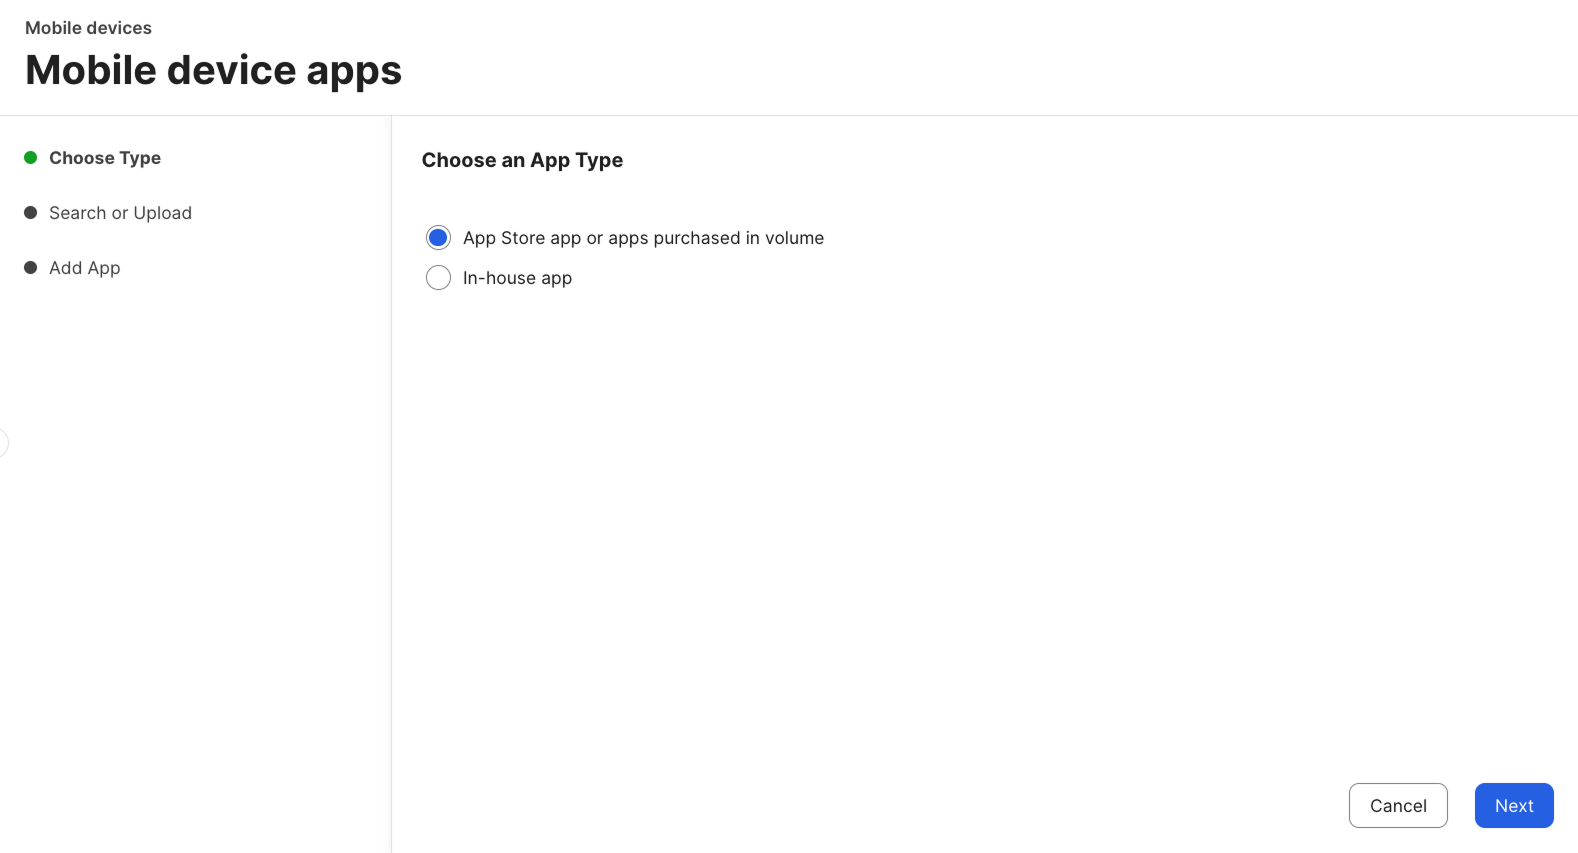
Click + New, select App Store app or apps purchased in volume under Choose an App Type, then click Next.
Enter
blocksiin the Search box, select your country or region from the App Store Country or Region drop-down list, then click Next.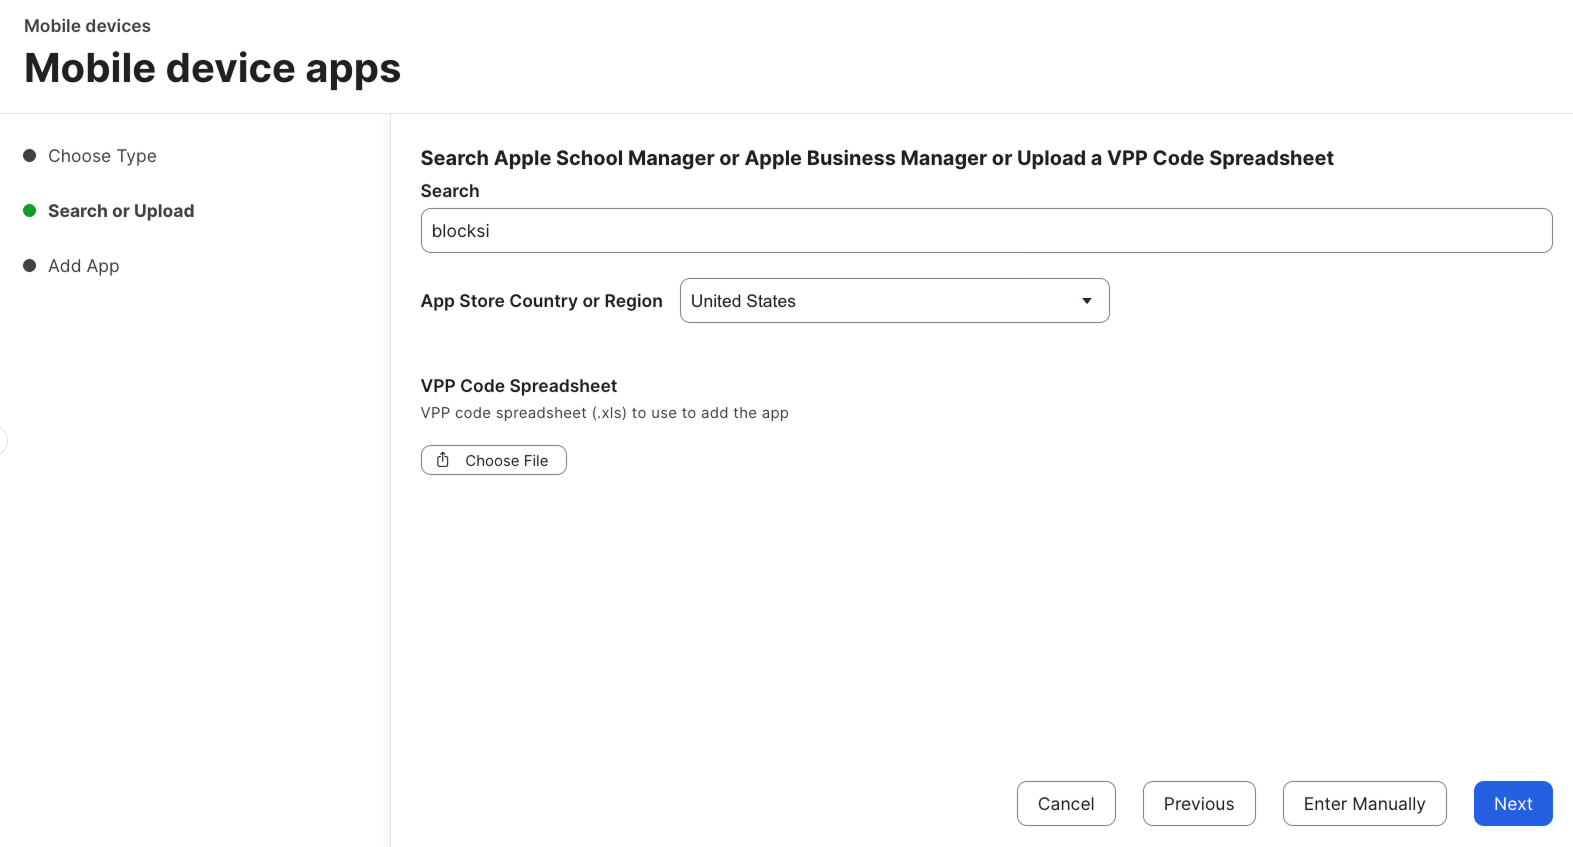
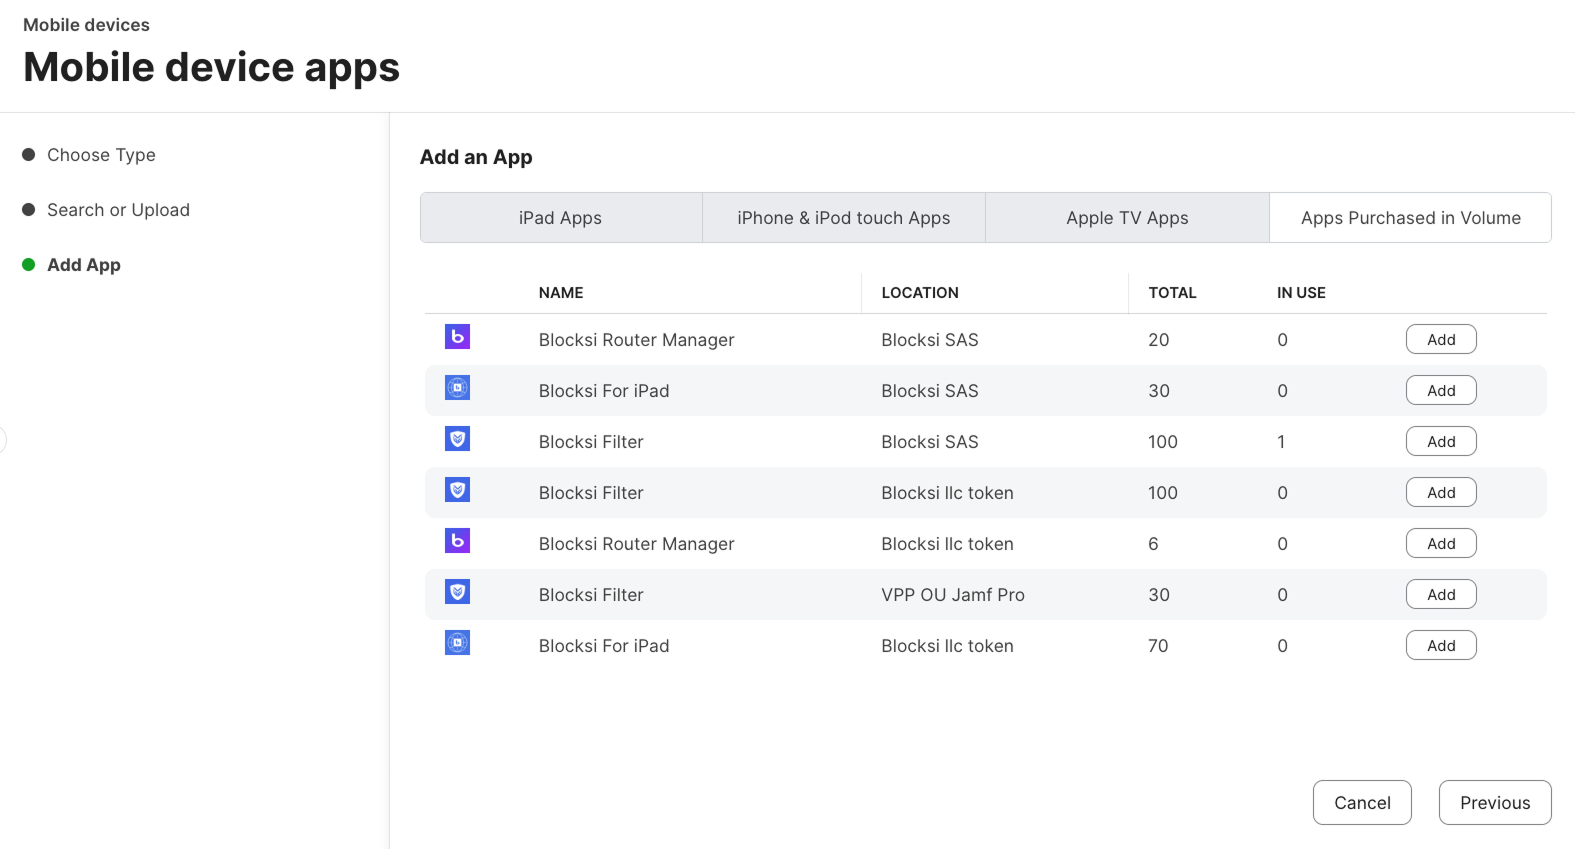
Click the Apps Purchased in Volume tab, locate Blocksi Filter in the row for your volume purchasing location, and click Add. The New Mobile Device App page opens on the General tab.
Note
If Blocksi Filter is listed more than once, select the row whose Location matches the location you created in the Uploading the Service Token section.
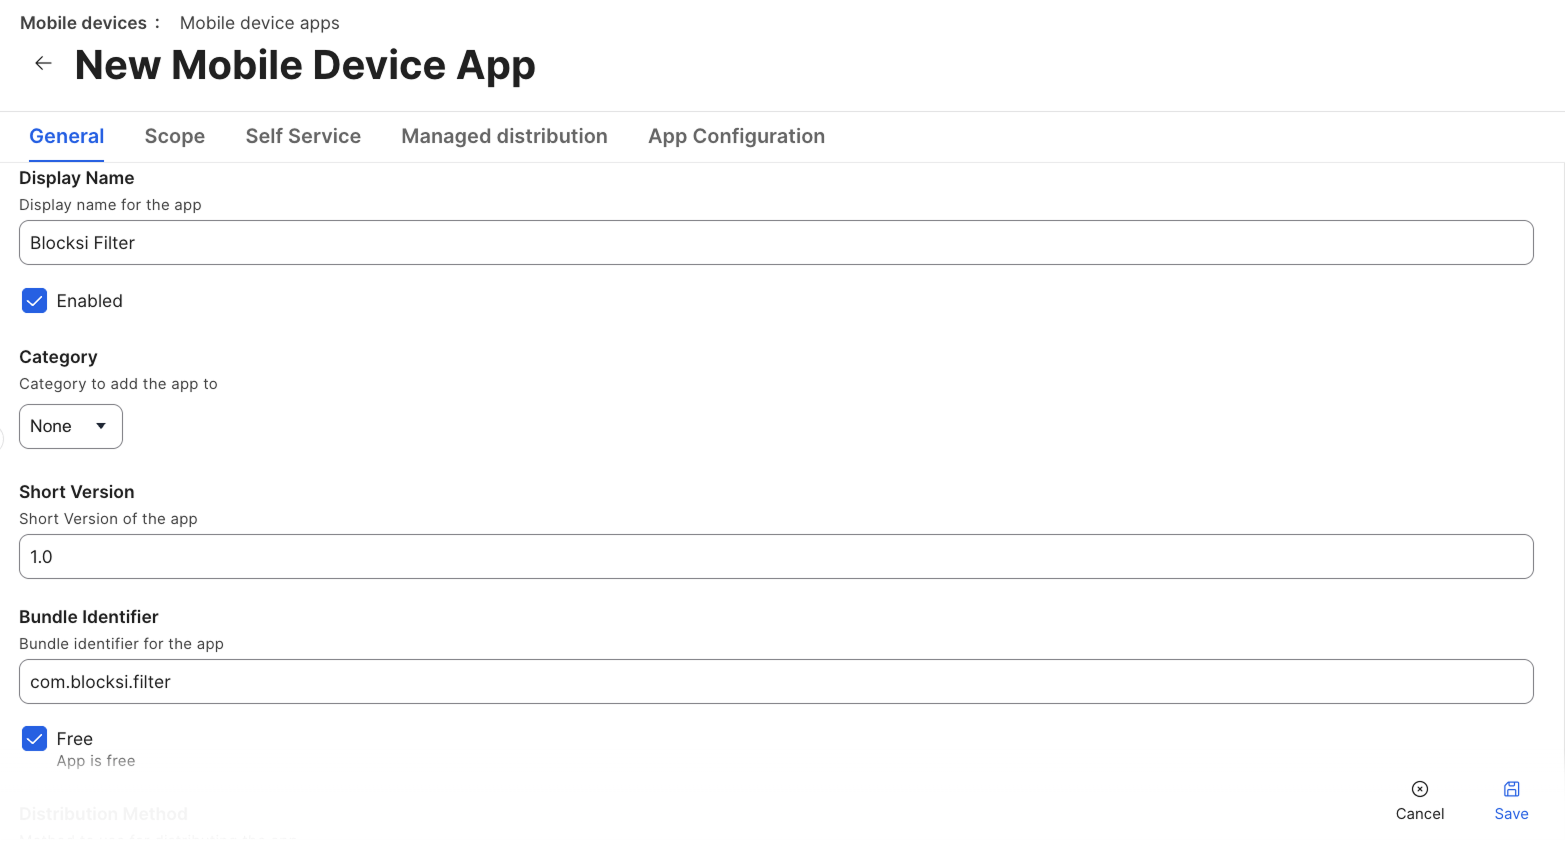
Confirm the following:
Display Name - Blocksi Filter.
Bundle Identifier -
com.blocksi.filter.Enabled - Selected.
Free - Selected.
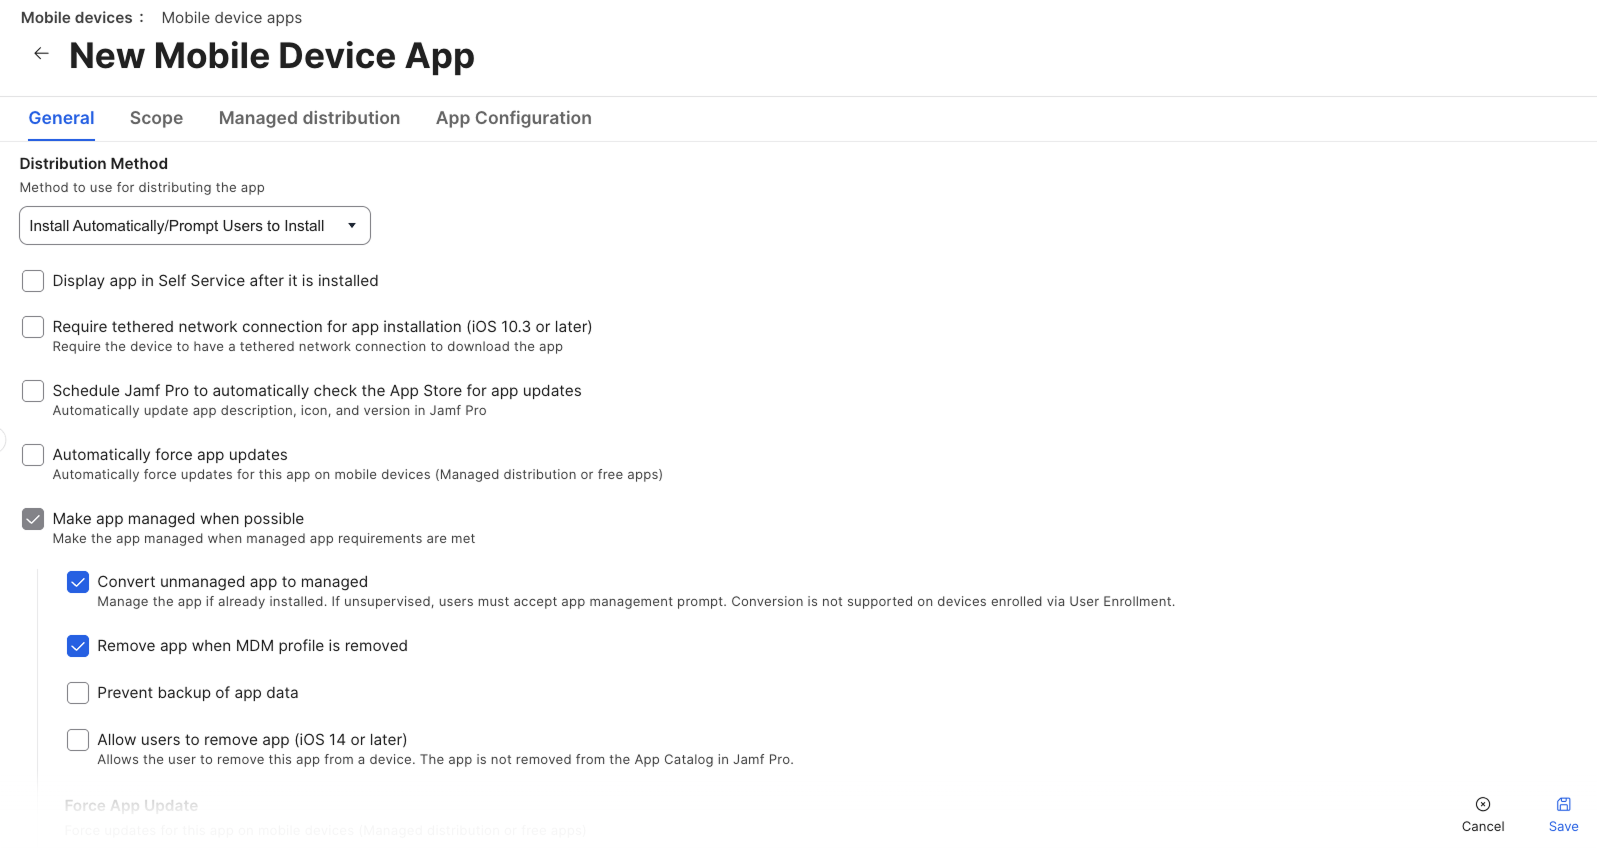
Configure the following:
Distribution Method - Select Install Automatically/Prompt Users to Install.
Make app managed when possible - Select the checkbox, then select Convert unmanaged app to managed and Remove app when MDM profile is removed beneath it.
Allow users to remove app (iOS 14 or later) - Make sure the checkbox is cleared.
Click the Scope tab, click + Add under Selected Deployment Targets, and select your target devices.
Note
Note which devices you scope here. The Blocksi certificate profile and the per-app VPN profile must be scoped to the same devices.
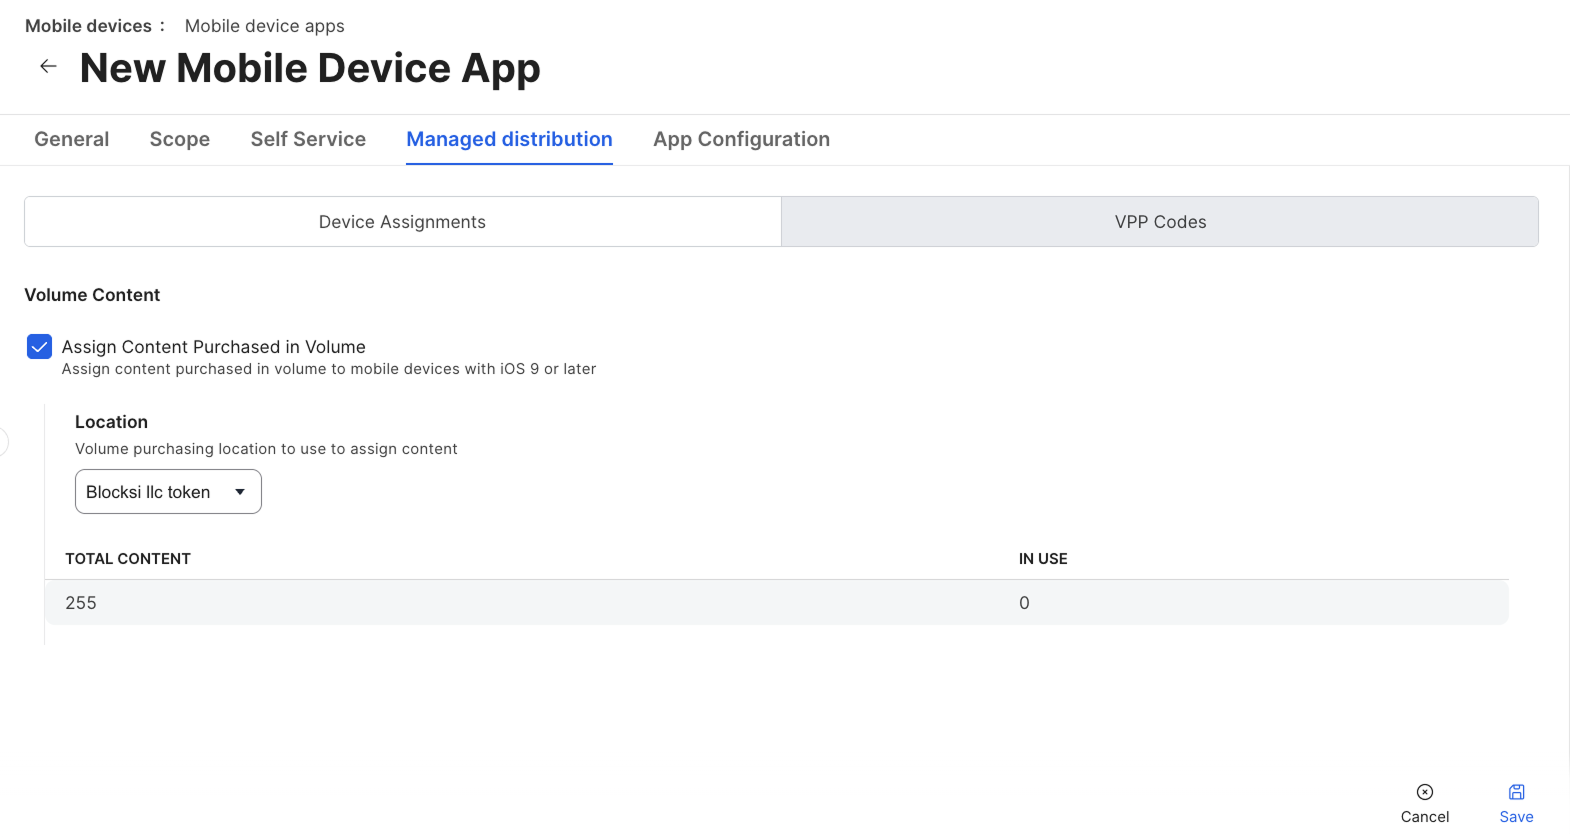
Click the Managed distribution tab, select Assign Content Purchased in Volume, then select your volume purchasing location from the Location drop-down list.
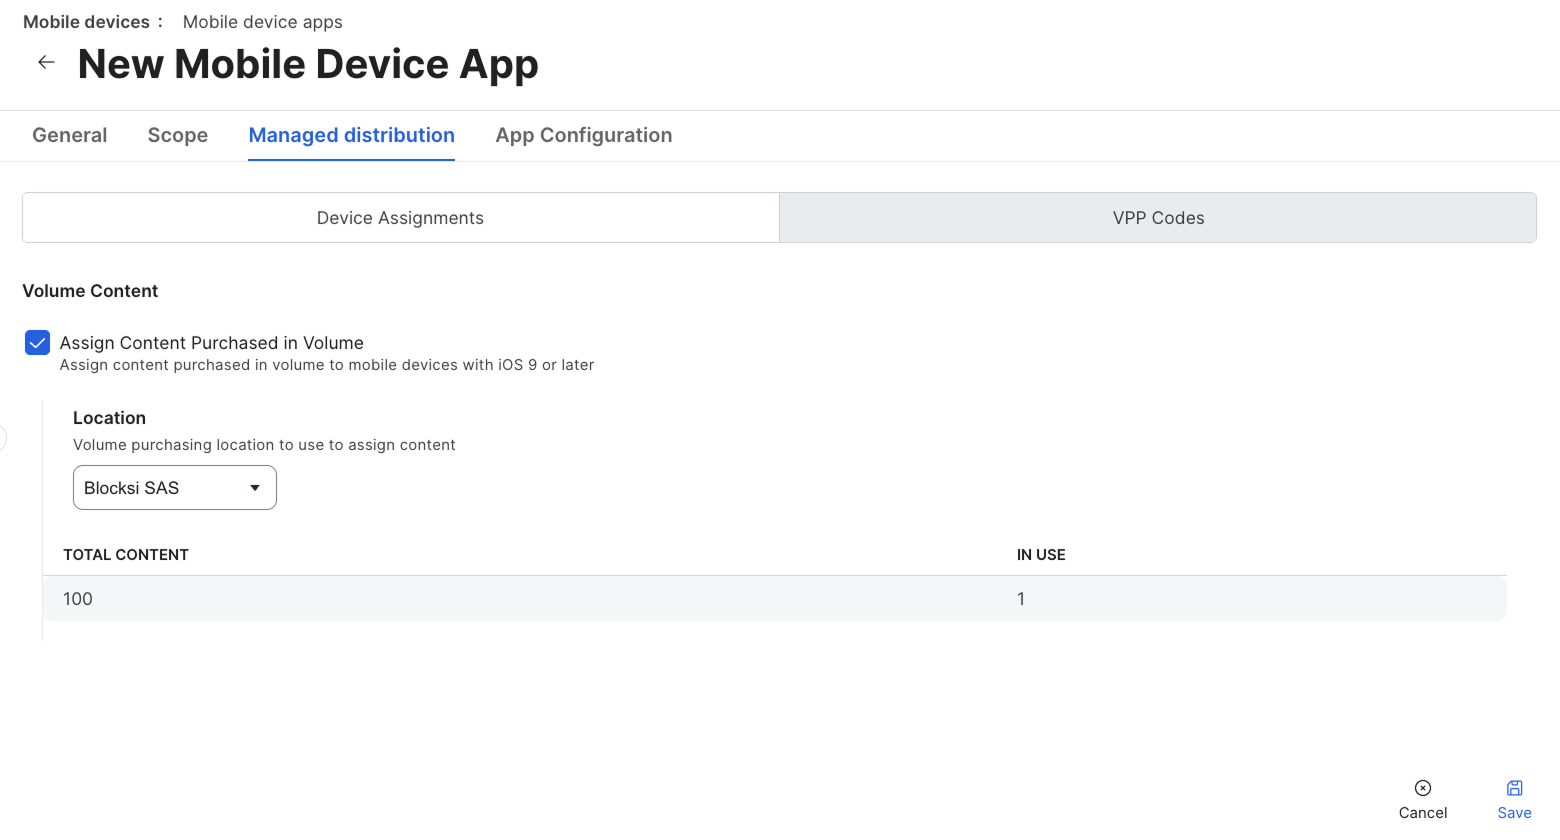
Click Save.
Download URLs
The relevant .mobileconfig file can be downloaded using the following link:
Blocksi_Filter_CA.mobileconfig- Delivers the Blocksi certificate.
In Jamf Pro, navigate to Devices > Content management > Configuration profiles. The Configuration profiles page opens.
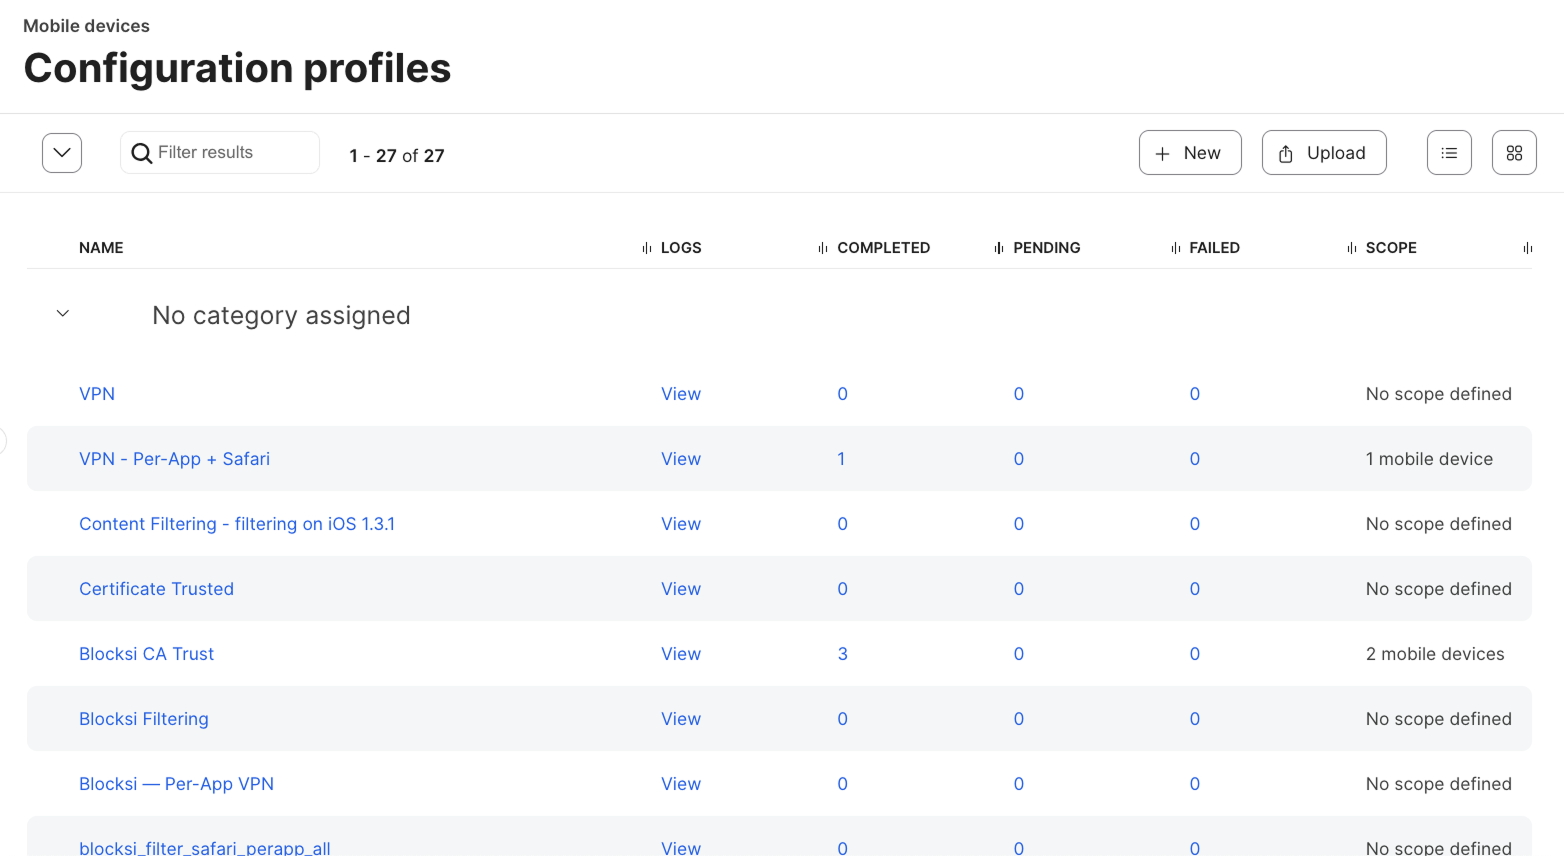
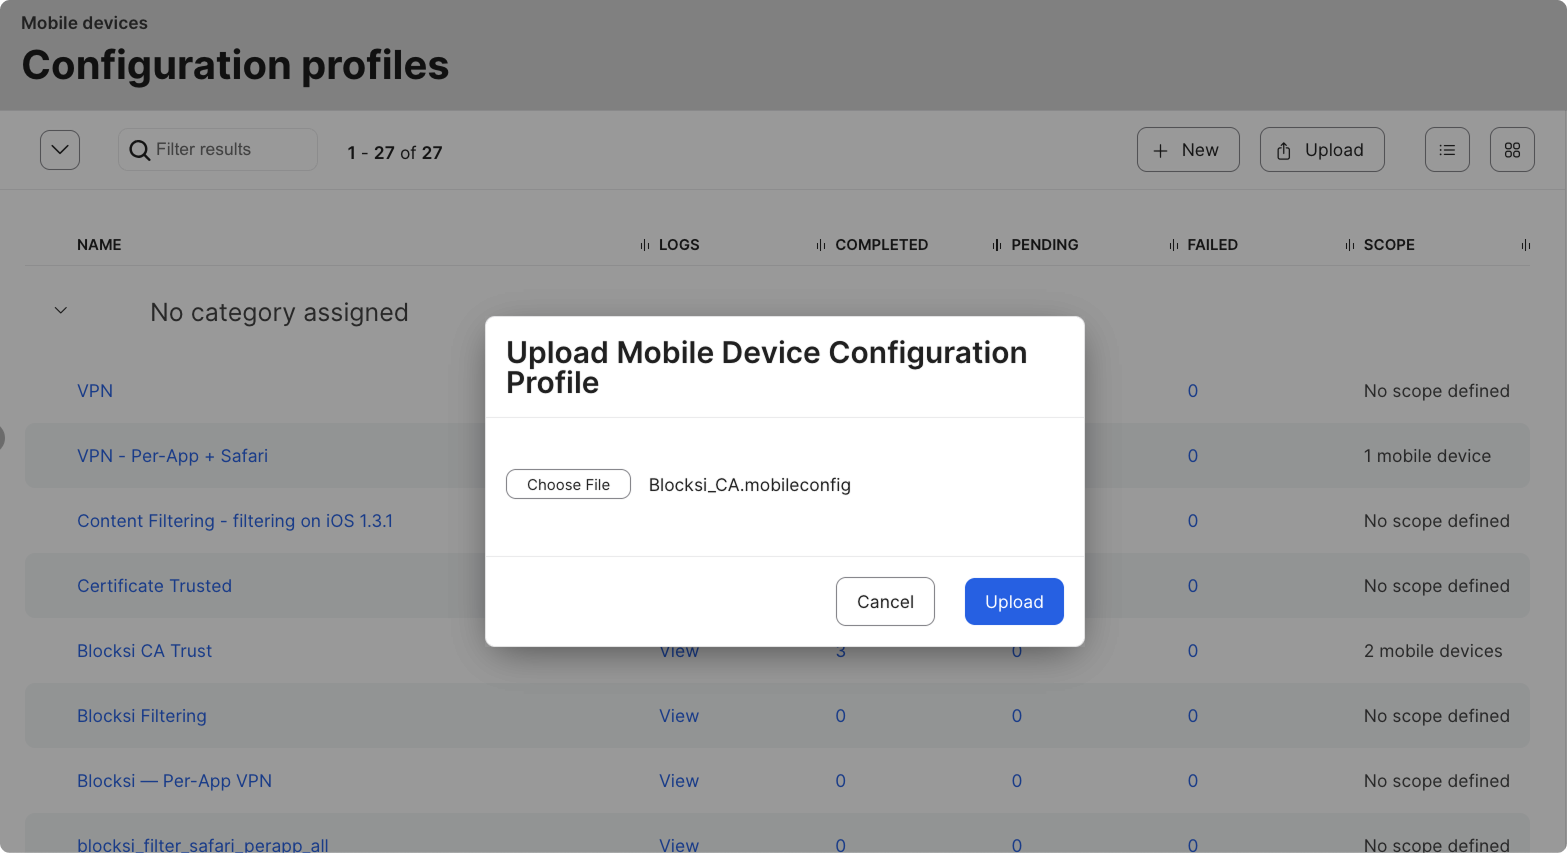
Click Upload and select the
Blocksi_Filter_CA.mobileconfigfile that you downloaded.Note
The Display Name is filled in automatically as Blocksi Certificate. You can rename it if needed.
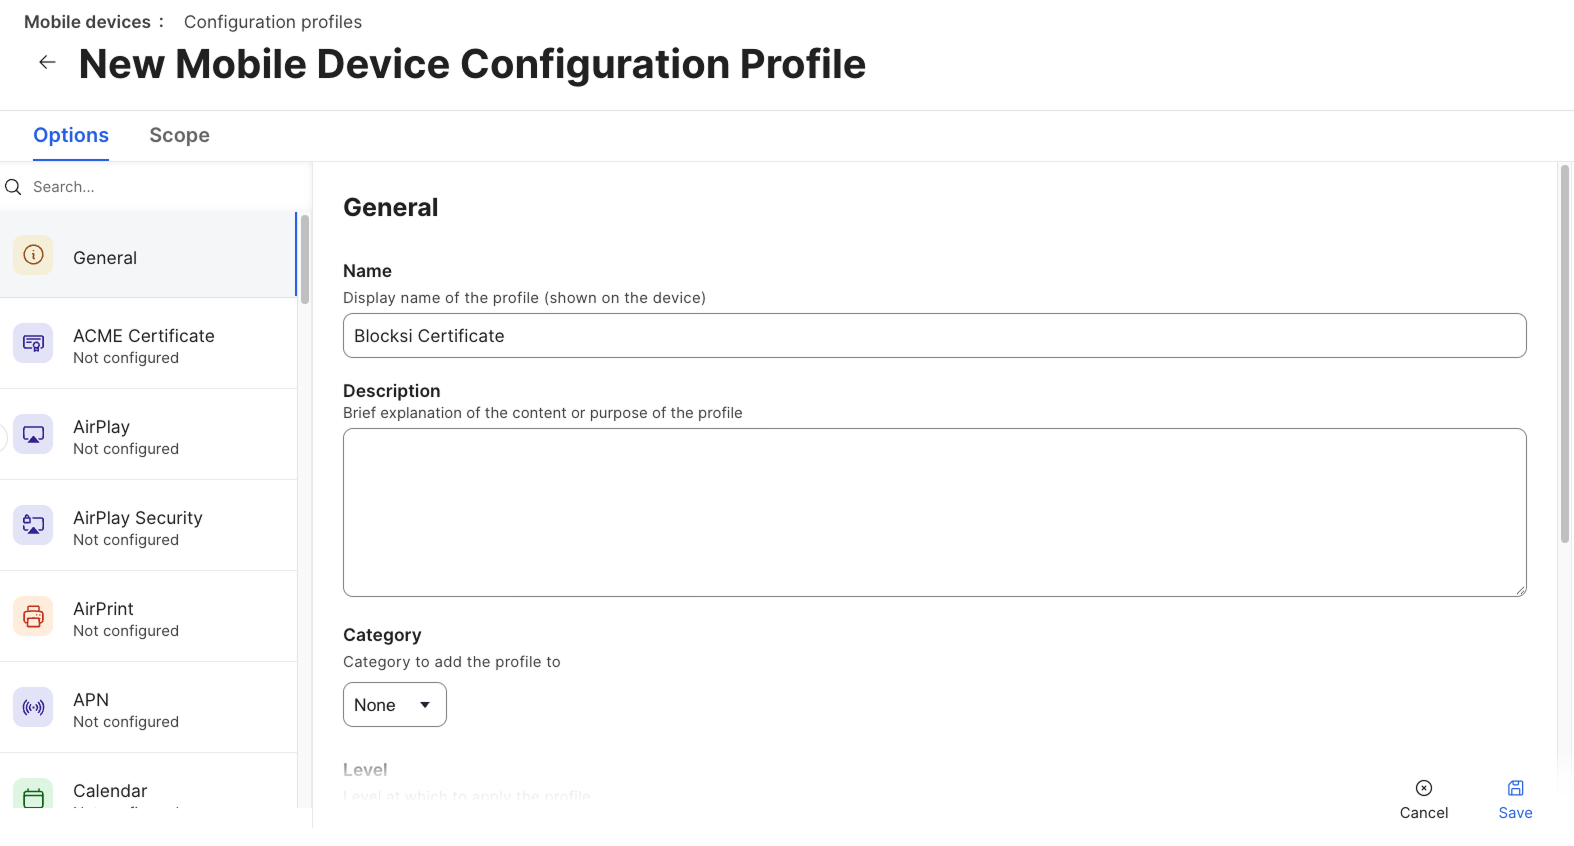
Click the Scope tab and select the same devices you scoped for the Blocksi Filter app.
Click Save.
Note
On supervised devices, the certificate is trusted automatically, so it does not need to be enabled manually under Settings > General > About > Certificate Trust Settings.
The per-app VPN profile is the working filtering configuration. It turns on filtering for the built-in Safari browser and creates a VPN connection named Blocksi Filter that managed apps are attached to. Upload the file to Jamf Pro, then configure it with your Organization ID. For custom DNS servers or captive portal detection, you also edit the file before you upload it.
Download URLs
The relevant .mobileconfig file can be downloaded using the following link:
Blocksi_Filter_JamfPro.mobileconfig- Configures Safari filtering and provides the connection for managed apps.
Download the
Blocksi_Filter_JamfPro.mobileconfigfile.In Jamf Pro, navigate to Devices > Content management > Configuration profiles. The Configuration profiles page opens.
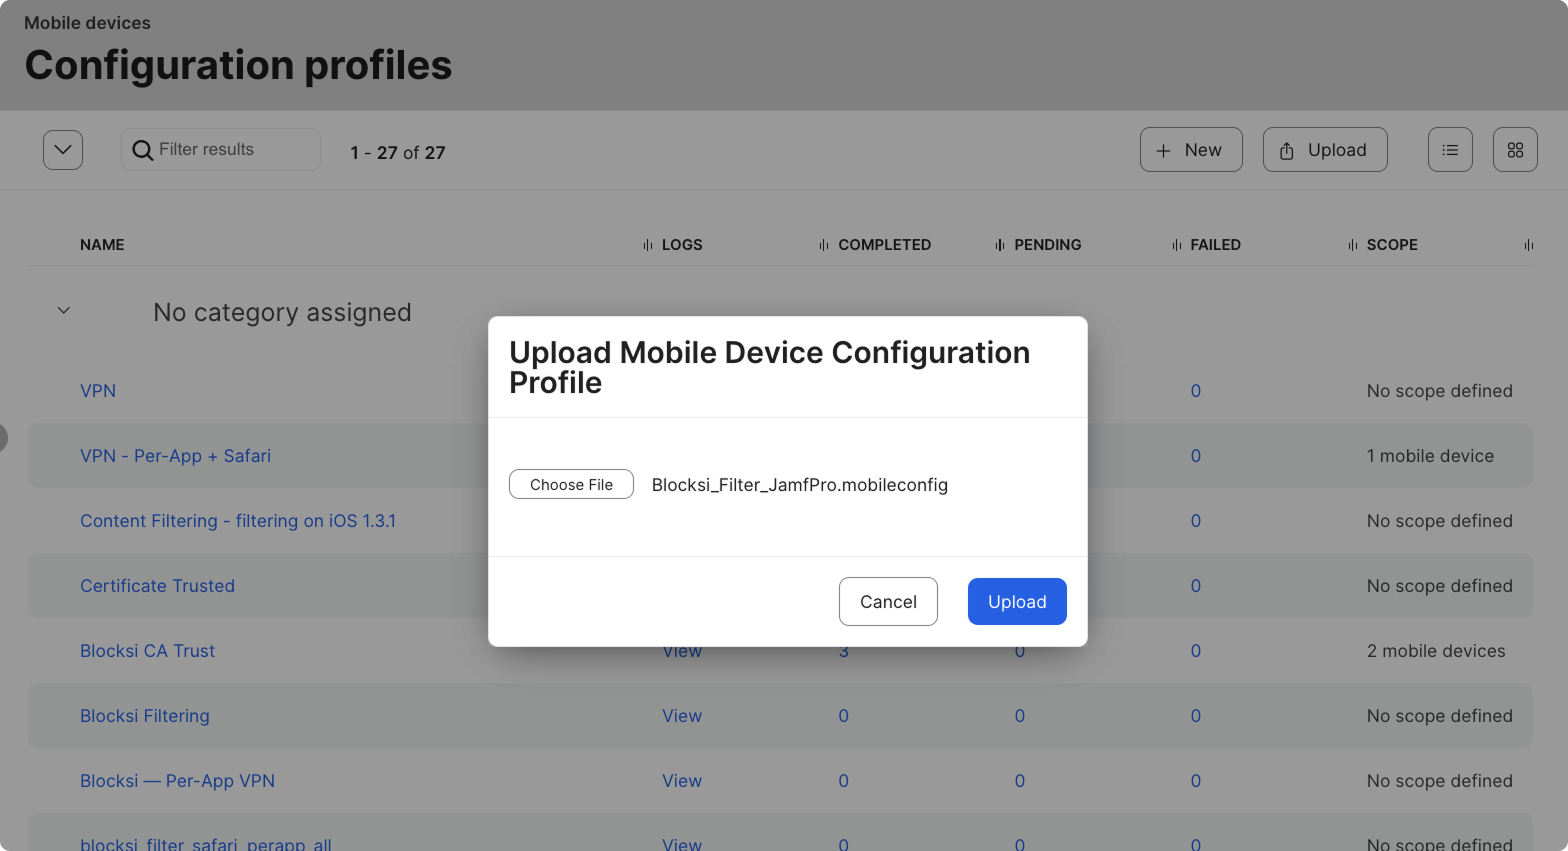
Click Upload and select the
Blocksi_Filter_JamfPro.mobileconfigfile that you downloaded. The New Mobile Device Configuration Profile page opens on the General tab.Note
The Display Name is filled in automatically as Blocksi Web Filter (Jamf Pro custom). You can rename it if needed.
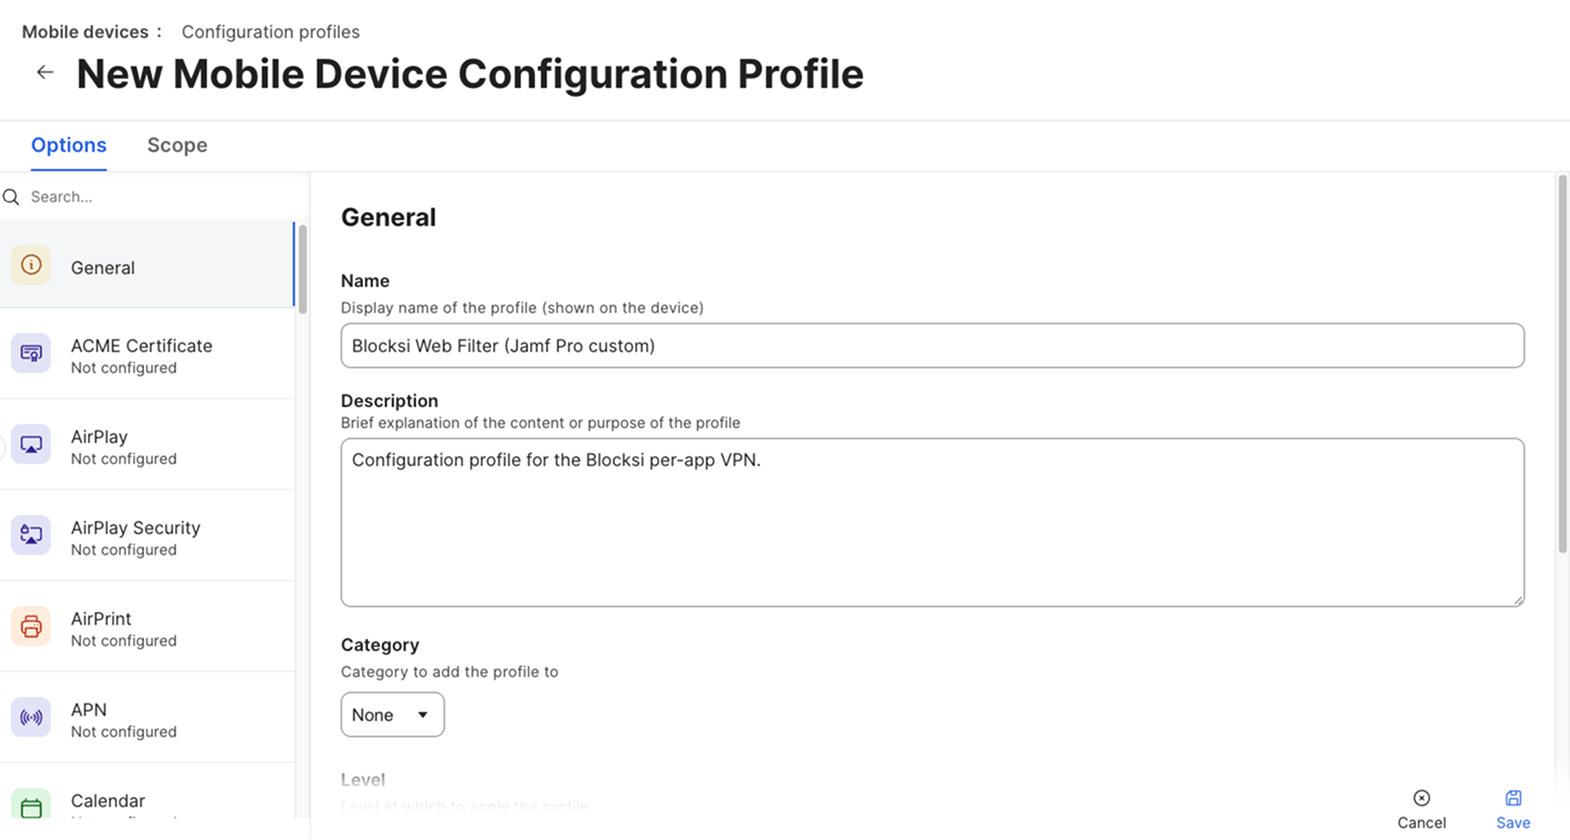
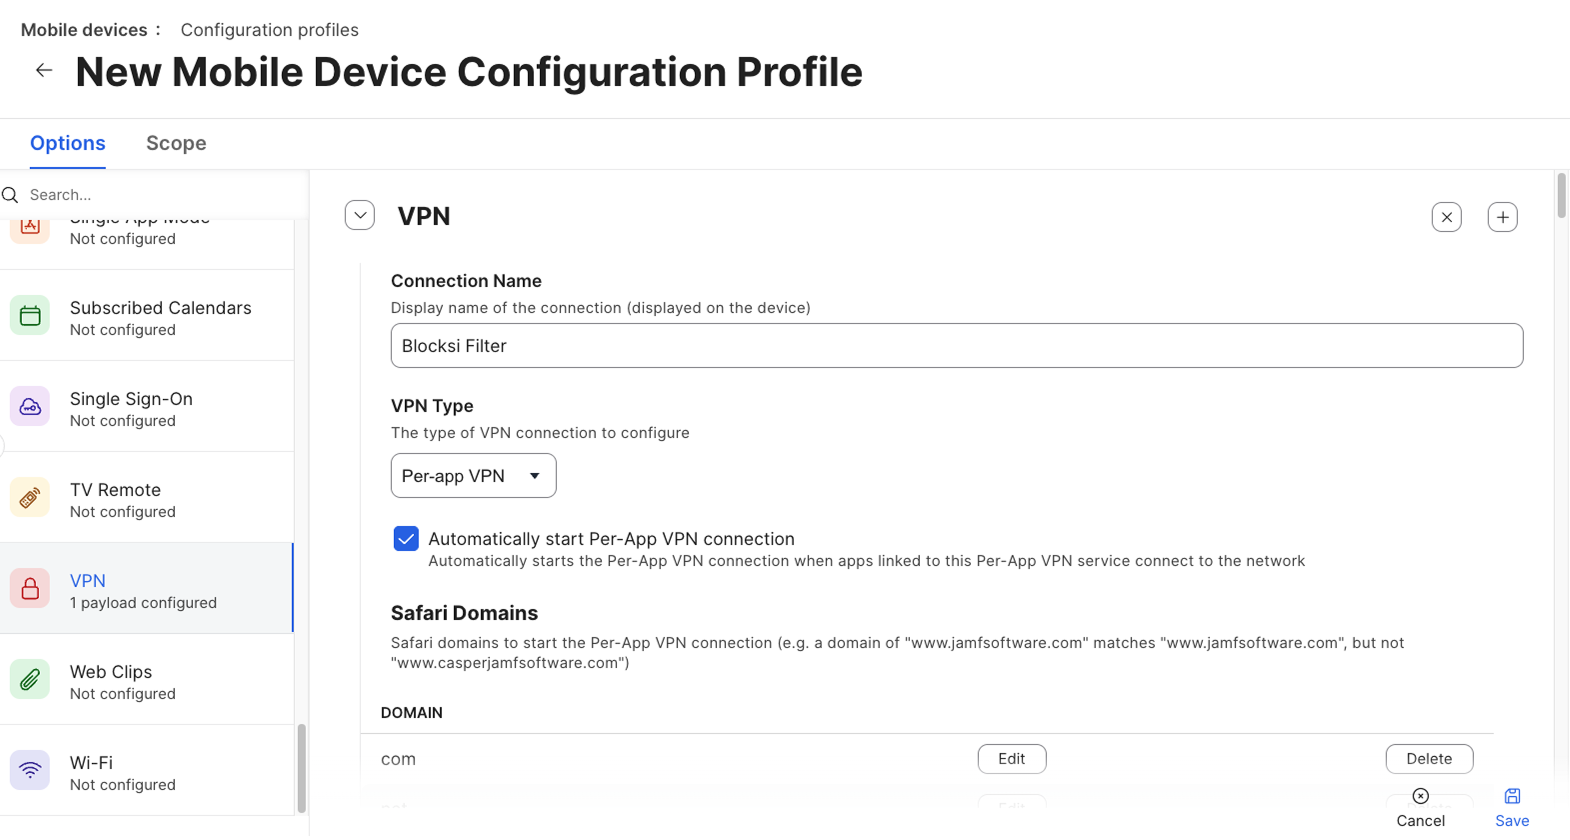
Click VPN in the left sidebar. The VPN page opens.
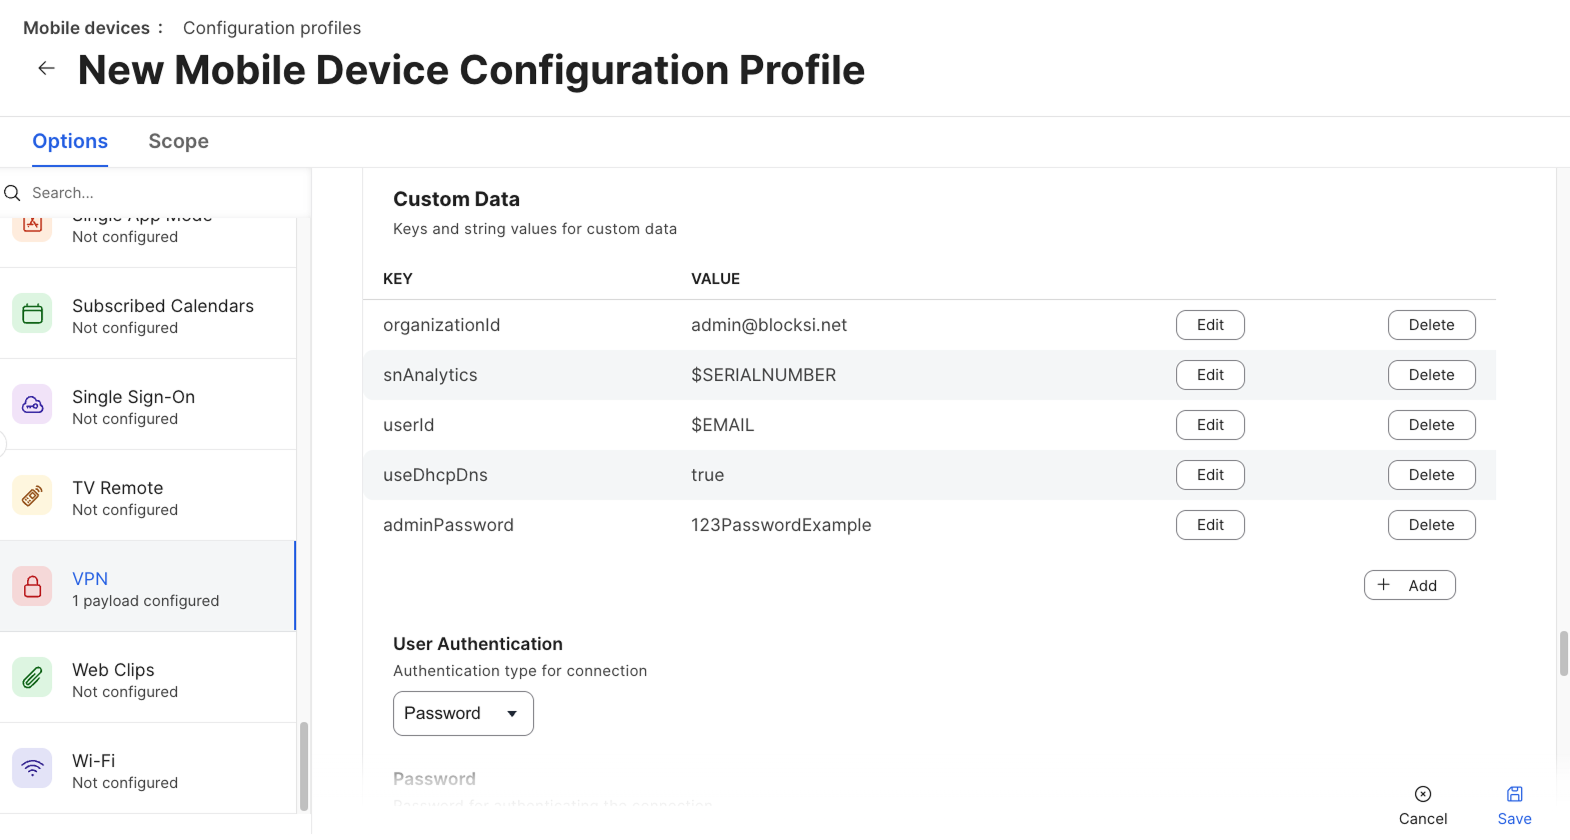
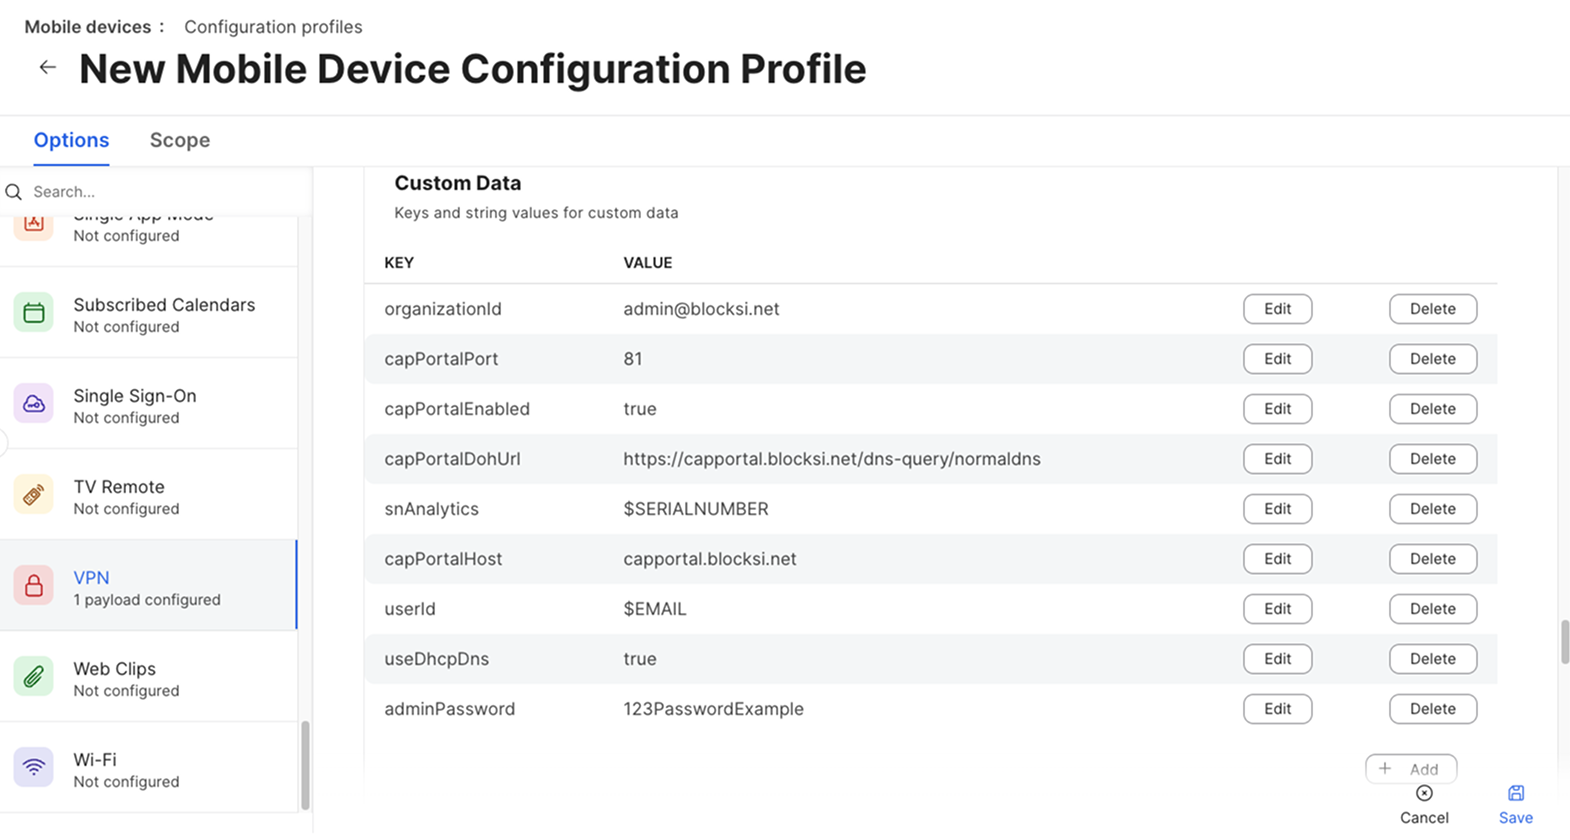
Scroll down to the Custom Data section and configure the following keys:
organizationId- Replaceadmin@blocksi.netwith your Blocksi Organization ID.adminPassword- Leave the default value, or replace it with a password of your choice. This password protects access to the app details in the Blocksi Filter app.userId- Leave the value set to$EMAIL. Jamf Pro replaces this variable with the email address of the assigned user.snAnalytics- Leave the value unchanged. This key reports the serial number of the device for analytics only, and is separate from theserialNumberkey used for serial number-based filtering.useDhcpDns- Leave the value set totrue. The filter uses the DNS servers provided by your network and falls back to public DNS servers if none are available.
Leave every other value unchanged.
Click the Scope tab and select the same devices you scoped for the Blocksi Filter app.
Click Save.
Note
The profile reports the assigned user of the device to Blocksi so that activity is attributed correctly. This requires the device to have a user assigned in Jamf Pro. Devices without an assigned user, such as shared devices, receive a blanket filtering policy instead.
By default, the profile identifies devices by their assigned user. Configure the profile as described in this section when you want the filter to identify devices by serial number instead, such as on shared devices without an assigned user.
Download the
Blocksi_Filter_JamfPro.mobileconfigfile.In Jamf Pro, navigate to Devices > Content management > Configuration profiles. The Configuration profiles page opens.
Click Upload and select the
Blocksi_Filter_JamfPro.mobileconfigfile that you downloaded. The New Mobile Device Configuration Profile page opens on the General tab.Click VPN in the left sidebar. The VPN page opens.
Scroll down to the Custom Data section and configure the following keys:
organizationId- Replaceadmin@blocksi.netwith your Blocksi Organization ID.adminPassword- Leave the default value, or replace it with a password of your choice. This password protects access to the app details in the Blocksi Filter app.userId- Replace the key name withserialNumber, and replace the$EMAILvalue with$SERIALNUMBER.snAnalytics- Leave the value unchanged. This key reports the serial number of the device for analytics only, and is separate from theserialNumberkey used for serial number-based filtering.useDhcpDns- Leave the value set totrue. The filter uses the DNS servers provided by your network and falls back to public DNS servers if none are available.
Leave every other value unchanged.
Important
Enter
$SERIALNUMBERexactly as shown, including the dollar sign and in upper case. Each MDM uses a different variable name, and Jamf Pro does not resolve the variable if the name does not match.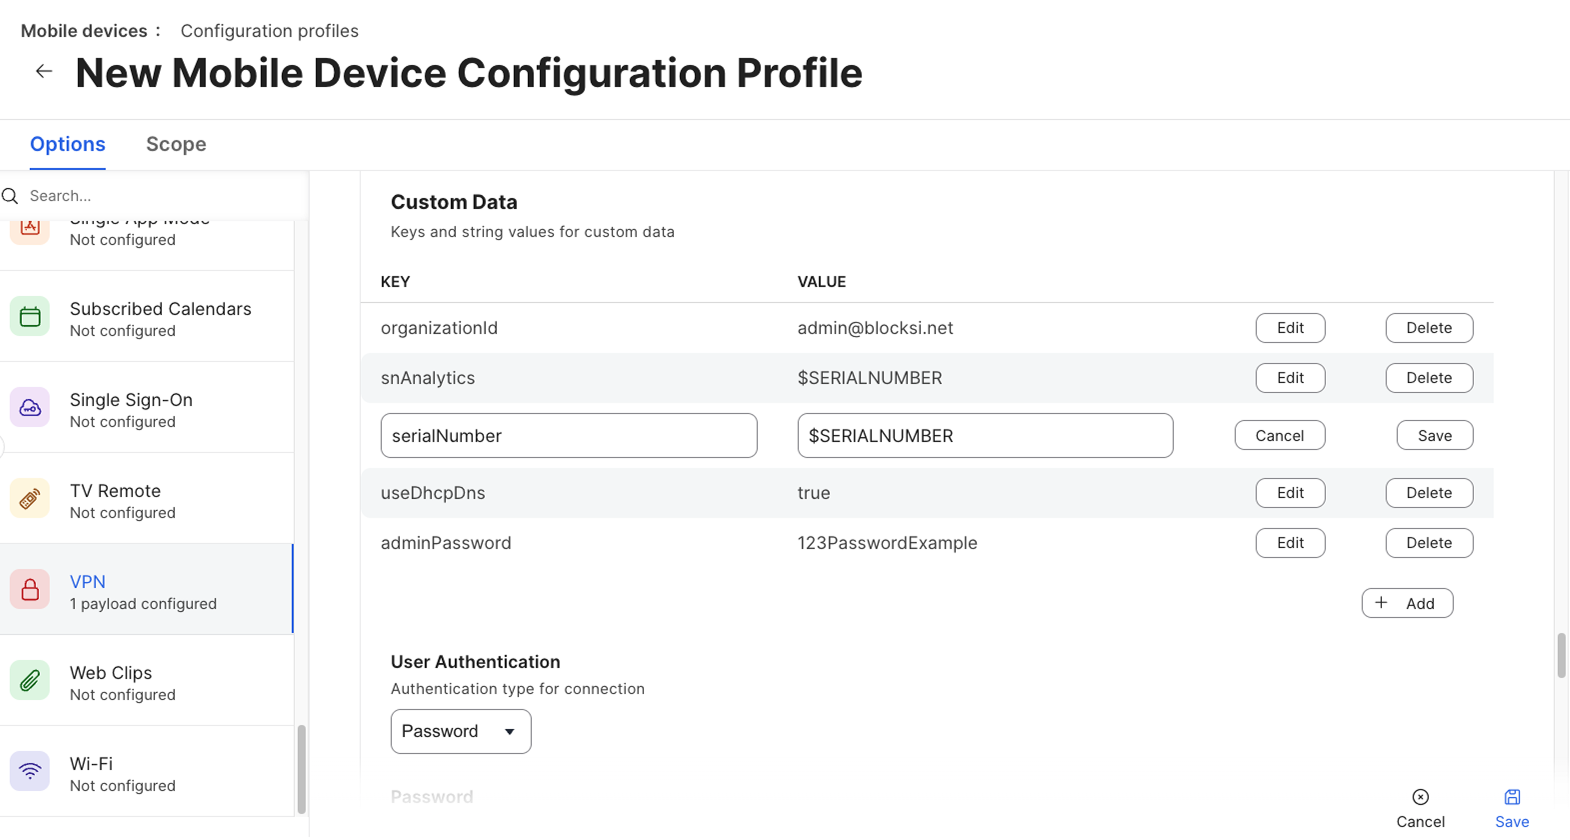
Click the Scope tab and select the same devices you scoped for the Blocksi Filter app.
Click Save.
By default, the filter resolves DNS through the DNS servers that DHCP provides on your network. If DHCP does not provide DNS servers, or they do not respond, the filter falls back to built-in public DNS servers. Configure the profile as described in this section when you want the filter to use specific DNS servers instead. You can combine this configuration with the other optional configurations by editing the relevant keys in the same profile.
Download the
Blocksi_Filter_JamfPro.mobileconfigfile.Open the downloaded
.mobileconfigfile using any text or code editor.Add the
dnsServerskey after theuseDhcpDnskey and enter your DNS server addresses as an array, in priority order, as shown in the following example. These servers are used instead of the DHCP DNS servers.<key>dnsServers</key> <array> <string>10.0.0.53:5353</string> <string>[2001:db8::1]:5353</string> </array>
Note
Each
dnsServersentry is an IPv4 or IPv6 address and can include a port. Enclose IPv6 addresses in square brackets when you add a port, as shown in the example.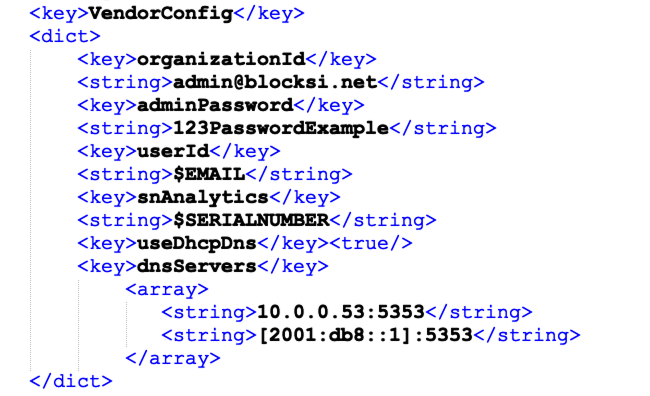
Save the file.
In Jamf Pro, navigate to Devices > Content management > Configuration profiles. The Configuration profiles page opens.
Click Upload and select the
Blocksi_Filter_JamfPro.mobileconfigfile that you edited. The New Mobile Device Configuration Profile page opens on the General tab.Click VPN in the left sidebar. The VPN page opens.
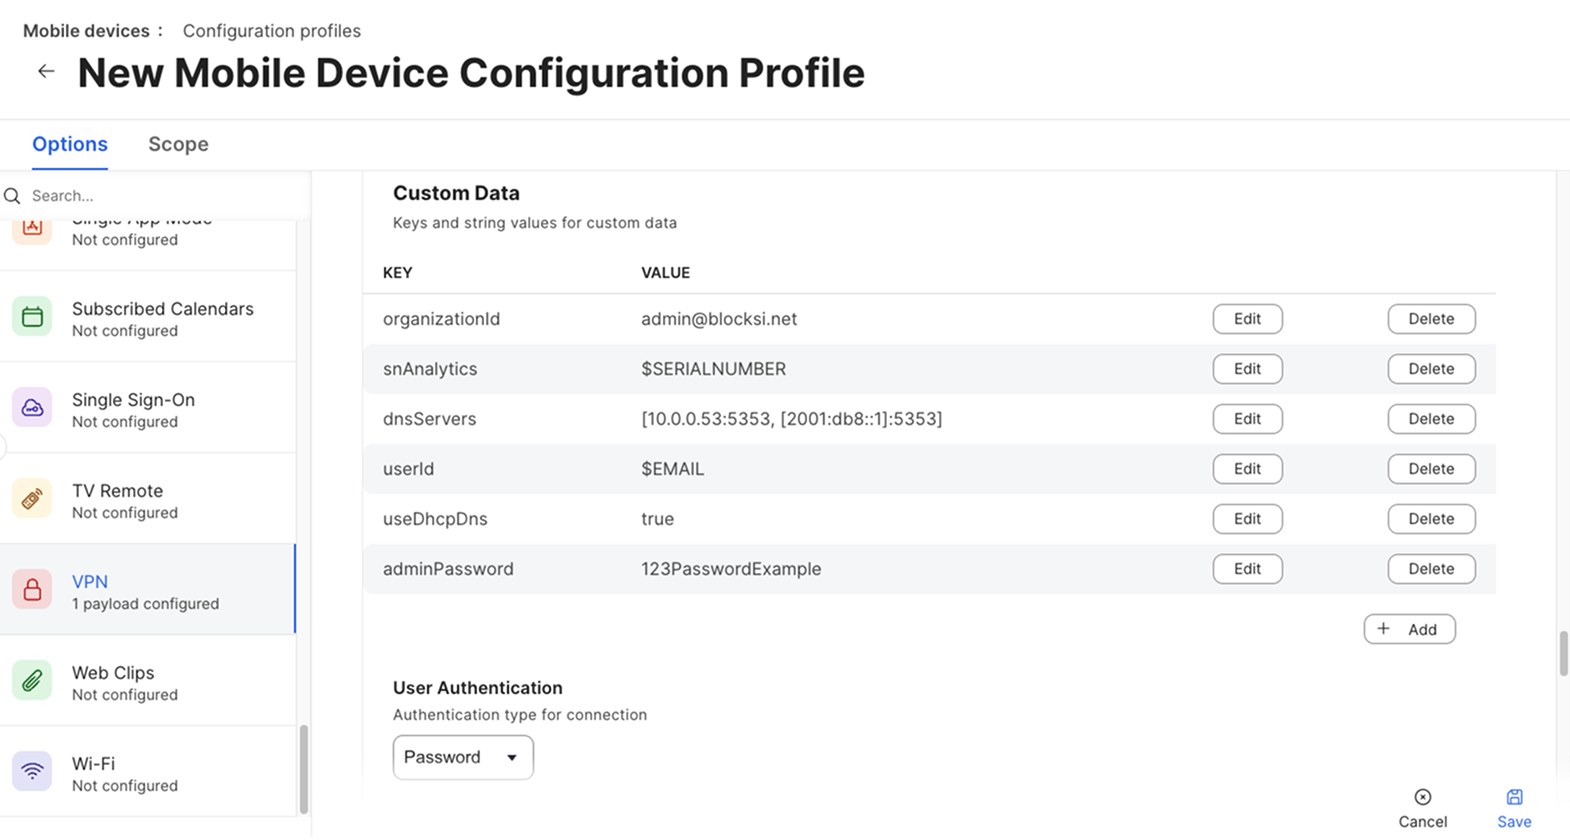
Scroll down to the Custom Data section and configure the following keys:
organizationId- Replaceadmin@blocksi.netwith your Blocksi Organization ID.adminPassword- Leave the default value, or replace it with a password of your choice. This password protects access to the app details in the Blocksi Filter app.userId- Leave the value set to$EMAIL. Jamf Pro replaces this variable with the email address of the assigned user.snAnalytics- Leave the value unchanged. This key reports the serial number of the device for analytics only, and is separate from theserialNumberkey used for serial number-based filtering.useDhcpDns- Leave the value set totrue. The filter uses the DNS servers provided by your network and falls back to public DNS servers if none are available.dnsServers- Make sure the value lists the DNS servers that you added to the file.
Leave every other value unchanged.
Click the Scope tab and select the same devices you scoped for the Blocksi Filter app.
Click Save.
Configure the profile as described in this section when your network uses the captive portal of the Blocksi Appliance. Captive portal detection works only with the Blocksi Appliance, not with captive portals from other providers. When captive portal detection is turned on, the filter detects the Blocksi Appliance captive portal on the network and hands off DNS resolution to the Blocksi DNS-over-HTTPS (DoH) service. You can combine this configuration with the other optional configurations by editing the relevant keys in the same profile.
Download the
Blocksi_Filter_JamfPro.mobileconfigfile.Open the downloaded
.mobileconfigfile using any text or code editor.Add the following lines after the
useDhcpDnskey:<key>capPortalEnabled</key><true/> <key>capPortalHost</key> <string>capportal.blocksi.net</string> <key>capPortalPort</key> <integer>81</integer> <key>capPortalDohUrl</key> <string>https://capportal.blocksi.net/dns-query/normaldns</string>
Enter the lines as shown. The
capPortalDohUrlvalue is the recommended server URL for Blocksi Filter. Refer to the Choosing a Server URL section.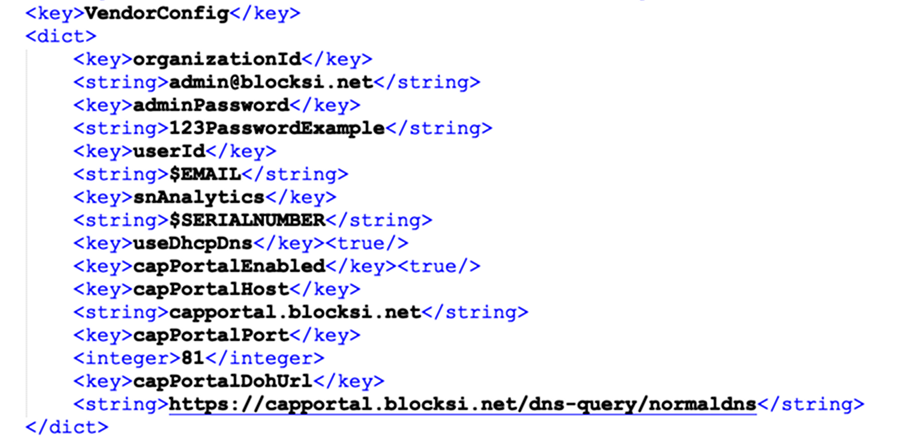
Save the file.
In Jamf Pro, navigate to Devices > Content management > Configuration profiles. The Configuration profiles page opens.
Click Upload and select the
Blocksi_Filter_JamfPro.mobileconfigfile that you edited. The New Mobile Device Configuration Profile page opens on the General tab.Click VPN in the left sidebar. The VPN page opens.
Scroll down to the Custom Data section and configure the following keys:
organizationId- Replaceadmin@blocksi.netwith your Blocksi Organization ID.adminPassword- Leave the default value, or replace it with a password of your choice. This password protects access to the app details in the Blocksi Filter app.userId- Leave the value set to$EMAIL. Jamf Pro replaces this variable with the email address of the assigned user.snAnalytics- Leave the value unchanged. This key reports the serial number of the device for analytics only, and is separate from theserialNumberkey used for serial number-based filtering.useDhcpDns- Leave the value set totrue. The filter uses the DNS servers provided by your network and falls back to public DNS servers if none are available.
Leave every other value unchanged.
Click the Scope tab and select the same devices you scoped for the Blocksi Filter app.
Click Save.
Safari is covered by the per-app VPN profile and needs nothing further. Other browsers are filtered only if they are installed as managed apps through Jamf Pro and attached to the Blocksi Filter connection. Repeat the relevant procedure for each browser that you want filtered.
Important
The Blocksi Filter connection appears in the Per-App VPN drop-down list only after the per-app VPN profile has been uploaded and scoped to the same devices as the app.
If the browser is already deployed and managed by Jamf Pro, you do not need to add it again. Attach it to the Blocksi Filter connection instead.
In Jamf Pro, navigate to Devices > Content management > Mobile device apps. The Mobile device apps page opens.
Click the browser, then click Edit in the bottom right corner.
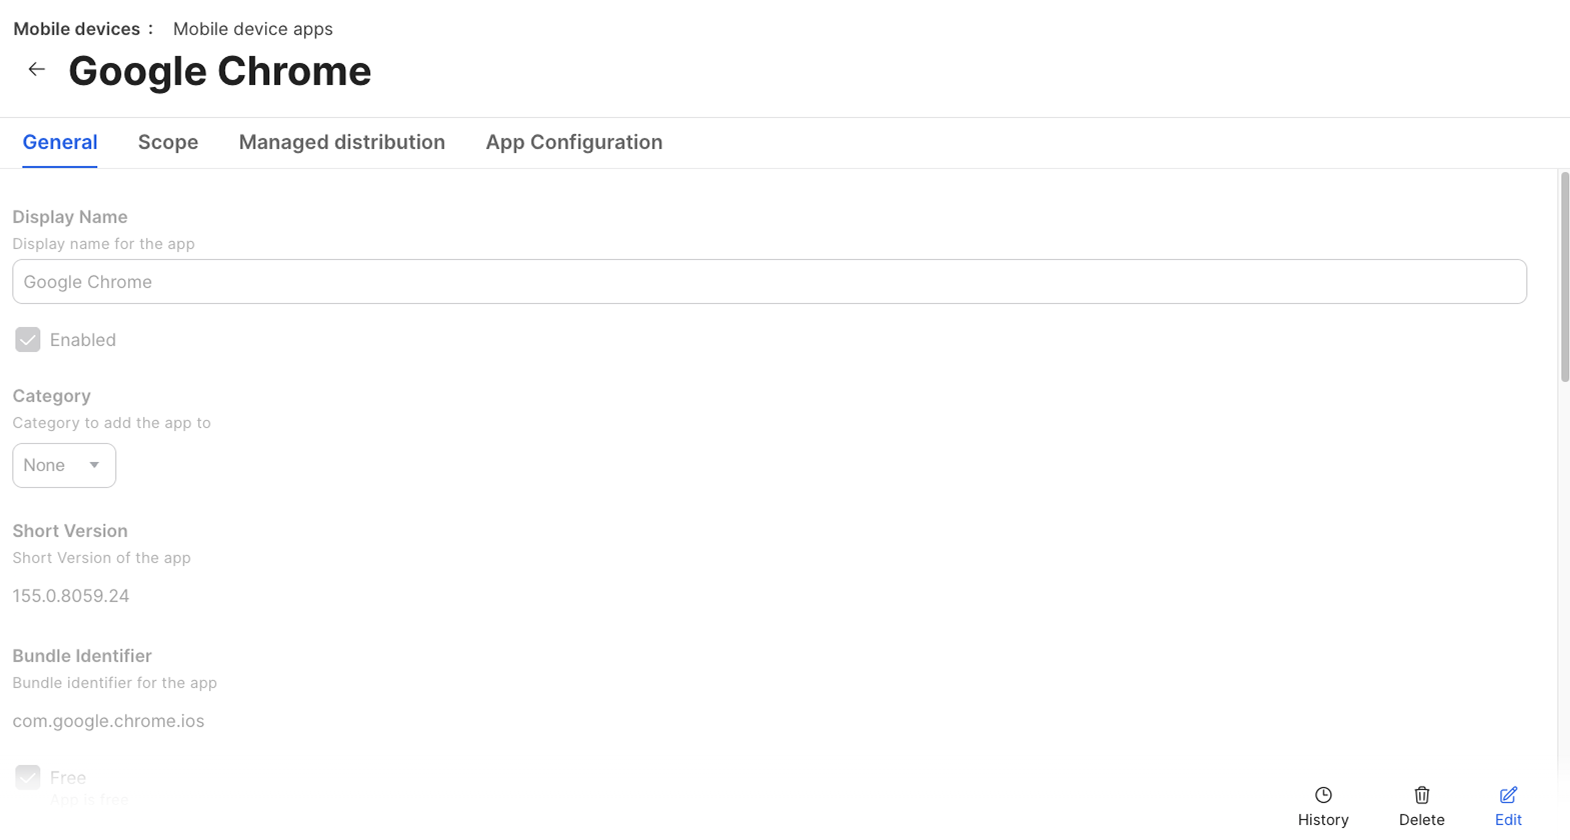
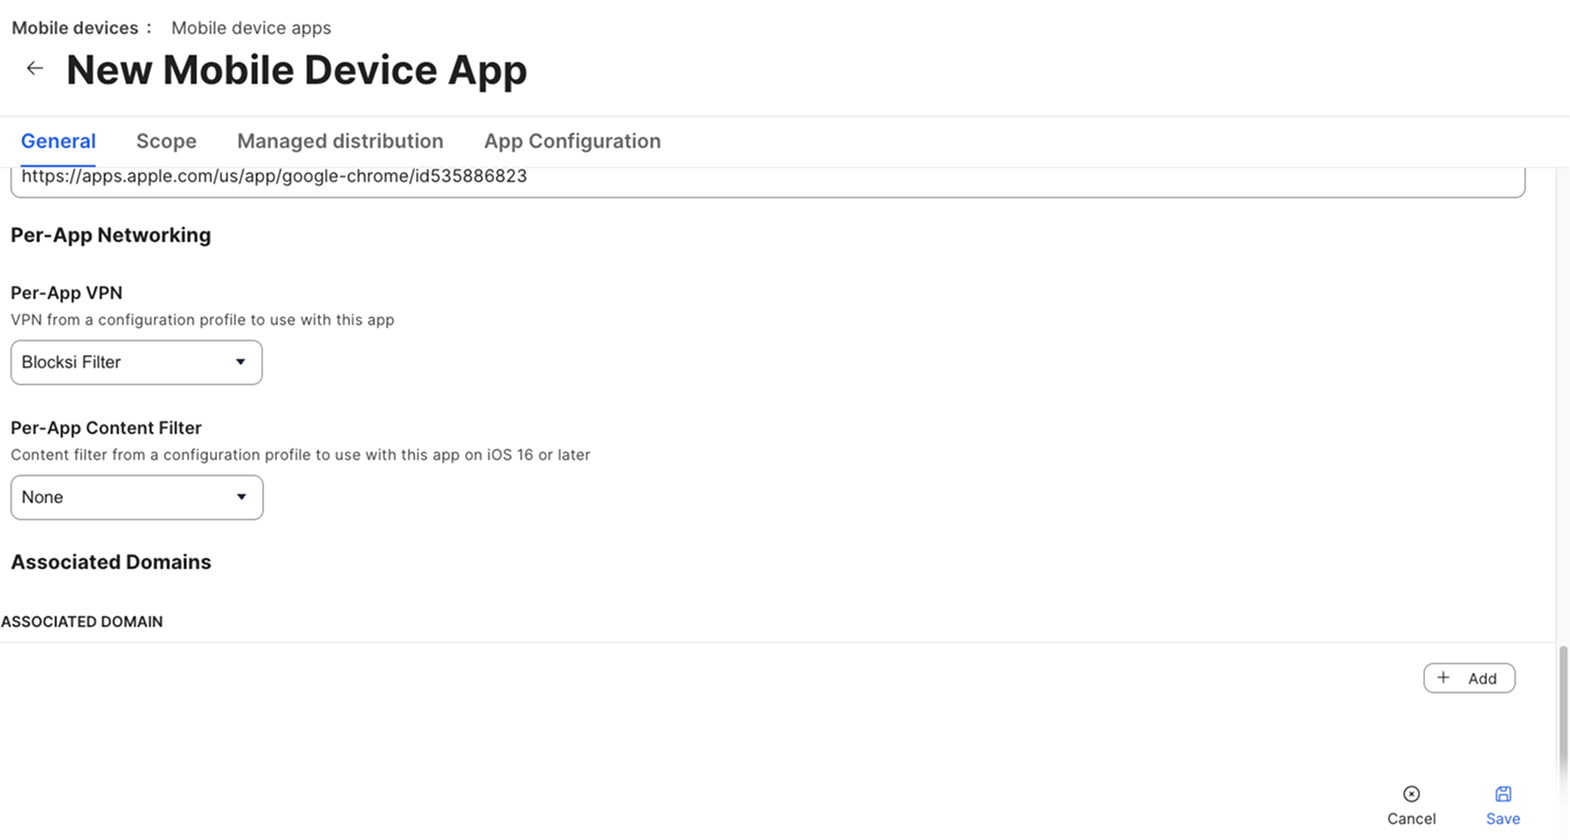
On the General tab, scroll down to the Per-App Networking section and select Blocksi Filter from the Per-App VPN drop-down list.
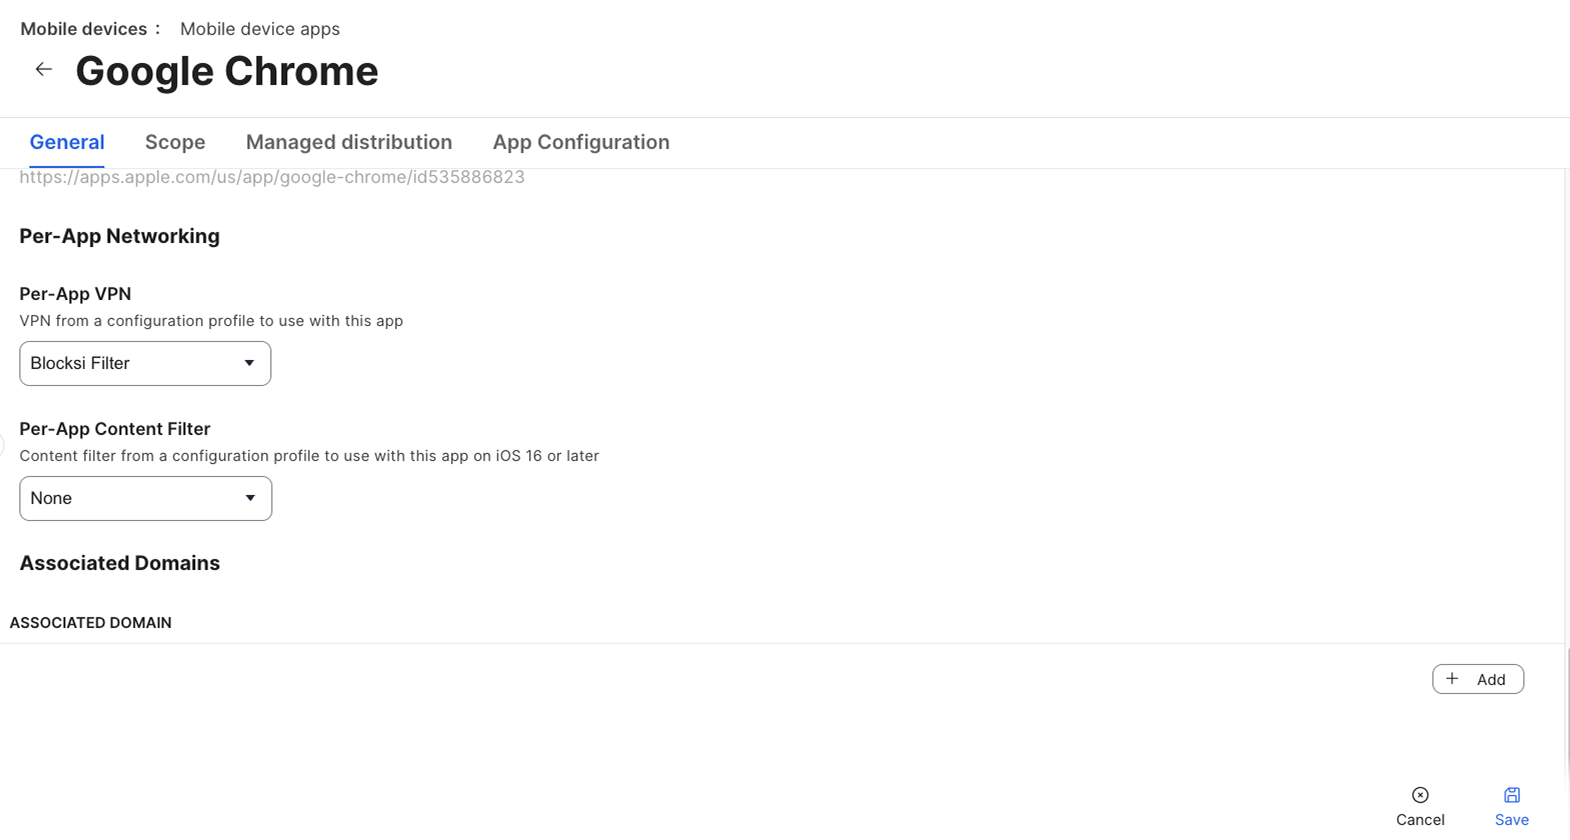
Click Save.
Before you begin, assign the browser to your volume purchasing location in Apple School Manager or Apple Business Manager.
In Jamf Pro, navigate to Devices > Content management > Mobile device apps. The Mobile device apps page opens.
Click + New, select App Store app or apps purchased in volume under Choose an App Type, then click Next.
Enter the name of the browser in the Search box, select your country or region from the App Store Country or Region drop-down list, then click Next.
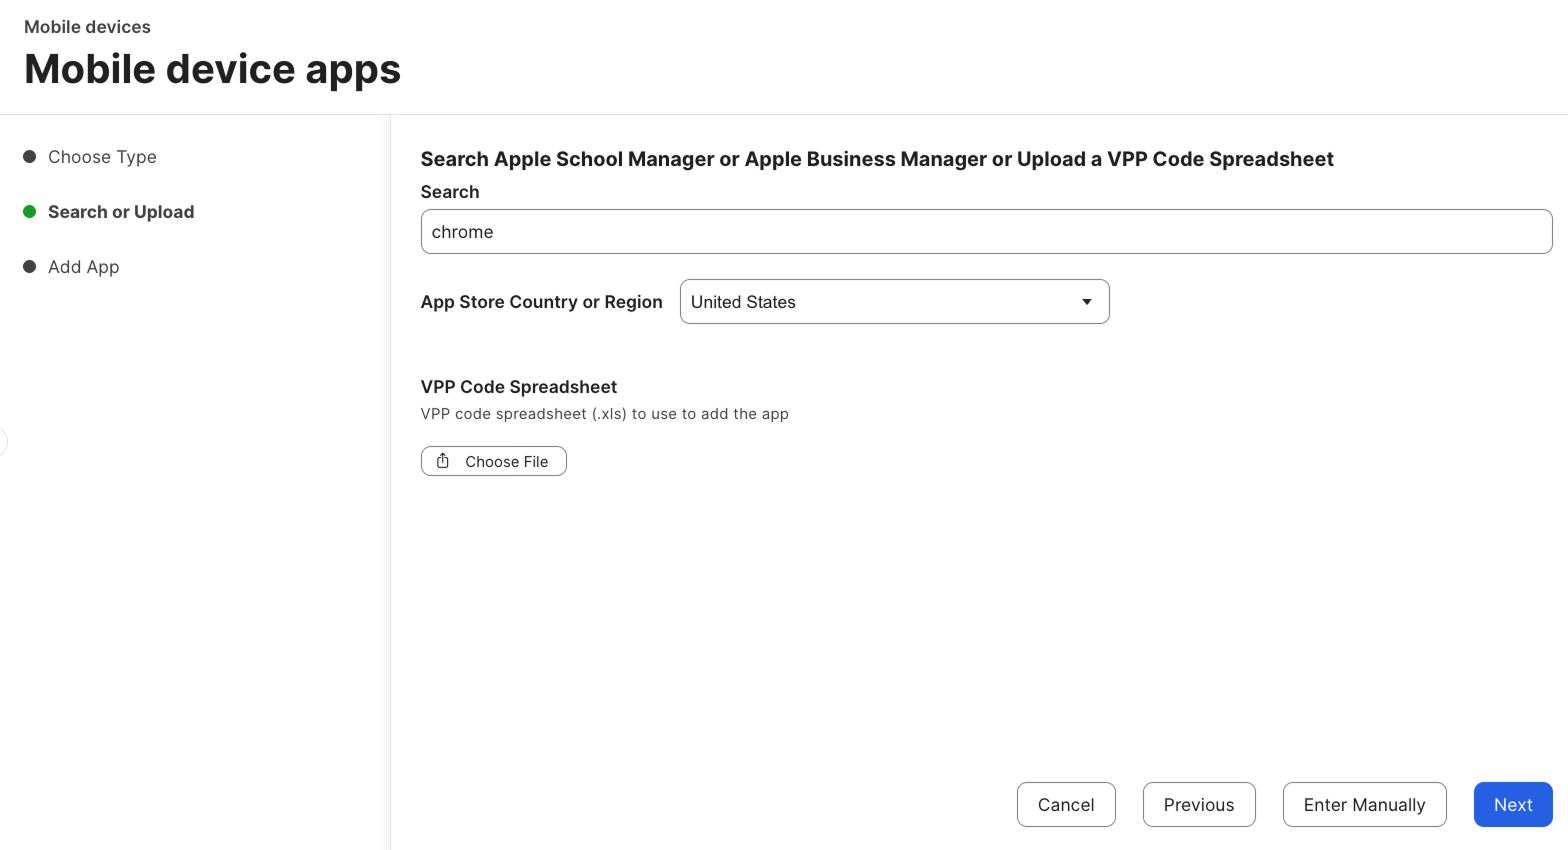
Click the Apps Purchased in Volume tab, locate the browser in the row for your volume purchasing location, and click Add. The New Mobile Device App page opens on the General tab.
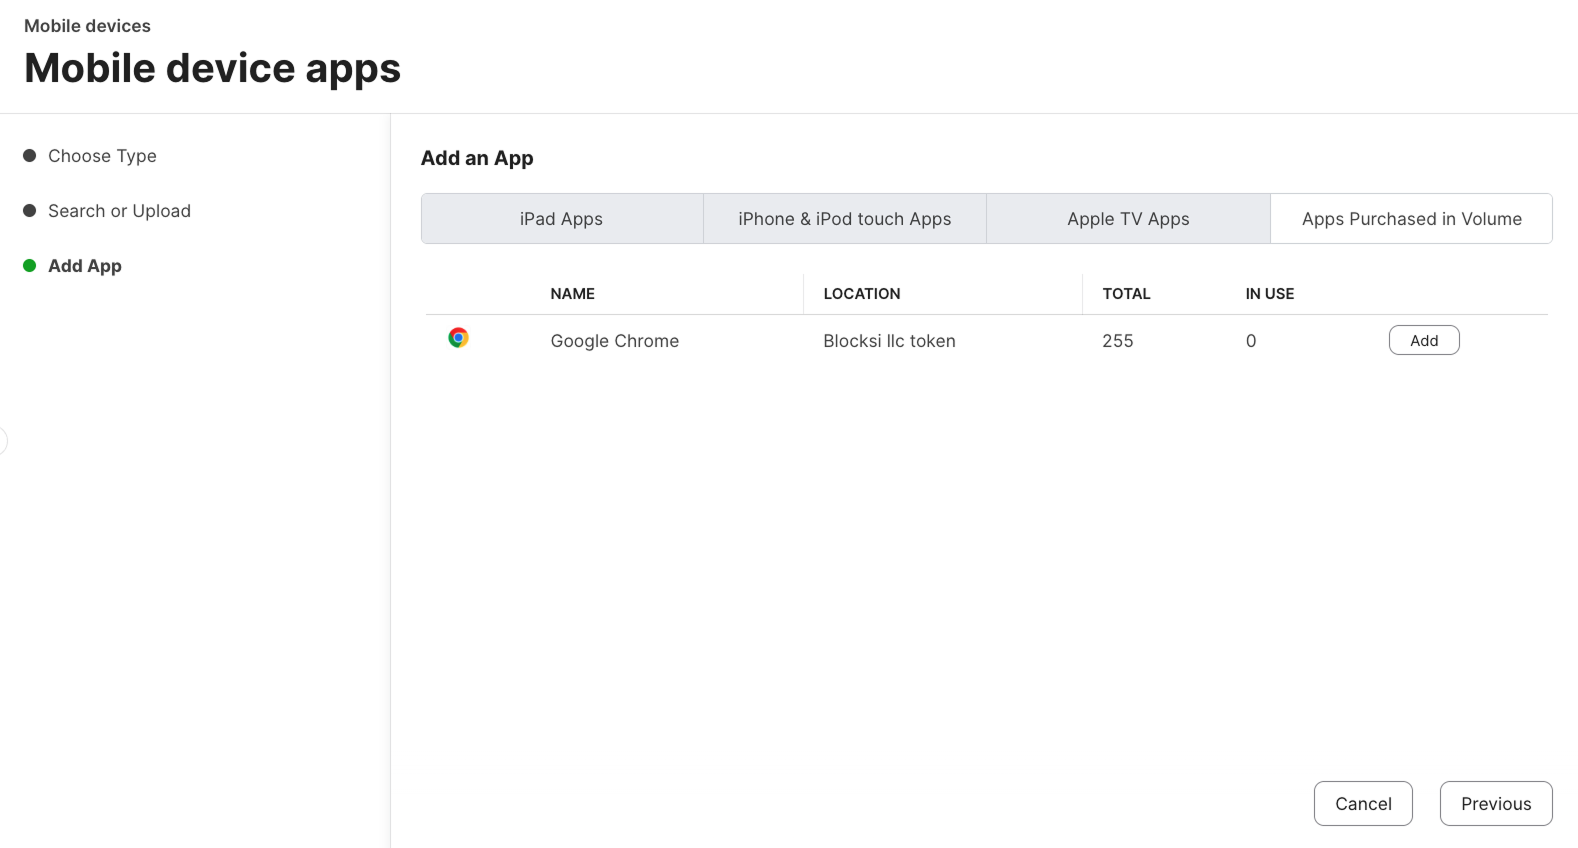
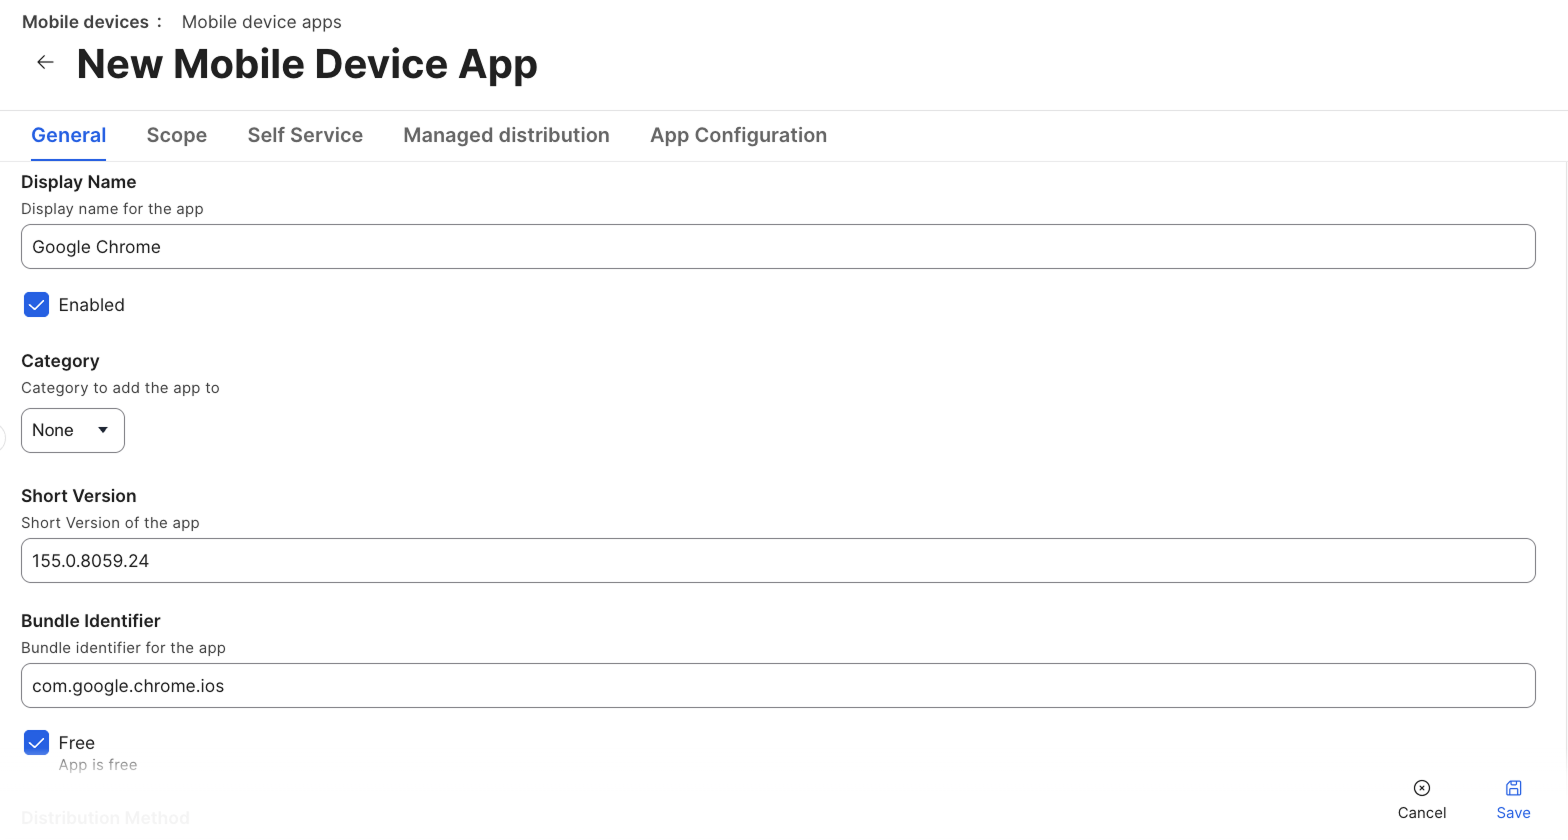
Confirm the following:
Display Name - The name of the browser (e.g., Google Chrome).
Enabled - Selected.
Free - Selected.
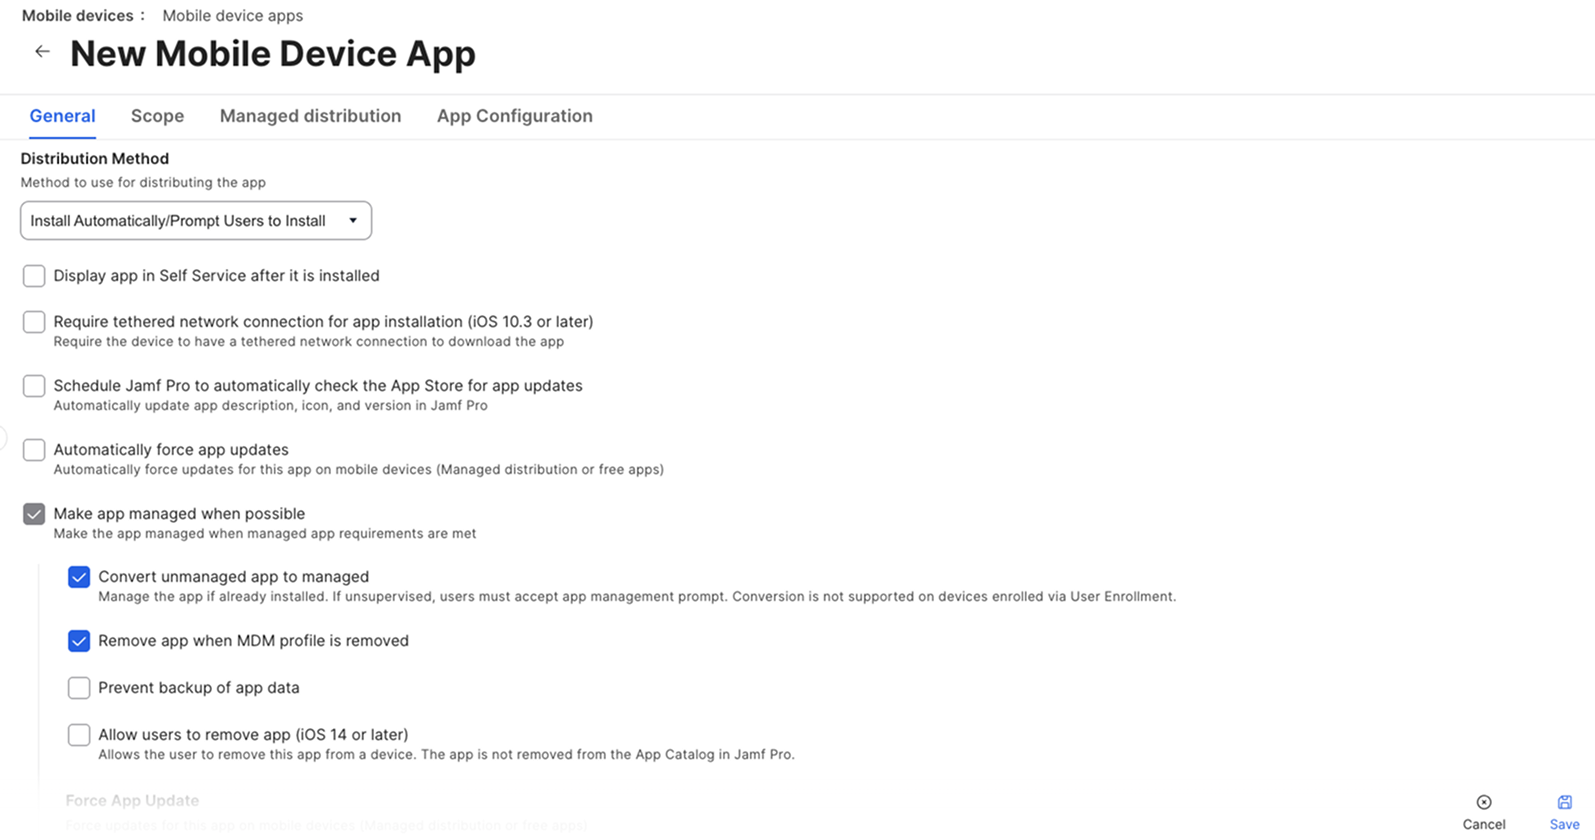
Configure the following:
Distribution Method - Select Install Automatically/Prompt Users to Install.
Make app managed when possible - Select the checkbox, then select Convert unmanaged app to managed and Remove app when MDM profile is removed beneath it.
Allow users to remove app (iOS 14 or later) - Make sure the checkbox is cleared.
Per-App VPN - Select Blocksi Filter.
Click the Scope tab, click + Add under Selected Deployment Targets, and select the same devices you scoped for the Blocksi Filter app.
Click the Managed distribution tab, select Assign Content Purchased in Volume, then select your volume purchasing location from the Location drop-down list.
Click Save.
To validate the deployment, verify that the app and profiles are installed on the target device and that filtering is working correctly.
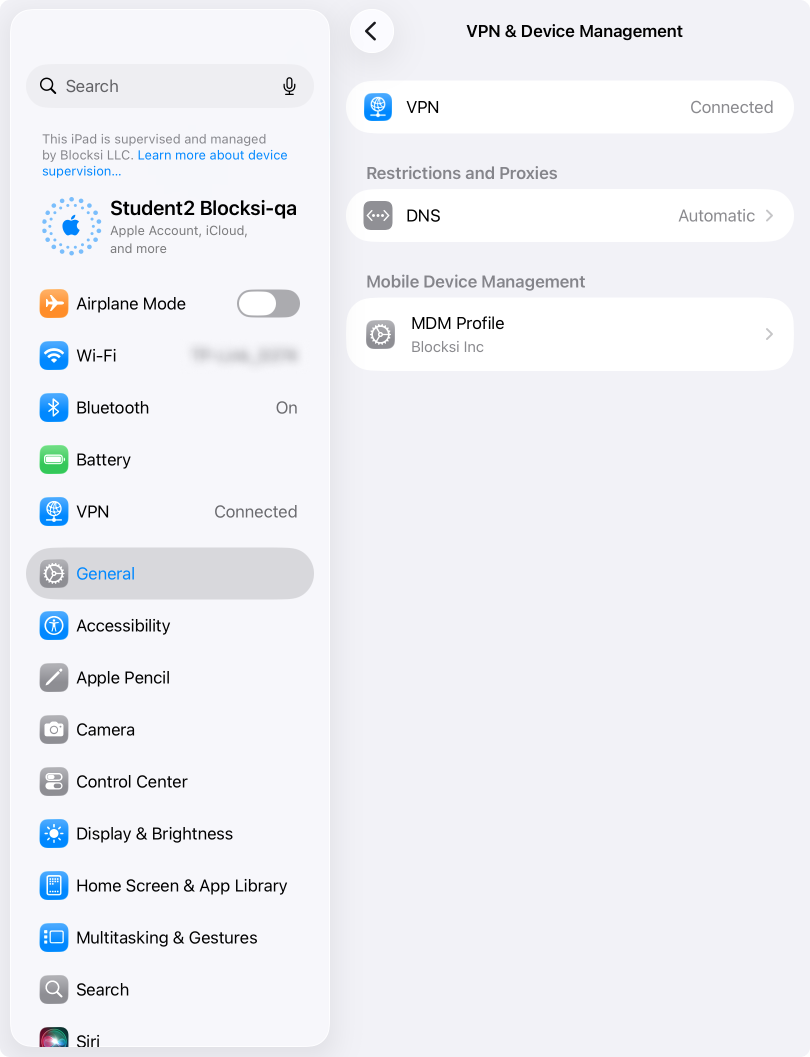
Open Settings on the target device and navigate to General > VPN & Device Management. The Blocksi certificate profile and the per-app VPN profile should both be listed.
Open Safari on the target device and navigate to a site that your policy allows. The site loads normally.
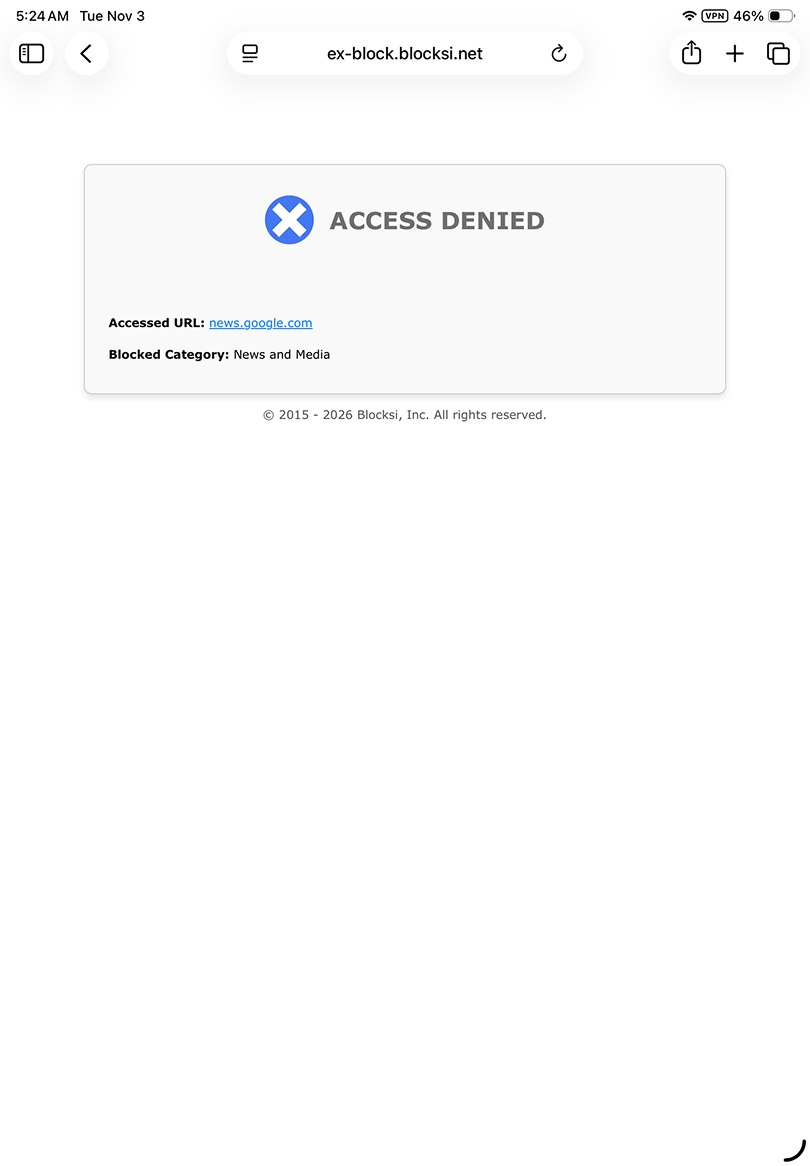
Navigate to some sites that should be blocked by your policy.
Verify that the Blocksi block page appears, with no certificate warning.
Repeat both checks in each managed browser that you attached to the Blocksi Filter connection.
In Jamf Pro, click Search Inventory from the main menu and select the target device.
Click the Configuration Profiles tab, then click the Apps tab. Both Blocksi profiles should be listed, and Blocksi Filter should show as Installed and Managed.
Open Safari on the target device so that the filter activates.
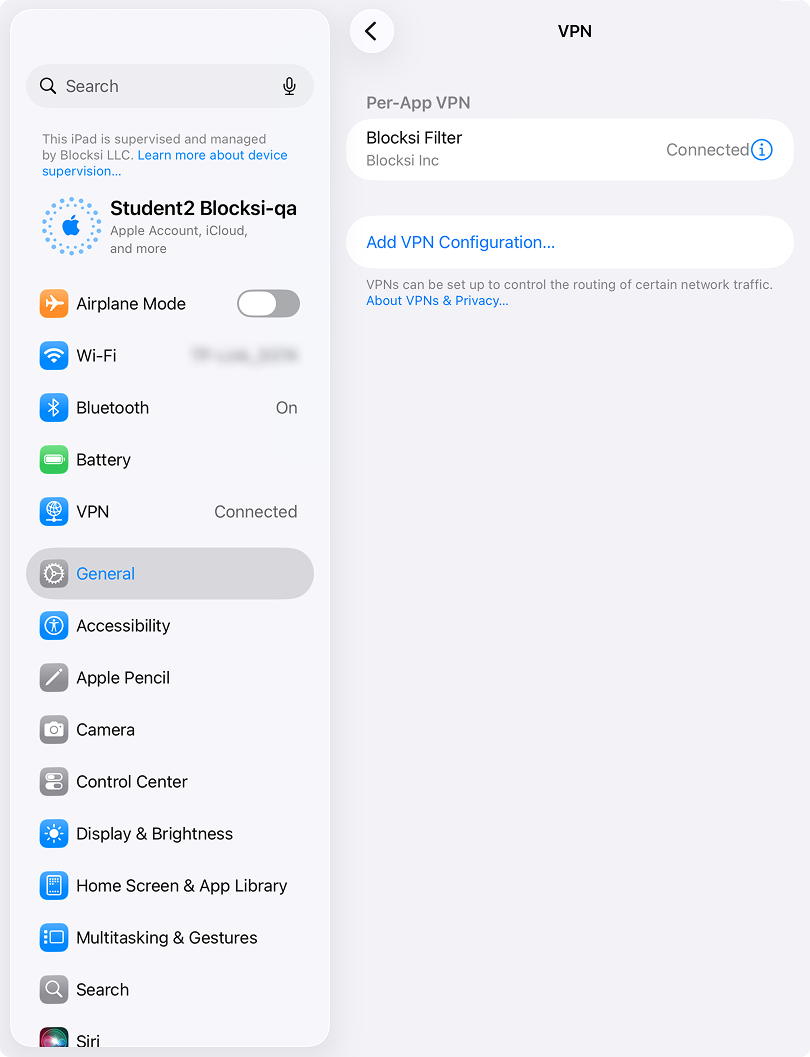
Open Settings on the target device and navigate to VPN > Blocksi Filter. The VPN shows a status of Connected.
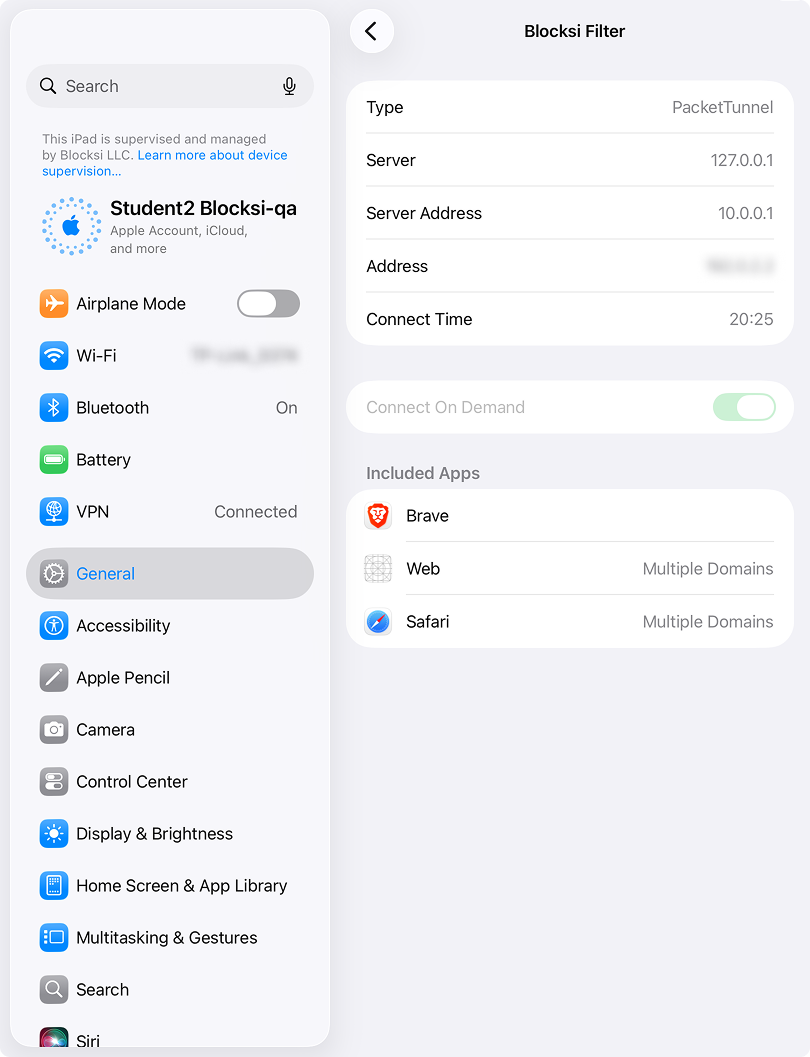
Open Safari on the target device so that the filter activates.
Open the Blocksi Filter app. The app should report your organization and the assigned user. Until the filter activates, the app may report that no organization is configured.
Important
If the deployment does not behave as expected, refer to the Troubleshooting article.