Hall Pass
The Blocksi Hall Pass is a digital hall pass management system designed to enhance student safety, reduce classroom disruptions, and provide accountability by tracking student movements within school facilities.
Administrators can configure Hall Pass, monitor and manage Hall Passes, set and manage Hall Pass rules, and view analytics across their organization.
Hall Pass limits are set per destination rather than school-wide: each destination type has its own maximum duration and its own maximum occupancy. An individual student or a defined group can also be granted a higher pass allowance than the school-wide default.
Click Student Safety from the Main Menu, then click Hall Pass from its sub-menu. The Hall Pass page appears.
The Active tab opens by default and displays all currently active Hall Passes in real time.
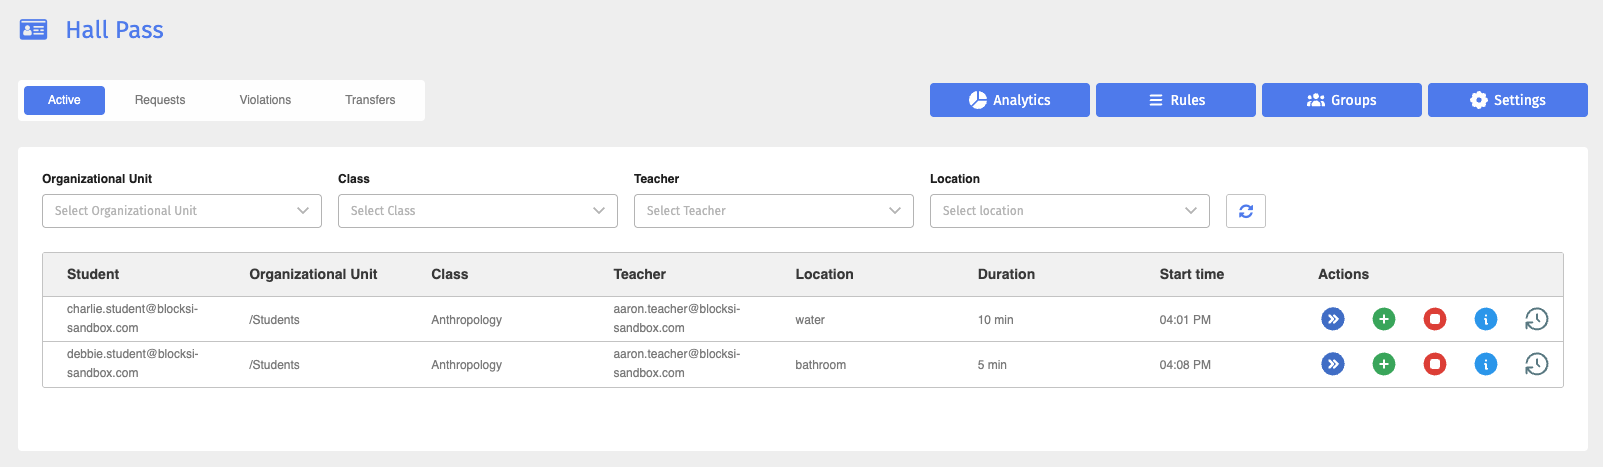
The table gives the following information:
Student
The email address of the student with an active Hall Pass
Organizational Unit
The organizational unit the student belongs to
Class
The name of the class the student is in
Teacher
The email address of the student's class holder
Location
The requested destination of the Hall Pass - nurse
 , water
  , counselor
  , library
  , bathroom
  , and office
Duration
The duration of the student's Hall Pass
Start time
The timestamp when the Hall Pass started, adjusted to the set timezone
Actions
Administrative controls used to manage Hall Passes; see Managing Hall Passes for details
Tip
You can filter the table using different parameters, such as student, class, teacher, and location.
Before you begin
The student must be in an active class and must not already have an active Hall Pass. The requested duration plus any start delay must fit within the remaining class time, though this check is skipped for the office, nurse, and counselor destinations.
Click the
 button. The Create Hall Pass window appears.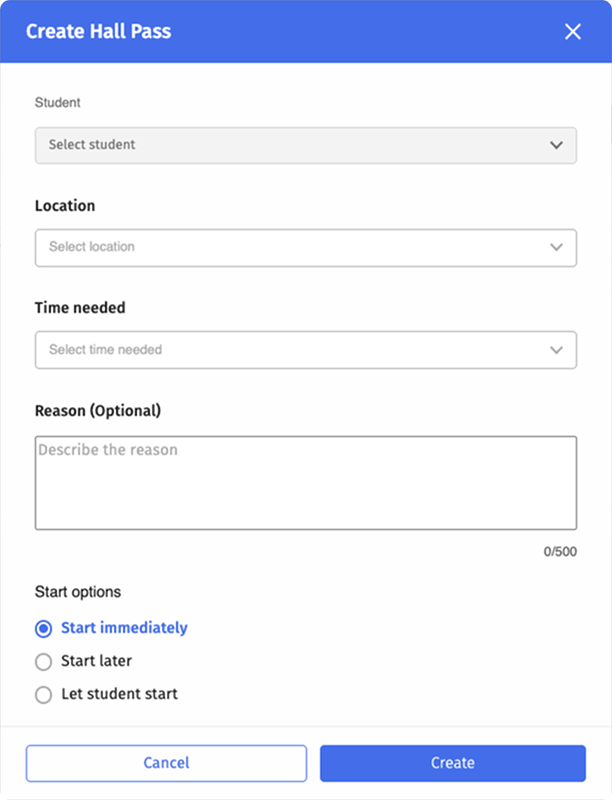
Select the Student you want to create a Hall Pass for from the Select student drop-down list.
Choose the Hall Pass Location from the drop-down list.
Select the Time needed.
Note
A Hall Pass can be ended prematurely either by a student, a teacher, an administrator, or a delegate.
If needed, describe why a Hall Pass is required in the Reason field.
Choose from the given Start options:
Start immediately - The Hall Pass starts instantly.
Start later - Schedule a time for the Hall Pass to start (in 1:00 minute, 3:00 minutes, or 5:00 minutes).
Let student start - Lets the student decide when to start the Hall Pass; you will be prompted to select an auto-start time.
Click Create.
Note
If an active rule denies the Hall Pass, the error appears in a toast notification. Refer to Hall Pass Rules to learn more about setting rules.
The Active tab contains five action buttons to manage Hall Passes: Transfer, Extend, Stop, Info, and History.
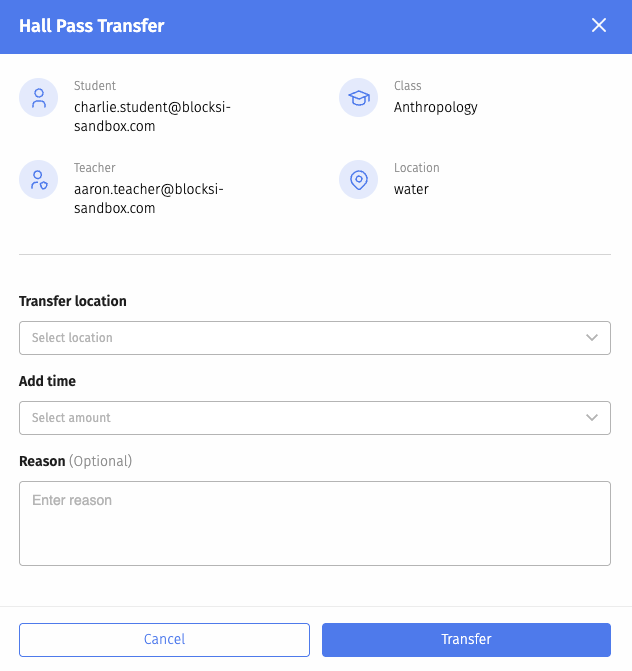
Clicking the  button opens a modal that allows the administrator to change the location and duration of the Hall Pass.
Note
Transferred passes appear both in the Active and the Transfers tab.
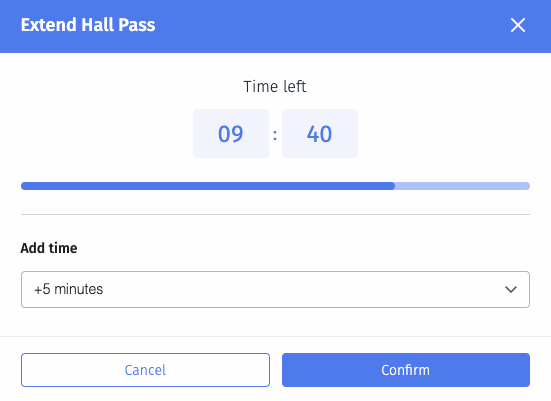
Clicking the  button opens a modal showing the time remaining and an option to add time.
Note
The selected time is added on top of the existing time.
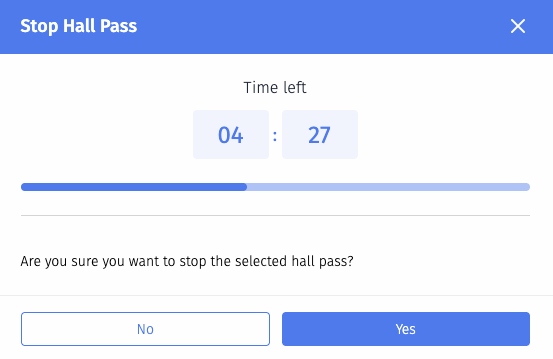
Administrators can stop any active Hall Pass by clicking the  button. A confirmation modal appears before the pass is terminated. Once stopped, the pass is removed from the Active tab.
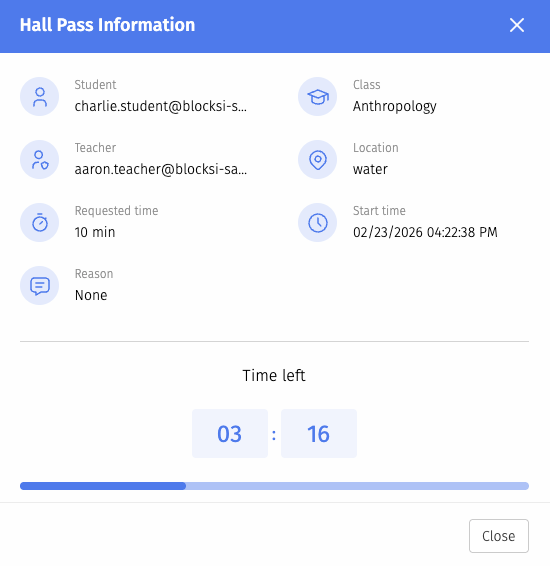
Clicking the  button shows a modal with the following information:
Student name
Class
Teacher
Location
Requested time
Start time
Reason
Remaining time
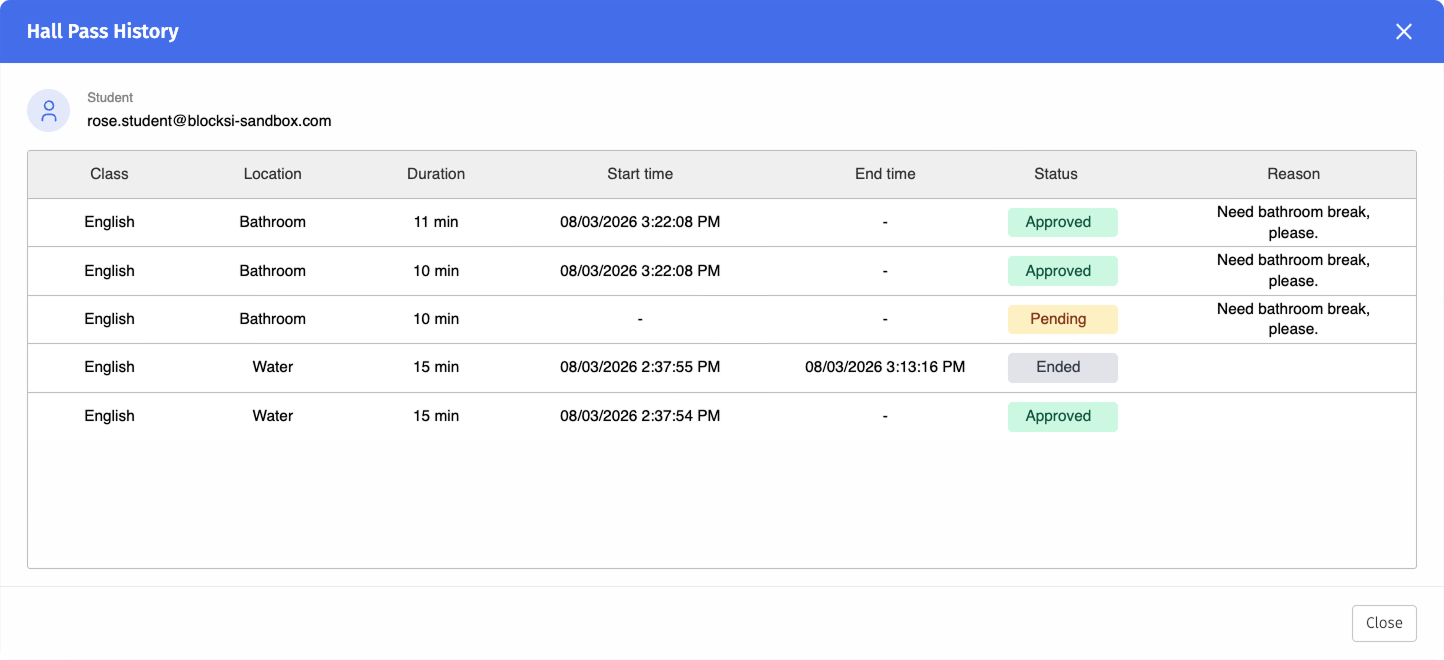
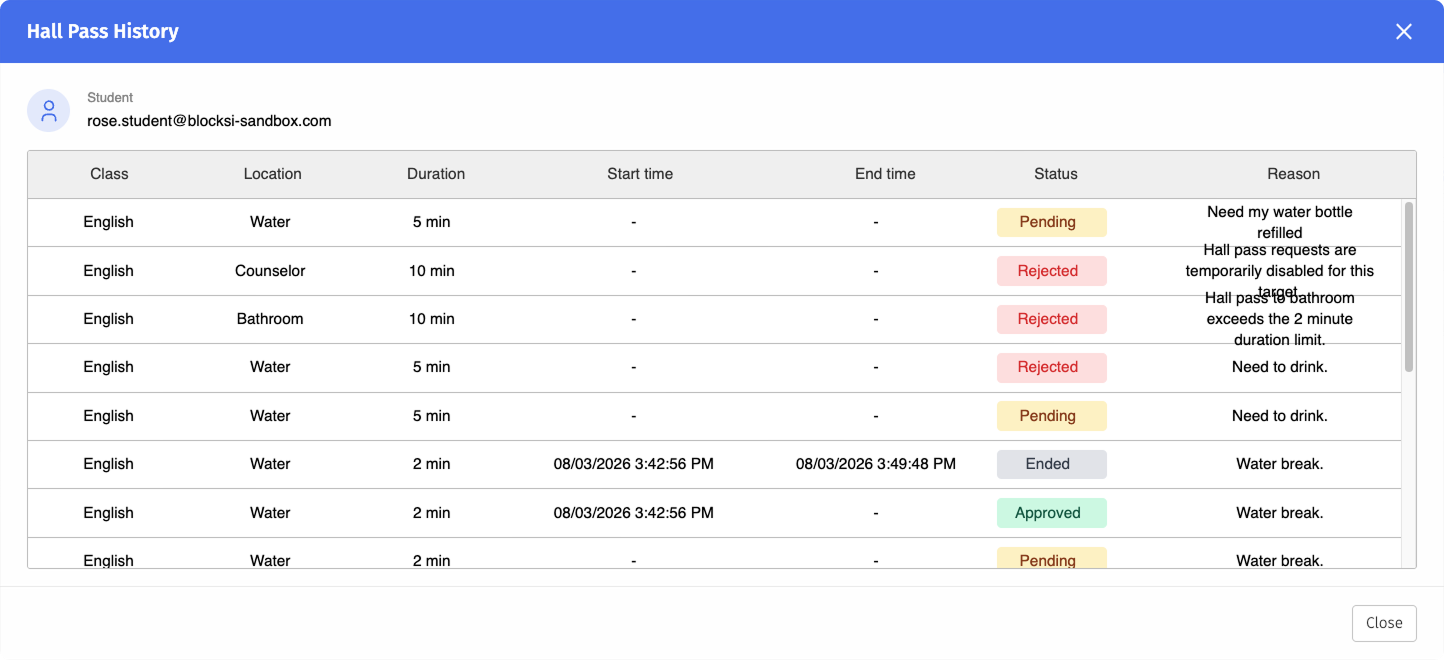
Clicking the  button displays a table of all past Hall Passes for the selected student. The table includes information on the following:
Class name
Location
Duration
Start and end time
Status
Reason
Navigate to the Requests tab to view all Hall Pass requests with their current status (pending, approved, or denied). The table can be filtered by student, class, teacher, and location.
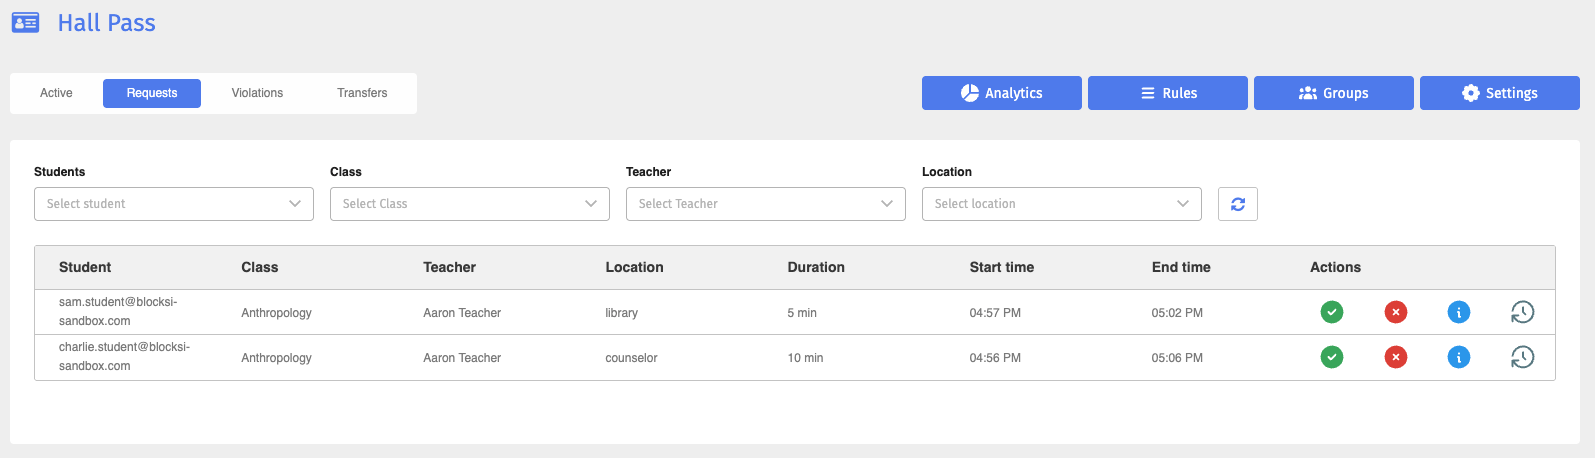
Administrators can approve or deny pending Hall Pass requests directly from the table. A confirmation modal is shown before both actions are executed.
When a destination has an occupancy limit, the number of free spots is displayed alongside the request. While spots are available, the Hall Pass can be approved manually or automatically. Once the destination is full, the request is rejected manually or automatically.
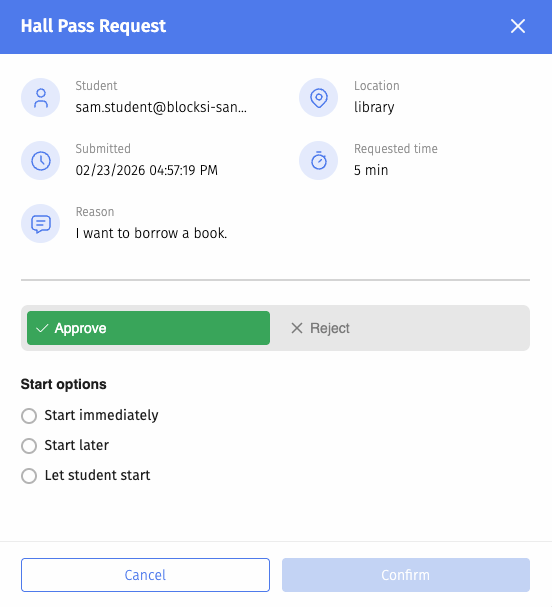
Clicking the button opens the details modal. From there, administrators can approve or deny a Hall Pass request and set a start time when approving a request. A comment can also be added when approving or denying using this method.
Note
Hall Pass requests with a violation are not displayed here. You can find them in the Violations tab.
A Hall Pass is in violation if a student exceeds the time limit of their Hall Pass.
Navigate to the Violations tab to view all Hall Pass requests with a violation tag.
Important
All requests with a violation tag are automatically rejected.
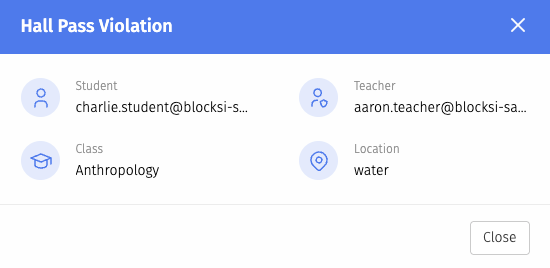
Clicking the button opens a details modal, where you can see details of a request and the reason for the violation.
Clicking the button shows a table of all requested Hall Passes with violations for the selected student.
Click the  button to view visual analytics and reports about Hall Pass usage patterns across the organization.
The analytics page has four tabs: Active, Requests, Violations, and Transfers.
Active tab | Requests tab | Violations tab | Transfers tab |
Shows data for all currently active Hall Passes. | Shows data for all requested Hall Passes. | Shows data on Hall Pass violations. | Shows data on transferred Hall Passes. |
The horizontal bar chart shows time elapsed, time remaining, and time violated grouped by student. | The line chart shows approved vs. rejected Hall Pass requests by day in the selected date range. | The line charts show the number of violations and sum of violated time in minutes per day in the selected date range. | The line chart shows the number of transfers per day in the selected date range. |
The doughnut charts show the number of active Hall Passes grouped by location, class, and teacher. | The doughnut charts show the number of requested Hall Passes grouped by location, student, and teacher. | The doughnut charts show the number of transferred Hall Passes grouped by end location, student, and teacher. |
All charts can be filtered by location, class, teacher, and student.
Note
Each filter is a searchable single-select, and two or more filters can be combined. For example, selecting nurse in location and English in class shows only Hall Passes with that location and class.
The default time range of data displayed is last 7 days, but you can choose from 1 day, 7 days, 1 month, and 3 months.
Tip
Data on the Active tab is refreshed every minute and can also be manually refreshed with the  button. Data on the other tabs reloads any time a different time range is selected.
Rules include time restrictions, location limits, encounter prevention, rate limits, duration limits, and automatic request denial. They can be configured for both locations and students.
Each Students rule is scoped to one or more organizational units and can be applied to all students, groups, or individuals.
Click the  button to view, create, and manage automated rules that control Hall Pass behavior.
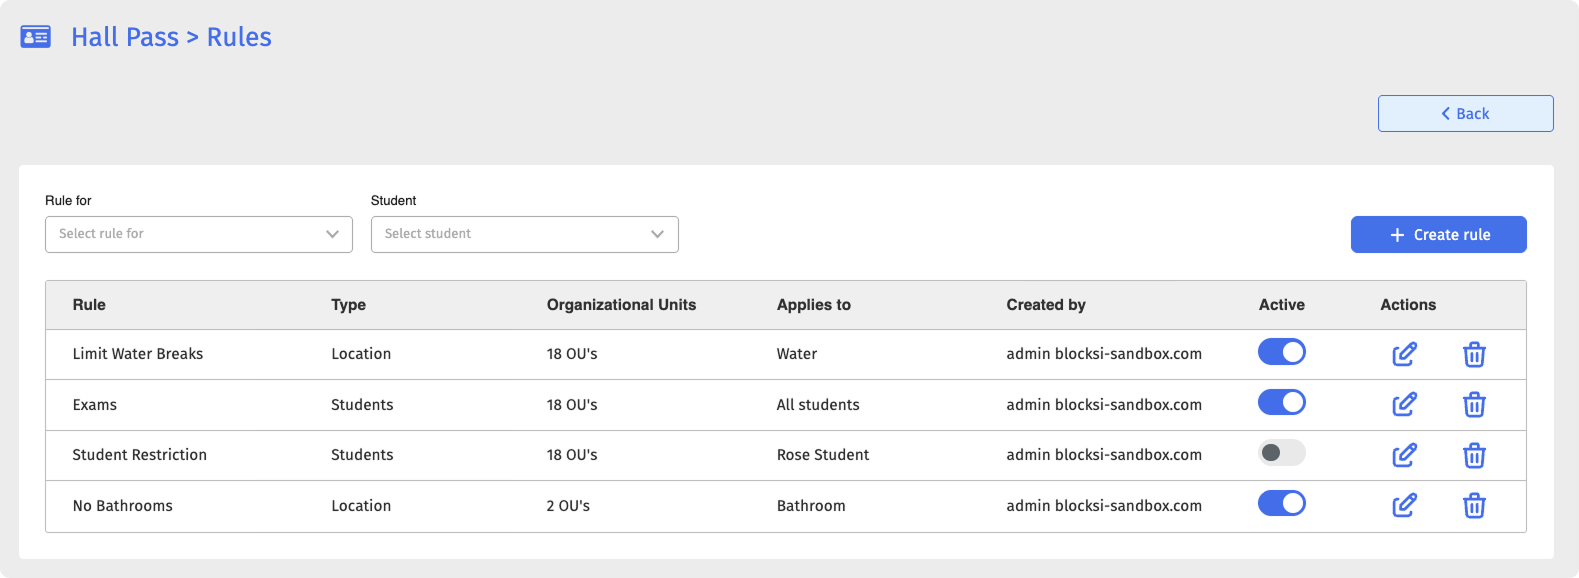
The rules overview table shows all currently active and inactive rules with information about the rule name, type, who it applies to, who it targets, rule creator, status, and actions. It also includes rules created by delegates for their organizational units. Each rule can be activated and deactivated from the table using a slider.
Note
Each rule can be edited  or deleted
  as needed.
Click the
 button to open the Create rule window.
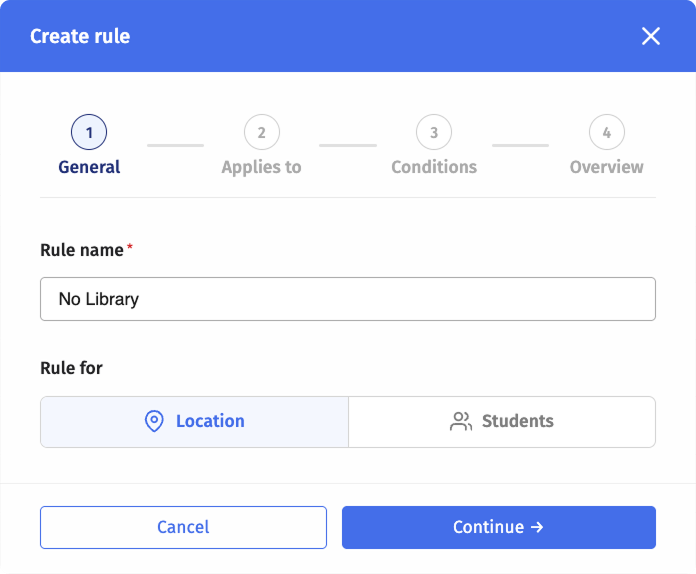
Enter a Rule name and select Location under Rule for, then click Continue.
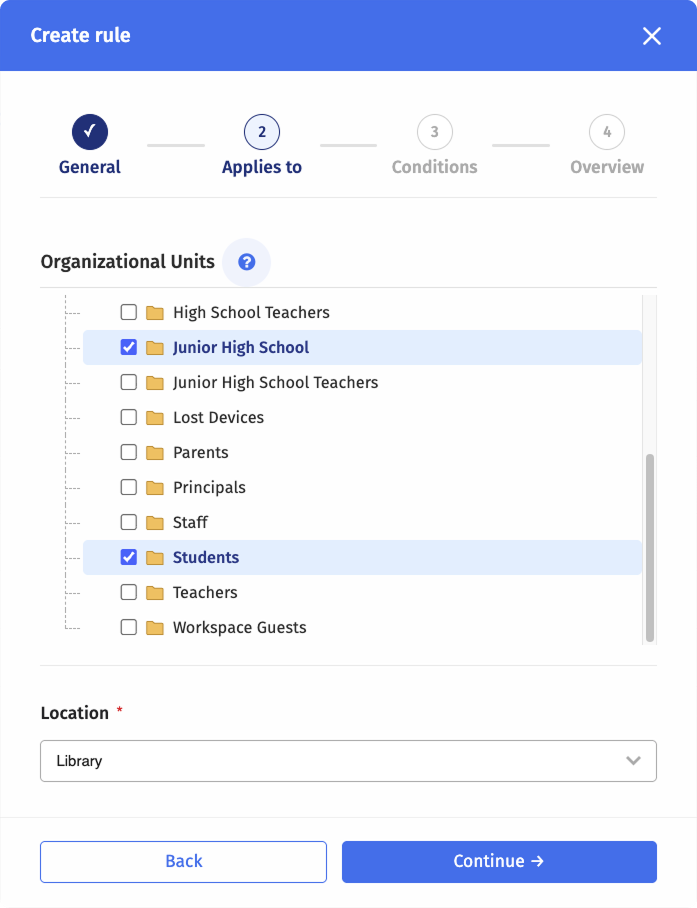
Select the Organizational Units the rule will apply to, then select the Location this rule will apply to from the drop-down list.
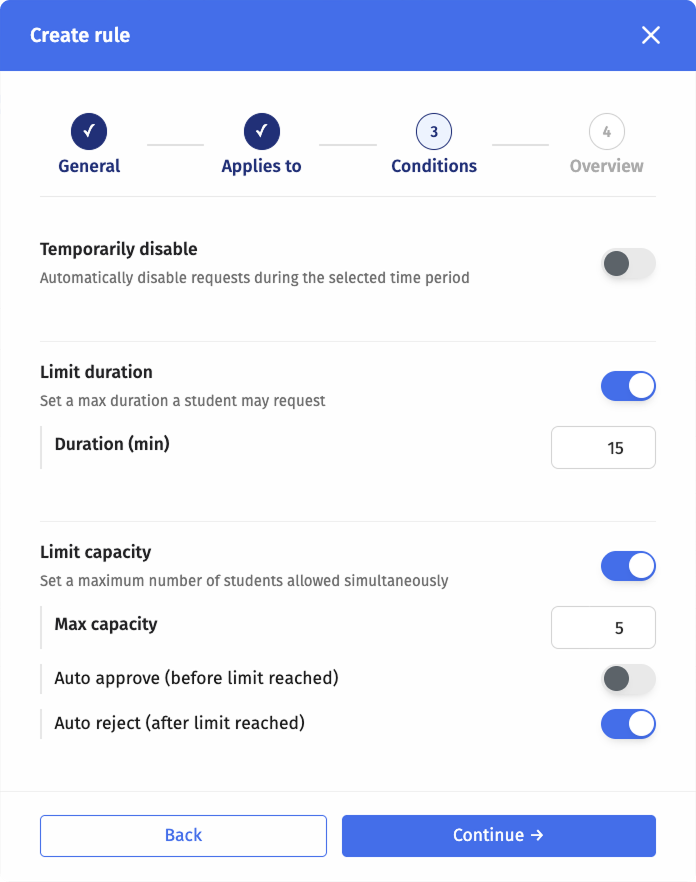
Configure the rule conditions. The available options include:
Temporarily disable - Automatically disables Hall Pass requests for the selected location during the selected time period.
Limit duration - Sets a maximum Hall Pass duration that a student may request for the selected location. Each destination type can have its own limit, for example bathroom 15 minutes, office 25 minutes, and nurse 30 minutes.
Limit capacity - Sets a maximum number of students that are allowed to have a Hall Pass for the selected location simultaneously.
Tip
Both Limit duration and Limit capacity can be configured in the same rule.
Note
Time-of-day restrictions apply on top of per-destination limits. The two controls combine rather than override each other.
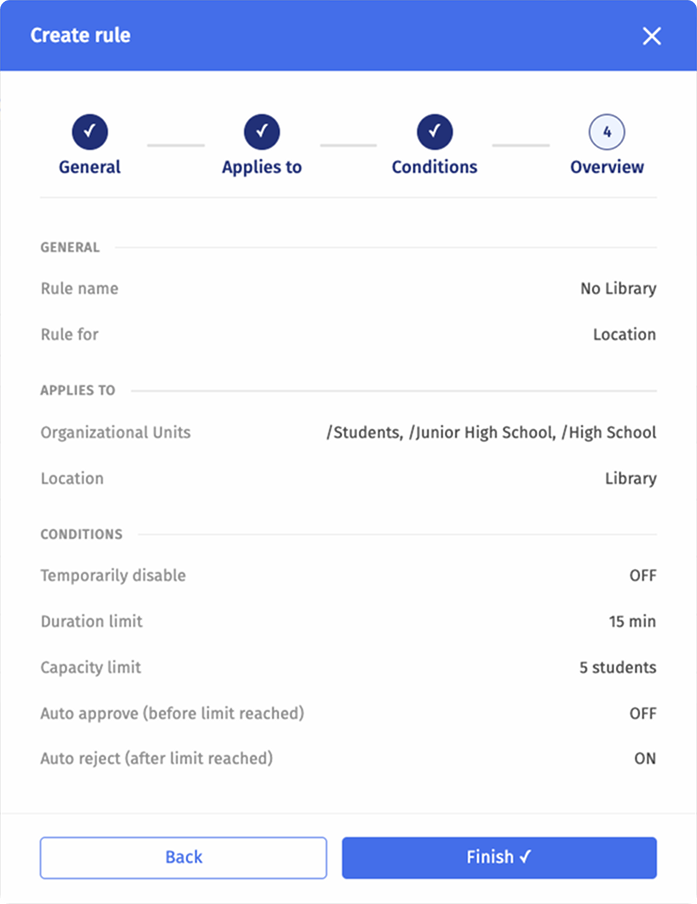
Review the rule configuration and click Finish.
Click the
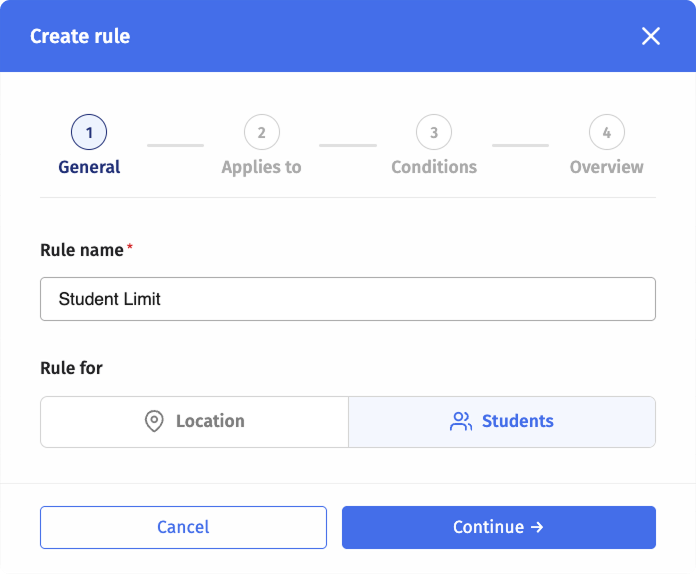
button to open the Create rule window.Enter a Rule name and select Students under Rule for, then click Continue.
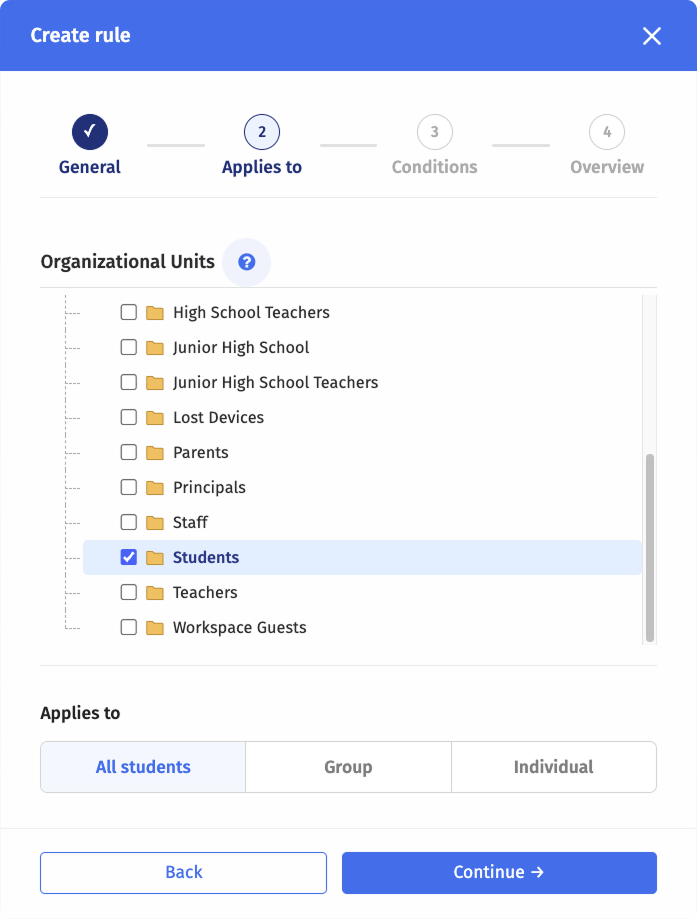
Select the Organizational Units the rule will apply to, then select whether to apply the rule to All Students, a Group of students, or Individual students.
Note
Student groups can be created directly in the rule creation modal, or alternatively in the Hall Pass Groups section. Refer to Hall Pass Groups for more information.
Configure the rule conditions. The available options depend on the selection made in step 3:
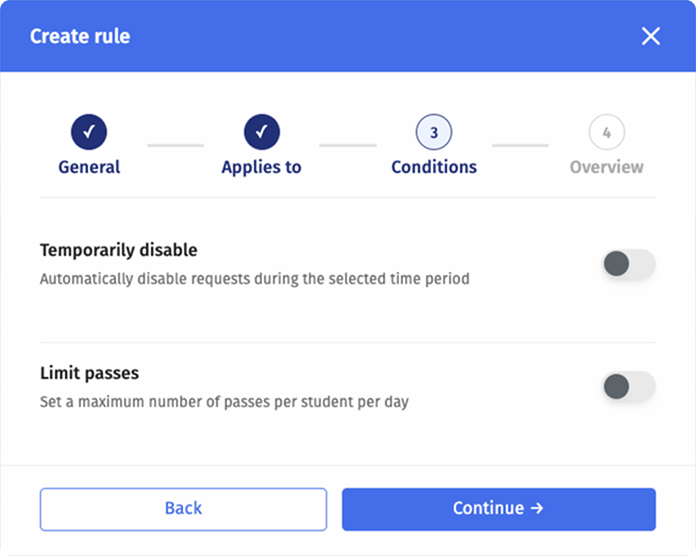
Rules for all students:Temporarily disable - Automatically disables Hall Pass requests for the selected students during the selected time period.
Limit passes - Sets a maximum number of Hall Passes per student per day.
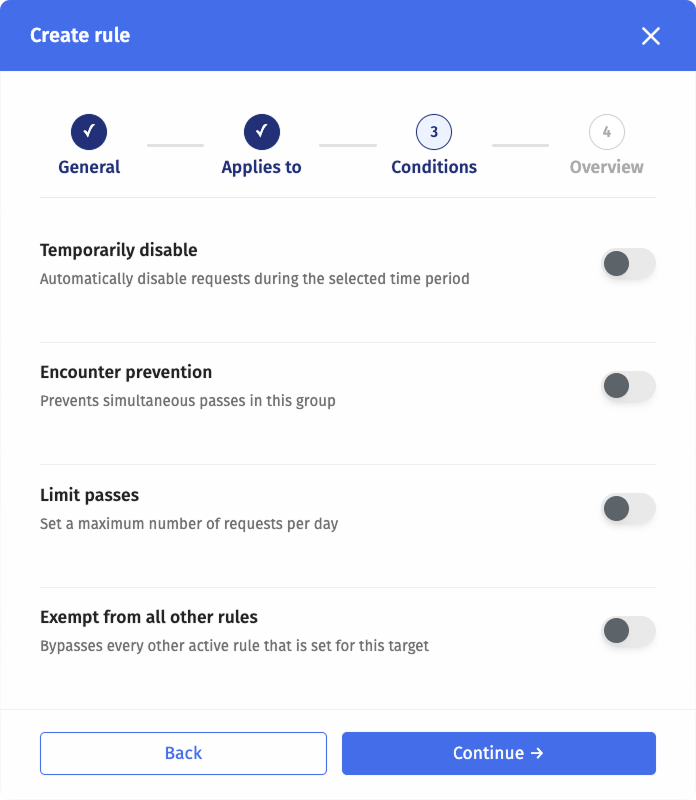
 Rules for groups:
Temporarily disable - Automatically disables requests from the selected student group during the selected time period.
Encounter prevention - Prevents simultaneous Hall Passes in the selected student group.
Limit passes - Sets a maximum number of Hall Pass requests per day for the selected student group.
Exempt from all other rules - Bypasses every other active rule that is set for this student group.
 Rules for individual students:
Temporarily disable - Automatically disables requests from the selected student during the selected time period.
Limit passes - Sets a maximum number of Hall Pass requests per day for the selected student.
Exempt from all other rules - Bypasses every other active rule that is set for this student.
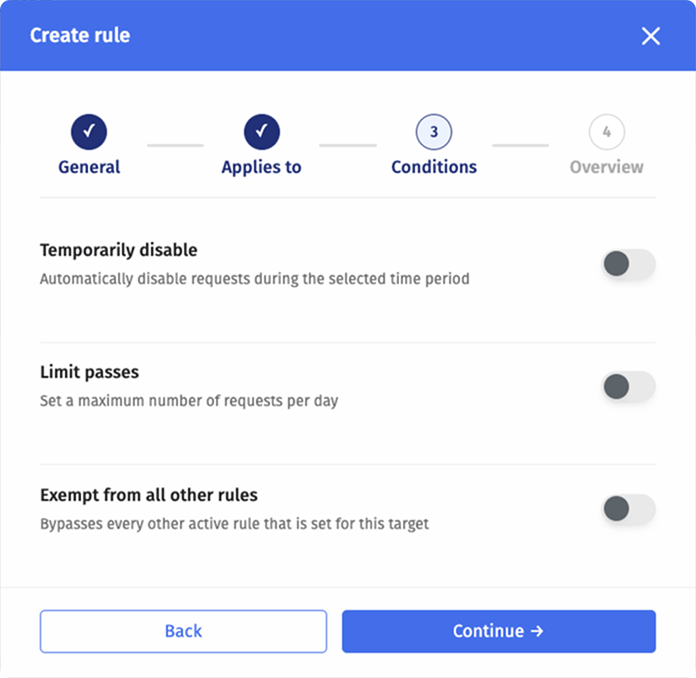
Review the rule configuration and click Finish.
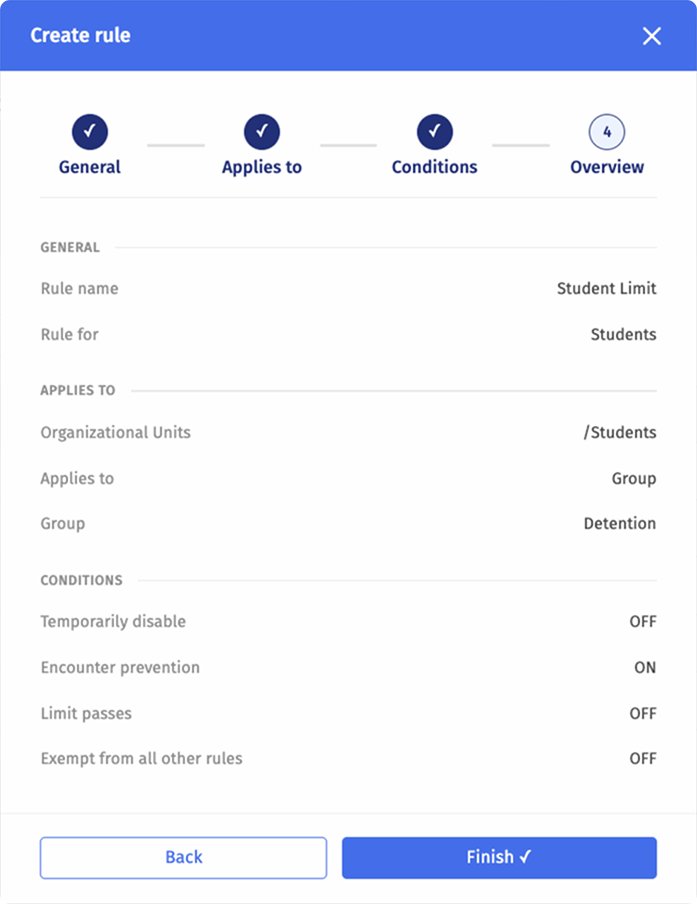
To grant a higher allowance, set Limit passes above the school-wide default. The override applies only to the selected student or group; everyone else keeps the default.
Important
Pass allowance overrides are intended for documented health needs and state-mandated accommodations, where standard restrictions would conflict with a legal or medical requirement.
Click the  button to view, create, and manage student groups that are used for applying rules to multiple students. Student groups can also be created directly in the rule creation window.
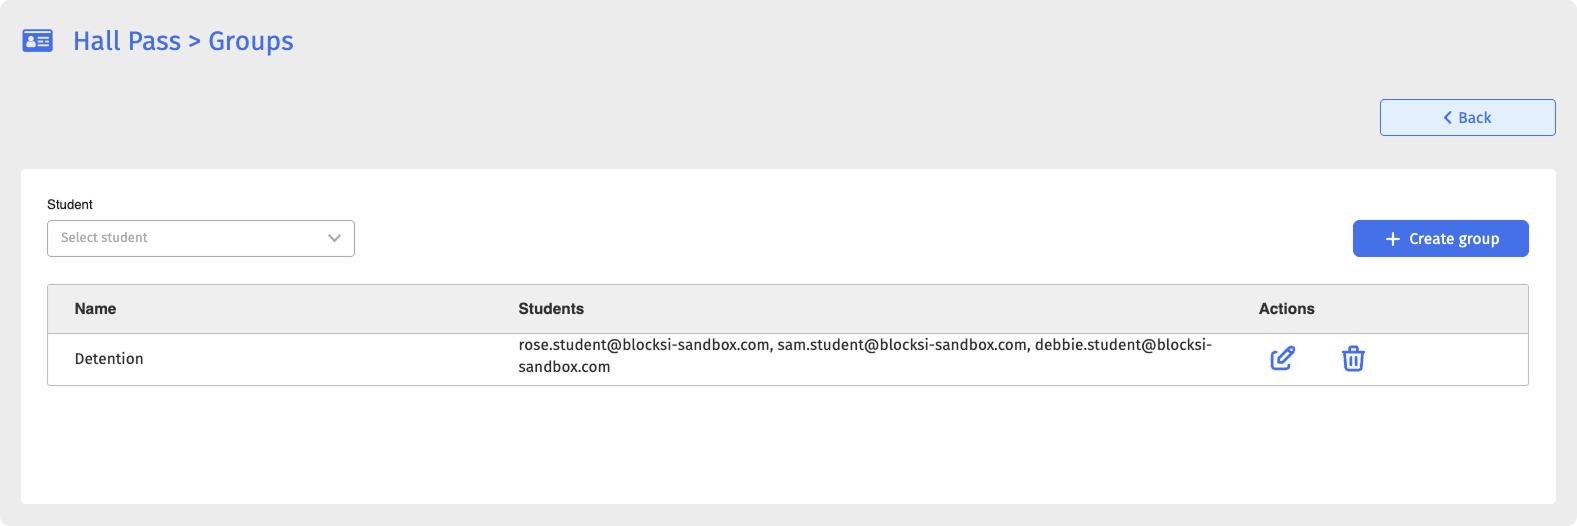
The group overview table shows group name and students that are part of the group.
Note
Each rule group can be edited or deleted from the table.
Warning
Deleting a group may affect rules that reference it.
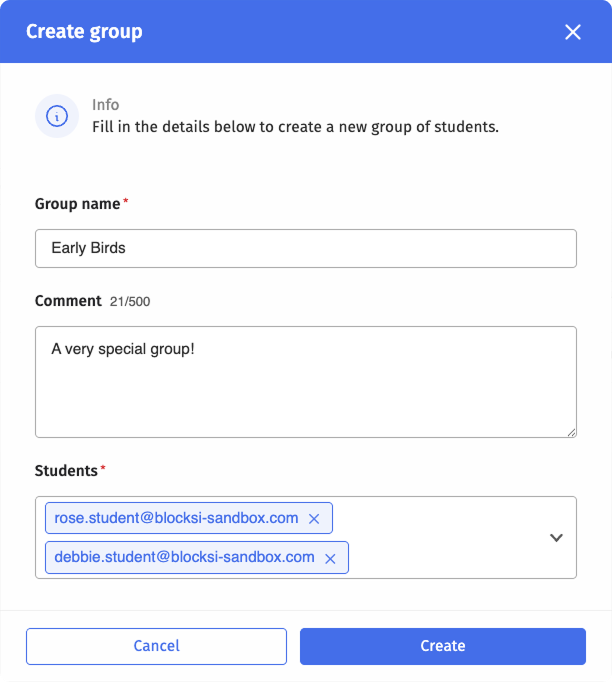
Click the
 button to open the Create group window.
Enter a Group name and select Students from the drop-down list. A Comment can be added optionally.
Click Create.
Click the  button to manage organization-wide Hall Pass settings.
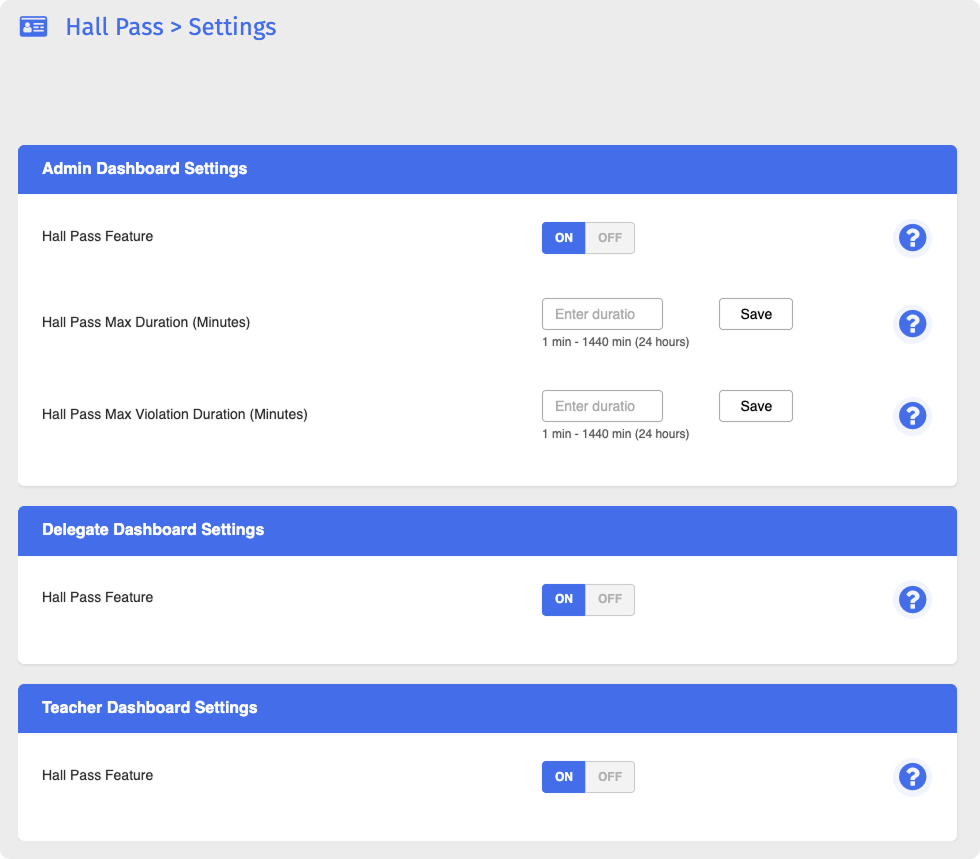
Hall Pass Feature - Turn the Hall Pass feature ON or OFF.
Hall Pass Max Duration (Minutes) - Set the maximum duration a student may request, from 1 to 1440 minutes (24 hours).
Hall Pass Max Violation Duration (Minutes) - Set the maximum violation duration, after which the Hall Pass automatically stops.