Policies
A policy groups filters into a single set and puts them into effect. Filters define individual rules for the content students can reach, and a policy decides which of those rules apply, when they apply, and to whom. Policies are assigned to organizational units, so every user in a unit receives the same filtering.
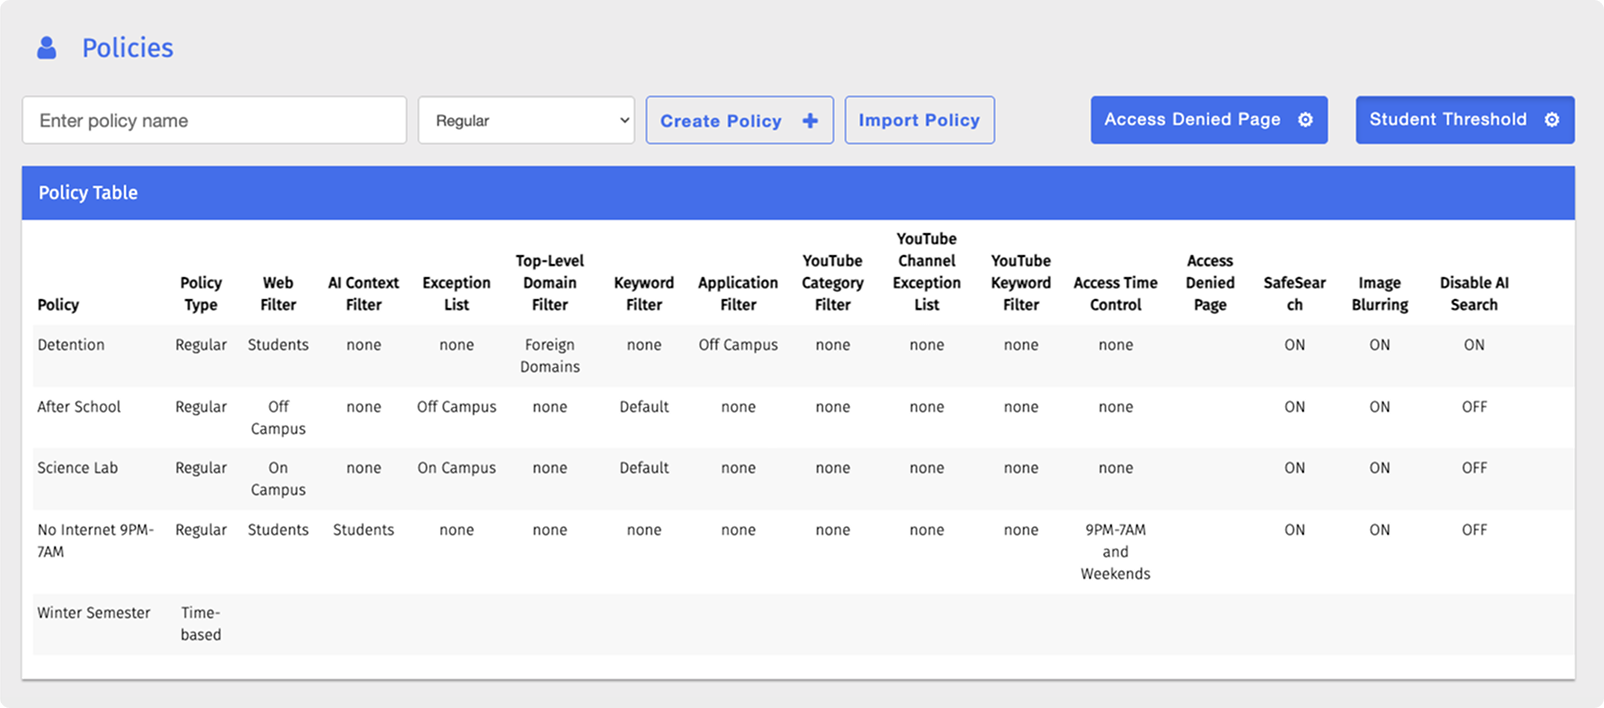
A policy can also apply to an individual student or a class. The Penalty Box applies a dedicated policy to an individual student or group of students, taking precedence over the policy assigned to their organizational unit. Administrators can share policies with teachers, who apply them to their class sessions. While a class is running, the class policy takes precedence over the policy assigned to the student’s organizational unit. Refer to the Policy Hierarchy section to learn about which policy applies when more than one is in effect.
Policies are either regular or time-based. The filters in a regular policy are always active. A time-based policy applies a different set of filters to each time period you define, for example one set during school hours and another after school.
Note
Filters in a policy are checked in a fixed order, and the first filter that blocks or allows a website decides the result. Refer to the Filtering Hierarchy section to learn about which filter takes precedence.
To access the Policies page, click Content Filtering from the Main Menu, then click Policies from its sub-menu.
Important
After making any changes to your content filtering or policies, click the  button in the Action Bar at the top of the page to apply the changes.
Policy Hierarchy
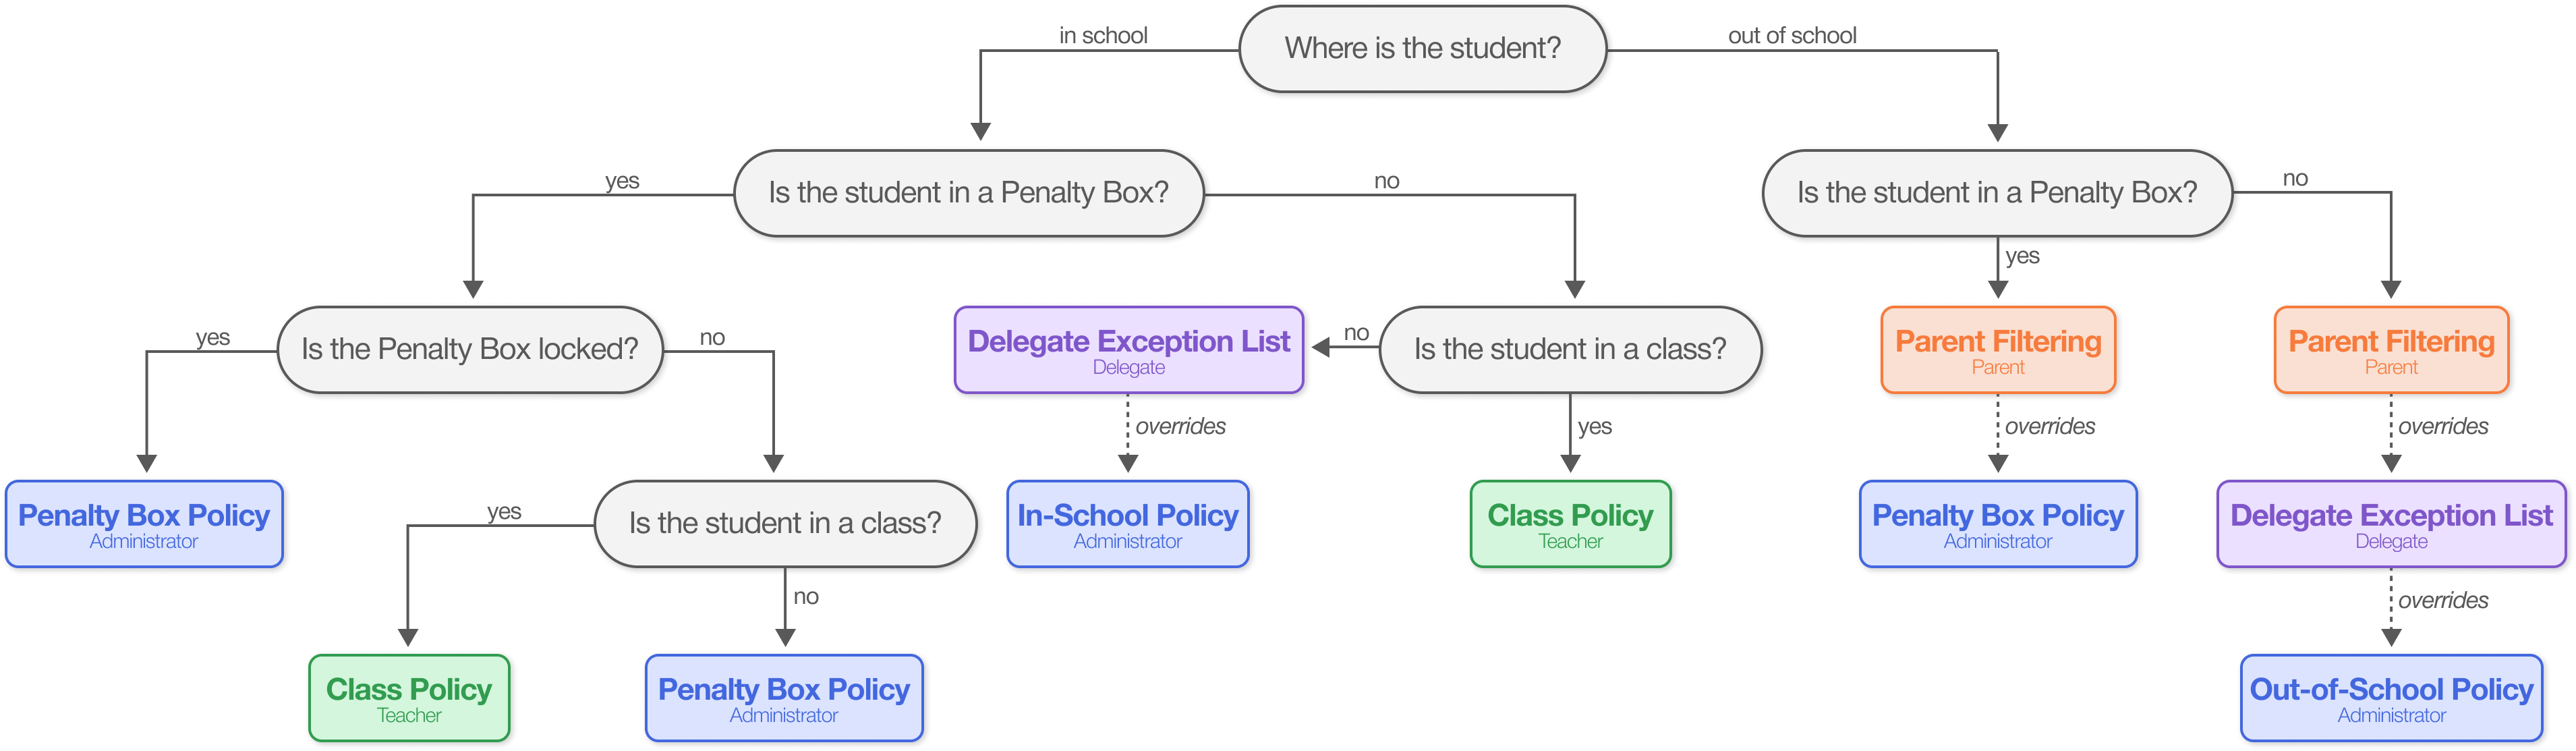
Choosing a policy type starts with the devices you want to filter. Each policy type filters a different set of devices and supports a different set of the filters you create in Filters. Some types keep their filters active at all times, while others switch between sets of filters on a schedule you define. Refer to the Assigning Policies section to learn about how each policy type reaches users.
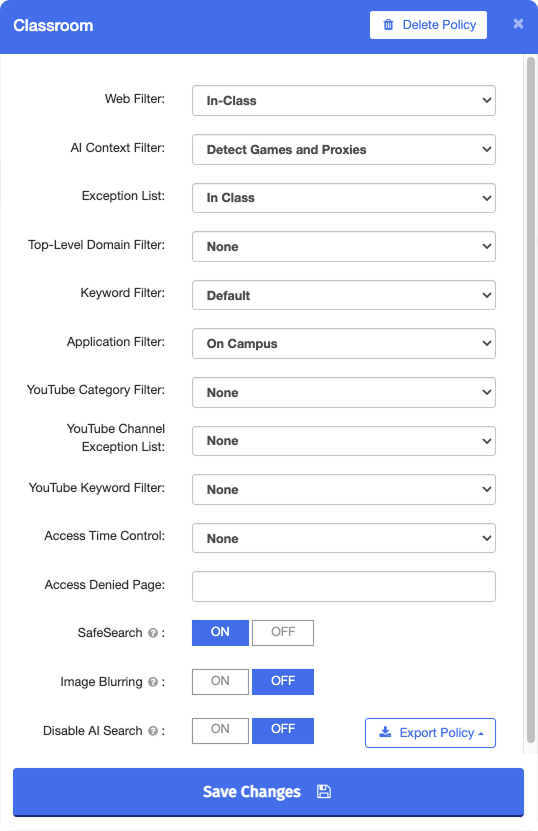
A Regular policy filters Chromebooks, Windows devices, and iPads and macOS devices that run the Blocksi Filter application. Its filters are always active, and it is the only policy type that can be assigned in the Penalty Box.
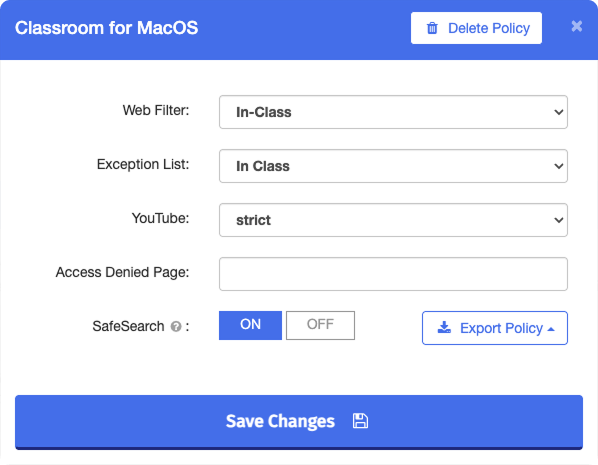
An OSX Regular policy filters macOS devices that run the Blocksi for OSX application. Its filters are always active, and it supports only the Web Filter and Exception List filters, plus a YouTube restriction level.
A Time-based policy filters Chromebooks and Windows devices and applies a different set of filters to each time period you define. It is the only policy type that lets parents add restrictions from their Parent Dashboard.
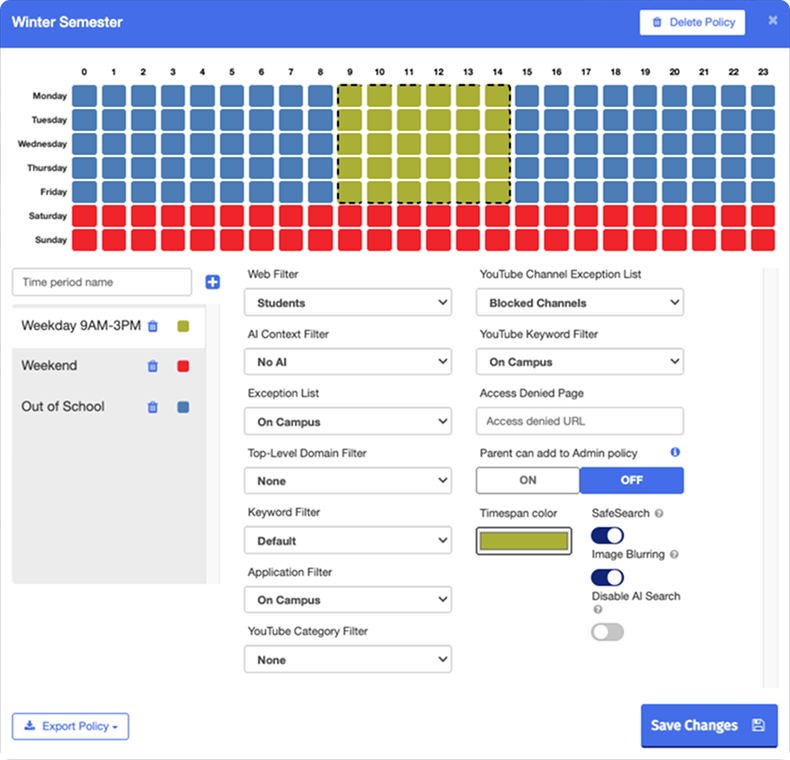
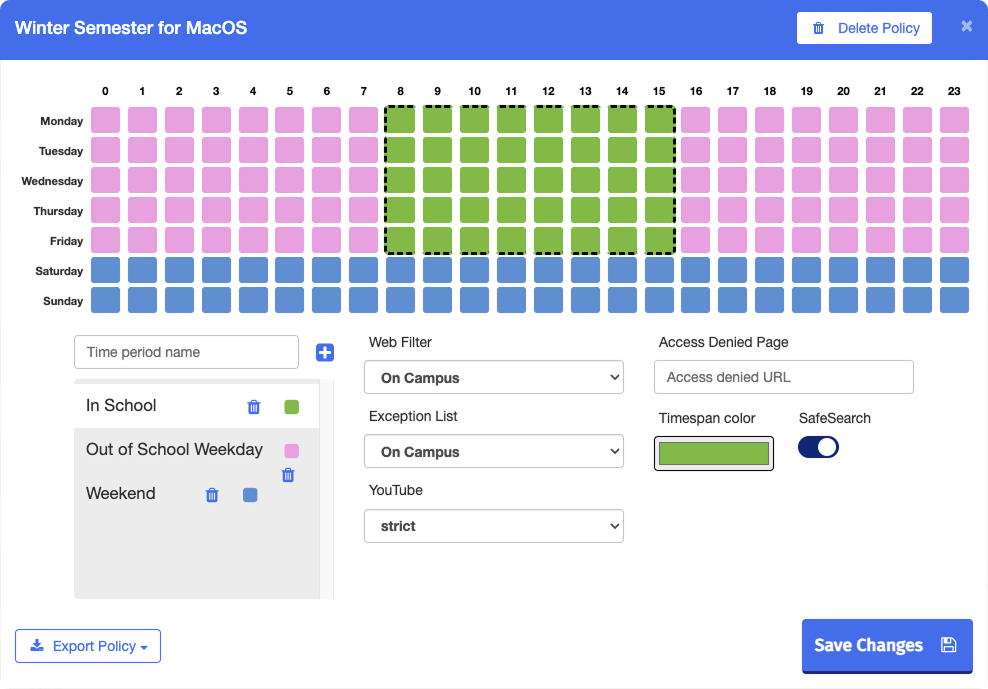
An OSX Time-based policy filters macOS devices that run the Blocksi for OSX application and applies a different set of filters to each time period you define. It supports only the Web Filter and Exception List filters, plus a YouTube restriction level.
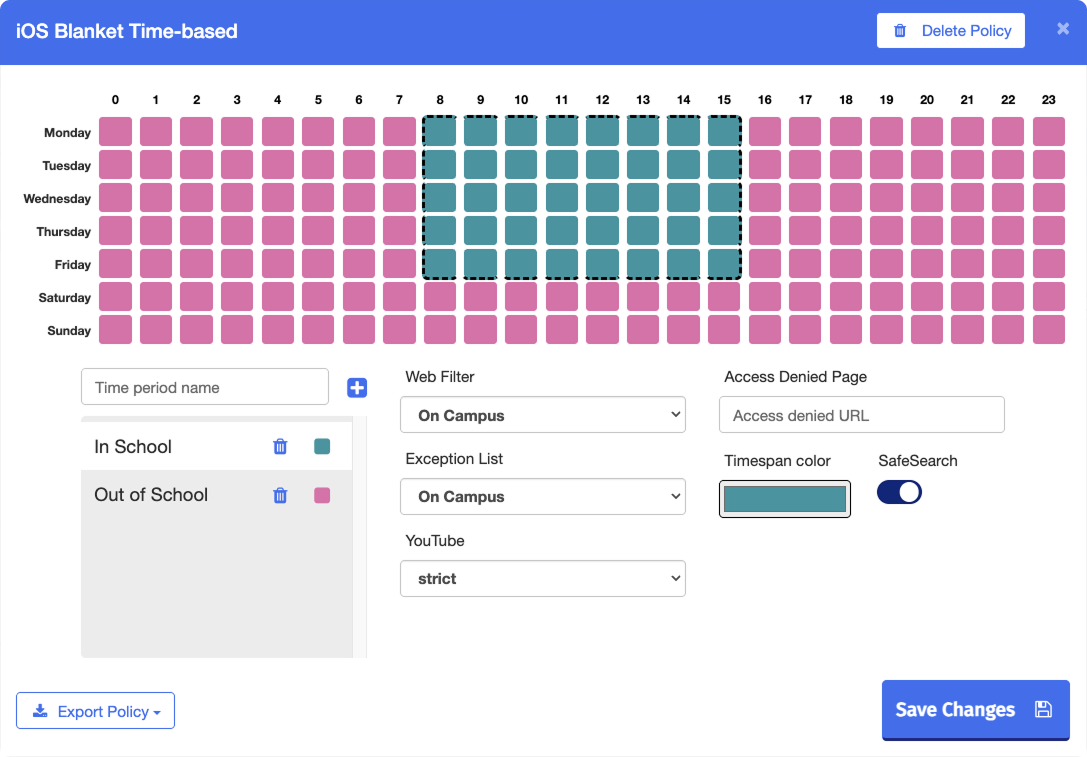
An iOS Blanket Time-based policy filters iPads and macOS devices that run the Blocksi Filter application or the legacy Blocksi for iOS application, and applies a different set of filters to each time period you define. It supports only the Web Filter and Exception List filters, plus a YouTube restriction level.
Note
Only one iOS Blanket Time-based policy can exist at a time. It is not assigned to organizational units, and it applies as soon as it is created to every iPad and macOS device in your organization that is not subject to user-based or serial number-based filtering.
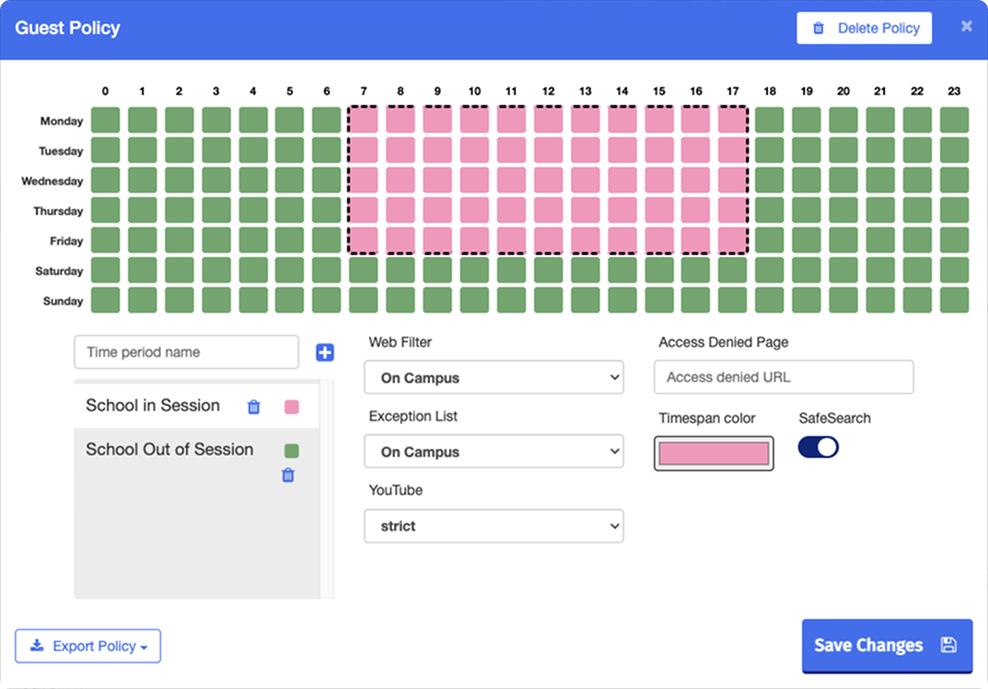
A DNS policy filters devices at the DNS level, including devices that have no Blocksi extension or application, such as guest devices on your network. It applies a different set of filters to each time period you define and supports only the Web Filter and Exception List filters, plus a YouTube restriction level.
Important
A DNS policy is required for DNS filtering. Refer to the DNS Filtered IP Addresses section to learn about configuring DNS filtering.
A domain blocked by a DNS policy cannot be unblocked by a browser-level policy, because the DNS server never returns an address.
The steps for creating a policy depend on its type. A regular policy has a single set of filters, while time-based and DNS policies have a separate set of filters for each time period you define.
Regular and OSX Regular - Refer to the Creating a Regular Policy section.
Time-based, OSX Time-based, and iOS Blanket Time-based - Refer to the Creating a Time-based Policy section.
DNS - Refer to the Creating a DNS Policy section.
Refer to the Assigning Policies section to learn about applying a policy to users.
The filters in a regular policy are always active. Use this procedure for both Regular and OSX Regular policies.
Type a name for the policy in the Enter policy name text box.

Select one of the following options from the Choose policy type drop-down list:
Regular - Filters Chromebooks, Windows devices, and iPads and macOS devices that run the Blocksi Filter application.
OSX Regular - Filters macOS devices that run the Blocksi for OSX application.
Click the
 button. The policy window opens.
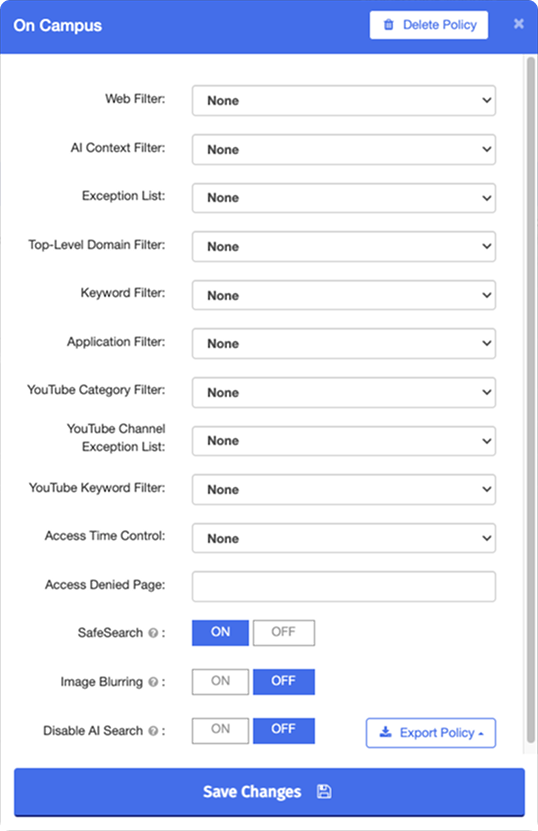
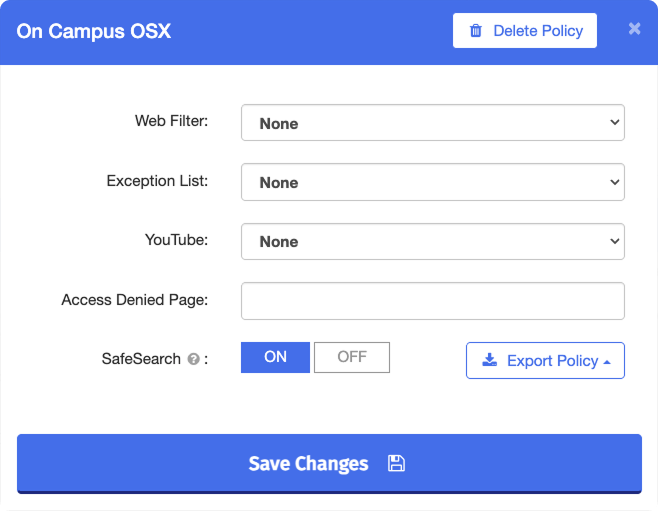
Select a filter from each drop-down list. The drop-down lists show the filters you have already created. Select None for any filter type you want to leave unset.
Important
Every drop-down list is set to None by default. A new policy does not apply any filters until you select them.
Type a URL in the Access Denied Page text box to redirect students to a specific page when access is denied, for example your district’s website.
Note
Leave the text box empty to display the standard Blocksi Access Denied page. Students cannot send an Access Request when they are redirected to an external website.
Turn each of the following optional settings on or off:
Setting
Description
Availability
SafeSearch
Enforces SafeSearch in the search engine, filtering explicit images, videos, and websites from results.
Regular and OSX Regular
Image Blurring
Blurs images with adult content.
Regular only
Disable AI Search
Hides Google AI overviews and disables Google AI search mode on targeted devices. Applies only in Google Chrome and requires the Blocksi extension.
Regular only
Note
SafeSearch is turned on by default. Image Blurring and Disable AI Search are turned off by default.
Click the
 button. The new policy appears in the Policy Table.
A time-based policy applies a different set of filters to each time period you define. Use this procedure for Time-based, OSX Time-based, and iOS Blanket Time-based policies. The available filters and settings depend on the policy type.
Type a name for the policy in the Enter policy name text box.

Select one of the following options from the Choose policy type drop-down list:
Time-based - Filters Chromebooks and Windows devices.
OSX Time-based - Filters macOS devices that run the Blocksi for OSX application.
iOS Blanket Time-based - Filters iPads and macOS devices that run the Blocksi Filter application or the legacy Blocksi for iOS application.
Click the
button. The policy window opens.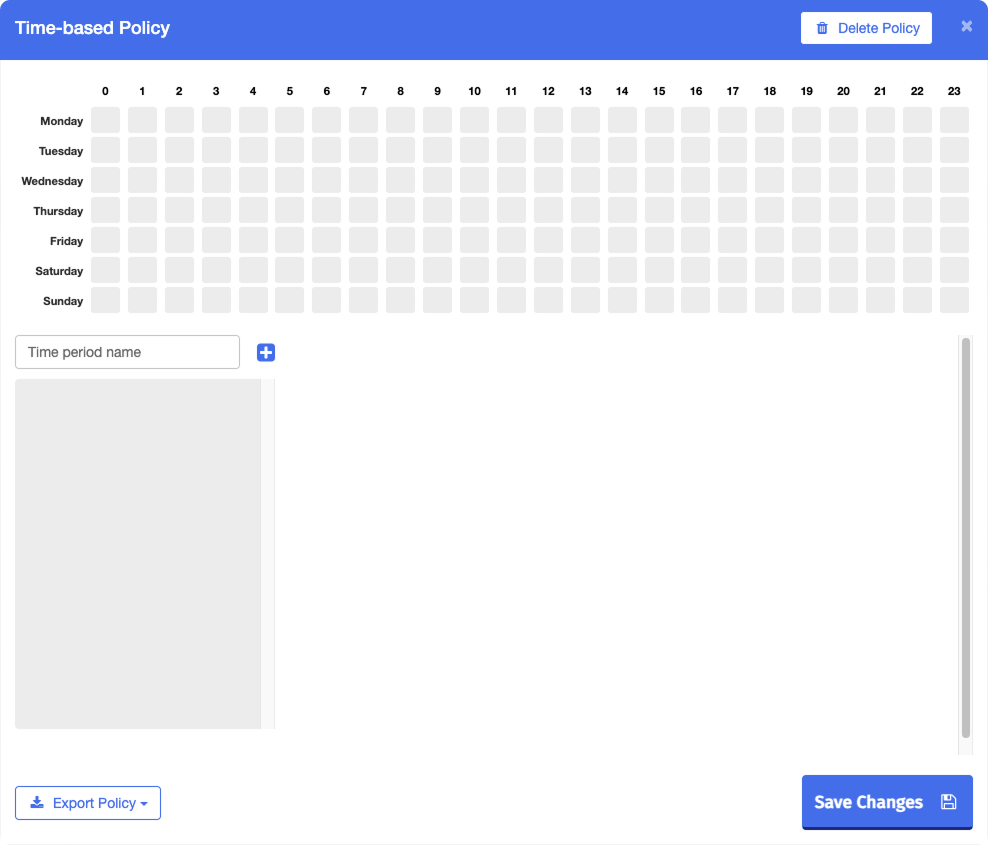
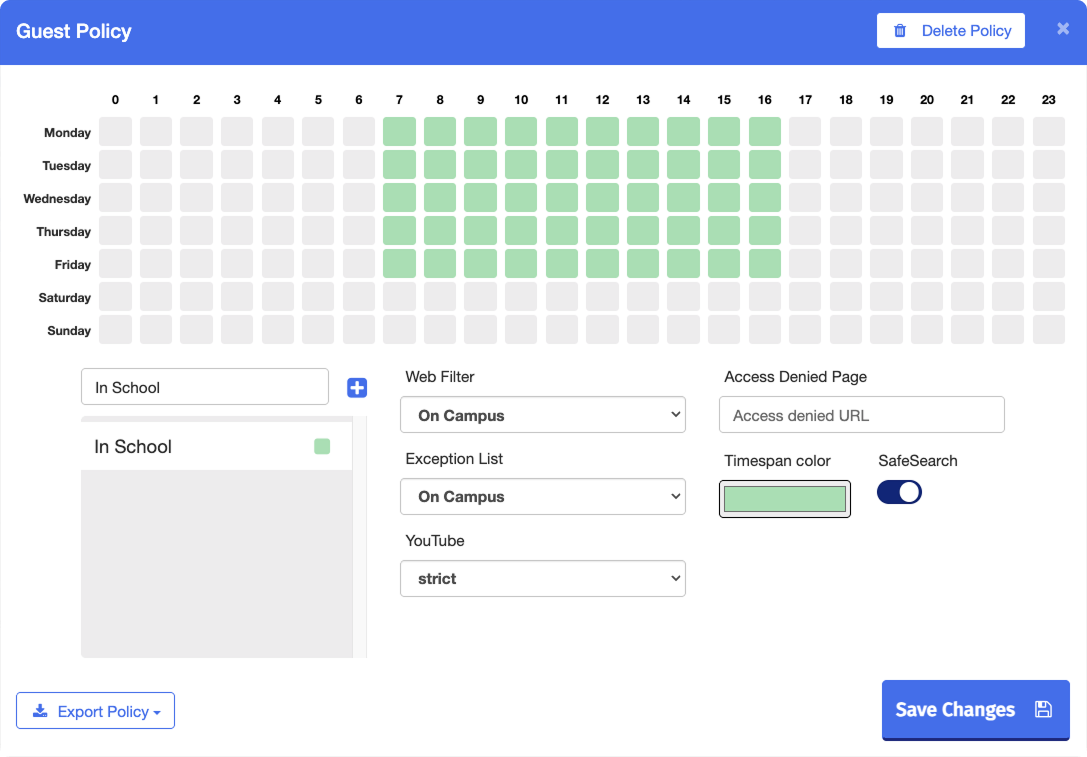
Type a name for the time period in the Time period name text box, then click the
 button. The window expands to show the time period’s settings.
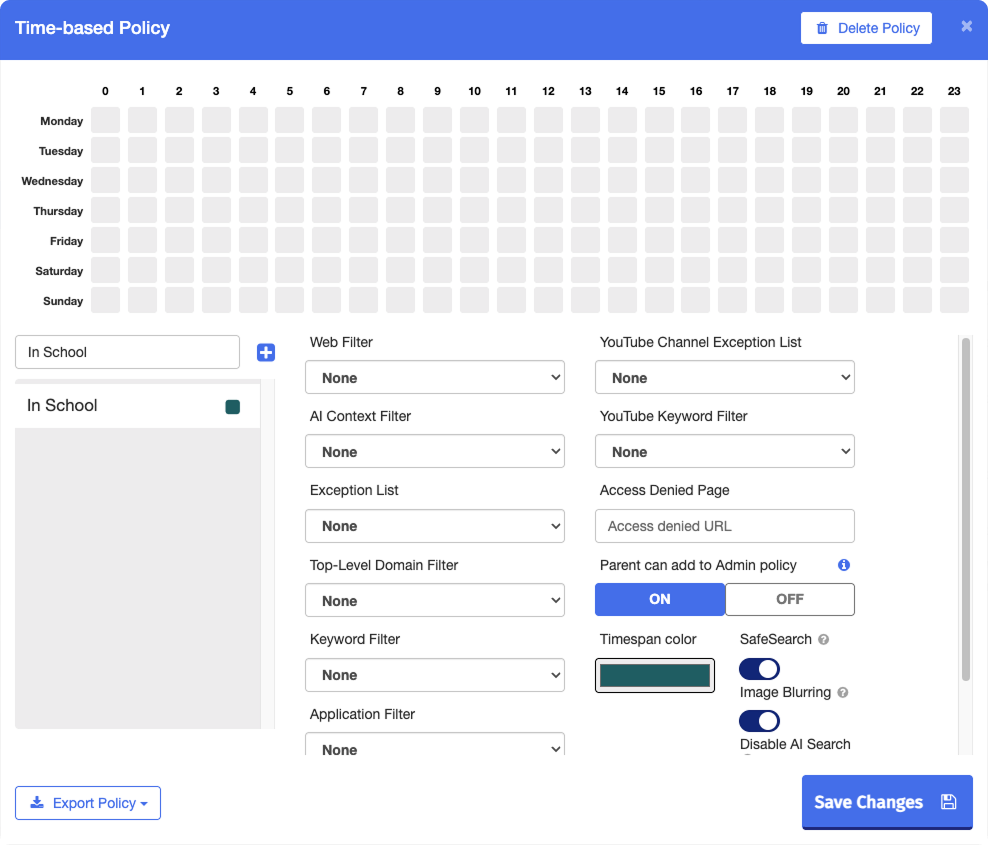
Select a filter from each drop-down list. The drop-down lists show the filters you have already created. Select None for any filter type you want to leave unset.
Important
Every drop-down list is set to None by default. A new policy does not apply any filters until you select them.
Type a URL in the Access Denied Page text box to redirect students to a specific page when access is denied, for example your district’s website.
Note
Leave the text box empty to display the standard Blocksi Access Denied page. Students cannot send an Access Request when they are redirected to an external website.
Turn each of the following optional settings on or off:
Setting
Description
Availability
Parent can add to Admin policy
Lets parents add restrictions to this policy from their Parent Dashboard.
Standard Time-based only
SafeSearch
Enforces SafeSearch in the search engine, filtering explicit images, videos, and websites from results.
All time-based policy types
Image Blurring
Blurs images with adult content.
Standard Time-based only
Disable AI Search
Hides Google AI overviews and disables Google AI search mode on targeted devices. Applies only in Google Chrome and requires the Blocksi extension.
Standard Time-based only
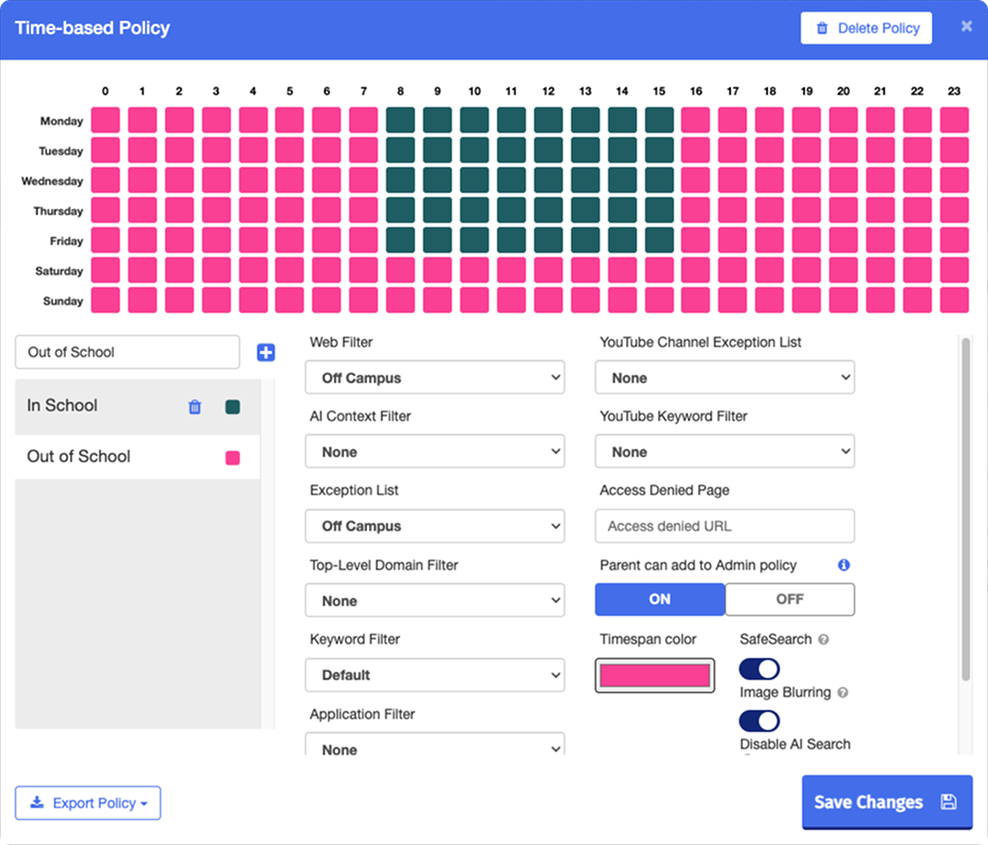
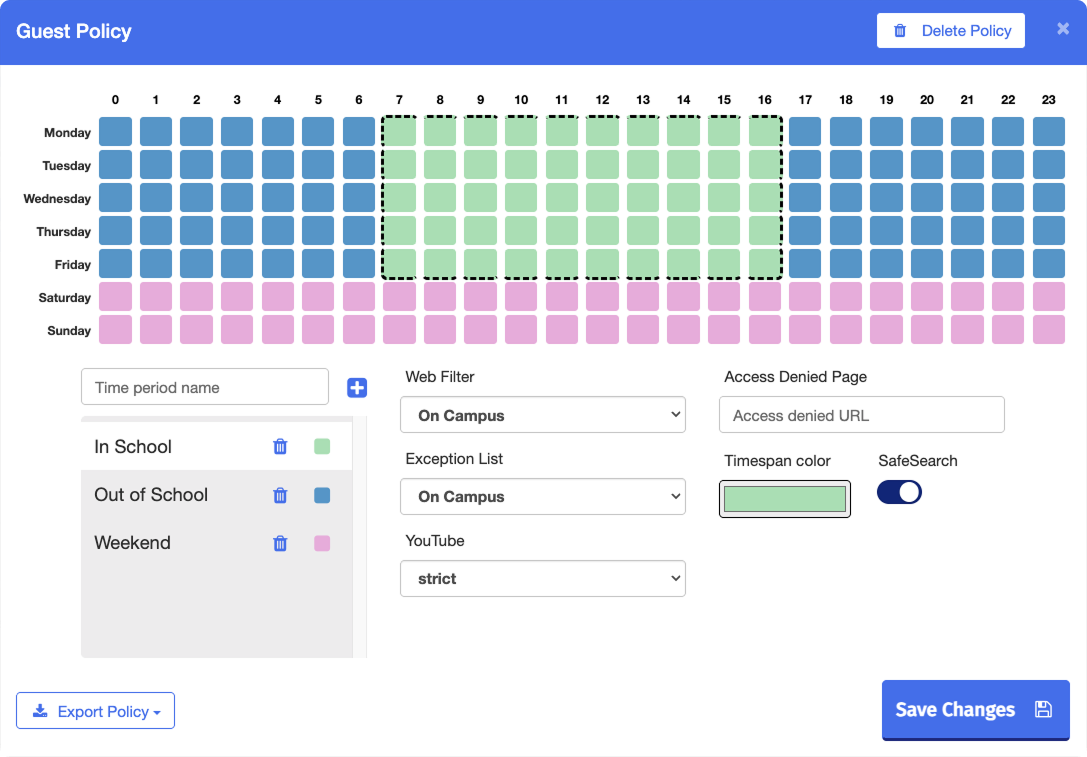
Select a color for the time period in the Timespan color box, then click a cell to add that hour to the time period, or click and drag across several cells to add a range. The selected cells turn the time period’s color.
Note
Each row is a day of the week, and each column is an hour in military time, from 0 to 23.
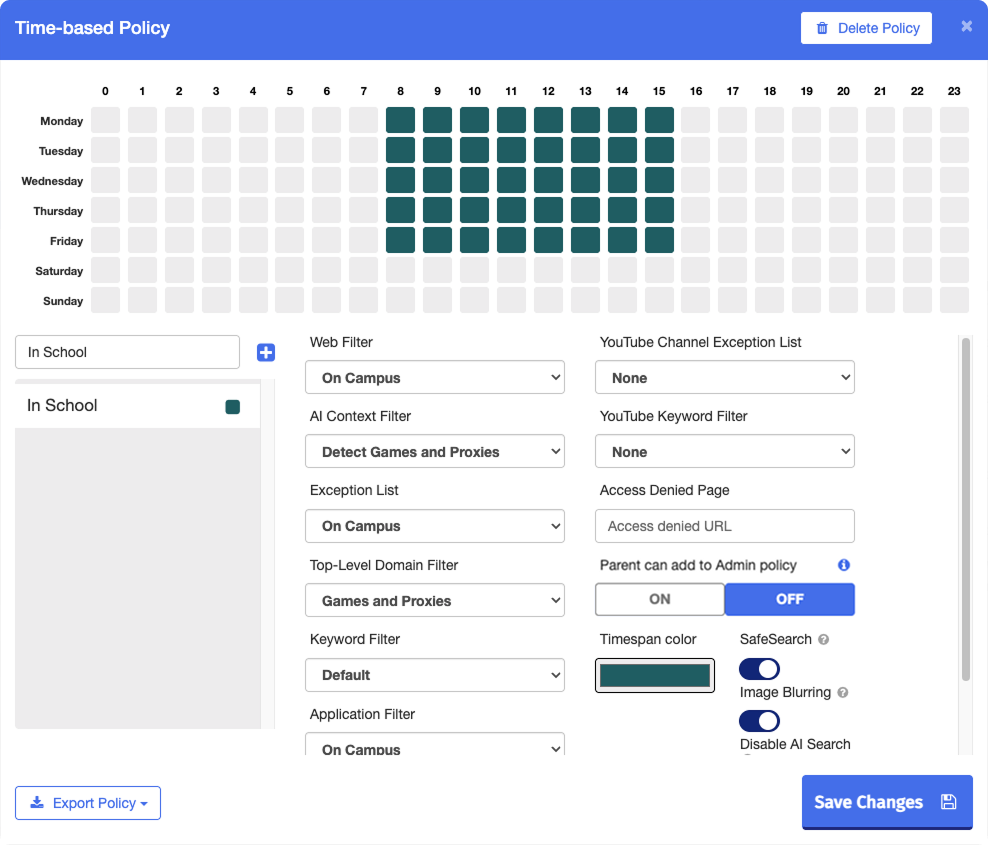
Click the
button.Repeat steps 4–9 for each time period you want to add, for example school hours, after school, and weekends. Each time period appears on the grid in its own color.
A DNS policy filters devices at the DNS level, including devices that have no Blocksi extension or application. Like a time-based policy, it applies a different set of filters to each time period you define.
Type a name for the policy in the Enter policy name text box.

Select DNS from the Choose policy type drop-down list.
Click the
button. The policy window opens.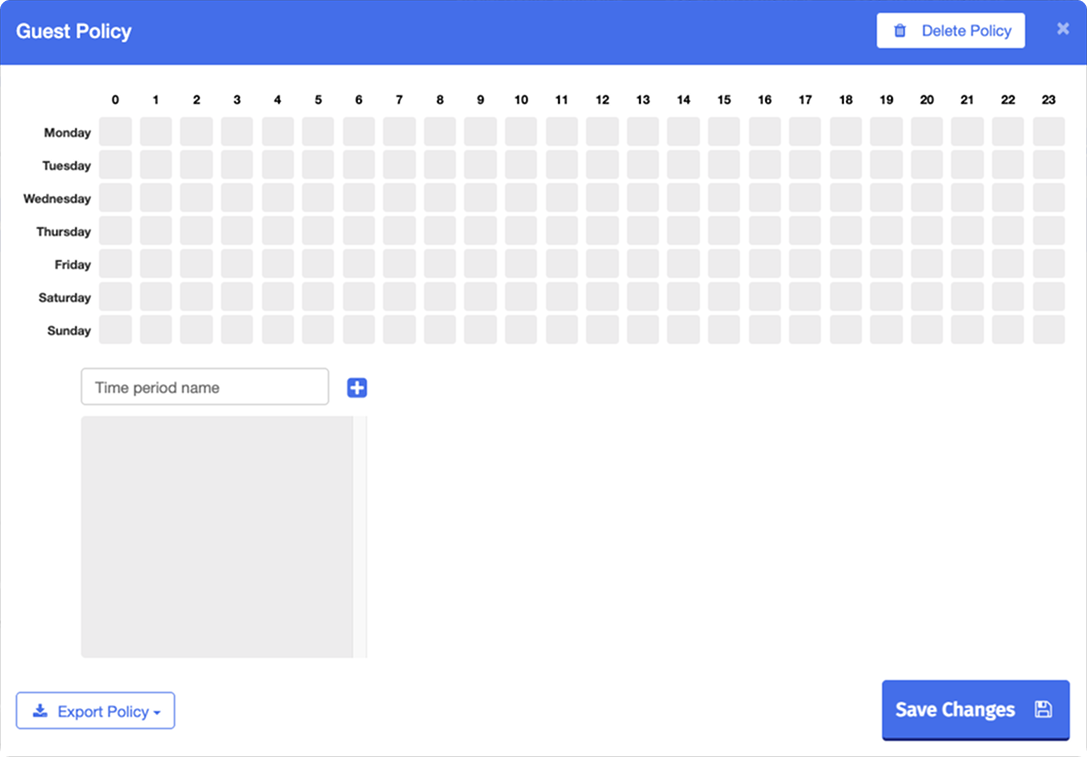
Type a name for the time period in the Time period name text box, then click the
button. The window expands to show the time period’s settings.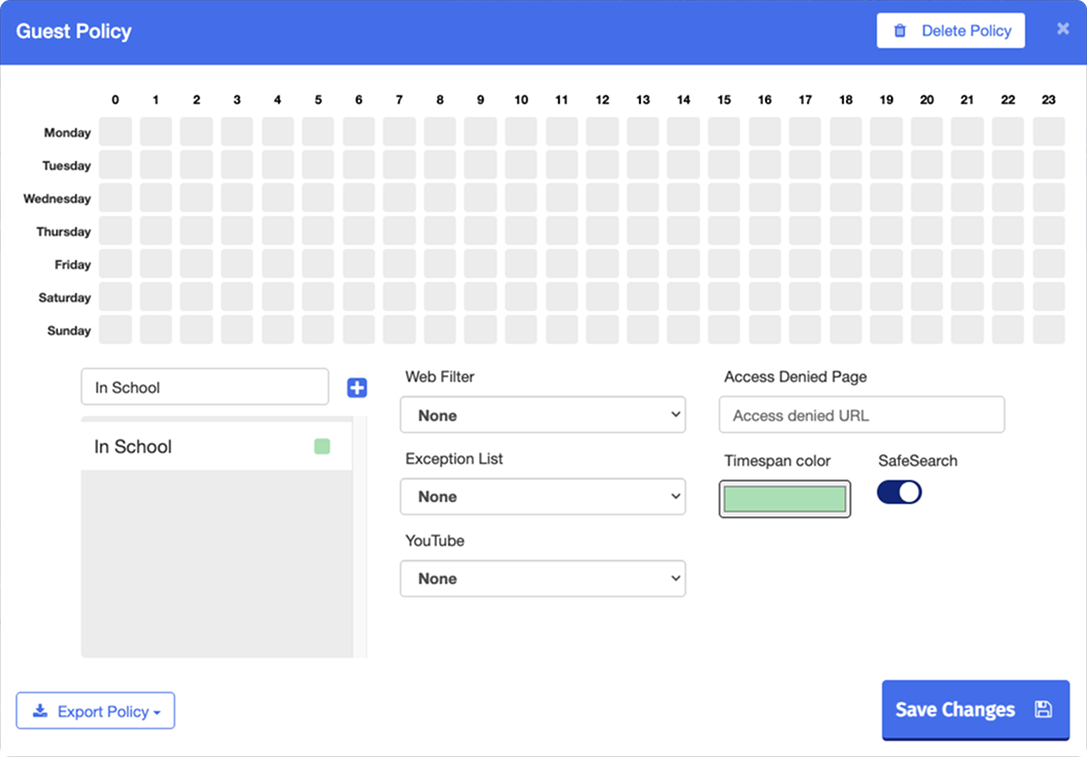
Select a filter from each drop-down list. The drop-down lists show the filters you have already created. Select None for any filter type you want to leave unset.
Important
Every drop-down list is set to None by default. A new policy does not apply any filters until you select them.
Type a URL in the Access Denied Page text box to redirect students to a specific page when access is denied, for example your district’s website.
Note
Leave the text box empty to display the standard Blocksi Access Denied page. Students cannot send an Access Request when they are redirected to an external website.
Turn SafeSearch on or off. When it is on, explicit images, videos, and websites are filtered from search engine results.
Select a color for the time period in the Timespan color box, then click a cell to add that hour to the time period, or click and drag across several cells to add a range. The selected cells turn the time period’s color.
Note
Each row is a day of the week, and each column is an hour in military time, from 0 to 23.
Click the
button.Repeat steps 4–9 for each time period you want to add, for example school hours, after school, and weekends. Each time period appears on the grid in its own color.
A policy starts filtering once it is assigned. You can assign a policy to an organizational unit or group, so it applies to every user in it, or assign a DNS policy to devices on your network.
An iOS Blanket Time-based policy is the only policy type that needs no assignment. It applies to every iPad and macOS device that runs the Blocksi Filter application or the legacy Blocksi for iOS application as soon as you create it, as long as the application is deployed through your MDM and the device is not subject to user-based or serial number-based filtering.
Refer to the Penalty Box section to learn about applying a regular policy to an individual student or group of students.
A policy assigned to an organizational unit or group applies to every user in it. Each organizational unit or group has an in-school and an out-of-school policy. Blocksi applies one or the other based on the device’s IP address or geolocation. Refer to the Geofencing section to learn about how Blocksi determines whether a device is in school.
Important
If Geofencing is not enabled, the in-school policy is always applied.
Policies can be assigned from the Google Workspace Organizations, Azure AD Groups, or LDAP OU page, depending on where your organizational units or groups come from. To access these pages, click Organizations and Entities from the Main Menu, then click the page you need from its sub-menu.
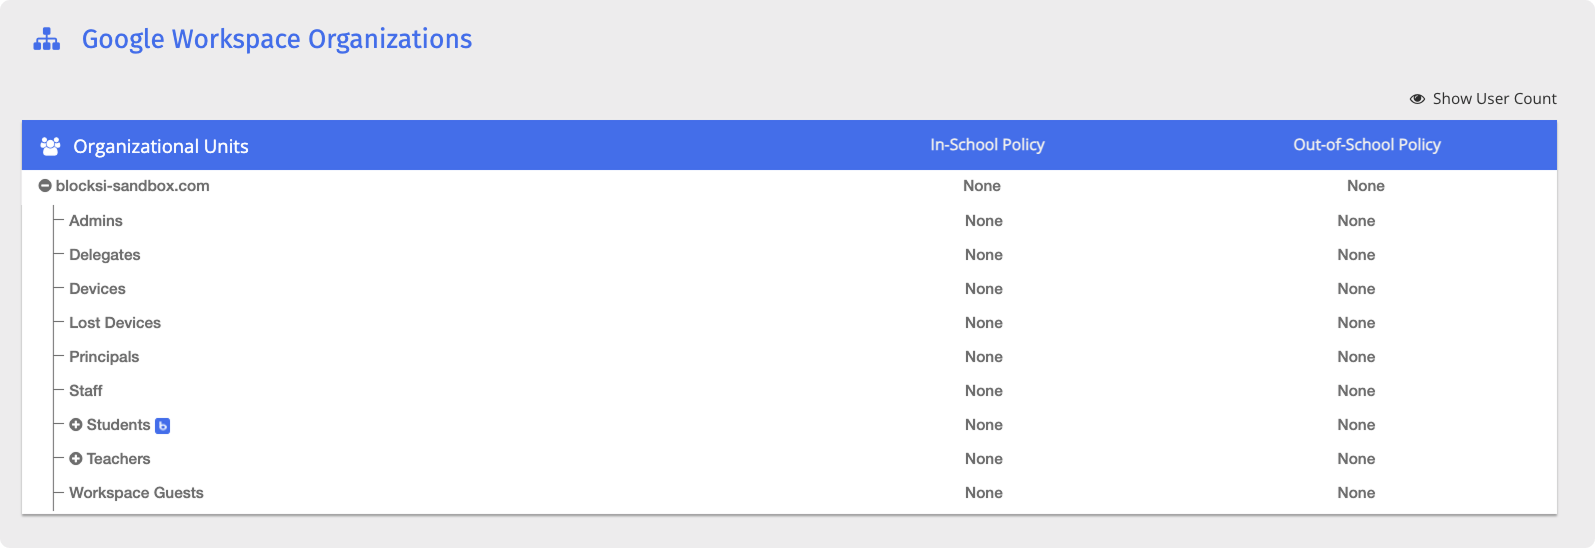
Locate the organizational unit or group in the table. To show a child organizational unit, click the
 button next to its parent.
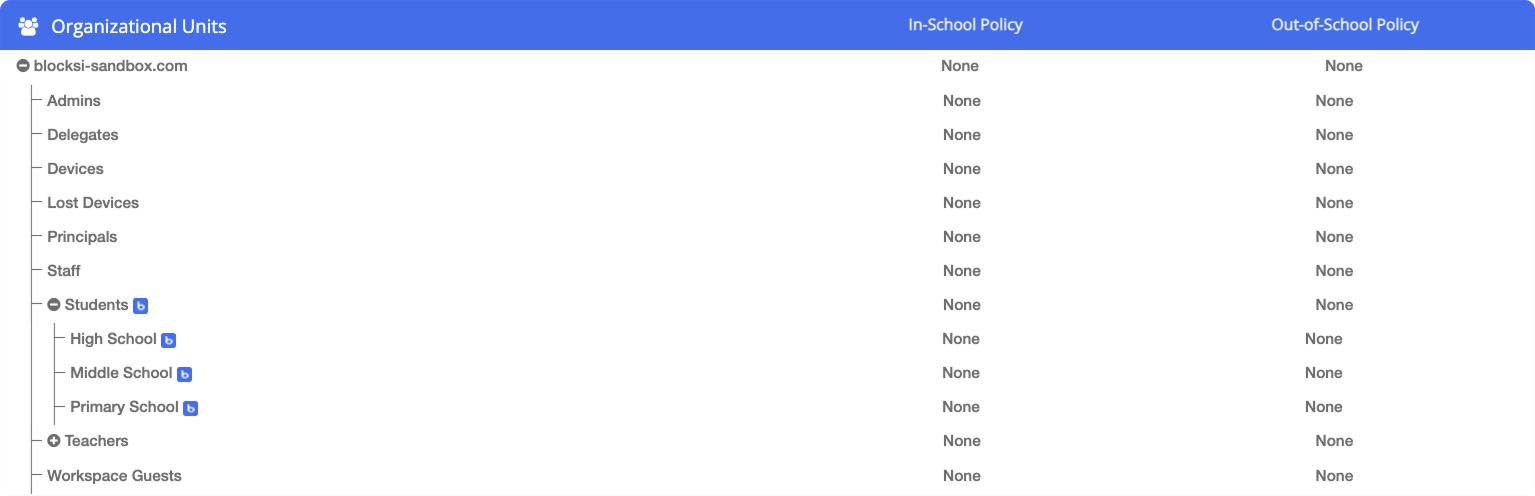
Click the
 button in the same row. The window for the selected organizational unit or group opens.
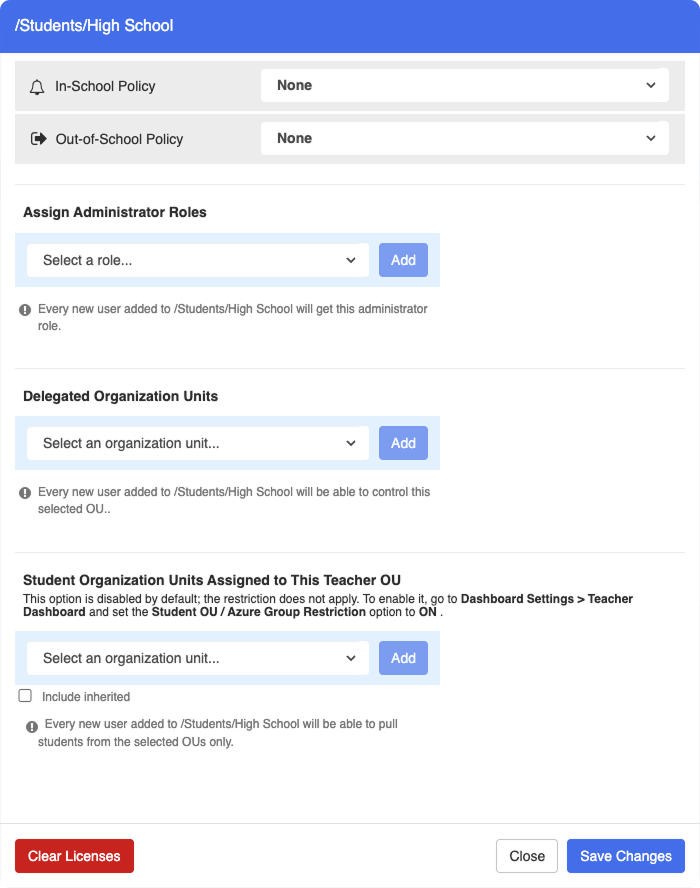
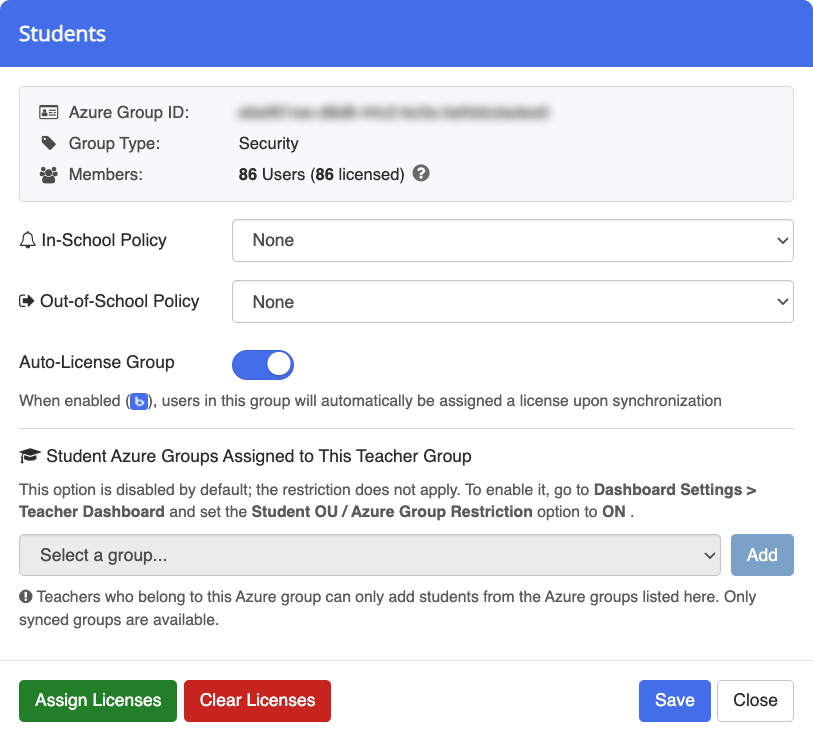
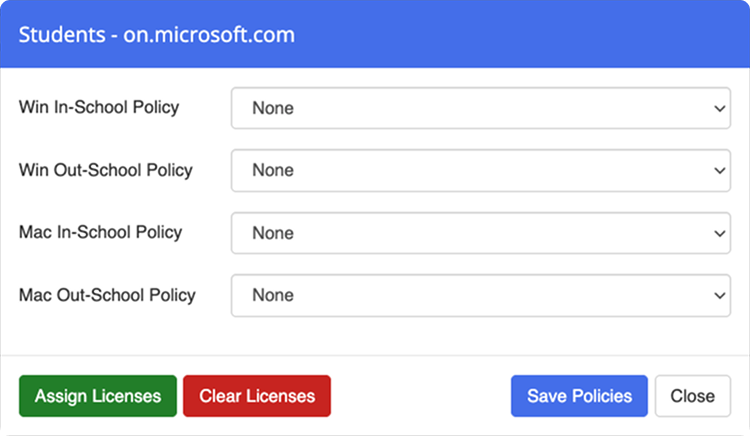
Select a policy from the In-School Policy and Out-of-School Policy drop-down lists. In the LDAP OU window, use the Win In-School Policy and Win Out-School Policy drop-down lists for Windows devices and for Macs that run the Blocksi Filter application. The Mac drop-down lists accept only OSX policies, for the legacy Blocksi for OSX application.
Important
Every drop-down list is set to None by default. Select Inherited to apply the policy of the parent organizational unit instead.
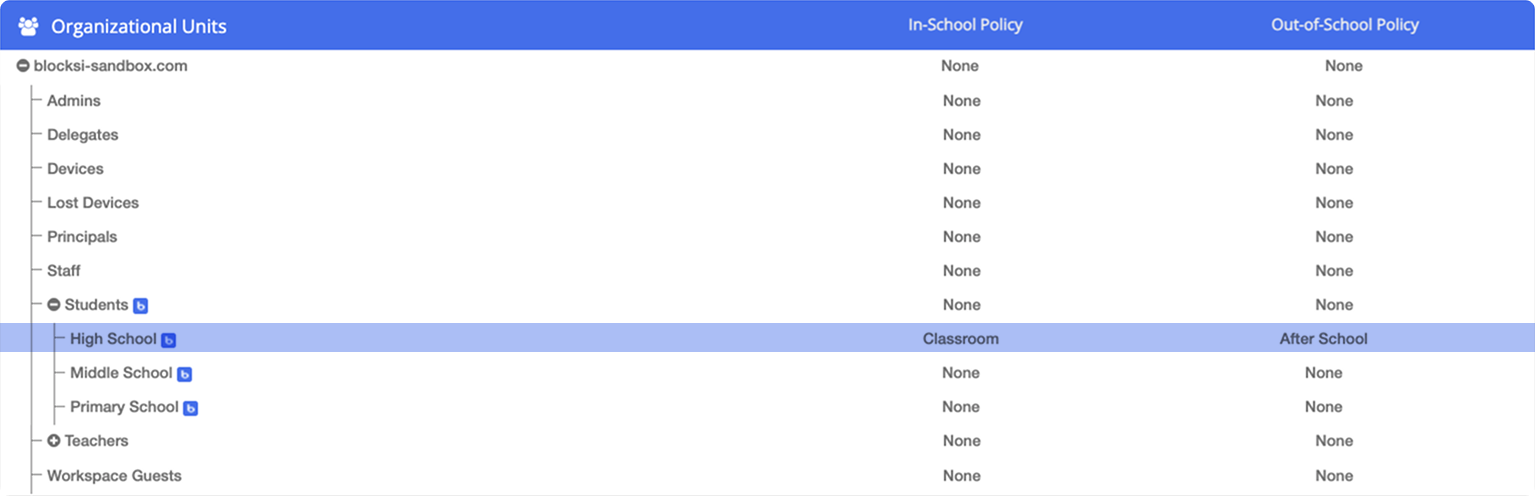
Click the save button at the bottom of the window. The selected policies appear in the policy columns.
A DNS policy is applied at the network level, to the public IP addresses your network uses. DNS policies are assigned from the DNS Filtered IP Addresses page. To access this page, click Organizations and Entities from the Main Menu, then click DNS Filtered IP Addresses from its sub-menu.
Important
DNS policies apply only to networks that use the Blocksi DNS nameservers, 104.155.190.120 and 34.132.104.149.
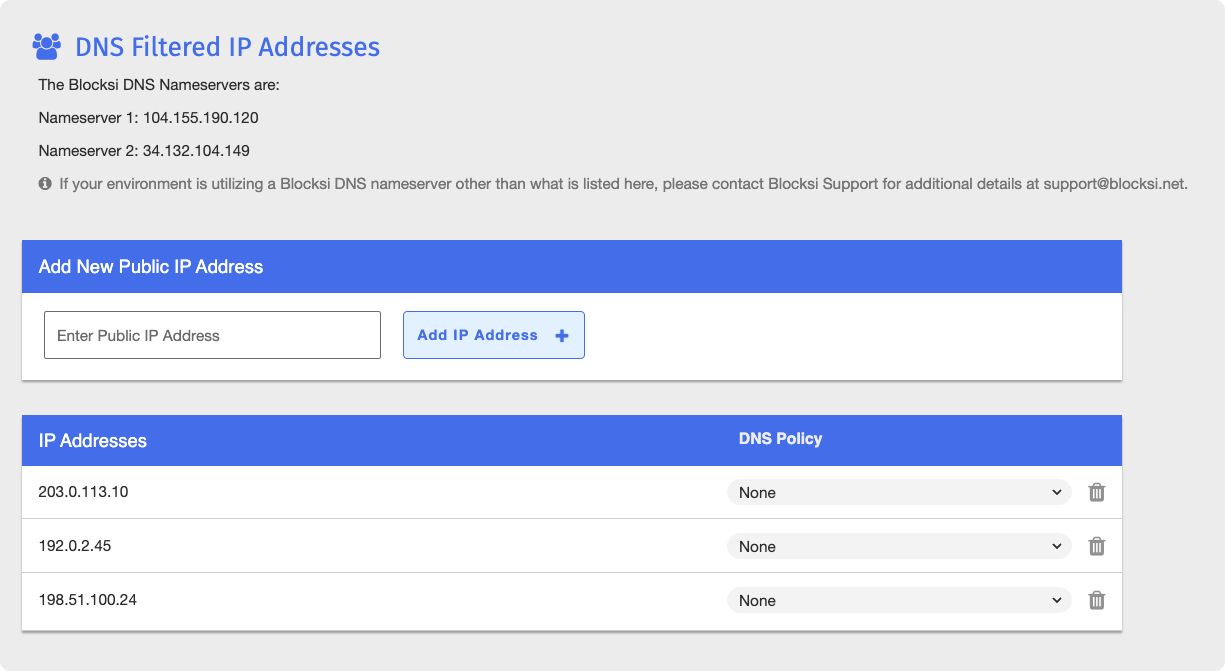
Locate your network’s public IP address in the IP Addresses table. To add a new one, type it in the Enter Public IP Address text box, then click the
 button.
Select a policy from the DNS Policy drop-down list in the same row. The selected policy appears in the DNS Policy column.
Important
A newly added IP address has no DNS policy assigned until you select one.

You can customize the Access Denied page that students see when a site is blocked, and set the student threshold for blocked-page notifications. Both settings apply across all policies and are opened from the buttons above the Policy Table.
The Access Denied page appears on student devices when access to a site is blocked. You can customize it with a school logo and a custom message, which appear on every device in your district.
Note
The customized page appears only for policies with an empty Access Denied Page text box. Policies that redirect students to another website show that website instead.
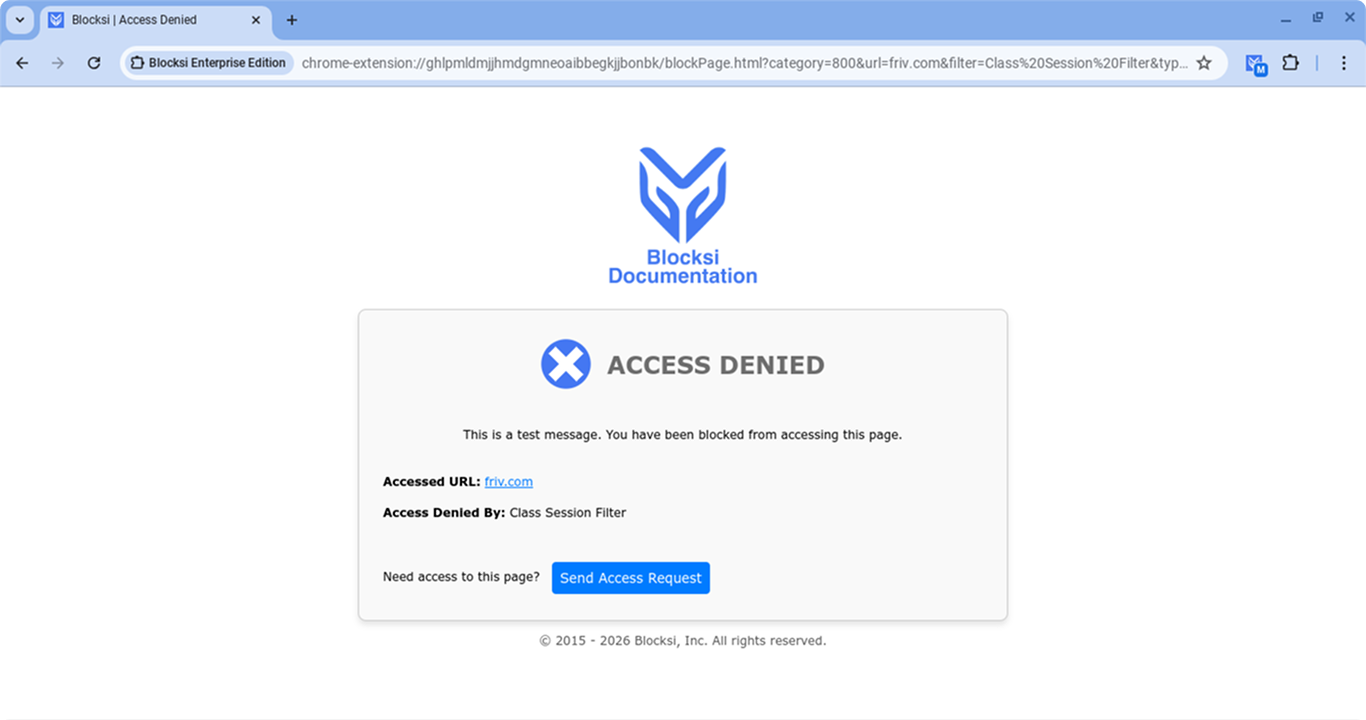
On the Policies page, click the
 button in the top-right corner above the Policy Table. The Access Denied Page window opens on the School Logo tab.
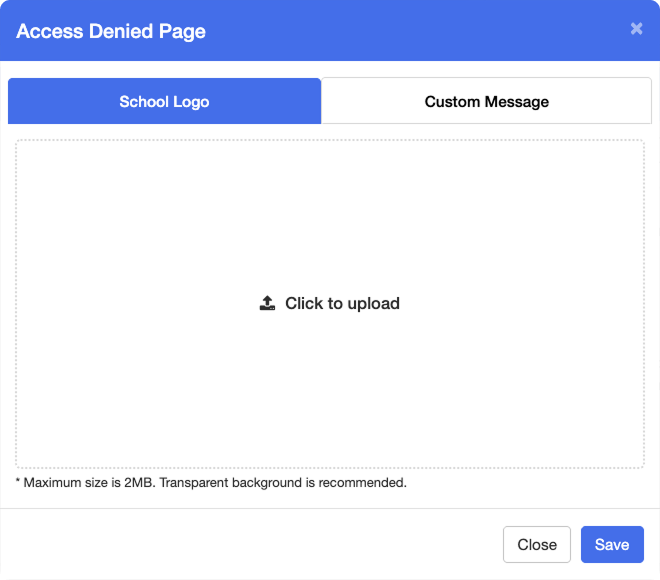
Click the Click to Upload button, then select an image file on your device and click Open.
Tip
To remove the school logo, click the uploaded image, then confirm the removal in the window that opens.
Click the Custom Message tab and type the message to display on the Access Denied page.
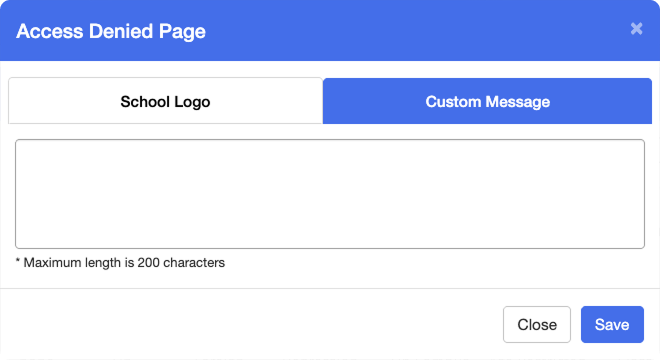
Click the
 button.
The student threshold is the maximum number of times a student can view or attempt to view blocked pages. When a student exceeds it, they receive an email notifying them of their behavior.
On the Policies page, click the
 button. The Student Threshold window opens.
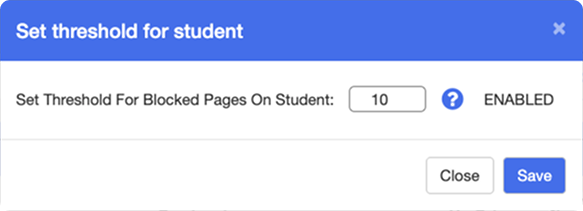
Type the threshold value.
Important
Setting the value to
0disables threshold notifications.Click the
button.
You can manage your policies by editing, duplicating, or deleting them, and delete individual time periods from time-based and DNS policies. All of these actions can be performed directly on the Policies page.
On the Policies page, locate the policy to edit in the Policy Table and click its name. The policy window opens.
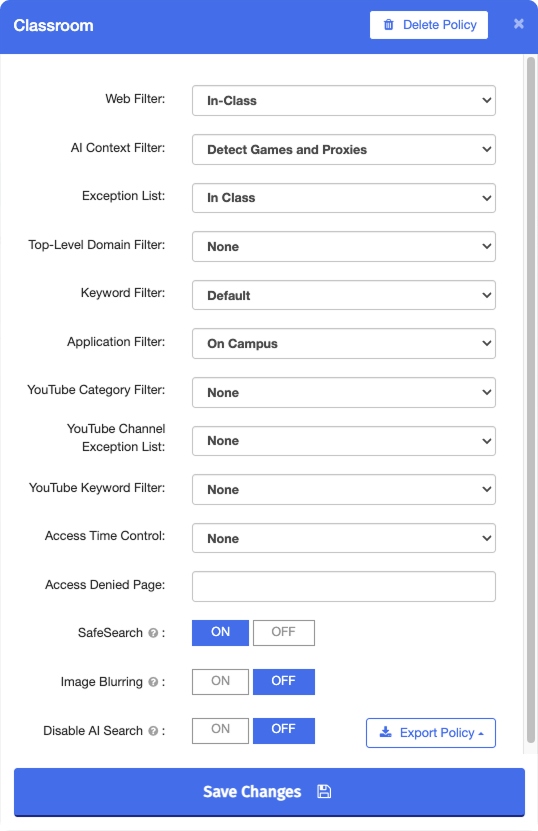
Make your changes, then click the
button.Important
In time-based and DNS policies, save after each change to a time period. Changes that are not saved are lost. Refer to the Creating a Time-based Policy section to learn about adding and configuring time periods.
On the Policies page, locate the policy to duplicate in the Policy Table and click the
 button in the last column. The Duplicate Policy window opens.
Note
Only Regular policies can be duplicated.
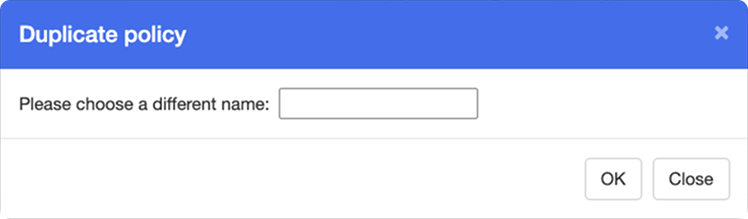
Enter a name for the new policy in the text box, then click OK. The new policy appears in the Policy Table.
Note
The duplicate is an exact copy of the original, including all its filters, settings, and the Access Denied Page URL. The original policy is not removed upon duplicating.
On the Policies page, locate the time-based or DNS policy in the Policy Table and click its name. The policy window opens.
Click the
 button to the right of the time period you want to delete.
Click OK in the confirmation window. The time period is permanently removed from the policy.
Warning
Deleting a policy is a permanent action. Deleted policies cannot be recovered, and any organizational unit or group assigned to the policy is set to None.
On the Policies page, locate the policy to delete in the Policy Table and click its name. The policy window opens.
Click the
 button in the top-right corner of the policy window.
Click OK in the confirmation window. The policy is permanently removed from the Policy Table.
You can import a policy from a JSON file or export a policy to a JSON or PDF file. Every policy type can be exported to JSON, and Regular and OSX Regular policies can also be exported to PDF. Imports use JSON files only.
Tip
Exporting a policy to JSON and importing it into another environment is a quick way for multi-tenant schools to reuse the same policy across schools.
You can import an entire policy, including its filters, settings, and the Access Denied Page URL. The policy’s filters are imported along with it. The imported policy appears in the Policy Table alongside your manually created policies.
On the Policies page, click the
 button above the Policy Table. The Import Policy from Your Computer window opens.
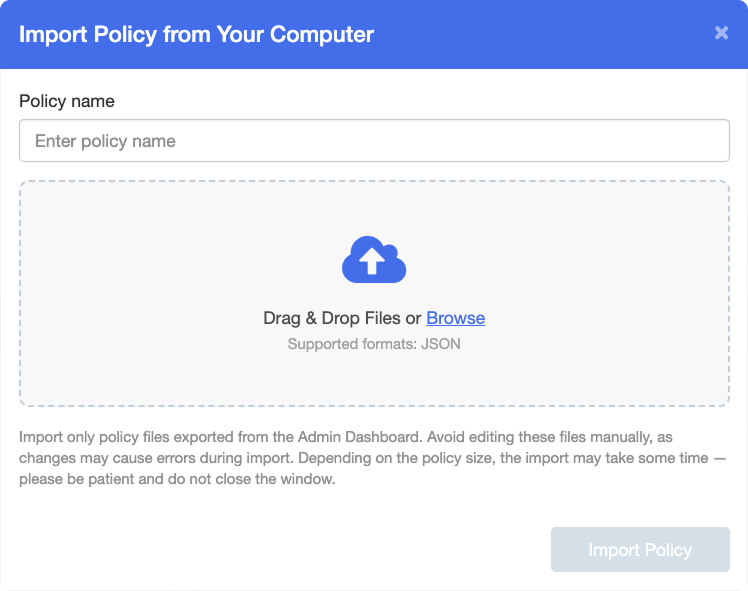
Enter a name for the imported policy in the Policy name text box, then drag and drop the JSON file or browse for it on your device.
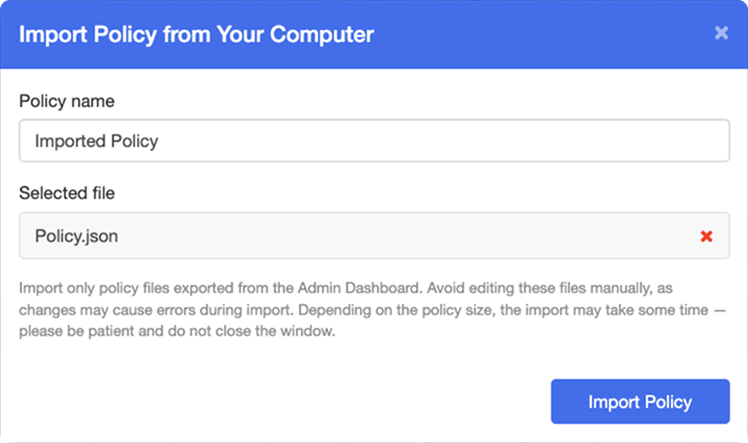
Click the
 button.
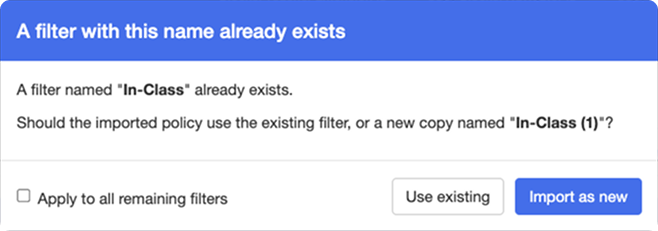
If a Custom Category or filter in the file has the same name as an existing one, a window opens for each match. Select one of the following:
Use existing - The imported policy uses the Custom Category or filter that already exists.
Import as new - Imports it from the file as a new copy with a number added to its name, for example
In-Class (1).
Select the Apply to all remaining custom categories or Apply to all remaining filters checkbox to use the same choice for the rest of the matches.
Important
Use existing links the imported policy to your existing Custom Category or filter, not the one in the file. If their contents differ, the imported policy does not filter exactly like the original.
The imported policy appears in the Policy Table.
Note
An imported policy is a new, independent policy. Editing it does not affect the policy it was exported from.
You can export an entire policy to a JSON file, including its filters, settings, and the Access Denied Page URL. The file can be imported as is into the same or another Admin Dashboard, with no changes needed. Regular and OSX Regular policies can also be exported to a PDF file, which gives a visual overview of the policy’s filtering configuration.
Note
Exporting a policy is especially useful during a troubleshooting session with Blocksi Support.
On the Policies page, locate the policy to export in the Policy Table and click its name. The policy window opens.
Click the
 button, then select Export PDF or Export JSON. The policy is exported to your device in the selected format.
Note
You can also export a policy to JSON directly from the Policy Table by clicking the
 button in the last column of the policy’s row.