Mosyle - iOS Configuration Guide
Note
Blocksi supports iOS 13.1 and higher.
Open port 81 outbound traffic on the internal network.
All iOS Devices must be enrolled in the Supervised model.
Create an iOS Filtering Policy on the Blocksi Admin Dashboard.
Provide Organization ID and Organization Name to Blocksi Support to authorize use of the iOS filtering application.
To get your organization ID and name
Sign in to your Apple School Manager account with your Administrator credentials.
Click your account name in the lower left-hand corner, and then click Preferences from the pop-up menu.
Go to Organization Information.
Locate your Organization ID and Company Name.
Send this information to Blocksi to add your organization to the approved list of customers who can use Blocksi's filtering app.
To configure volume purchasing
Sign in to your company’s account at business.apple.com (Apple Business Manager) or school.apple.com (Apple School Manager).
Click your account name in the lower left-hand corner, and then click Preferences from the pop-up menu.
Click Payments and Billing.
Click Download in the Content Tokens section next to the correct server location token under the Apps and Books tab. The token downloads to the Downloads folder on your computer.
Upload the downloaded token to the Mosyle Content (Volume Purchasing) payload. The Blocksi for iPad application should now be available for assignment in the Mosyle app library and appears as a Custom App.
To configure the DNS proxy extension
Note
If DNS Proxy Extension is not listed, click Activate New Profile Type to add this profile type to your Management Profiles in Mosyle.
Go to Management Profiles and click DNS Proxy Extension from the left menu.
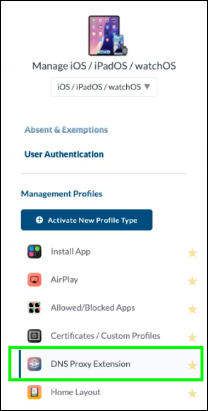
Click Add new profile to create a new DNS Proxy Extension profile.
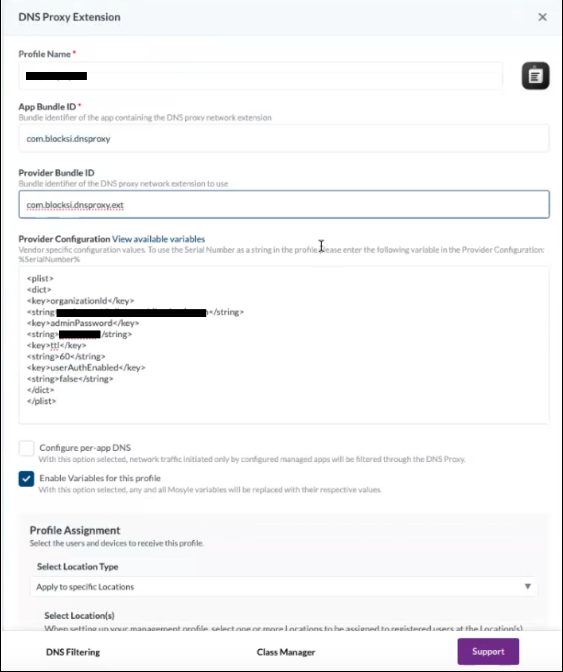
Give the profile a name. For example, Blocksi for iPad DNS Proxy Ext.
Add com.blocksi.dnsproxy in the App Bundle ID field.
Add com.blocksi.dnsproxy.ext in the Provider Bundle ID field.
Type the following configuration in the Provider Configuration box.
<plist>
<dict>
<key>organizationId</key>
<string>admin@blocksi-super-admin.com</string>
<key>adminPassword</key>
<string>123PasswordExample</string>
<key>ttl</key>
<string>60</string>
<key>userAuthEnabled</key>
<string>false</string>
</dict>
</plist>
Note
You need to change BlocksiSuperAdmin@domain.com to match your main super-admin account for Blocksi. You may also change 123Blocksi to any password of your choice or keep 123Blocksi as the standard password to access app details.
Note
Make sure that this provider configuration matches the AppConfig PLIST configuration for the App. You will configure this in the next section of these instructions.
Ensure the Configure per-app DNS checkbox is cleared; if it is not, clear it now.
Select the Enable Variables for this profile checkbox now, if it is not already selected.
Configure Profile Assignment to target devices.
Click Save. The profile should look like this:
To configure the app
Go to Management Profiles and click Install App from the left menu.
Click Add new profile.
Give the new profile a name. For example, Blocksi for iPad App.
Select your preferred Assignment Method.
Click the + Add Application button and add the Blocksi for iPad application to the profile.
Click the app icon once the app is added to the App Grid View. The following window opens. Here you need to configure the Per-App Configuration.
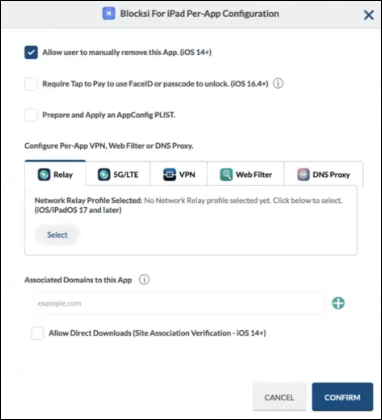
Clear the Allow user to manually remove this app checkbox.
Select the Prepare and Apply an AppConfig PLIST checkbox. A new text box area appears below it.
Add the following XML/PLIST configuration in the text box area:
<plist>
<dict>
<key>organizationId</key>
<string>admin@blocksi-super-admin.com</string>
<key>adminPassword</key>
<string>123PasswordExample</string>
<key>ttl</key>
<string>60</string>
<key>userAuthEnabled</key>
<string>false</string>
</dict>
Note
You need to change BlocksiSuperAdmin@domain.com to match your main super-admin account for Blocksi. You may also change 123Blocksi to any password of your choice or keep 123Blocksi as the standard password to access app details.
Note
Make sure that this AppConfig PLIST configuration matches the Provider configuration of the DNS Proxy Extension profile.
Click Configure Per-App VPN, Web Filter or DNS Proxy.
Click the DNS Proxy tab and select the DNS Proxy Extension profile you created for the Blocksi app.
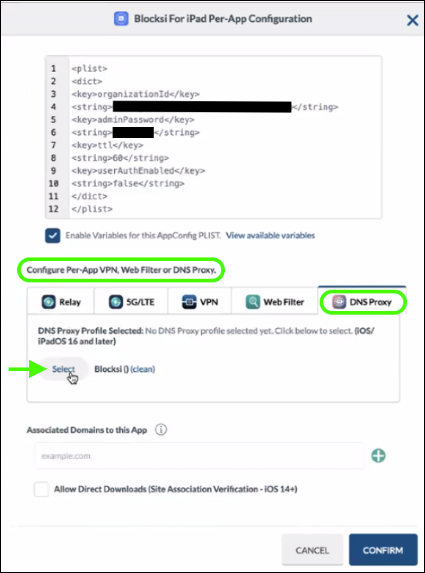
Click Confirm.
The deployment configuration is now complete. All you need to do now is verify that the configuration is correctly installed on the target enrolled devices.
To validate the app installation
Verify the app is installed on the target device.
Open the app. You should see a page with a green check mark and the following text: Everything is OK.
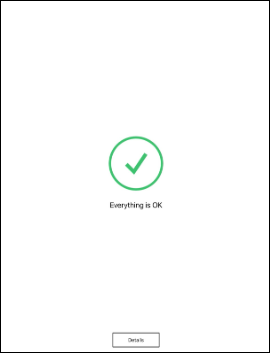
Click the Details button and type the Admin password configured in plist to verify the configurable values.
Open a browser on the iPad device (Safari or Chrome) and verify that the filtering policy you created is working correctly.
Navigate to a site that is set to Allow on the filtering policy: the site opens.
Navigate to a site that is set to Block on the filtering policy. You are presented with the Blocksi Access denied page or a This Connection Is Not Private page.
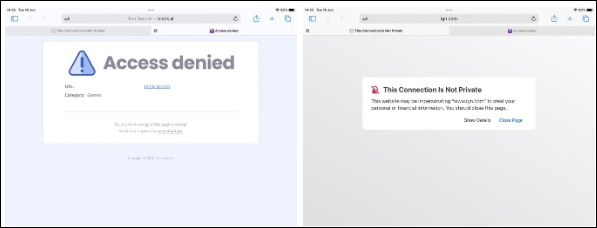
To create the filtering policy, please see Configuring the iOS Filtering Policy on the BMEE Admin Dashboard