Set up teacher accounts here.
Add as many teacher accounts as you need. Adding a teacher account authorizes that account to access the Teacher Dashboard with their credentials. Teacher Dashboard accounts do not use a Blocksi license.
To add a teacher account
Click Dashboard Settings from the Main Menu and then click Teacher Dashboard from its sub-menu. The Teacher Accounts screen appears. Due to the large amount of content, the screen is shown in four parts.
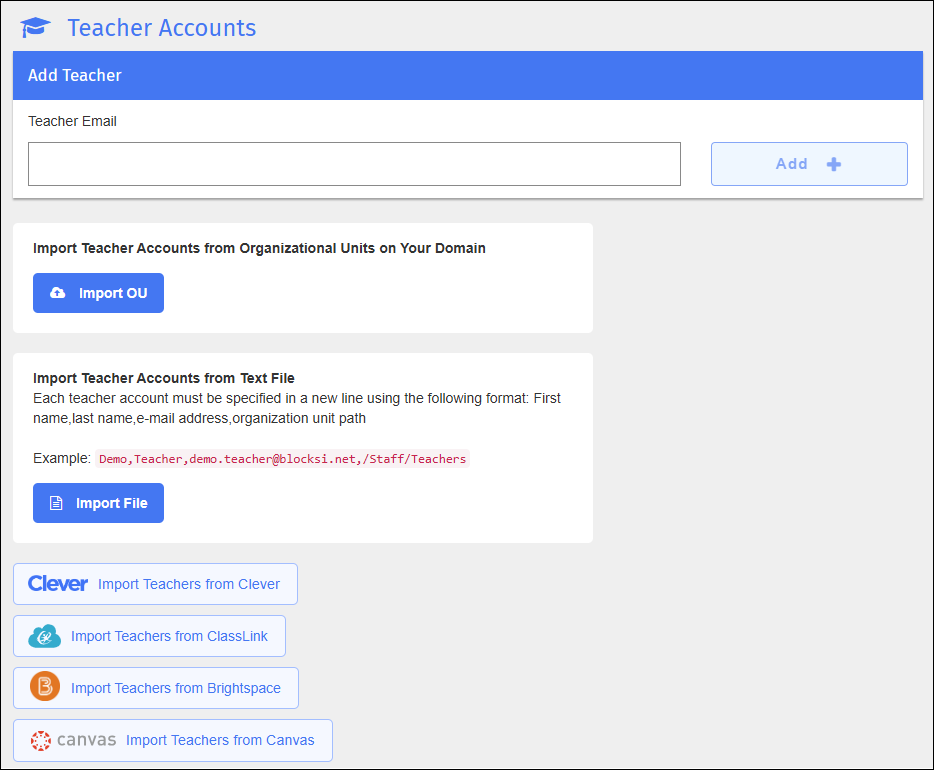
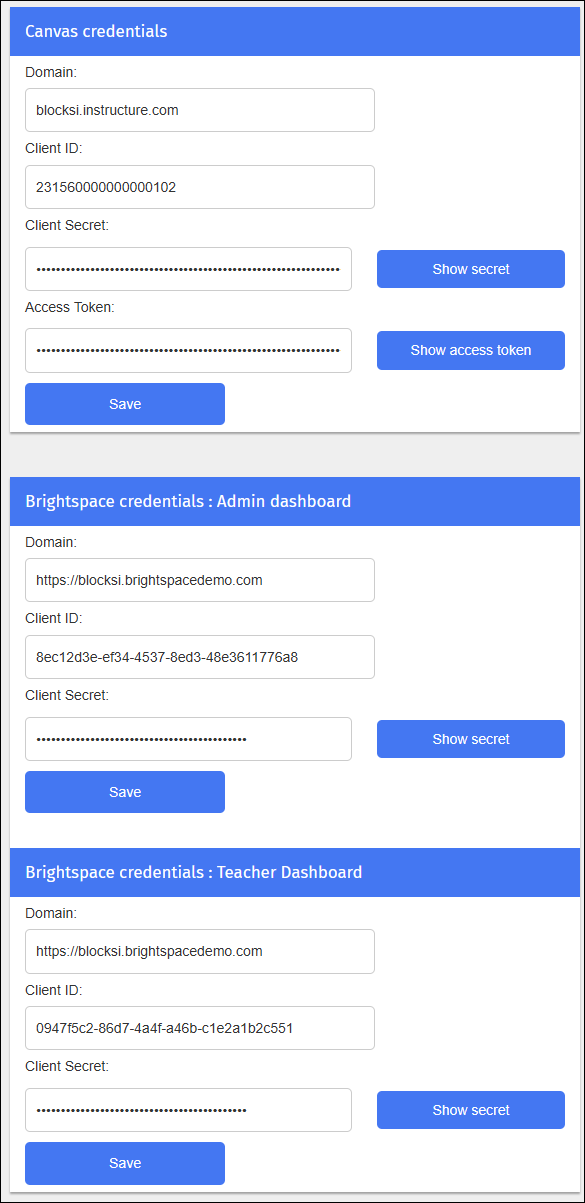
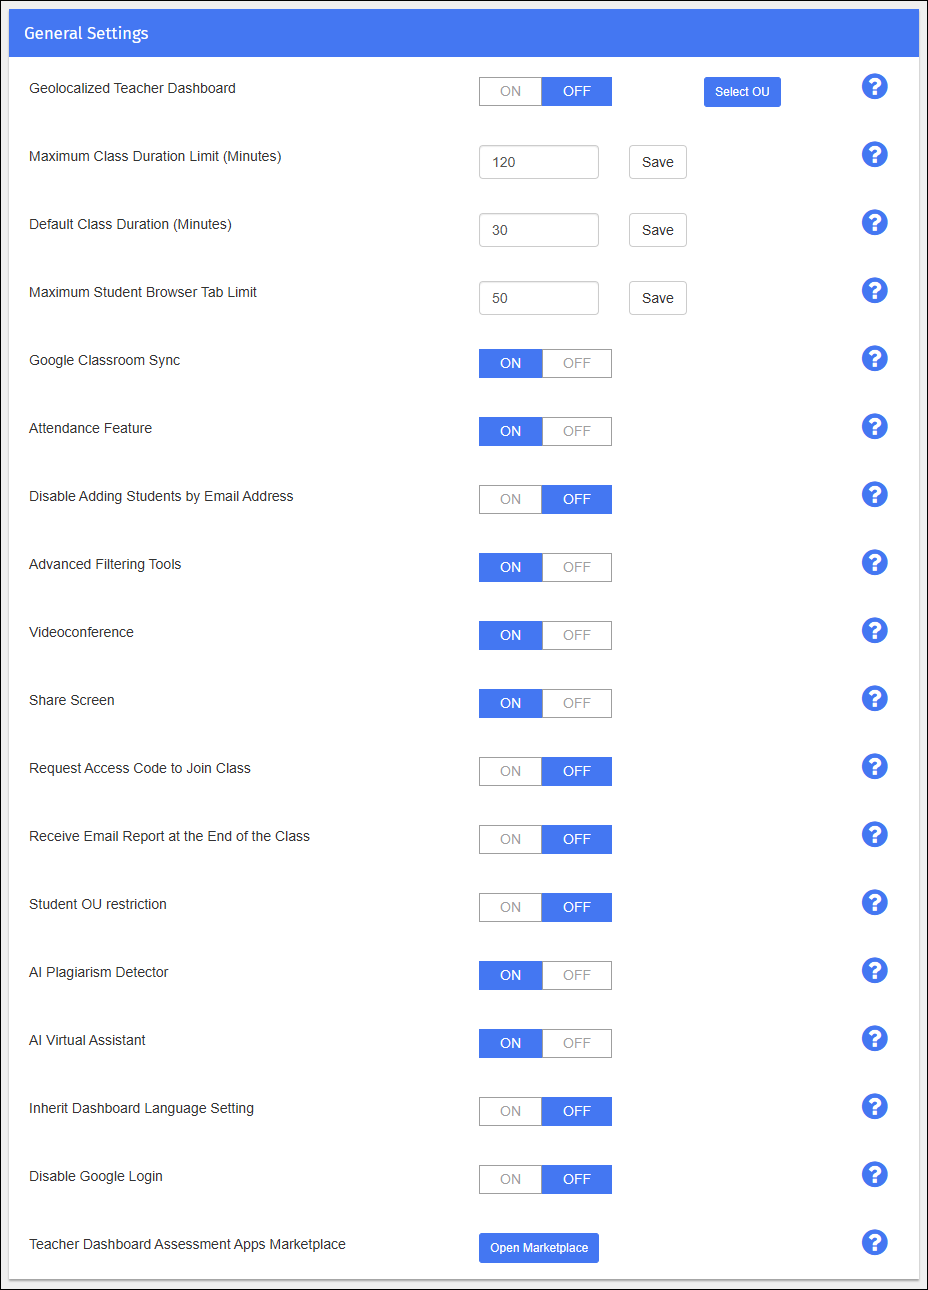
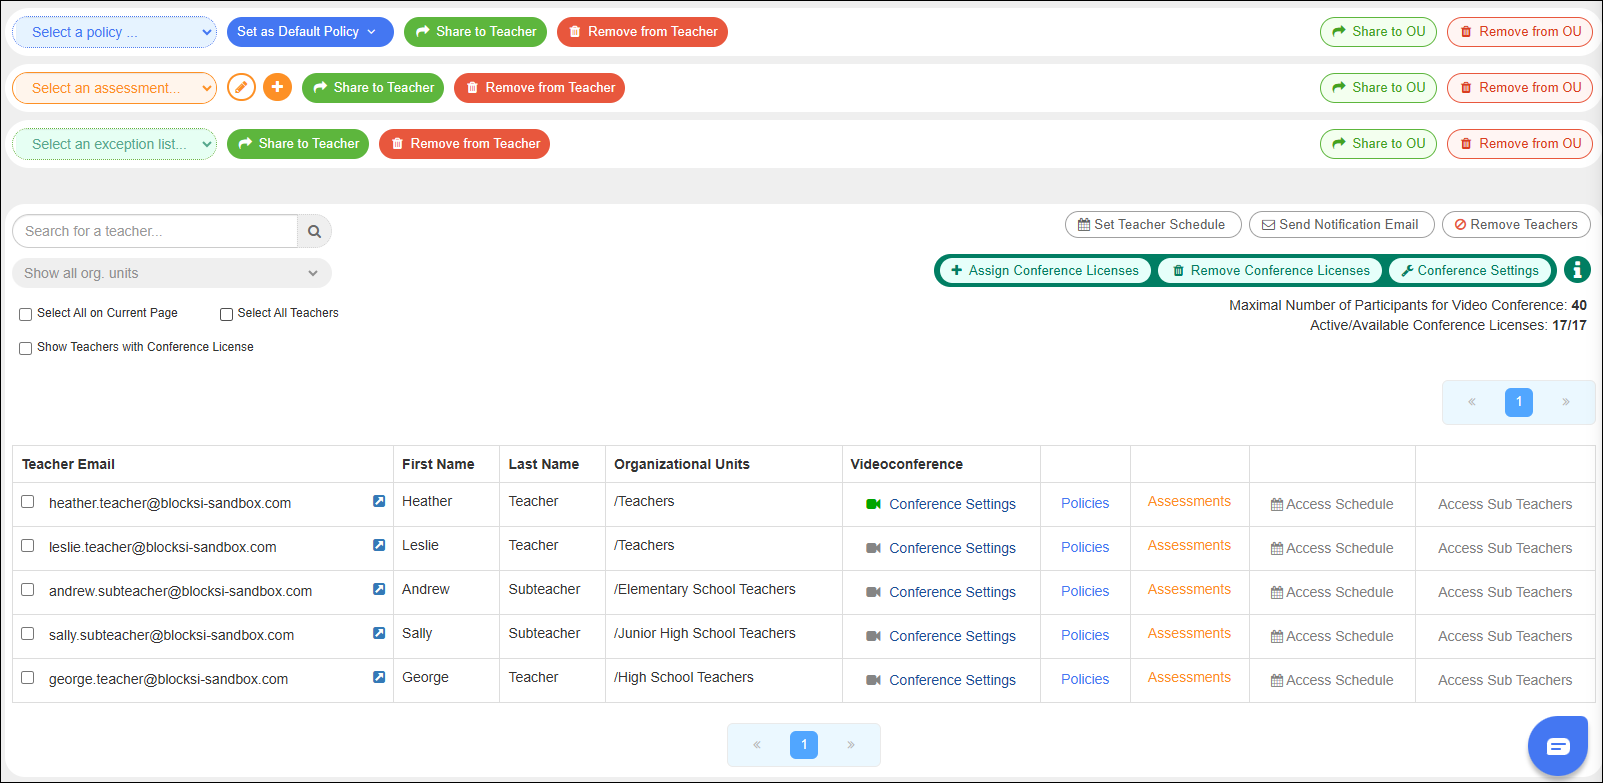
Type the email address of the teacher account to add in the Teacher Email text box in the Add teacher section.
Click Add + to add the teacher account. Blocksi adds the new teacher account to the list.
Import teacher accounts from a text file, an organizational unit, ClassLink, or Clever.
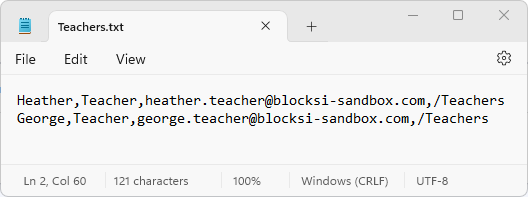
Import teacher accounts from a text file.
To import teacher accounts
Click Dashboard Settings from the Main Menu and then click Teacher Dashboard from its sub-menu. The Teacher Accounts screen appears.
Click the Import File button to import the file. The Open dialog appears.
Navigate to the desired file and click Open. Blocksi imports the teacher accounts from that text file into the listing.
Example Teachers Import File
Import teacher accounts from an organizational unit (OU).
To import teacher accounts
Click Dashboard Settings from the Main Menu and then click Teacher Dashboard from its sub-menu. The Teacher Accounts screen appears.
Click the Import OU button to import the file. The Select Organizational Units window appears.
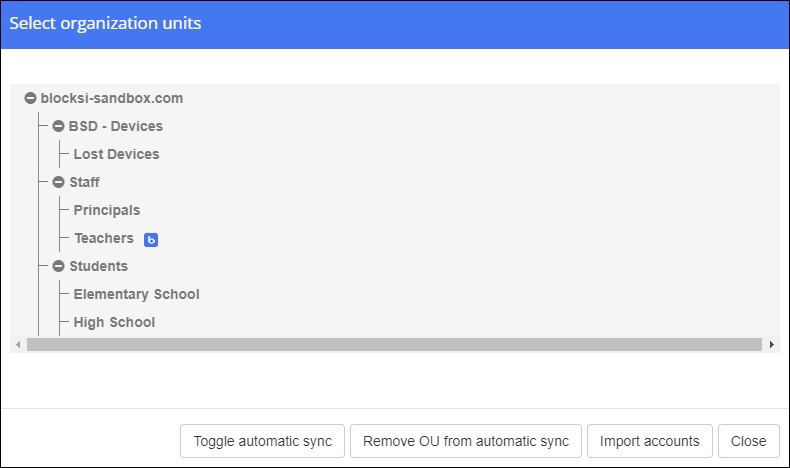
Navigate to the desired OU and click Import Accounts. Now that you have imported the desired teacher accounts, enable automatic sync. Automatic synchronization updates teacher accounts on the Admin Dashboard on a regular basis, ensuring that Blocksi synchronizes new teacher accounts and removes deactivated teacher accounts.
Highlight the desired OUs and click Toggle automatic sync. A blue Blocksi b appears to the right of the OUs indicating that automatic sync is enabled.
Note
When you no longer want to sync an OU, highlight the desired OU and click Remove OU from automatic sync. The blue Blocksi b is removed, indicating that the OU is no longer synchronizing teacher accounts automatically.
Import teacher accounts from ClassLink after ClassLink integration with Blocksi is complete. See Integrating ClassLink With Blocksi for details on integration.
To import teacher accounts
Click Dashboard Settings from the Main Menu and then click Teacher Dashboard from its sub-menu. The Teacher Accounts screen appears.
Click the Import Teachers from ClassLink button to import the teachers. You are taken to the ClassLink website.
Sign in to ClassLink as a district administrator and locate the teachers to import.
Import the desired teachers and sign out of ClassLink.
Import teacher accounts from Clever after Clever integration with Blocksi is complete. See Integrating Clever With Blocksi for details on integration.
To import teacher accounts
Click Dashboard Settings from the Main Menu and then click Teacher Dashboard from its sub-menu. The Teacher Accounts screen appears.
Click the Import Teachers from Clever button to import the teachers. You are taken to the Clever website.
Sign in to Clever as a district administrator and locate the teachers to import.
Import the desired teachers and sign out of Clever.
Import teacher accounts from Brightspace after Brightspace integration with Blocksi is complete. See Integrating Brightspace With Blocksi for details on integration.
To import teacher accounts
Click Dashboard Settings from the Main Menu and then click Teacher Dashboard from its sub-menu. The Teacher Accounts screen appears.
Click the Import Teachers from Brightspace button to import the teachers. You are taken to the Brightspace website.
Sign in to Brightspace as a district administrator and locate the teachers to import.
Import the desired teachers and sign out of Brightspace.
Import teacher accounts from Canvas after Canvas integration with Blocksi is complete. See Integrating Canvas With Blocksi for details on integration.
To import teacher accounts
Click Dashboard Settings from the Main Menu and then click Teacher Dashboard from its sub-menu. The Teacher Accounts screen appears.
Click the Import Teachers from Canvas button to import the teachers. Blocksi imports the teachers from Canvas and a success prompt appears.
Send a notification email to a teacher account to inform them that they now has access to the Teacher Dashboard.
To send a notification email
Click Dashboard Settings from the Main Menu and then click Teacher Dashboard from its sub-menu. The Teacher Accounts screen appears.
Select the checkbox to the left of the teacher or teacher accounts to which to send the notification email.
Click the Send Notification Email button to send the notification. Blocksi sends a notification email to the teacher accounts you selected.
Set the time during which teachers can access their dashboards to see student screens.
To set teacher schedules
Click Dashboard Settings from the Main Menu and then click Teacher Dashboard from its sub-menu. The Teacher Accounts screen appears.
Click the Set Teacher Schedule button. The Teacher Schedule window opens.
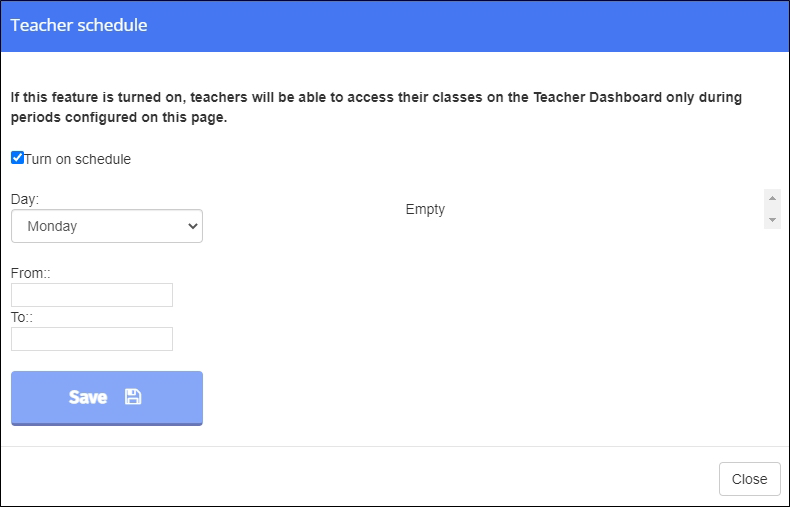
Select the Turn On Schedule checkbox to enable this feature and select the day on which to allow teachers to access their classes from the Day drop-down list.
Click in the From field. A time selector window opens. The time selector uses military time.
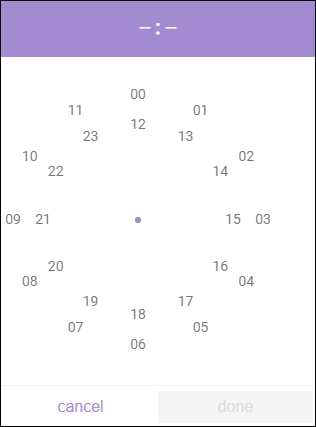
Select time from which teachers can access their classes, and click Done when you have finished. The start time you selected appears in the From field.
Note
You must select the hour and minute individually.
Click in the To field. The time selector window opens once again and select the time up until which teachers can access their classes, and click Done when you have finished. The end time you selected appears in the To field.
Click Save to add the times. The times you selected appear to the right and teachers are now able to access their classes on the day you selected during the hours you selected.
Click Close to close the window.
Add as many new assessments for your teachers as you need. This provides teachers with easy access to any assessments you have created and shared with them on their Teacher Dashboards.
To create a new assessment
Click Dashboard Settings from the Main Menu and then click Teacher Dashboard from its sub-menu. The Teacher Accounts screen appears.

Click the
 icon. An edit window opens.
Type the name of the new assessment in the Enter name... text box and click Create Assessment to add the new assessment. The new assessment name appears in the Select an assessment... drop-down list.
Select the new assessment and click the
 icon. The assessment edit window opens.
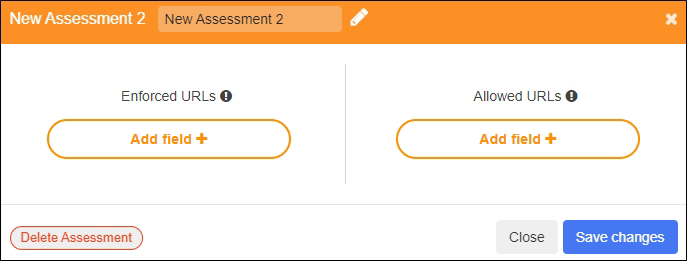
Click the edit icon to the right of the assessment name to change it, if desired.
Click the Add field + button in the Enforced URLs section, and type the URL in the text box that appears. Click the Add field + button again to add more URLs.
Note
Enforced URLs determine which sites are pushed out to the students’ screens.
Click the Add field + button in the Allowed URLs section, and type the URL in the text box that appears. Click the Add field + button again to add more URLs.
Note
Allowed URLs determine which websites the students are allowed to access; however, they not pushed out to the students.
Tip
The URL that you type in the Allowed URLs section must contain wildcards to allow access to the entire domain of the URL you type in the Enforced URLs section. For example, if you type www.purple.com in the Enforced URLs section, then you must type *purple.com* in the Allowed URLs section.
When you have finished adding all the URLs, click Save Changes.
Configuring Wildcards
Use the following rules when configuring wildcards:
*purple.com allow sites such as accounts.purple.com, but not accounts.purple.com/login
purple.com* allows sites such as purple.com/login, but not accounts.purple.com
*purple.com* allows all sites within the purple.com domain whether the custom text appears before purple.com or after
Manage the default Assessment and Web App options available on the Teacher Dashboard when a teacher clicks the Assessment button.
To add Assessments and Web Apps
Click Dashboard Settings from the Main Menu and then click Teacher Dashboard from its sub-menu. The Teacher Accounts screen appears.
In the General Settings section, click the Open Marketplace button. The Teacher Dashboard Assessment Apps Marketplace window opens. The window defaults to the Assessments tab. By default, all Assessments are already added. If you need to remove any Assessments, go to Step 4.
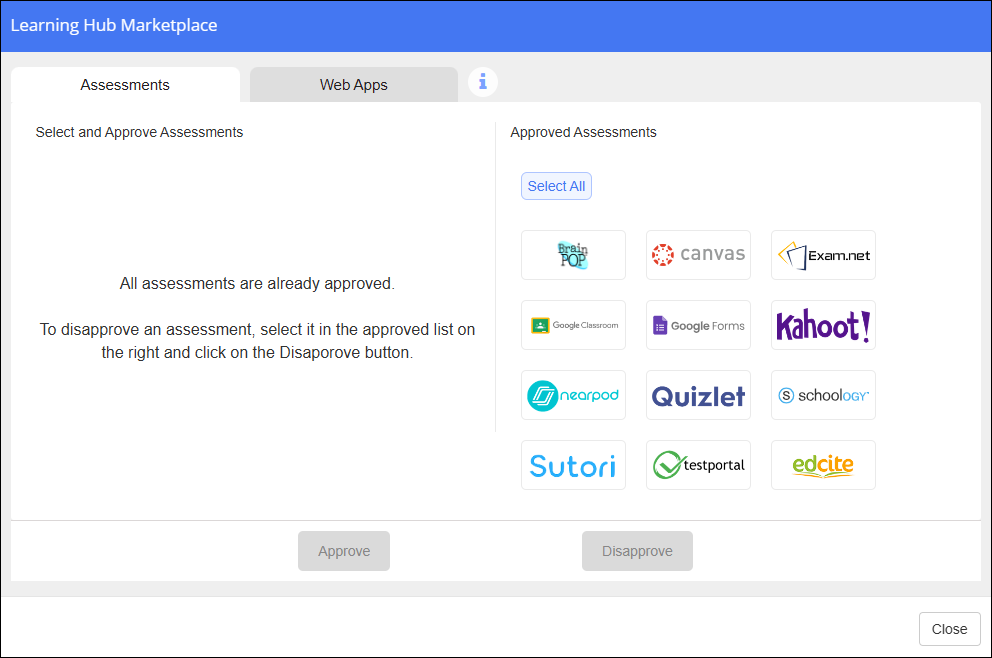
Click the Assessments to remove from the right-hand side of the window and click Remove. Click Select All to select all Assessments at once. The Assessments are moved to the left-hand side of the window. These Assessments are now available for teachers to push out during class.
Click the Web Apps tab. The window changes to show the available Web Apps. As with the Assessments tab, all Web Apps are already added. If you need to remove any Web Apps, go to Step 6.
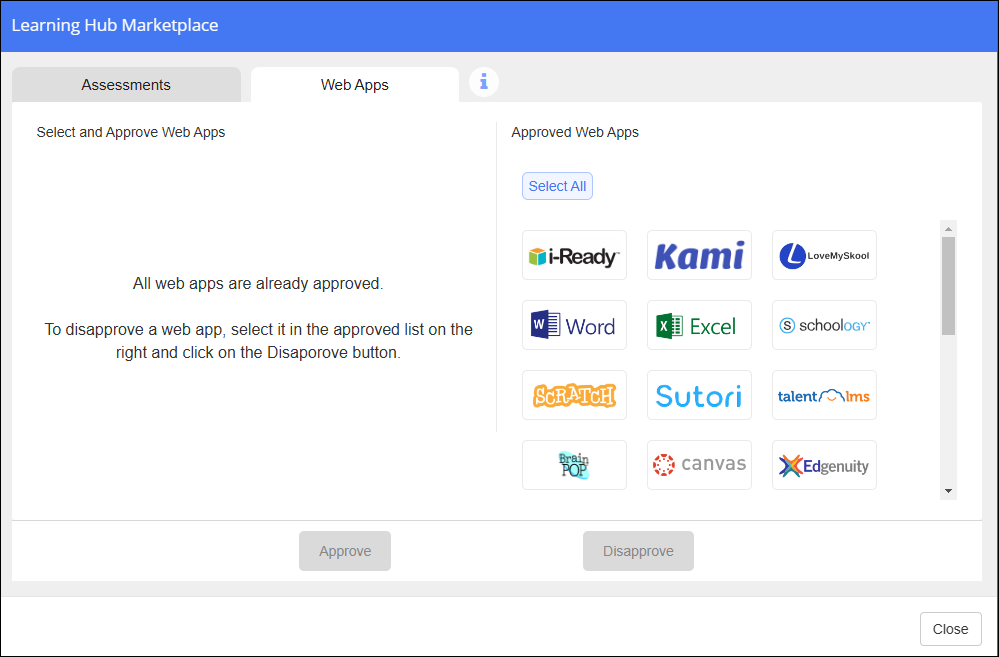
Click the Web Apps to remove from the right-hand side of the window and click Remove. Click Select All to select all Web Apps at once. The Web Apps are moved to the left-hand side of the window. These Web Apps are now available for teachers to push out during class.
Modify shared assessments as needed.
To modify an assessment
Click Dashboard Settings from the Main Menu and then click Teacher Dashboard from its sub-menu. The Teacher Accounts screen appears.

Select the name of the assessment to modify in the Select an assessment... drop-down list.
Click the
 icon. The assessment edit window opens
Make the necessary changes to the assessment.
When you have finished making your changes, click Save Changes.
Share an assessment to a teacher account.
To share an assessment to a teacher account
Click Dashboard Settings from the Main Menu and then click Teacher Dashboard from its sub-menu. The Teacher Accounts screen appears.

Select the desired assessment from the Select an assessment... drop-down list.
Select the checkboxes to the right of the teachers to whom to share the assessment.
Click the Share to Teacher button to the right. Blocksi shares the selected assessment to the teachers you selected.
Remove an assessment from a teacher account at any time.
To remove an assessment from a teacher account
Click Dashboard Settings from the Main Menu and then click Teacher Dashboard from its sub-menu. The Teacher Accounts screen appears.

Select the desired assessment from the Select an assessment... drop-down list.
Select the checkbox to the right of the teachers from whom to remove the assessment.
Click the Remove from Teacher button to the right. Blocksi removes the selected assessment from the teachers you selected.
Tip
Click the Assessments link to the right of the teacher email to remove the assessment from only one teacher. Click the down arrow to the right of the drop-down list and select the assessment to remove. Click Remove to the right. Blocksi removes the selected assessment from that teacher.
Share an assessment to an organizational unit (OU).
To share an assessment to an OU
Click Dashboard Settings from the Main Menu and then click Teacher Dashboard from its sub-menu. The Teacher Accounts screen appears.

Select the desired assessment from the Select an assessment... drop-down list.
Click the Share to OU button to the right. The Select Organizational Units window opens.
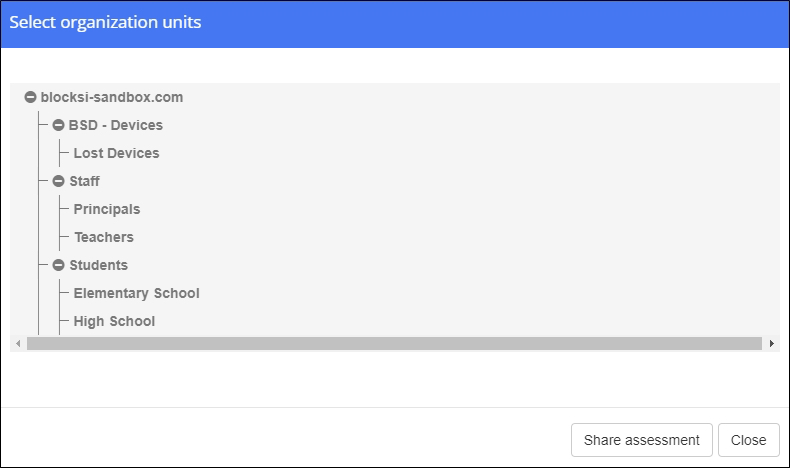
Navigate to the OU to which to share the assessment and click Share Assessment. Blocksi shares the selected assessment to the OU.
Remove an assessment from an organizational unit (OU) at any time.
To remove an assessment from an OU
Click Dashboard Settings from the Main Menu and then click Teacher Dashboard from its sub-menu. The Teacher Accounts screen appears.

Select the desired assessment from the Select an assessment... drop-down list.
Click the Remove from OU button to the right. The Select Organizational Units window opens.
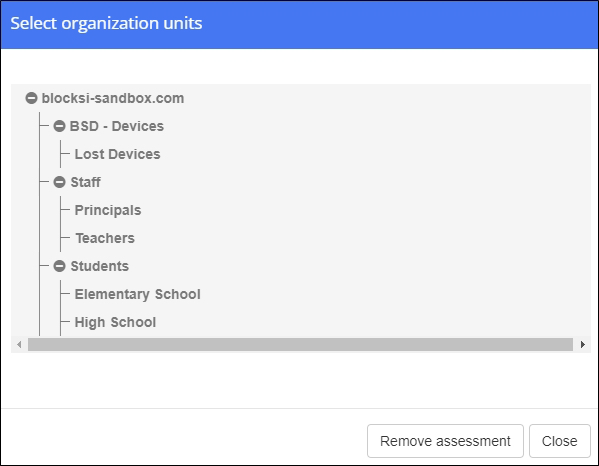
Navigate to the OU from which to remove the assessment and click Remove Assessment. Blocksi removes the selected assessment from the OU.
Note
When you remove an assessment from an OU, all presets for that assessment are also removed from all teachers in that OU.
Share an exception list to a teacher account.
To share an exception list to a teacher account
Click Dashboard Settings from the Main Menu and then click Teacher Dashboard from its sub-menu. The Teacher Accounts screen appears.

Select the desired exception list from the Select an exception list... drop-down list.
Select the checkboxes to the right of the teachers to whom to share the exception list.
Click the Share to Teacher button to the right. Blocksi shares the selected exception list to the teachers you selected.
Remove an exception list from a teacher account at any time.
To remove an exception list from a teacher account
Click Dashboard Settings from the Main Menu and then click Teacher Dashboard from its sub-menu. The Teacher Accounts screen appears.

Select the desired exception list from the Select an exception list... drop-down list.
Select the checkboxes to the right of the teachers from whom to remove the exception list.
Click the Remove from Teacher button to the right. Blocksi removes the selected exception from the teachers you selected.
Tip
Click the Exception Lists link to the right of the teacher email to remove the exception list from only one teacher. Click the down arrow to the right of the drop-down list and select the exception list to remove. Click Remove to the right. Blocksi removes the selected exception list from that teacher.
Share an exception list to an organizational unit (OU).
To share an exception list to an OU
Click Dashboard Settings from the Main Menu and then click Teacher Dashboard from its sub-menu. The Teacher Accounts screen appears.

Select the desired exception list from the Select an exception list... drop-down list.
Click the Share to OU button to the right. The Select Organizational Units window opens.
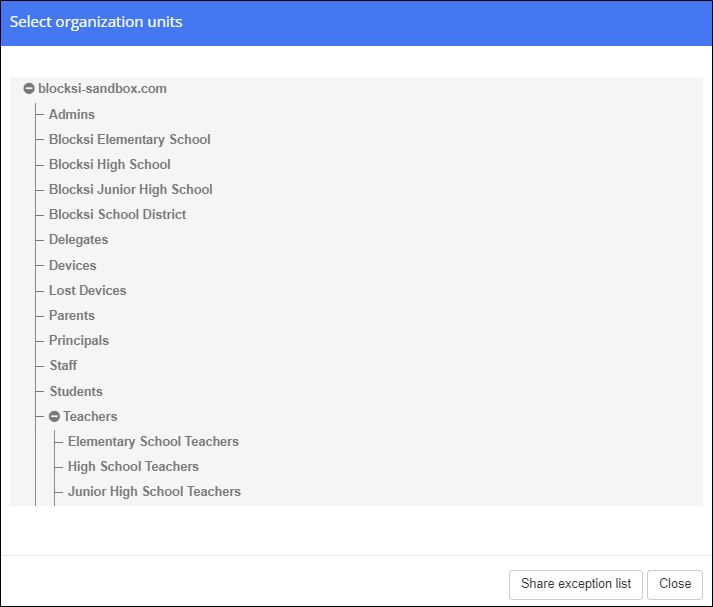
Navigate to the OU to which to share the exception list and click Share Exception List. The selected exception list is shared to the OU.
Remove an exception list from an organizational unit (OU) at any time.
To remove an exception list from an OU
Click Dashboard Settings from the Main Menu and then click Teacher Dashboard from its sub-menu. The Teacher Accounts screen appears.

Select the desired exception list from the Select an exception list... drop-down list.
Click the Remove from OU button to the right. The Select Organizational Units window opens.
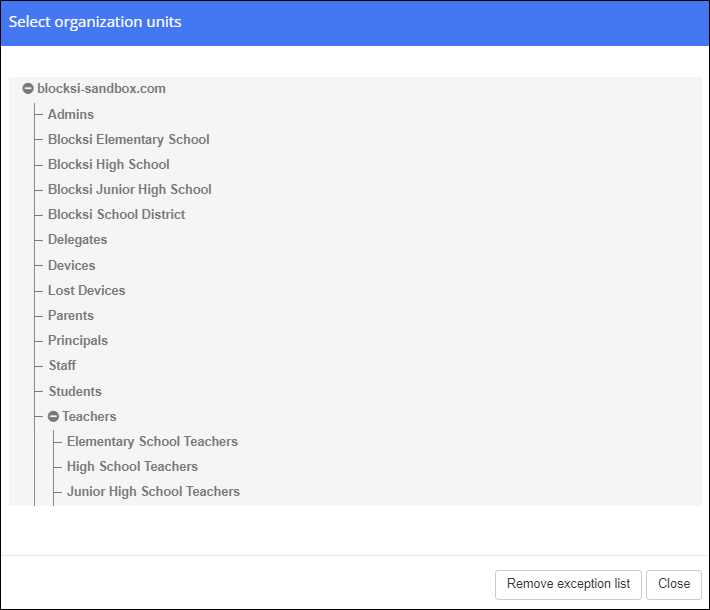
Navigate to the OU from which to remove the exception list and click Remove Exception List. The selected exception list is removed from the OU.
Assign a default policy to ensure filtering is applied during class without requiring teacher selection.
To set the default policy for teacher accounts
Click Dashboard Settings from the Main Menu and then click Teacher Dashboard from its sub-menu. The Teacher Accounts screen appears.
Select the desired policy from the Select a policy... drop-down list.
Click the down arrow to the right of the Set as default policy button to reveal the following three options:
Set as Default Policy. Selecting this option makes the selected policy the default policy for teachers who do not select a policy.
Set as Default OU Policy. Selecting this option makes the selected policy the default policy for the OU.
Override OU Defaults. Selecting this option overrides any policies already set for teachers in the OU.
Share a policy to a teacher account.
To share a policy to a teacher account
Click Dashboard Settings from the Main Menu and then click Teacher Dashboard from its sub-menu. The Teacher Accounts screen appears.

Select the desired policy from the Select a policy... drop-down list.
Select the checkboxes to the right of the teachers to whom to share the policy.
Click the Share to Teacher button to the right. Blocksi shares the selected policy to the teachers you selected.
Remove a policy from a teacher account at any time.
To remove a policy from a teacher account
Click Dashboard Settings from the Main Menu and then click Teacher Dashboard from its sub-menu. The Teacher Accounts screen appears.

Select the desired policy from the Select a policy... drop-down list.
Select the checkboxes to the right of the teachers from whom to remove the policy.
Click the Remove from Teacher button to the right. Blocksi removes the selected policy from the teachers you selected.
Tip
Click the Policies link to the right of the teacher email to remove the policy from only one teacher. Click the down arrow to the right of the drop-down list and select the policy to remove. Click Remove to the right. Blocksi removes the selected policy from that teacher.
Share a policy to an organizational unit (OU).
To share a policy to an OU
Click Dashboard Settings from the Main Menu and then click Teacher Dashboard from its sub-menu. The Teacher Accounts screen appears.

Select the desired policy from the Select a policy... drop-down list.
Click the Share to OU button to the right. The Select Organizational Units window opens.
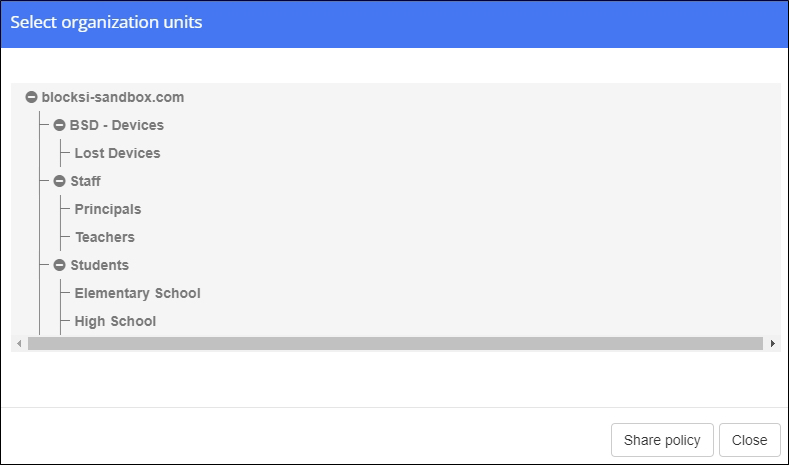
Navigate to the OU to which to share the policy and click Share Policy. Blocksi shares the selected policy to the OU.
Remove a policy from an organizational unit (OU) at any time.
To remove a policy from an OU
Click Dashboard Settings from the Main Menu and then click Teacher Dashboard from its sub-menu. The Teacher Accounts screen appears.

Select the desired policy from the Select a policy... drop-down list.
Click the Remove from OU button to the right. The Select Organizational Units window opens.
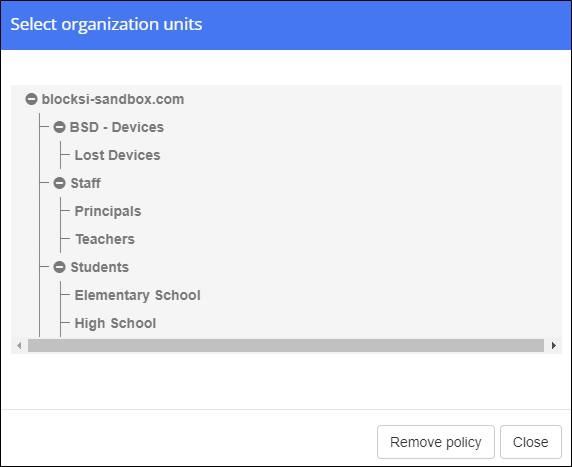
Navigate to the OU from which to remove the policy and click Remove Policy. Blocksi removes the selected policy from the OU.
Assign conference licenses to as many teachers as necessary.
To assign a conference license to a teacher
Click Dashboard Settings from the Main Menu and then click Teacher Dashboard from its sub-menu. The Teacher Accounts screen appears.
Do one of the following:
Select the checkboxes to the left of the teachers to whom to assign licenses and click the Assign Conference Licenses button. A success prompt appears. The licenses are assigned to the selected teachers.
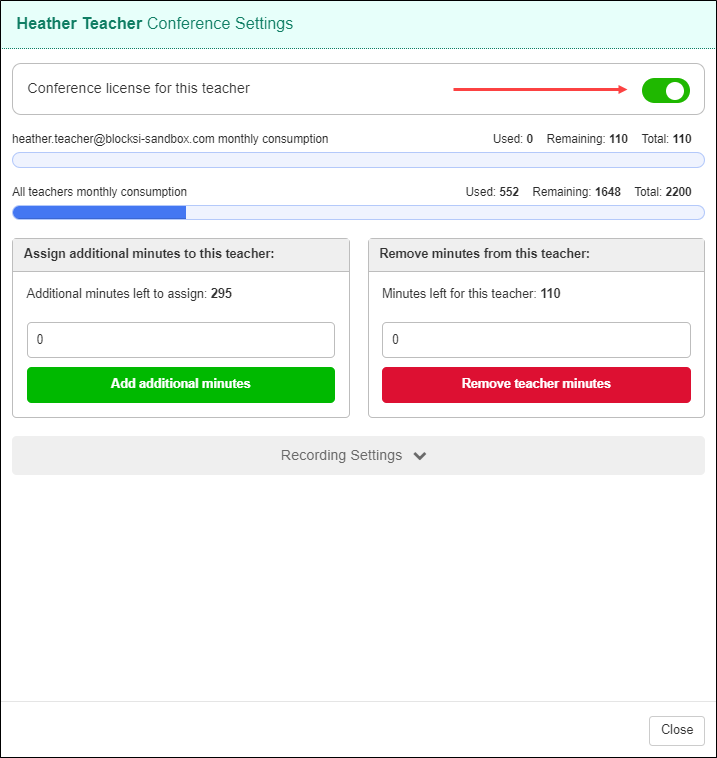
Locate the teacher for whom to assign the license, and click Conference Settings in the Videoconference column. The Conference Settings window opens. Click the Conference license for this teacher option. Blocksi assigns the license to the teacher you selected.
Assign up to 5000 minutes of conference time to an individual teacher or to multiple teachers.
To assign minutes to an individual teacher
Click Dashboard Settings from the Main Menu and then click Teacher Dashboard from its sub-menu. The Teacher Accounts screen appears.
Locate the teacher for whom to assign minutes, and click Conference Settings in the Videoconference column. The Conference Settings window opens.
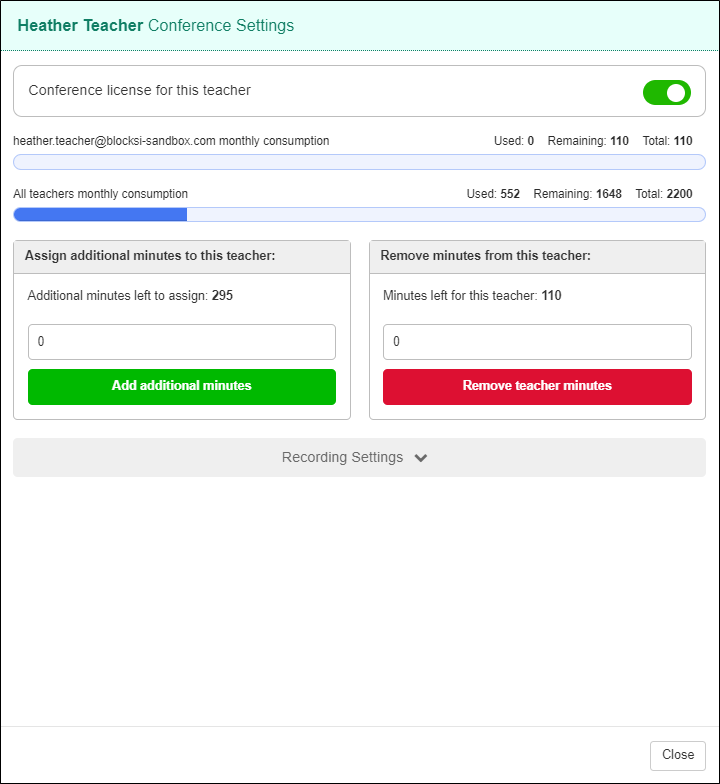
Type the number of minutes or select the number of minutes in the Assign additional minutes to this teacher: section.
Click the Add additional minutes button to add the minutes. Note that the minutes are subtracted from the Assign additional minutes to this teacher: section and added to the Remove minutes from this teacher: section.
To assign minutes to multiple teachers
Click Dashboard Settings from the Main Menu and then click Teacher Dashboard from its sub-menu. The Teacher Accounts screen appears.
Select the checkboxes to the left of the teachers for whom to assign minutes, and click the Conference Settings button. The Conference Settings window opens.
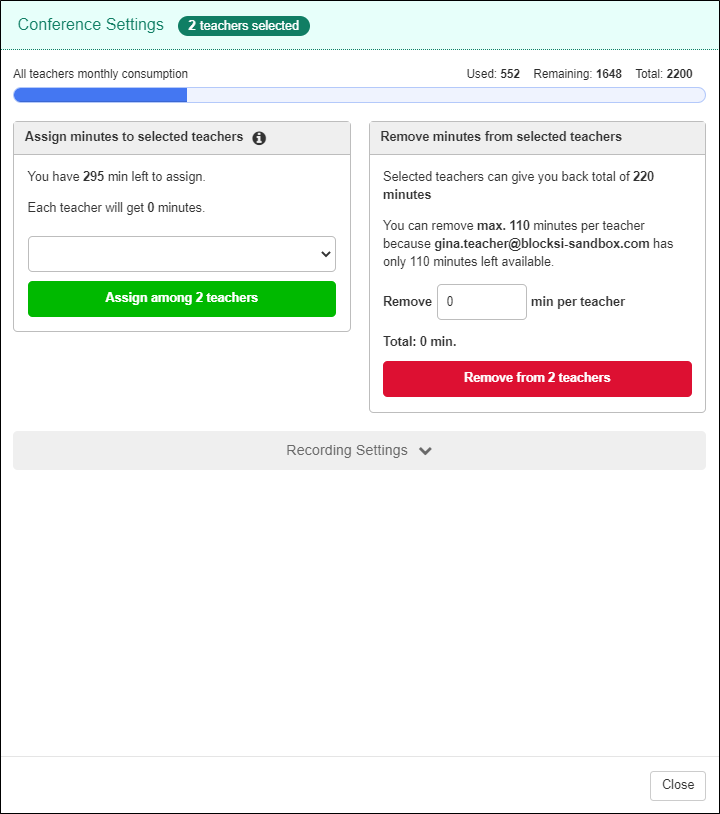
Type the number of minutes or select the number of minutes in the Assign minutes to selected teachers section.
Click the Assign among [number of] teachers button. Note that the minutes are subtracted from the Assign minutes to selected teachers section and added to the Remove minutes from selected teachers section. Also note that the minutes are assigned equally to the selected teachers.
Remove conference licenses when they are no longer needed.
To remove a conference license from a teacher
Click Dashboard Settings from the Main Menu and then click Teacher Dashboard from its sub-menu. The Teacher Accounts screen appears.
Do one of the following:
Select the checkboxes to the left of the teachers from whom to remove licenses and click the Remove Conference Licenses button. A success prompt appears. Blocksi removes the licenses from the teachers you selected.
Locate the teacher from whom to remove the license, and click Conference Settings in the Videoconference column. The Conference settings window opens. Click the Conference license for this teacher option. The license is removed from the teachers you selected.
Remove up to 5000 minutes of conference time from an individual teacher or multiple teachers.
To remove minutes from an individual teacher
Click Dashboard Settings from the Main Menu and then click Teacher Dashboard from its sub-menu. The Teacher Accounts screen appears.
Select the teacher from whom to remove minutes, and click the Conference Settings button. The Conference Settings window opens.

Type the number of minutes or select the number of minutes in the Remove minutes from this teacher: section.
Click the Remove teacher minutes button to remove the minutes. Note that the minutes are subtracted from the Remove minutes from this teacher: section and added to the Assign additional minutes to this teacher: section.
To remove minutes from multiple teachers
Click Dashboard Settings from the Main Menu and then click Teacher Dashboard from its sub-menu. The Teacher Accounts screen appears.
Select the checkboxes to the left of the teachers from whom to remove minutes, and click the Conference Settings button. The Conference Settings window opens.

Type the number of minutes or select the number of minutes in the Assign minutes to selected teachers section.
Click the Remove from [number of] teachers button. Note that the minutes are subtracted from the Remove minutes from selected teachers section and added to the Assign minutes to selected teachers section. Also note that the minutes are removed equally from the selected teachers.
View the details of your conference subscription.
To view your conference subscription details
Click Dashboard Settings from the Main Menu and then click Teacher Dashboard from its sub-menu. The Teacher Accounts screen appears.
Click the
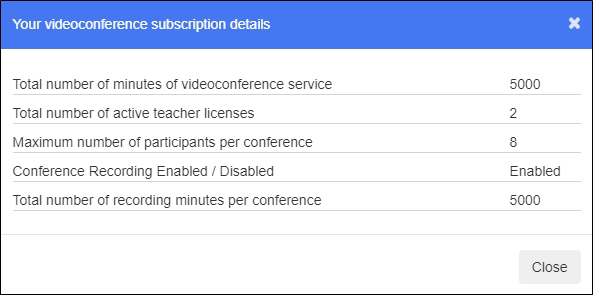
 icon to view the subscription details. The Your Videoconference Subscription Details window opens, as shown below.
Add up to three substitute teachers for each teacher.
To add a substitute teacher
Click Dashboard Settings from the Main Menu and then click Teacher Dashboard from its sub-menu. The Teacher Accounts screen appears.
Locate the teacher for which to add a substitute teacher.
Click the Access Sub Teachers link to the far right of the teacher's username. The teacher's sub teachers list window opens.
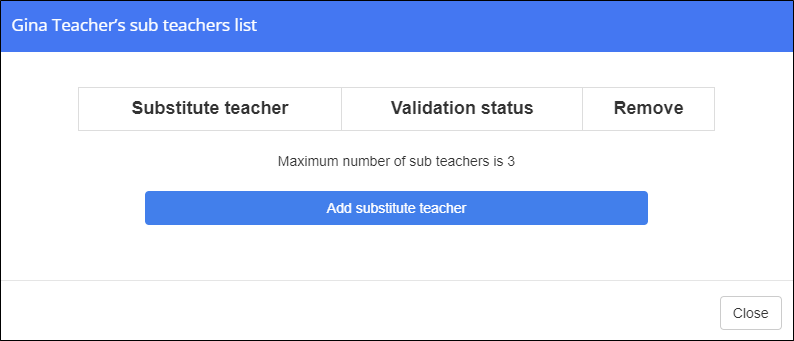
Click the Add Substitute Teacher button. The following window opens.
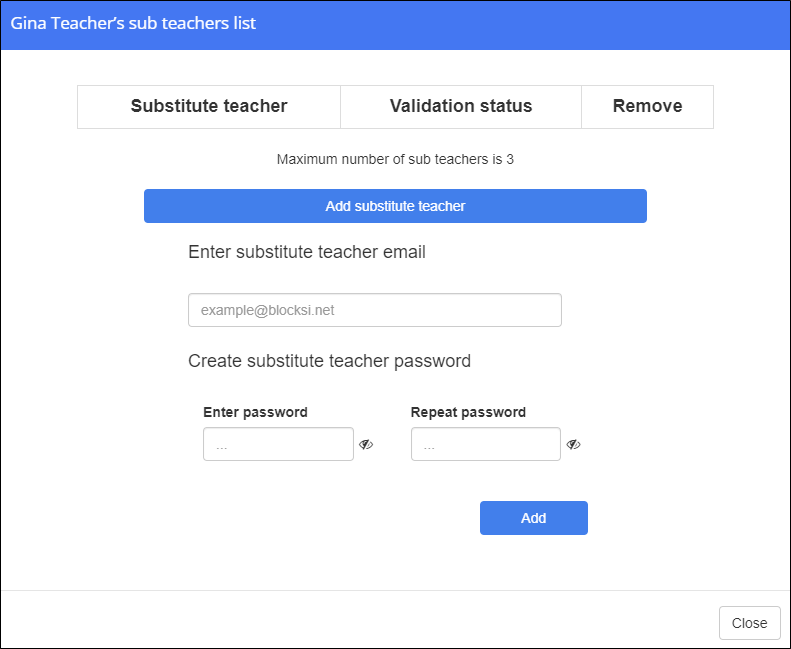
Type the substitute teacher's email address in the text box.
Type a password that the substitute will use to sign in to the dashboard and repeat it in the text box to the right.
Click Add to add the substitute teacher. A validation prompt appears at the top of the window.
Click the red AWAITING VALIDATION status. It changes to a green VALIDATED status. The substitute teacher can now sign in to the Teacher Dashboard.
Before substitute teachers can sign in to the Teacher Dashboard, they must be validated by either the Admin or Delegate.
To validate a substitute teacher
Click Dashboard Settings from the Main Menu and then click Teacher Dashboard from its sub-menu. The Teacher Accounts screen appears.
Locate the teacher with the substitute to validate.
Click the Access Sub Teachers link to the far right of the teacher's username. The teacher's sub teachers list window opens.
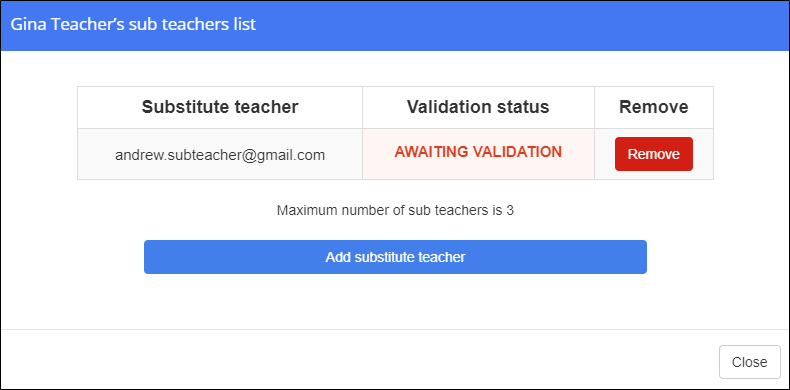
Click the red AWAITING VALIDATION status to validate the substitute teacher. It changes to a green VALIDATED status. The substitute teacher can now sign in to the Teacher Dashboard.
To search for a teacher account
Click Dashboard Settings from the Main Menu and then click Teacher Dashboard from its sub-menu. The Teacher Accounts screen appears.
Type the email for the teacher account you are searching for in the Search for a teacher... text box.
Click the
 icon. Blocksi adds the teacher to the list below.
Remove a teacher account when you no longer need it.
To remove a teacher account
Click Dashboard Settings from the Main Menu and then click Teacher Dashboard from its sub-menu. The Teacher Accounts screen appears.
Select the checkbox to the left of the teacher account to remove and click the Remove Teachers button. A confirmation prompt appears.
Click OK to remove the account.
Customize the functionality and appearance of the Teacher Dashboard for your district.
To set up the Teacher Dashboard
Click Dashboard Settings from the Main Menu and then click Teacher Dashboard from its sub-menu. The Teacher Accounts screen appears.
Make your selections in the General Settings section of the Teacher Accounts screen. See Teacher Dashboard Settings for descriptions of each option.
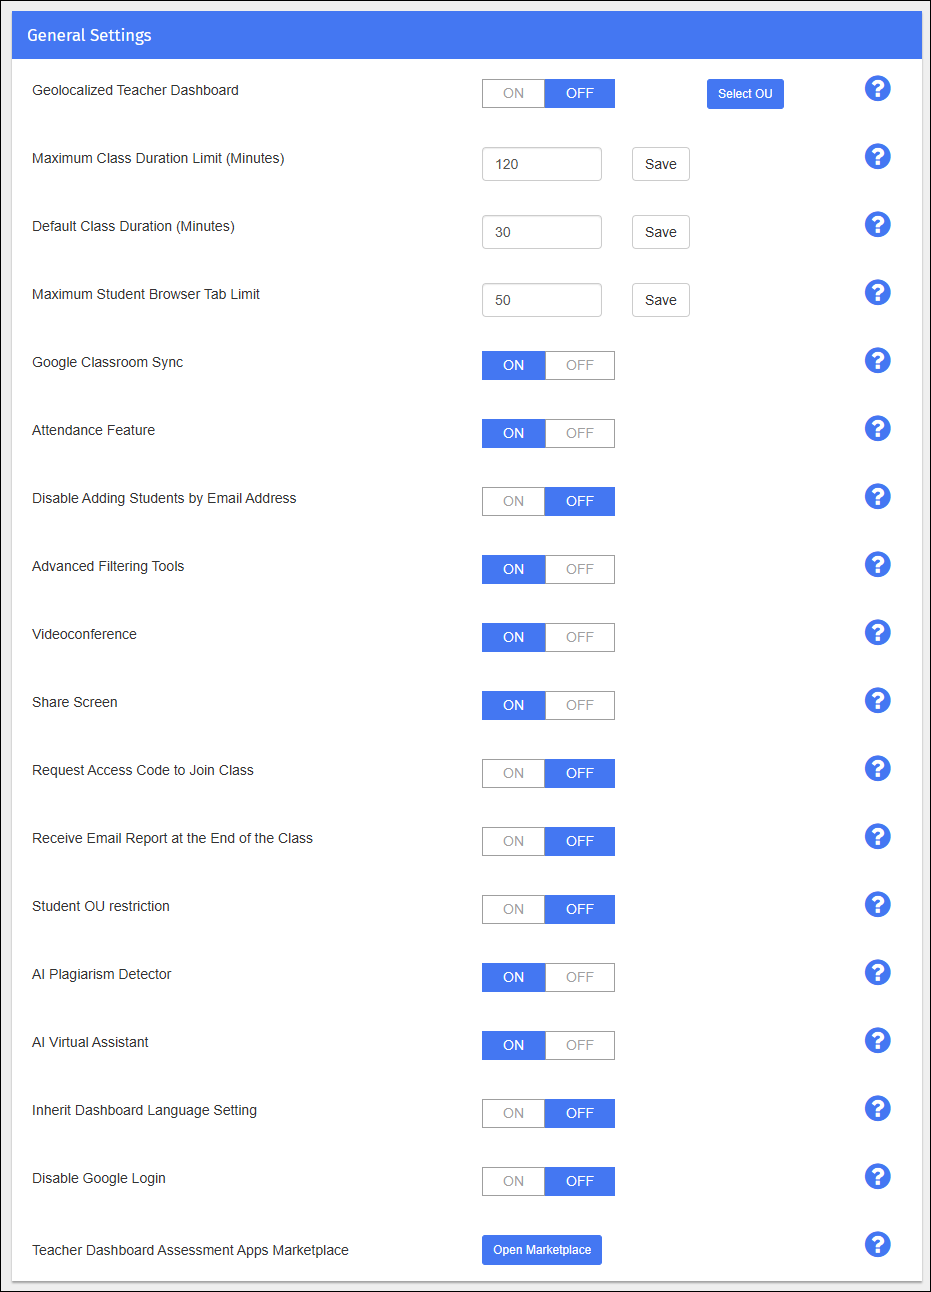
See the following descriptions for information on the delegate dashboard settings.
Option | Description |
|---|---|
Set whether to restrict use of the Teacher Dashboard to in school only. When set to ON, students located out of school cannot be monitored and are shown as out of school on their student tile in class. If Geofencing is not enabled, students are marked in school by default. Indicate which OUs to exclude from the settings. For more information, see Geofencing. | |
Indicate the maximum class duration teachers can set, in minutes. Setting this option to 0 indicates no limit on time. | |
Set the default duration of all imported classes, in minutes. Teachers can override the exact duration of each of their classes. | |
Set a maximum tab limit for all students in your domain. | |
Set whether to sync class data for all teachers with a Google classroom account. If you set this option to ON, data is synced once per day. | |
Indicate whether a teacher can take attendance during class. | |
Indicate whether a teacher can manually add students to a class by email address. | |
Set whether to allow access to all filtering tools on the Teacher Dashboard. If you set this to OFF, teachers cannot create their own filtering policies and cannot use any policies which they previously created themselves. Policies shared by administrators can be used in both cases. | |
Indicate whether videoconferencing is allowed on the Teacher Dashboard. | |
Indicate whether screen sharing is allowed on the Teacher Dashboard. | |
Indicate whether students can enter class with the class access code. If you set this option to ON, students can join their class manually after it has started by signing in as a student at blocksi.net. | |
Set whether to send email analytics reports sent to primary and secondary teachers after class has ended. | |
Indicate whether to enable or disable the student OU restriction. If you set this option to OFF, teachers can add students to their classes from any OU. If you set this option to ON, teachers are restricted to the OUs to which they are assigned in the OU setup. See Step 10 in Setting Up an OU for details. | |
Enable and disable access to the Plagiarism Checker. This tool allows teachers to check if students have submitted writing assignments that contain plagiarized or AI generated content. | |
Enable and disable access to the AI Virtual Assistant. This tool allows teachers to create AI-generated quizzes during class and distribute them to students. Quizzes are saved and editable in Google Forms. | |
Indicate whether to inherit the dashboard language setting from the Admin Dashboard. Setting this option to OFF allows teachers to select the language setting directly from the Teacher Dashboard. | |
Indicate whether to prevent teachers from signing in with Google and importing classes. Set this option to ON if teachers are required to access the dashboard using another SSO option such as Clever or ClassLink. | |
Allows teachers to add and remove assessments and web apps by clicking the Open Marketplace button. |