Set up parent accounts here.
Add as many parent accounts as you need.
To add a parent account
Click Dashboard Settings from the Main Menu and then click Parent Dashboard from its sub-menu. The Parent Accounts screen appears.
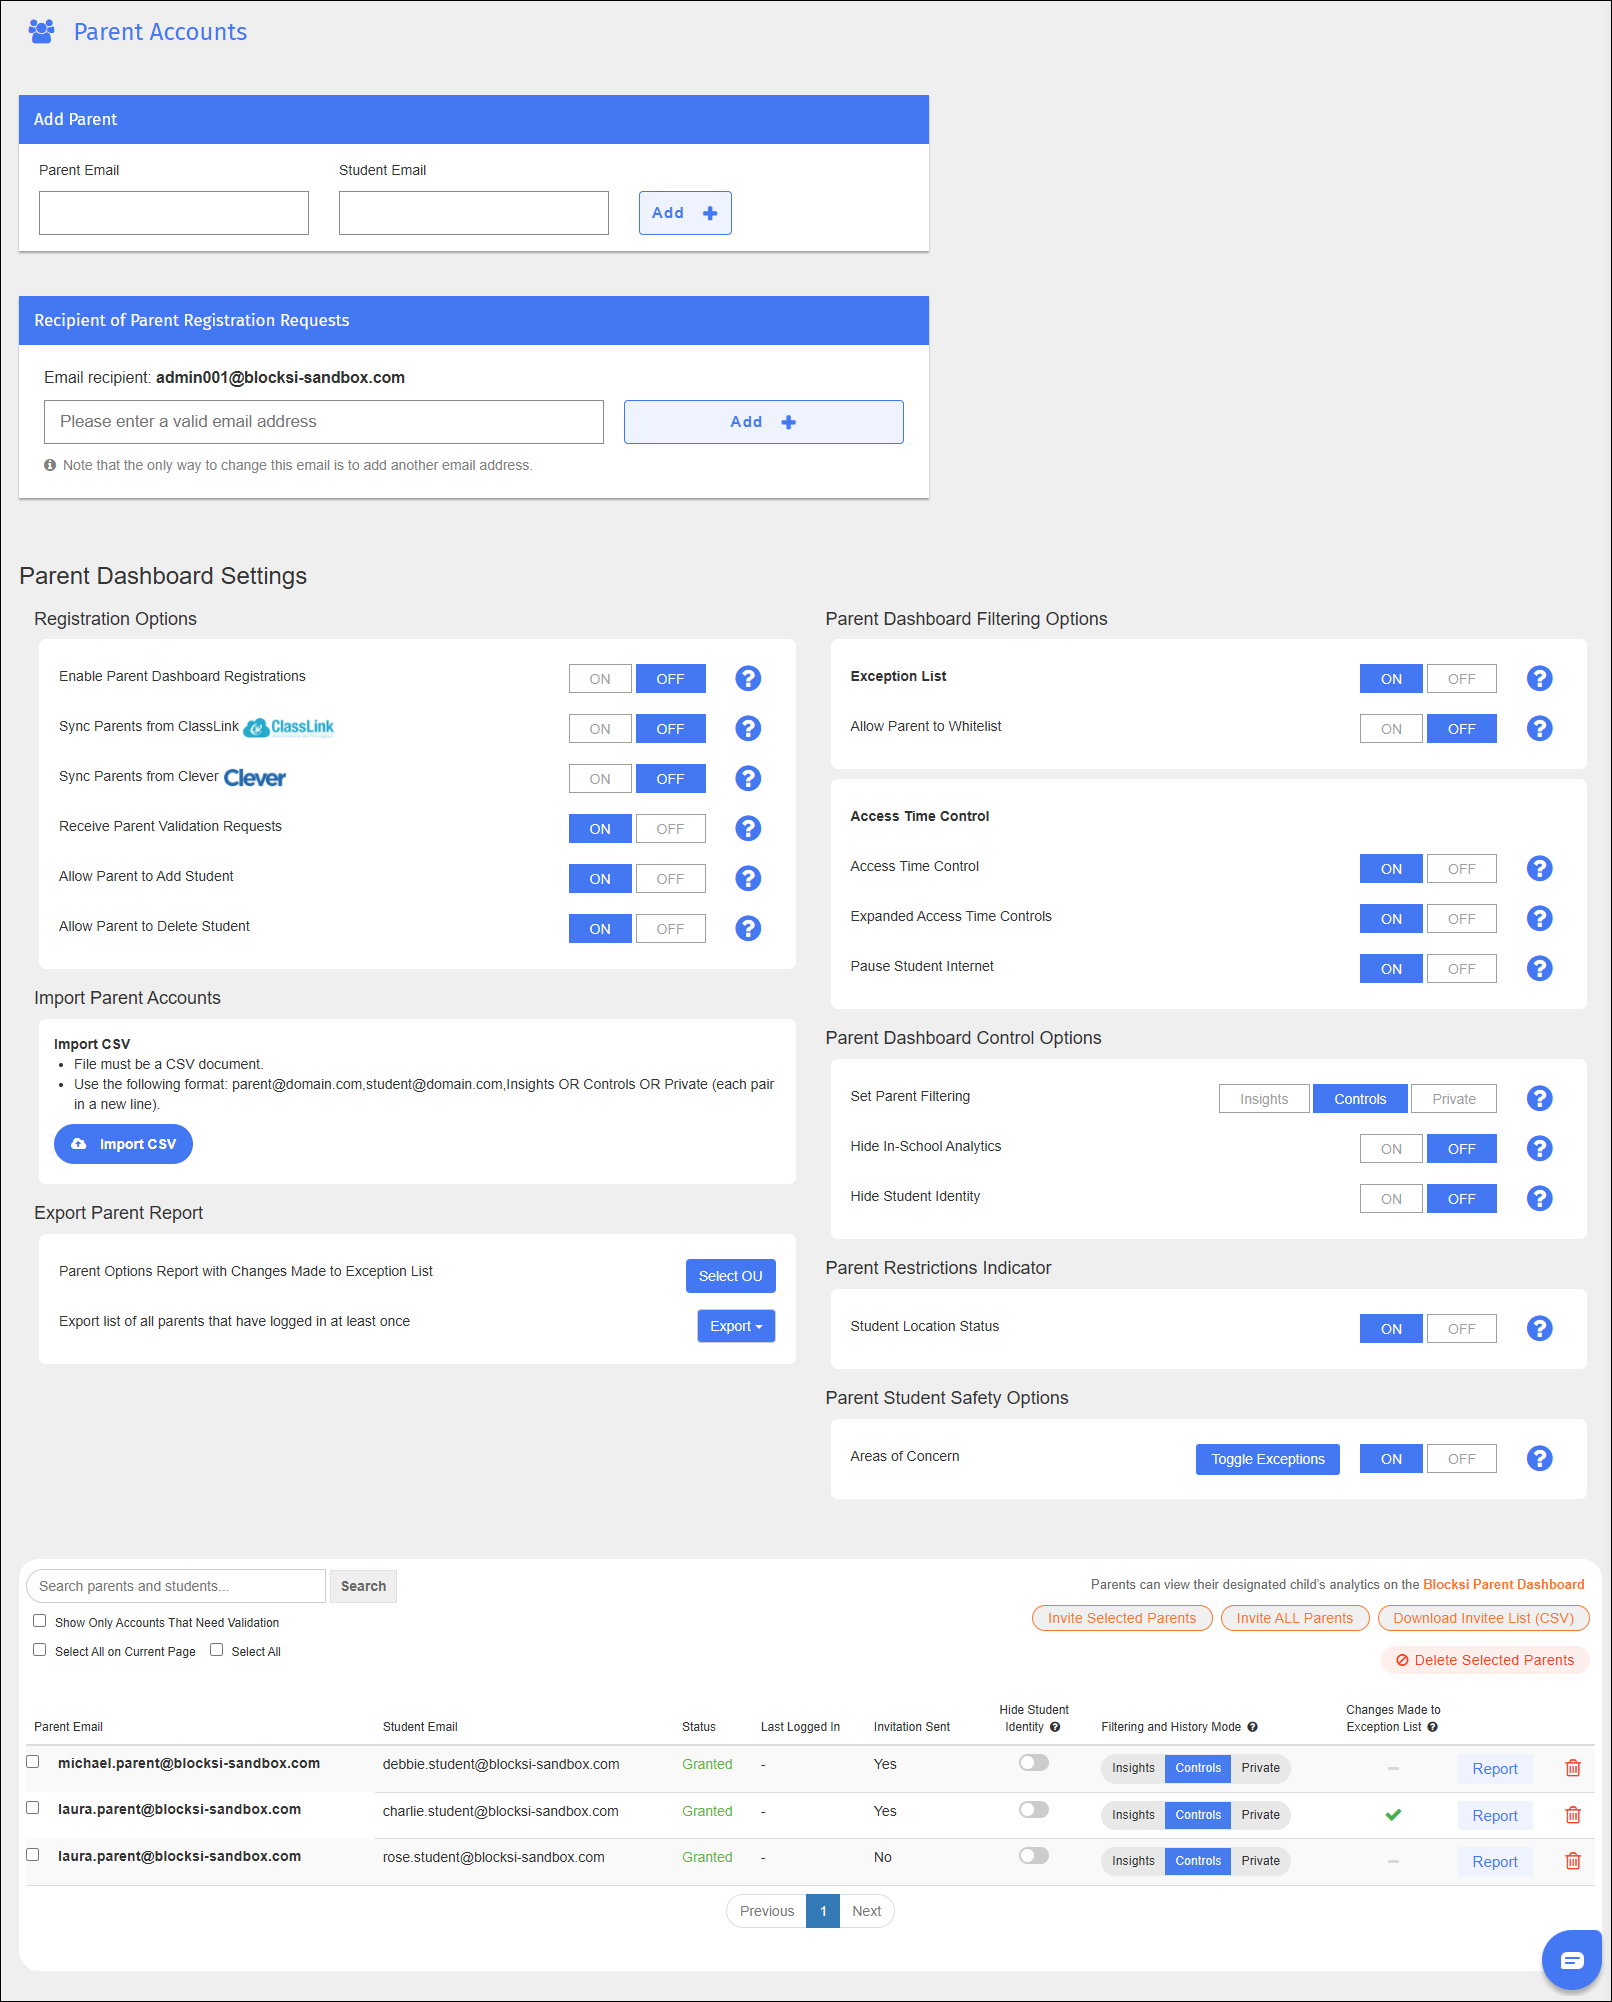
Type the email address of the parent account to add in the Parent Email text box in the Add Parent section.
Type the email of the student associated with this parent in the Student Email text box in the Add Parent section.
Click Add + to add the parent/student pairing. Blocksi adds the new parent/student pairing to the list.
Import parent accounts from a text file.
To import parent accounts
Click Dashboard Settings from the Main Menu and then click Parent Dashboard from its sub-menu. The Parent Accounts screen appears.

Click the Import CSV button in the Import Parent Accounts section. The Open dialog appears.
Navigate to the desired file and click Open. Blocksi imports the parent accounts from that text file.
Example Parent Import File

Note
This feature is available only if Enable Parent Dashboard Registrations is set to ON in the parent options.
Parent registration requests submitted by parents who already have an account with Blocksi are handled by the super admin. All other parents must first register with Blocksi before they can access their Parent Dashboards. These requests are handled by the admin at the email address you enter on this screen.
To designate a recipient
Click Dashboard Settings from the Main Menu and then click Parent Dashboard from its sub-menu. The Parent Accounts screen appears.

Type the email address of the account to which to send registration requests for parents not yet registered with Blocksi in the Email recipient text box in the Recipient of Parent Registration Requests section.
Click Add+ to send the request. Requests by parents without a Blocksi account are sent to the email address you entered here.
The Parent Dashboard offers multiple settings, which you can configure for all Parents, or override for specific Parent Accounts.
Click Dashboard Settings from the Main Menu and then click Parent Dashboard from its sub-menu. The Parent Accounts screen appears.
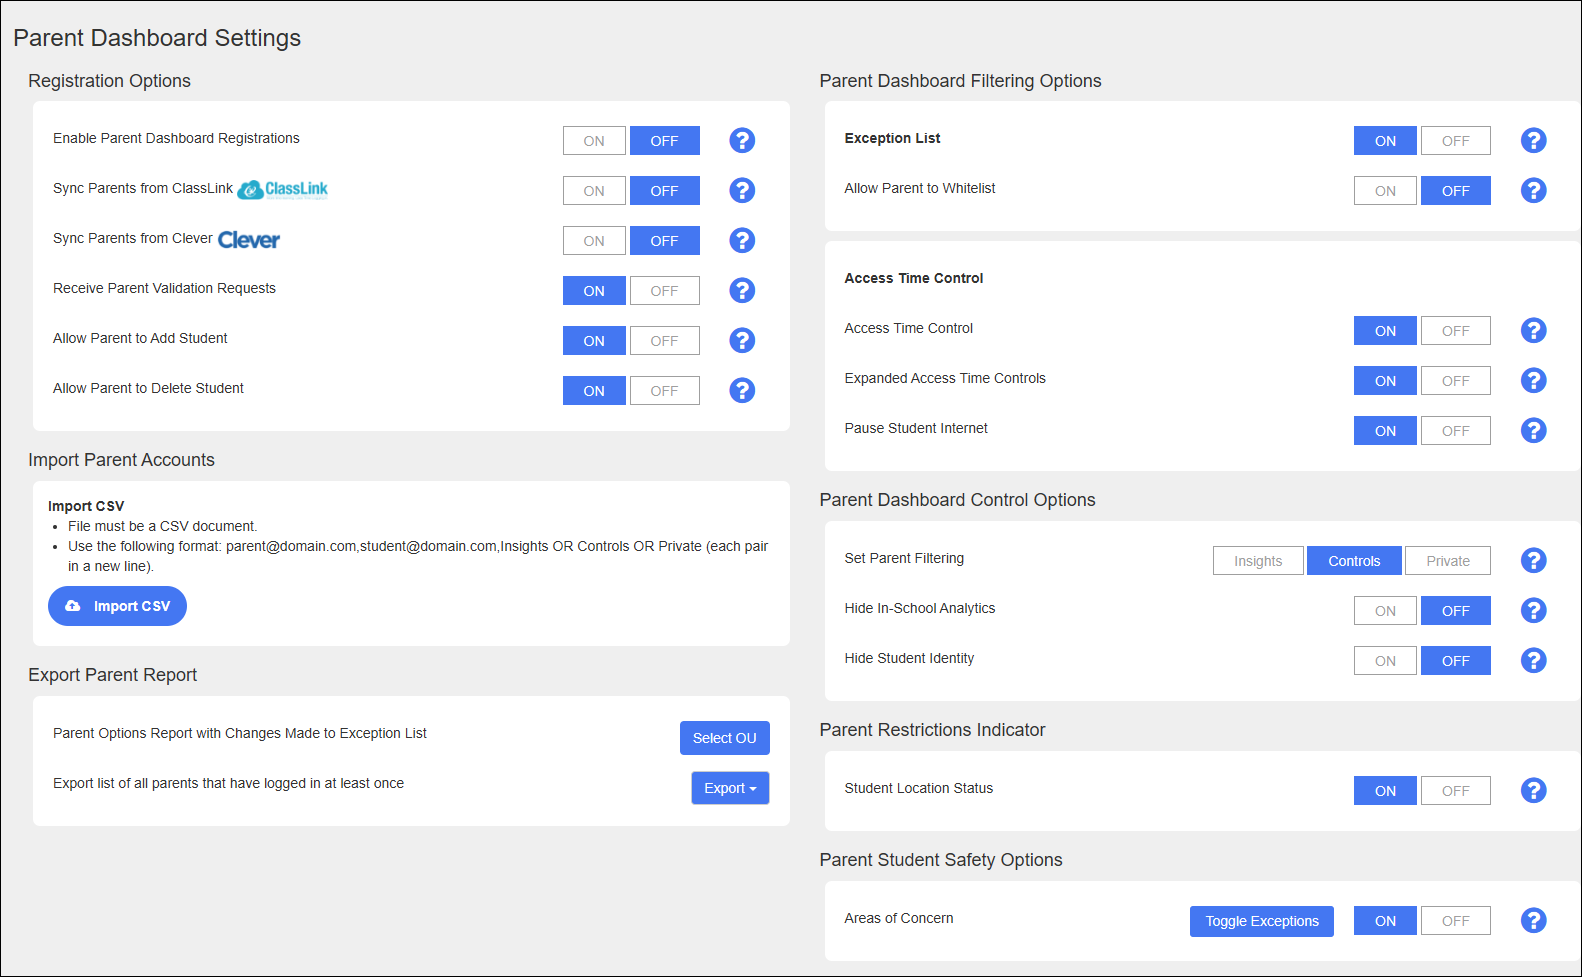
Make your selections in the Parent Dashboard Settings section of the Parent Accounts screen.
See the following tables for information on the parent dashboard settings.
Description | |
|---|---|
Enable Parent Dashboard Registrations | Set whether to allow registrations for Parent Dashboards. If you set this option to OFF, then Blocksi cannot initiate new parent registrations. |
Sync Parents From ClassLink | Indicate whether to sync parent emails from the Student Information System (SIS) once per day. If you set this option to ON, only parents who are on the SIS can register on the Parent Dashboard. Ensure ClassLink Import is authorized and is sharing only necessary data with Blocksi |
Sync Parents From Clever | Indicate whether to sync parent emails from the Student Information System (SIS) once per day. If you set this option to ON, only parents who are on the SIS can register on the Parent Dashboard. |
Receive Parent Validation Requests | Indicate whether administrators receive validation requests for dashboard registration. |
Allow Parent to Add Student | Indicate whether to allow parents to add students. Setting this option to OFF removes the request validation section from the Parent Dashboard. |
Allow Parent to Delete Student | Indicate whether to allow parents to delete students. Setting this option to OFF removes the Delete button from the USERS TABLE on the Parent Dashboard. |
Description | |
|---|---|
Parent Options Report With Changes Made to Exception List | Generate a report of all Exception List activity made by parents for all students. Select the OU on which to report. |
Export List of All Parents Who Have Signed in at Least Once | Generate a report of all parents who have signed in to their dashboard at least once during the selected time range. Options include Last 24 Hours, Last 30 Days, Last 60 Days, and Last 90 Days. |
Description | |
|---|---|
Exception List | Set whether to allow parents to block and allow websites on the Parent Dashboard. If you set this option to OFF, the exception list option is hidden on the Main Menu and on the USERS TABLE on the Parent Dashboard. |
Allow Parent to Whitelist | Set whether parents can allow websites in addition to blocking them. If you set this option to OFF, the Allow option is disabled on exception lists on the Parent Dashboard. A note in bold red text also indicates this condition: NOTE: The allow action has been disabled by the school administrator. |
Access Time Control | Indicate whether to allow parents to access the Access Time Control option on the Parent Dashboard. If you set this option to OFF, the Access Time Control option is hidden on the Main Menu and on the USERS TABLE on the Parent Dashboard. |
Expanded Access Time Controls | Indicate whether to include expanded access time controls for parents (Bedtime, YouTube, Streaming, Gaming, Social Media, Google Games). If you set this option to OFF, only Bedtime access time control is available to update on the Parent Dashboard. |
Pause Student Internet | Set whether to allow parents to pause student internet on the Parent Dashboard. If you set this option to OFF, the Pause internet option is hidden on the USERS TABLE on the Parent Dashboard. |
Description | |
|---|---|
Set Parent Filtering | Indicate whether to allow parents access to Insights only, full dashboard capabilities (Insights, Exception Lists, and Access Time Control), or allow filtering and logging at all hours. Settings are determined by the following options:
|
Hide Out-School Analytics | Indicate whether to hide in-school analytics from appearing on the Parent Dashboard. |
Hide In-School Analytics | Indicate whether to hide out-of-school analytics from appearing on the Parent Dashboard. |
Hide Student Identity | Indicate whether to hide student identity from appearing on the Parent Dashboard. Instead of a student's real name, only the student's alias appears. Enable and disable this option for individual parents in the Hide Student Identity column of the parent listing at the bottom of the page. |
Description | |
|---|---|
Student Location Status | Indicate whether to include information about student location (in school or out of school). In school and out of school locations are defined either by IP Settings or Geolocation settings on the Admin Dashboard. If no location is condition is defined, in school is the default status. |
Student reports contain detailed information about a student's activity.
Create reports for individual students.
To create a student report
Click Dashboard Settings from the Main Menu and then click Parent Dashboard from its sub-menu. The Parent Accounts screen appears.
Locate the student for whom to create the report and click the Report link to the right. The Set Student Analytics Reporting window opens.
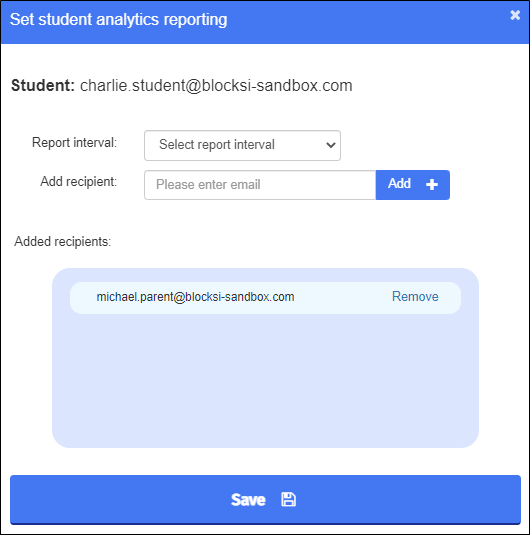
Select the report interval from the drop-down list. Choose to run the report Daily, Weekly, or Monthly. You must select the interval or you cannot create the report.
Type the email of the individual who is to receive the report. This is usually the parent. This email address of this student's parent is already populated in the Added Recipients section. Add one or more email addresses in the Add Recipient text box. Remove any of the recipients with the Remove link to the right of the recipient name
Click Add + to add the email. Blocksi adds the email to the .Added Recipients section.
When you have finished, click Save to add the report. Blocksi runs the report according to the interval you selected.
Delete student reports when you no longer need them.
To delete a student report
Click Dashboard Settings from the Main Menu and then click Parent Dashboard from its sub-menu. The Parent Accounts screen appears.
Locate the student from whom to delete the report and click the Report link to the right. The Set Student Analytics Reporting window opens.
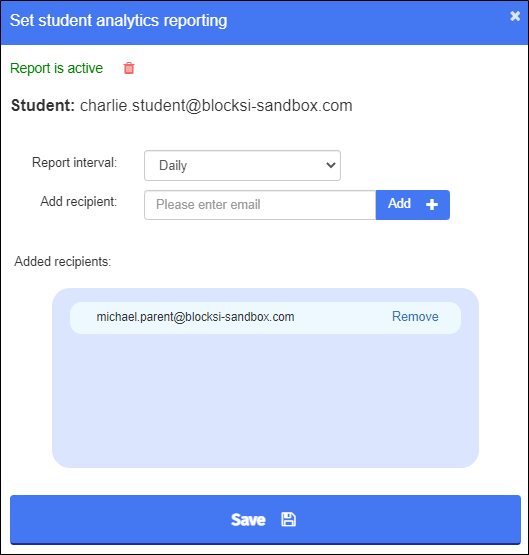
Click the delete icon in the upper left-hand corner to close the window and delete the report.
When you enable or disable Areas of Concern on the Parent Dashboard, add exceptions for parent accounts.
A note about exceptions. If you set the Areas of Concern option to ON, then all accounts you add to the exceptions will not have access to Areas of Concern. If you set the Areas of Concern option to OFF, then all accounts you add to the exceptions will have access to Areas of Concern.
To add an exception
Click Dashboard Settings from the Main Menu and then click Parent Dashboard from its sub-menu. The Parent Accounts screen appears.

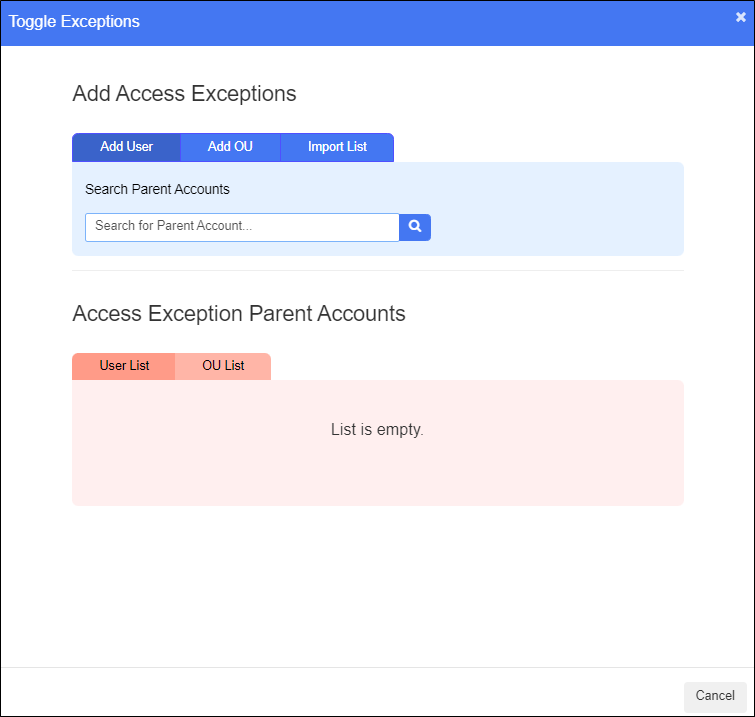
Click the Toggle Exceptions button in the Parent Student Safety Options section. The Toggle Exceptions window opens.
To add parent user accounts
The window defaults to the Add User tab. If you are on any other tab, click the Add User tab at the top of the window.
Type the email of the parent account to add and click the Search button. The parent account and all its associated student accounts appear.
Click the Add button to add this parent account as an exception.
To add all users in an OU
Click the Add OU tab.
Select the checkboxes to the left of the OUs to add as exceptions and click Add. Blocksi adds all users in those OUs as exceptions.
To import a list of parent accounts or a list of OUs
Click the Import List tab.
Click the Import CSV button in the Import Parent Accounts or Import OUs section. Navigate to the desired folder, click the file name, and click Open. Blocksi adds the accounts as exceptions.
Remove a parent account when you no longer need it.
To remove a parent account
Click Dashboard Settings from the Main Menu and then click Parent Dashboard from its sub-menu. The Parent Accounts screen appears.
Locate the parent account to remove and click the Remove link to the right. A confirmation prompt appears.
Click OK to remove the account.
After you add a parent, you invite the parent to use their Parent Dashboard. Download a list of parents that you have invited.
Invite parents to use their dashboard accounts.
To invite parents to use their dashboards
Click Dashboard Settings from the Main Menu and then click Parent Dashboard from its sub-menu. The Parent Accounts screen appears.

To invite specific parents, select the checkbox to the left of the name. Then click the Invite Selected Parent(s) button. To invite all parents at one time, click the Invite ALL Parents button. A confirmation prompt appears.
Click Invite Parent(s) or Invite ALL Parents. An email is sent to the selected parent(s).
Note
When inviting parents with a Gmail account, the parent can access the dashboard directly from the email invite. When inviting parents with an email account other than Gmail, that parent will be required to create an account to access the dashboard.
Download a list of the parents invited to use their dashboard accounts.
To download the parent invitee list
Click Dashboard Settings from the Main Menu and then click Parent Dashboard from its sub-menu. The Parent Accounts screen appears.
Click the Download Invitee List (CSV) button to download the file. The file appears in the lower left-hand corner of your screen in your spreadsheet program. Click it to open and save it.