Windows Intune Deployment
The following procedures guide you through Windows Intune deployment.
Web Filter – The file name appears as BlocksiWebfilter_X.X.X.X.msi . Performs the web filtering on the device. You can use it independently of the other MSIs.
On the Settings menu, under Domains, please include all domain names, sub-domains, and aliases that your district has in use.
This procedure describes the steps required to create Windows Defender Firewall Rules for the Blocksi Classroom application using Microsoft Endpoint Manager.
To create the rules
Navigate to https://endpoint.microsoft.com and sign-in to Microsoft Endpoint Manager.
Select Endpoint Security from the left-hand navigation pane.
Select Firewall from the Endpoint Security left-hand navigation pane.
Click + Create Policy at the top of the page.
Select Windows 10 and later under Platform in the Create a profile blade that appears on the right hand side.
Select Microsoft Defender firewall rules under Profile.
Click the Create button.
From the Create Profile Wizard
On the Basics tab:
Give your new profile a name. For example, Blocksi Allow Policy.
Add a description of your choice.
Click Next.
On the Configuration Settings tab:
Select the downward facing caret next to Firewall Rules 0 items.
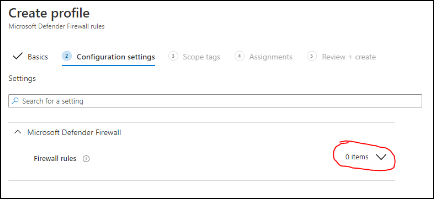
Click + Add. The Windows Firewall Rules blade appears to the right.
Type a name for your policy under Name; for example, Allow Blocksi application.
Select Out for Direction and Allowed for Action.
Select all that apply (at least Public and Private) for Network types.
Type C:\Program Files (x86)\Blocksi 2.4\blocksi2.4.exe for File Path.
Select Any for Protocol and Wireless and LAN (this covers both WiFi and wired networks) for Interface types.
Select Yes for Any local address and Yes for Any remote address.
Click the Save button.
Click + Add to add another rule for the inbound traffic.
Type a name for the new inbound policy; for example, Allow port 9432 inbound to Blocksi.
Select In for Direction and Allowed for Action.
Select all that apply (at least Public and Private) for Network types.
Type C:\Program Files (x86)\Blocksi 2.4\blocksi2.4.exe for File Path.
Select TCP for Protocol.
Select Add and then type 9432 in the field under Local port ranges. You do not need to configure remote port ranges.
Select Wireless and LAN (this covers both WiFi and wired networks) for Interface types.
Select Yes for Any local address and Yes for Any remote address.
Click the Save button.
On the Configuration Settings tab:
Click Next.
On the Scopes tab:
Click Next.
On the Assignments tab:
Assign either Policy to All users or choose the default Selected Groups. To select a group, click Add and select a group to include; for example, Students.
Click Next.
On the Review + Create tab:
Check the settings and click the Create button.
The policy now applies to the assigned users and devices.
To download the applications
Sign in to blocksi.net with your Administrator account.
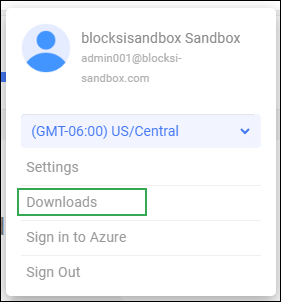
Click the User icon on the Action Bar and select Downloads. The Downloads window opens. The window defaults to the Windows tab.
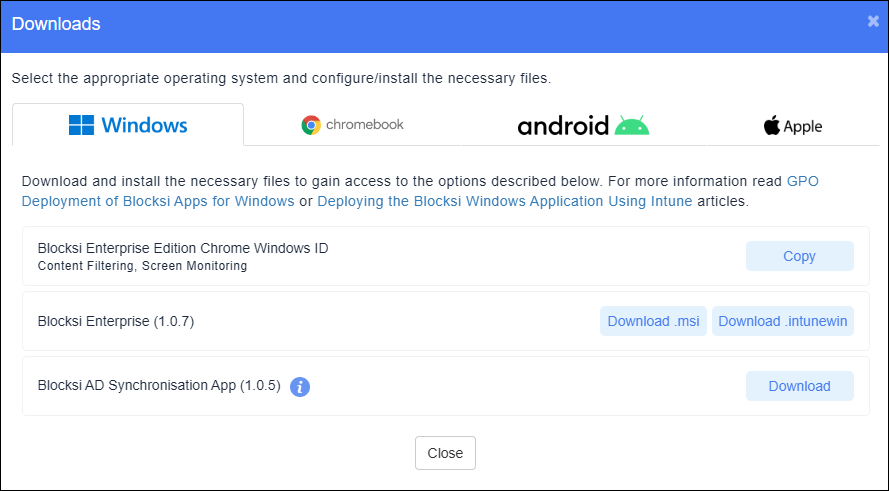
Download Blocksi Enterprise.
Intune supports the installation of .msi and .intunewin application packages on Windows 10 Pro and higher.Take the following steps to add the Blocksi app MSI to Intune and then assign it to a group of users so that it is installed on their computers upon login. See Microsoft's official instructions on this topic here: https://docs.microsoft.com/en-us/mem/intune/apps/apps-windows-10-app-deploy.
The following instructions are specific to the Blocksi applications.
Sign in to the Microsoft Intune Admin Center at intune.microsoft.com to continue the configuration process.
This next section covers the assignment of the Blocksi Enterprise, Blocksi Classroom, and Blocksi Webfilter.
To assign Blocksi Enterprise, Blocksi Classroom, and Blocksi Webfilter
Go to Apps > All Apps and click the Add icon at the top of the screen.
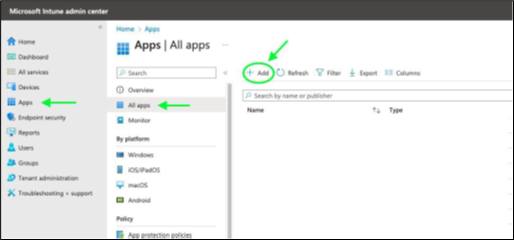
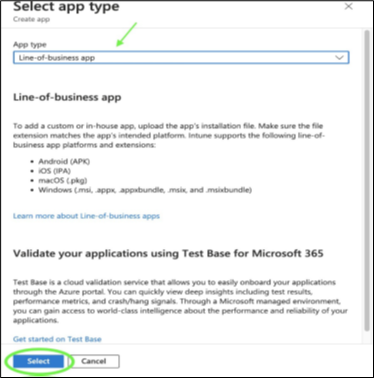
Select Line of Business App for the App type and click Select. The App Information window appears.
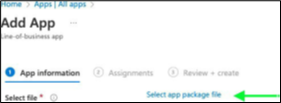
Click Select app package file.
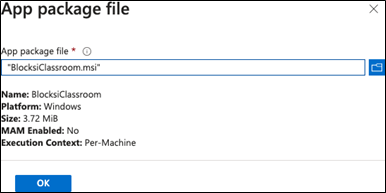
Click Select the App package file, browse to the folder where you have the Blocksi App installers, and select the installer (.msi) file.
Click OK. You should see a screen like the following.
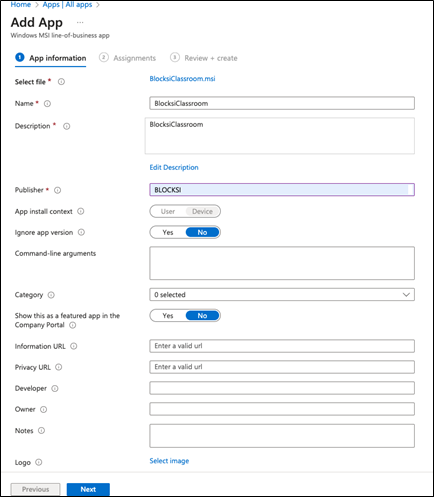
Fill in some details about the install package.The Name and description are pre-filled. Add a publisher name (e.g., Blocksi). All other fields are optional.
Click Next. The configuration should look like this:
Click the Assignments tab to add assignments for the app.
Add a Group for the users in the Required section for whom to install this app (e.g., All Users, Students, etc.).
Click Next.
Review the app settings on the Review + create tab.
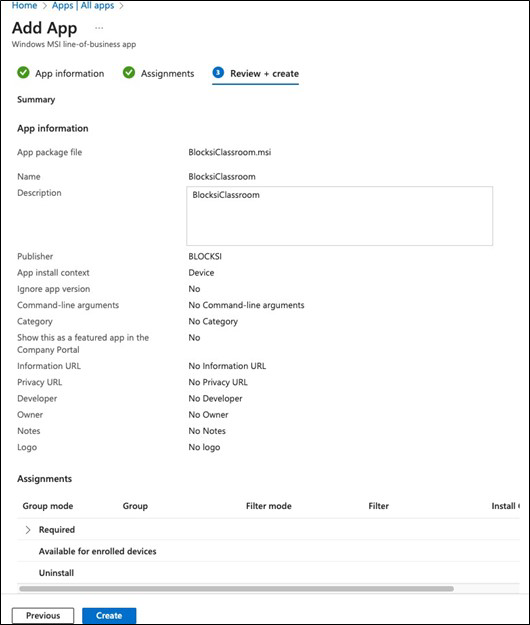
Click Create to confirm the configuration.Please wait for the file to finish uploading before continuing further.
Repeat the above steps for the other .msi application.
This section contains instructions for setting up Intune to install the Blocksi app.
To deploy the app
Sign in to the Microsoft Intune Admin Center at intune.microsoft.com.
Go to Apps > Windows and click the + Add button.
Select Windows app (Win32) in the App type drop-down list. When you have finished, the screen should look like this:
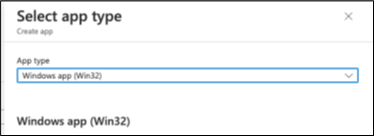
Click Select.
Click the Select app package file button.
Add the setup.intunewin file that you downloaded from the BM Admin dashboard.When you have finished, the screen should look like this:
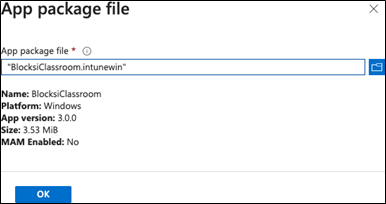
Click OK.
Configure the app as follows.
Name
Name of the file
Description
Any
Publisher
Blocksi
Other details do not need configuration and can be left as default. When you have finished, the screen should look like this:
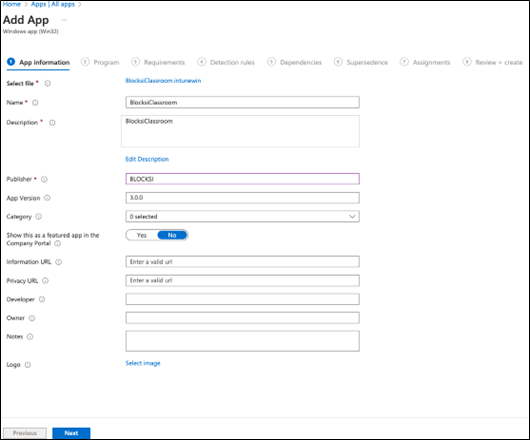
Click Next.
Configure the app as follows, depending on the app you are installing:
Install command
Blocksi Enterprise - msiexec /i "BlocksiEnterprise.msi" /qn
Uninstall command
Blocksi Enterprise - msiexec /x "{9487E0E2-95E9-4B9C-802E-BB6CFD03D28E}" /qn
Other details do not need configuration and can be left as default. When you have finished, the screen should look like this:
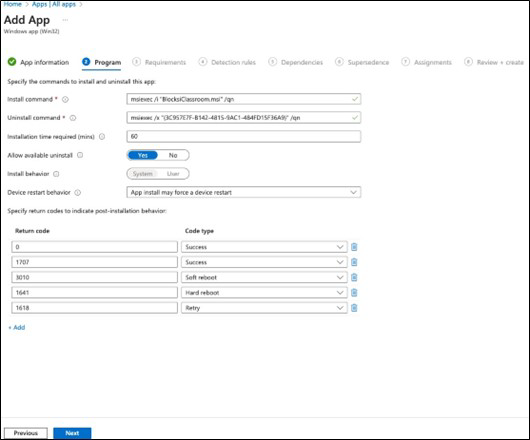
Click Next.
Configure the app as follows:
Operating system architecture
32-bit and 64-bit
Minimum operating system
Windows 10 1607
Other details do not need configuration and can be left as default. When you have finished, the screen should look like this:
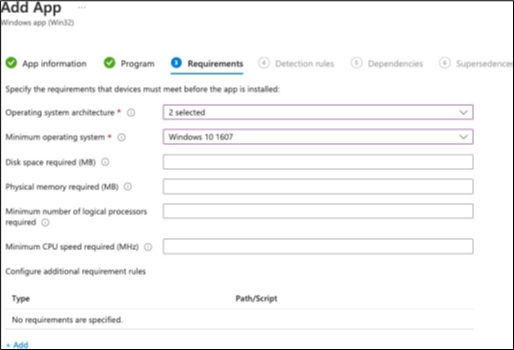
Click Next.
Configure the app as follows, depending on the app you are installing::
Rules format: Manually configure detection rules.
Click + Add and add the following rule:
Rule type
Manually configure detection rules
Rule type
MSI
MSI product code
Blocksi Enterprise - {9487E0E2-95E9-4B9C-802E-BB6CFD03D28E}
When you have finished, the screen should look like this:
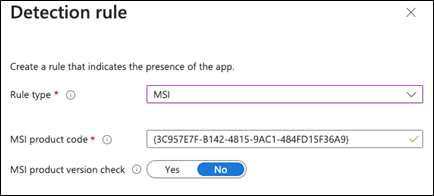
Click OK. The configuration should look like this:

Click Next.
Skip the Dependencies Tab configuration.
Click Next.
Skip the Supersedence Tab configuration.
Click Next.
Configure the app assignment to devices and users in your organization. The assignment details can be left as default.
Click Next.
Click Review + save to finish the app configuration and assignment. The app is installed on the target devices the next time the user signs in.
Next, you'll need to ensure that new computers have Google Chrome installed on them.
Go to https://chromeenterprise.google/download/.
Click the Download Chrome button.
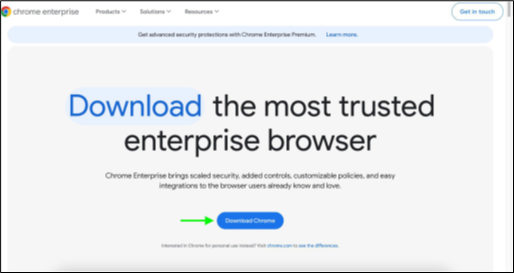
Configure the download as in the below picture and click Accept and download.
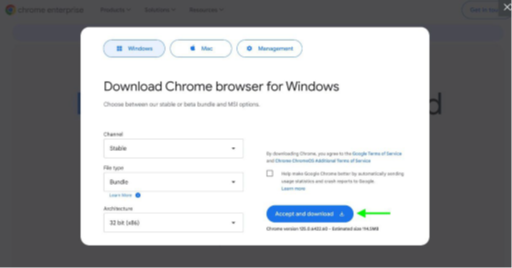
Extract the downloaded ZIP file and find the GoogleChromeStandalone.MSI file located in the Installers folder.
Repeat the same steps for adding a Line-of-Business app to Intune (refer to the Configuring the MSI App Deployments section of this article), except this time use the GoogleChromeStandalone.MSI as the app package file.
Intune does not have Chrome Management capability by default, so you have to add a custom CSP to Microsoft Intune for managing Chrome.Google provides the instructions for doing that here: https://support.google.com/chrome/a/answer/9102677?hl=en.
The key steps to perform are as follows
Ensure that the Chrome Enterprise Download includes the ADMX templates.You need to ingest the Chrome AMDX file into Intune.
Sign in to the Microsoft Intune Admin Center at intune.microsoft.com.
Go to Devices > Configuration.
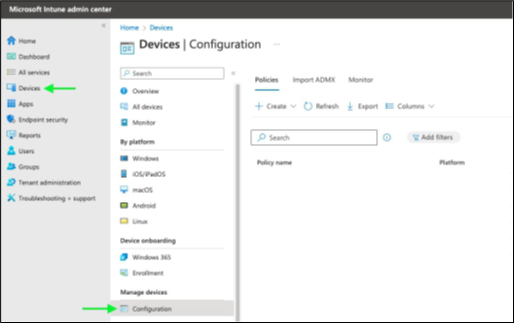
Click + Create > New Policy at the top of the page. A new pane opens on the right side of your screen.
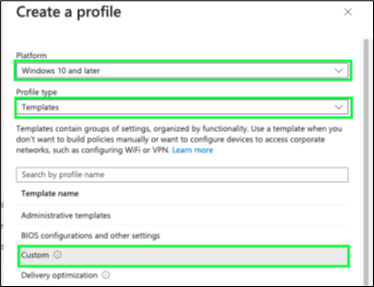
Select the following settings:
Platform
Windows 10 and later
Profile Type
Template
Template Name
Custom
Click Create at the bottom of the pane.
Insert the following on the next screen:
Name
Windows 10 - Chrome configuration (or use any other descriptive name)
Description
Enter a description (optional)
Click Next at the bottom of the page. The Configuration Settings Menu opens, in which to add the OMA-URI settings.
Click Add to add specific policies you need to configure. A new pane opens on the right side of the screen.
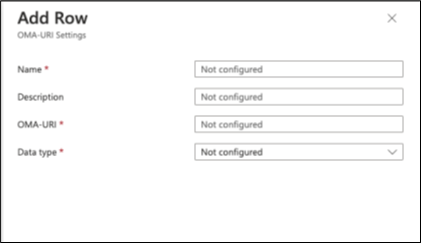
Enter the following text in the text fields. When you enter the String as Data type, the Value text field opens below.
Name
Chrome ADMX Ingestion
Description
Enter a description (optional)
OMA-URI
./Device/Vendor/MFST/Policy/ConfigOperations/ADMXInstall/Chrome/Policy/ChromeAdmx
Data type
String (select from drop-down list)
On your computer, go to GoogleChromeEnterpriseBundle\Configuration\admx\chrome.admx and copy the text from chrome.admx.0.
Tip
This is in the GoogleChromeEnterpriseBundle.zip file that you downloaded following the Setting Up Intune to Install the Blocksi MSI Applications section of this article.
In the Value field, paste the chrome.admx content.
Click Save to save the Custom OMA-URI settings.
Click Create to create the new profile.
Next you need to set up two Chrome policies with Intune. One to force install the Blocksi Chrome Extension and another to allow Apps to run in the background.
Sign in to the Microsoft Intune Admin Center at intune.microsoft.com.
Go to Devices > Configuration.
Click the Windows 10 – Chrome configuration profile you created in the previous section.
Select Properties > Configuration settings > Edit to open the Custom OMA-URI settings.
Click Add to add a new row.
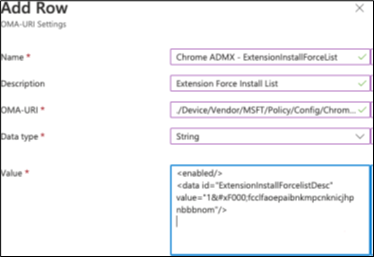
Enter the following text into the required fields:
Name
Chrome ADMX - ExtensionInstallForceList
Description
Extension Force Install List
OMA-URI
./Device/Vendor/MFST/Policy/Config/Chrome~Policy~googlechrome~Extensions/ExtensionInstallForce list
Data type
String (select from drop-down list)
Value
<enabled><data id='ExtensionInstallForcelistDesc' value='1&amp;#xF000;fcclfaoepaibnkmpcnknicjhpnbbbnom'/
The configured setting should look like in the following screenshot:
Remember to click Save, Review and Save, and then Save; otherwise, your new policy does not get saved!
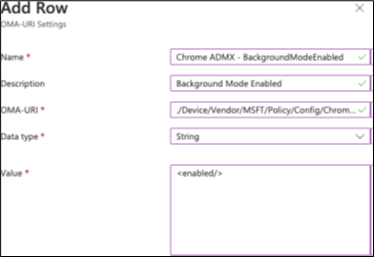
Repeat the same process for adding a policy to allow apps to run in background mode. Use these values for the fields instead.
Name
Chrome ADMX - BackgroundModeEnabled
Description
Background mode enabled
OMA-URI
./Device/Vendor/MSFT/Policy/Config/Chrome~Policy~googlechrome/Background/ModeEnabled
Data type
String (select from drop-down list)
Value
<enabled/>
The configured setting should look like in the following screenshot:
Remember to click Save, Review and Save, and then Save.
The Blocksi application needs a modification to the Windows Defender Firewall rules to function properly. Do this by employing the following steps.
Sign in to the Microsoft Intune Admin Center at intune.microsoft.com.
Go to Devices > Configuration and click + Create > New Policy. A new pane opens on the right side of the screen.
Select the following configuration.
Platform
Windows 10 and later
Profile type
Template
Template name
Endpoint protection
Click Create. You are taken to the Basics screen.
Enter the following:
Name
Windows Defender Firewall Policies
Description
Allows specific policies for Windows Defender Firewall
Expand the Windows Firewall setting on the Configuration setting screen.
Scroll down to the Firewall Rules section and click Add.

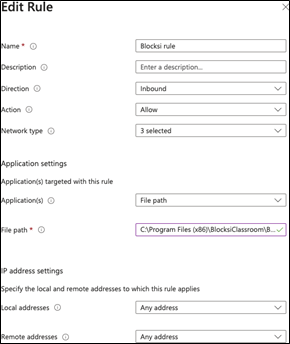
Configure the new rule as follows:
Name
Blocksi Firewall Rule
Description
(optional)
Direction
Inbound
Action
Allow
Network type
Select all applicable options
Application settings:
Applications
File path
File path
C:\Program Files(x86)\BlocksiClassroom\BlocksiClassroom.exe
IP address settings:
Leave the default value
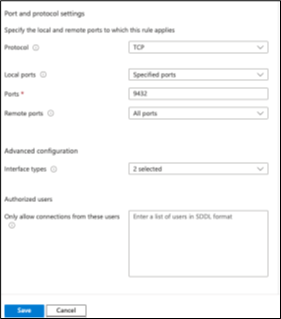
Port and protocol settings:
Protocol
TCP
Local ports
Specified ports
Ports
9432
Remote ports
All ports
Advanced configuration:
Interface type
Select all applicable options (e.g., Wireless, LAN) that you are using
Leave all other settings as defaults. The rule configuration should look like the following images:
Click Save to add the rule and click Next. You are taken to the Assignments screen.
Assign this policy to selected groups like Students or All Users and click Next.
Leave the defaults for Applicability Rules and click Next.
Review your settings and then click Create.
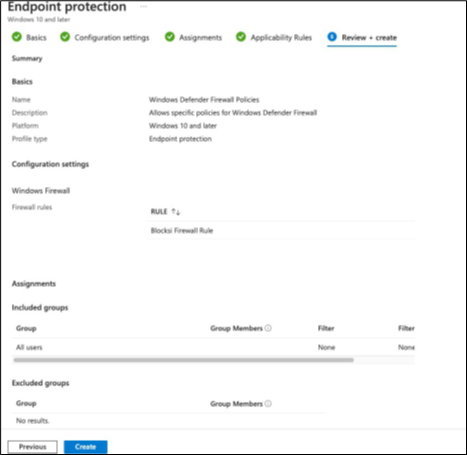
You should then see your new Windows Defender Firewall policies listed on the Configuration Policies screen along with your Chrome policies that you created earlier.
When new versions of Blocksi applications are released, you must update the configured apps and re-upload the new.msi app package.
Sign in to the Microsoft Intune Admin Center at intune.microsoft.com.
Select Apps > All apps.
Find and select your app from the list of apps.
Select Properties under Manage from the left app pane.
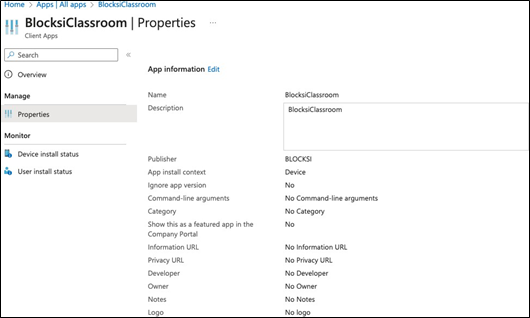
Select Edit next to App information.
Click the file listed next to Select file to update. The App package file pane appears.
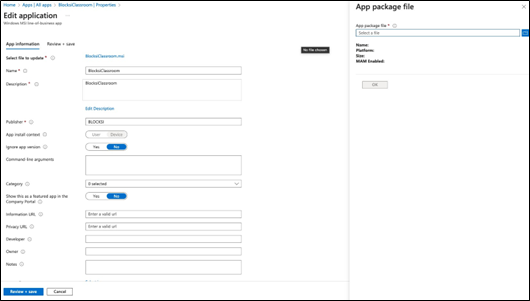
Click the folder icon and browse to the location of your updated app file.
Click Open. The app information is updated with the package information.
Verify that the App version reflects the updated app package.
Click the Review + Save button to update the app.
At this point you should have everything you need to deploy and run Blocksi in your organization.Here are some troubleshooting tips in case things are not working.
Always wait at least 15 minutes for a new policy or script to push down to a computer. If you are unsure, log out and log back in again.
If the MSI is not installing, check if Intune pushed it down to the computer.Intune pushed MSIs are stored in this location: C:\Windows\System32\config\systemprofile\AppData\Local\mdm.
To check if the Blocksi applications are installed on the computer, go to C:\ProgramFiles (x86)\ and verify if you see the following folders and inside of the corresponding.exe applications:
Blocksi Classroom - BlocksiClassrooom.exe
Blocksi Webfilter - bsflt.exe
Blocksi Enterprise – BlocksiEnterprise.exe
Check if Chrome policies were installed correctly by browsing to chrome://policy.