Use the penalty box to easily assign an individual user their own in and out of school policies. When you place a student in the penalty box and assign them a policy, it takes precedence over the default OU policy while in the penalty box and remains with students until moved out of the penalty box. Once a student is moved out of the penalty box, the policy defaults back to the OU-assigned policy.
The following are some of the reasons to place students in the penalty box (this is not an all-inclusive list):
When a student is not paying attention in class or is engaging in other disruptive behavior.
To lock down a student to a specific list of websites; for instance, students with special needs.
To allow a student who is working on a school project access to additional websites.
When a student is placed on In-School Suspension for a period of time.
The penalty box displays the first and last names of the student, the student’s email address, and the in school and out of school policies that apply while the student is in the penalty box.
Note
Only regular policies are supported for use in the penalty box.
Place a student in the penalty box at any time.
To place a student in the penalty box
Click Content Filtering from the Main Menu and then click Penalty box from its sub-menu. The Penalty box screen appears.

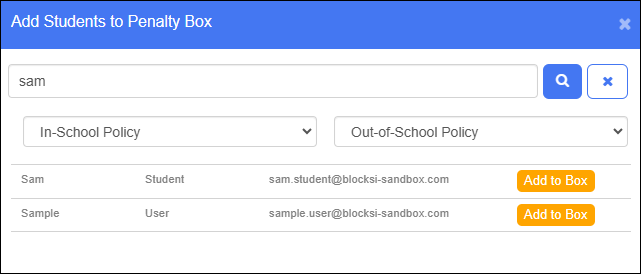
Click Add Student. The Add Students to Penalty Box window opens.

Type the name of the student in the Search for a student... text box. The window changes to include the student name and drop-down lists for the in-school and out-of-school policies.

Select the policies and click the Add to Box button. The student is added to the penalty box.
Click the X in the upper right corner of the prompt to close it.
Set the time at which the student is released from the penalty box.
To set the timer
Click Content Filtering from the Main Menu and then click Penalty Box from its sub-menu. The Penalty Box screen appears.

Locate the student for whom to set the timer and click the
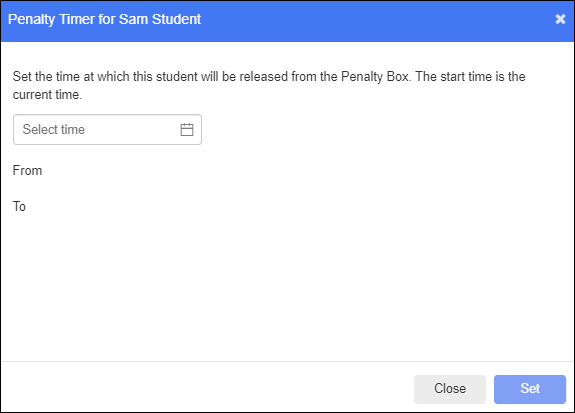
 icon. The Penalty Timer window opens.
Select the time at which the penalty ends and the student is released from the penalty box.
Click Set. The time remaining appears.
Note
The Penalty Timer icon appears in green on the Penalty Box screen when a release time is set.
There may be times when you need to change the in-school or out-of-school policy for a student in the Penalty Box.
To change a policy
Click Content Filtering from the Main Menu and then click Penalty box from its sub-menu. The Penalty box screen appears.

Locate the student in the list.
Change the policy that takes effect while the student is in school from the In school policy drop-down list.
Change the policy that takes effect while the student is out of school from the Out of school policy drop-down list.
Note
Click the  icon to lock the policy and prevent delegates from changing the policy for students in the penalty box. The lock icon locks and turns black when the policy is locked.
Note
Click the  icon to unlock the policy and allow delegates to change the policy for students in the penalty box. The lock icon opens and turns gray when the policy is unlocked.
Lock the policy for a student in the Penalty Box to prevent delegates from changing it.
To lock a policy
Click Content Filtering from the Main Menu and then click Penalty box from its sub-menu. The Penalty box screen appears.

Locate the student in the list for whom to lock the policy.
Click the
 icon to lock the policy and prevent delegates from changing the policy for students in the penalty box. The lock icon locks and turns black when the policy is locked.
Note
Policy locks do not apply to classroom policies; teachers can change classroom policies for students in the Penalty Box even when they are locked on the Admin Dashboard.
Unlock the policy for a student in the Penalty Box to allow delegates to change it.
To unlock a policy
Click Content Filtering from the Main Menu and then click Penalty box from its sub-menu. The Penalty box screen appears.

Locate the student in the list for whom to unlock the policy.
Click the
 icon to unlock the policy and allow delegates to change the policy for students in the penalty box. The lock icon opens and turns gray when the policy is unlocked.
Remove a student from the penalty box before the timer runs out.
To remove a student from the penalty box
Click Content Filtering from the Main Menu and then click Penalty box from its sub-menu. The Penalty box screen appears.

Locate the student to remove, and click the
 icon in the Remove Student column. A confirmation prompt appears.
Click OK to remove the student from the penalty box.