Windows GPO Deployment
The following procedures outline the configuration steps needed for the Group Policy Object to deploy Blocksi for Windows in your environment.
Set up the following before setting up Blocksi:
Windows Server with the following roles created:
Active Directory domain services
DNS
File and storage services
Chrome browser installed on client devices.
A File Share accessible with Read permissions by all Windows users assigned the Group Policy Object created for Blocksi.
Proper organization of your Active Directory environment (users, computers, OUs, etc.).
Network usernames in Active Directory must match the email username in Google Admin Console. For example: Google User john.doe@example-school.com matches to Windows user example.local\john.doe. If the network username in Active Directory and email username in Google Admin Console do not match, additional steps are required to filter Windows users with Blocksi.
Devices running Windows 7 and later.
Blocksi Enterprise MSI file, which you can find when you sign in to your Admin Dashboard and access the Downloads window from the User icon on the Action Bar. Please contact support with questions regarding the necessary file.
On the Settings menu, under Domains, please include all domain names, sub-domains, and aliases that your district has in use.
To configure the GPO
Open Group Policy Manager on your Windows Server.
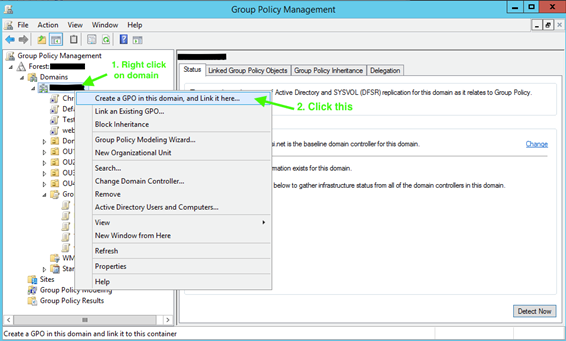
Navigate to the organizational unit(s) where you will deploy Blocksi, right-click the Organizational Unit Name, and select Create a GPO on this domain, and Link it here…. The New GPO window opens.
Note
In most cases, this Group Policy should be linked and enforced to an Organizational Unit that contains user accounts that will be filtered or monitored with Blocksi.
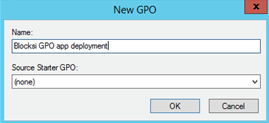
Type a name for the GPO deployment, such as Blocksi GPO app deployment in the Name text field and click OK.
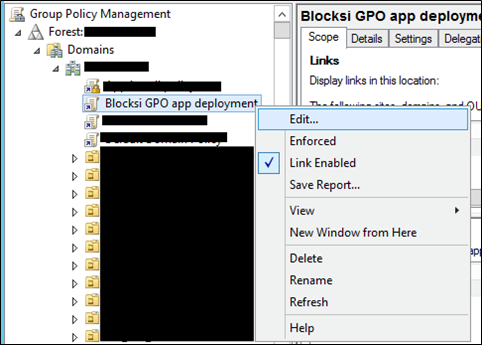
Right-click the newly created GPO and select Edit from the drop-down menu.
When installing Blocksi software with GPO, all required MSI files must reside in a shared folder accessible by all users subject to the GPO with Read access. This article outlines steps to create a shared folder and add the necessary applications.
To add application files to a shared folder
Select a shared folder on your network. If a shared folder does not exist yet, create it under the file path C:/.
Upload the required MSI files to the shared folder. These can include the following:
BlocksiWebFilter.msi and/or BlocksiClassroom.msi, or
BlocksiEnterprise.msi
Note
If installing BlocksiEnterprise.msi, no other application files are required.
Right click the shared folder and select Properties from the list. The Properties window opens.
Click the Sharing tab, then click Share… under the Network File and Folder Sharing section. The File Sharing window opens.
Click Add from the File Sharing window, and enter the appropriate Users or Groups. (This includes all users subject to the GPO created for Blocksi.)
Go back to the drop-down list and select the Find people… option. The Select Users and Groups window opens.
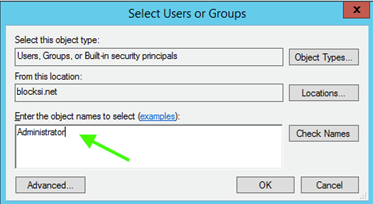
Type Administrator in the Enter the object names to select text box and click the Check Names button. A new window opens.
Select the Admin account that controls the Windows server and click OK. You are returned to the Select Users and Groups window.
Click OK. After these steps, the table in the File Sharing window should have the next accounts inside: Administrator, Administrators, and Everyone.
Add permissions for the accounts. Administrators need Read/Write and Owner permissions, and Everyone needs to have Read permission.

Click the Share button to complete the sharing process.
Verify that the sharing process was successful, go to File Explorer, click the search field at the top, and type \\SERVERNAME\SHARED_FOLDER_NAME. See the following example.

Note
If you don’t know the name of your Windows server, find it in the Server Manager. If the shared apps are listed at this location, then you have successfully configured the folder sharing.
To add the Blocksi application to the GPO
In the GPO Management Editor, navigate to User Configuration > Policies > Software Settings and click Software installation.
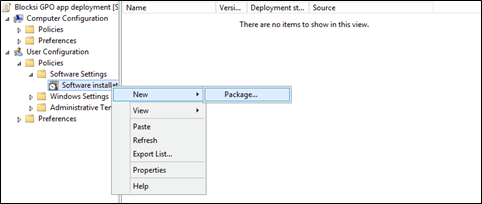
Right-click Software Installation and select New > Package. The Open window opens.
Navigate to the shared folder you created in the Adding the Application File to a Shared Folder section of this article. Do this by searching for it with the string: \\SERVERNAME\SHARED_FOLDER_NAME. See example below.

Select the Blocksi installation file from the folder and add it to the list.
To configure the application settings
In the GPO Management Editor, navigate to User Configuration > Policies > Administrative Templates > All Settings.
Configure/Set the following for the app.
To enable this setting, do the following:
Right-click the setting and select Edit from the drop-down menu.
Click Enabled.
Click Apply. The BlocksiEnterprise Properties window opens.
Select Assigned under Deployment type.
Select the Install this application at logon checkbox under Deployment options.
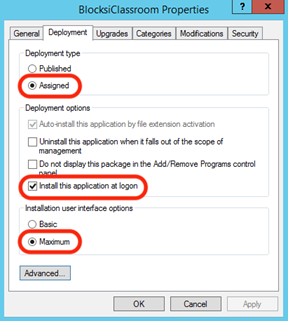
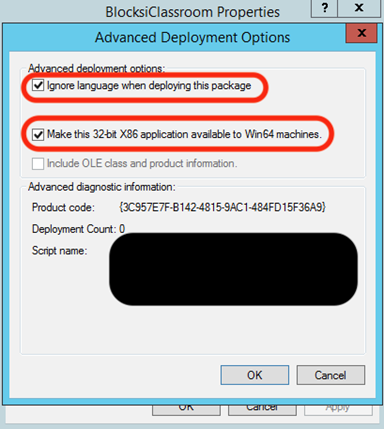
Click the Advanced… button. The Advanced Deployment Options window opens.
Select the Ignore language when deploying this package checkbox.
Note
If there is already a Group Policy Object to manage Google Chrome enforced for the same users subject to the Blocksi GPO, ensure the following steps are included with the existing Google Chrome GPO. Adding the Google Chrome settings listed here in a separate GPO can result in errors with the deployment.
If you do not see Classic Administrative Templates, you may need to download and unzip the GoogleChromeEnterpriseBundle64.zip file found here: https://dl.google.com/tag/s/appguid%253D%257B8A69D345-D564-463C-AFF1-A69D9E530F96%257D%2526iid%253D%257BBEF3DB5A-5C0B-4098-B932-87EC614379B7%257D%2526lang%253Den%2526browser%253D4%2526usagestats%253D1%2526appname%253DGoogle%252520Chrome%2526needsadmin%253Dtrue%2526ap%253Dx64-stable-statsdef_1%2526brand%253DGCEB/dl/chrome/install/GoogleChromeEnterpriseBundle64.zip?_ga%3D2.8891187.708273100.1528207374-1188218225.1527264447.
To configure the Chrome browser policy
Ensure that you are on User Configuration > Policies > Administrative Templates In your Group Policy Management Editor.
Select the Action tab and click Add/Remove Templates.
Click Add in the new window.
Locate the GoogleChromeEnterpriseBundle64 folder you’ve unzipped at Configuration > adm > en-US, select Chrome.adm, and click Open.
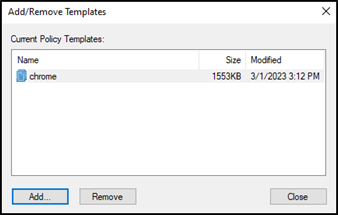
Close the window and go to User Configuration > Policies > Administrative Templates > Classic Administrative Templates > Google > Google Chrome.
Double-click Continue running background apps when Google Chrome is closed.
Go to User Configuration > Policies > Administrative Templates > Classic Administrative Templates > Google > Google Chrome > Extensions.
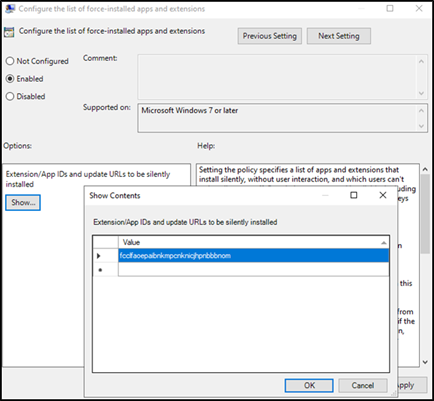
Double-click Configure the list of force-installed apps and extensions.
Select Enabled and click Show.
Return to the Blocksi Admin Dashboard Downloads window and copy the Blocksi Enterprise Edition Windows ID.
Paste the ID (fcclfaoepaibnkmpcnknicjhpnbbbnom) into the Value field and click OK.
Click OK in the next window.
To update the configured group policies
Open the PowerShell or Command Prompt.
Run the following command in the prompt: gpupdate /force. This updates the company GPOs.
When the users sign in to their accounts the next time, all the configured apps are installed.
Place every new version of the app in the shared folder.
Delete the previous (older) version from the shared folder.
Re-add the new version of the app to the GPO configuration.