Exception Lists
Exception lists let administrators define custom rules for blocking or allowing access to specific websites. Each entry can target a full domain, a subdomain, or part of a URL, with wildcards to match multiple URLs at once.
Important
After making any changes to your content filtering or policies, click the  button to apply the changes.
A wildcard, or asterisk (*), is a symbol used as a placeholder representing zero or more unknown characters in a URL. It marks the part of the URL that varies, while the rest of the pattern must match exactly. Using wildcards helps you refine which URLs are blocked or allowed without listing each one individually, creating filtering rules tailored to your needs. The position of the wildcard determines which part of the URL is variable.
Important
Entries higher on the exception list take priority over entries below them. For example, adding *youtube.com* as a blocked entry prevents access to all YouTube URLs. To allow a specific YouTube URL, add it above the *youtube.com* entry - otherwise, the higher entry takes priority, resulting in any YouTube subdomains or paths being blocked. Refer to the Reordering URLs section for more information.
There are a couple of rules as to where to place the wildcard to block or allow specific URLs, sub-domains, or paths. Refer to the example using google.com below, showing how the position of the wildcard affects which URLs are matched.
*google.com- Placing a wildcard in front of the domain matches any URL ending withgoogle.com(e.g.,classroom.google.com,mail.google.com,docs.google.com). However, it does not match URLs that contain anything after the domain, such as paths (e.g.,classroom.google.com/view,docs.google.com/document).google.com*- Placing a wildcard after the domain matches any URLs strictly starting withgoogle.com, and it includes paths (e.g.,google.com/search).*google.com*- Wrapping the entire domain in wildcards matches all URLs that containgoogle.comanywhere in the URL, covering both subdomains and paths (e.g.,mail.google.com/inbox,sheets.google.com/spreadhseets).
Note
Some URLs appear within other URLs - for example, go.com within lego.com, or x.com within hbomax.com. In these cases, be cautious when blocking or allowing entries with wildcards on both ends (such as *x.com*), as the pattern may match more URLs than intended.
Wildcards can also be used to block individual keywords appearing in a URL. Wrapping the keyword in wildcards blocks any URL containing that keyword, including URLs where the keyword appears as part of another word. Refer to the examples below.
*game*- Also blocks URLs containing mathgames, coolmathgames, or boardgames*bet*- Also blocks URLs containing alphabet, diabetes, or sherbet.*round*- Also blocks URLs containing roundabout, around, or ground.*pot*- Also blocks URLs containing spot, potato, or depot.
Tip
Adding keyword wildcards to the exception list also blocks search engine queries. When a student searches for a blocked keyword on Google or another search engine, the search URL contains the keyword (e.g., google.com/search?q=games), which the wildcard then matches.
Click Content Filtering from the Main Menu, then click Filters from its sub-menu.
Click Exception List at the top of the screen. The Exception List screen expands.
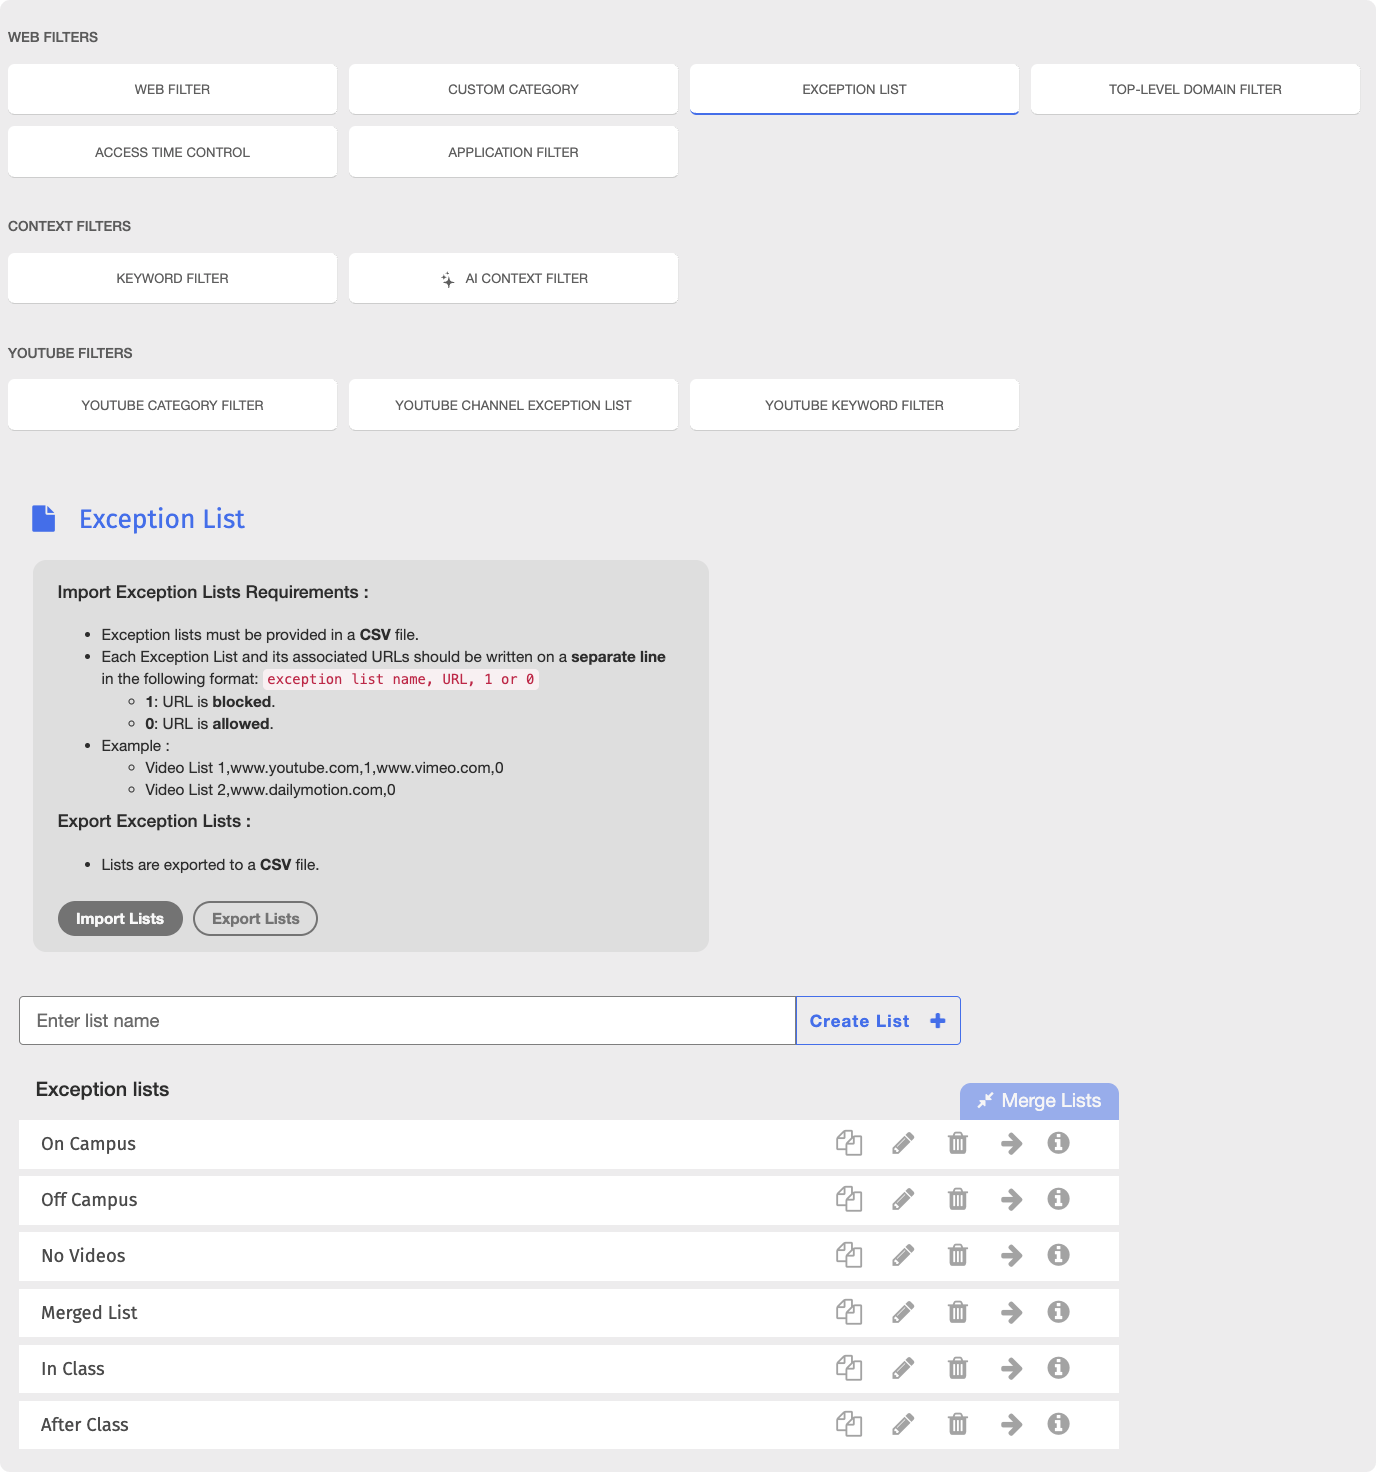
Type the name of the exception list in the Enter list name text field.
Click Create List +. The new list appears at the bottom of the list.
Click the
 icon. The Edit screen appears.
Block and allow as many URLs as you need in an exception list.
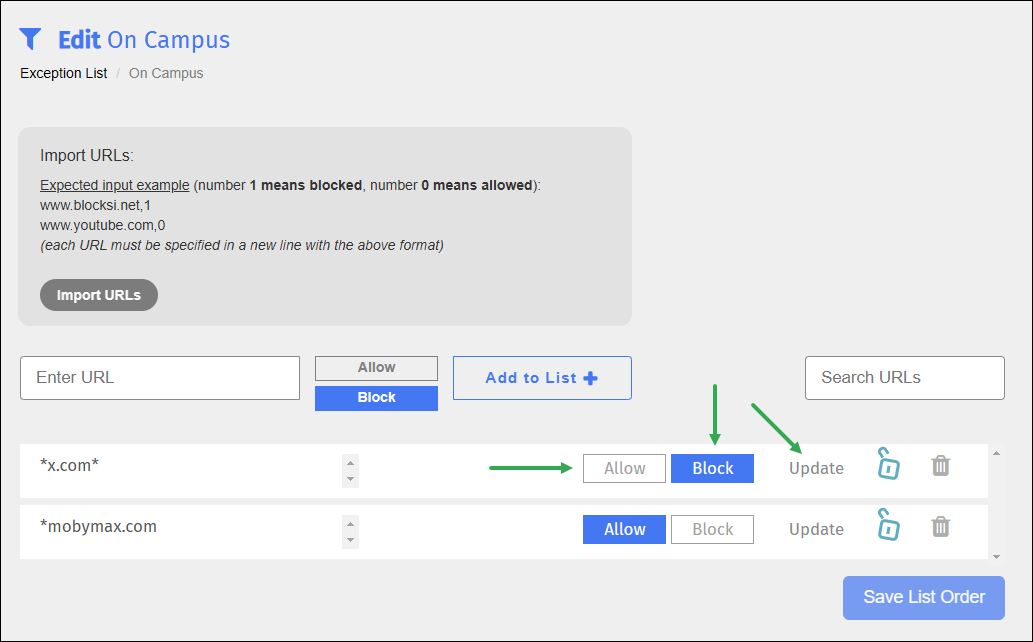
Type a URL in the Enter URL text box. You are given the option to add a note to this URL entry.
Click the Block or Allow button.
Click Add to List + to add the URL. The URL you entered appears below. If you entered a note, it appears to the right of the URL entry.
Note
Click the Block or Allow button at any time to change a blocked URL to an allowed URL and vice versa. Click Update to block or allow the URL.
Note
Click the  icon to delete the URL from the list. A confirmation prompt appears. Click OK to delete the URL.
Tip
Add URLs to the exception list from the Web Analytics screen. See Adding a URL to an Exception List for details.
Add URLs to exception lists directly from the Web Analytics screen.
Click Insights from the Main Menu and then click Web Analytics from its sub-menu. The Web Analytics screen appears.
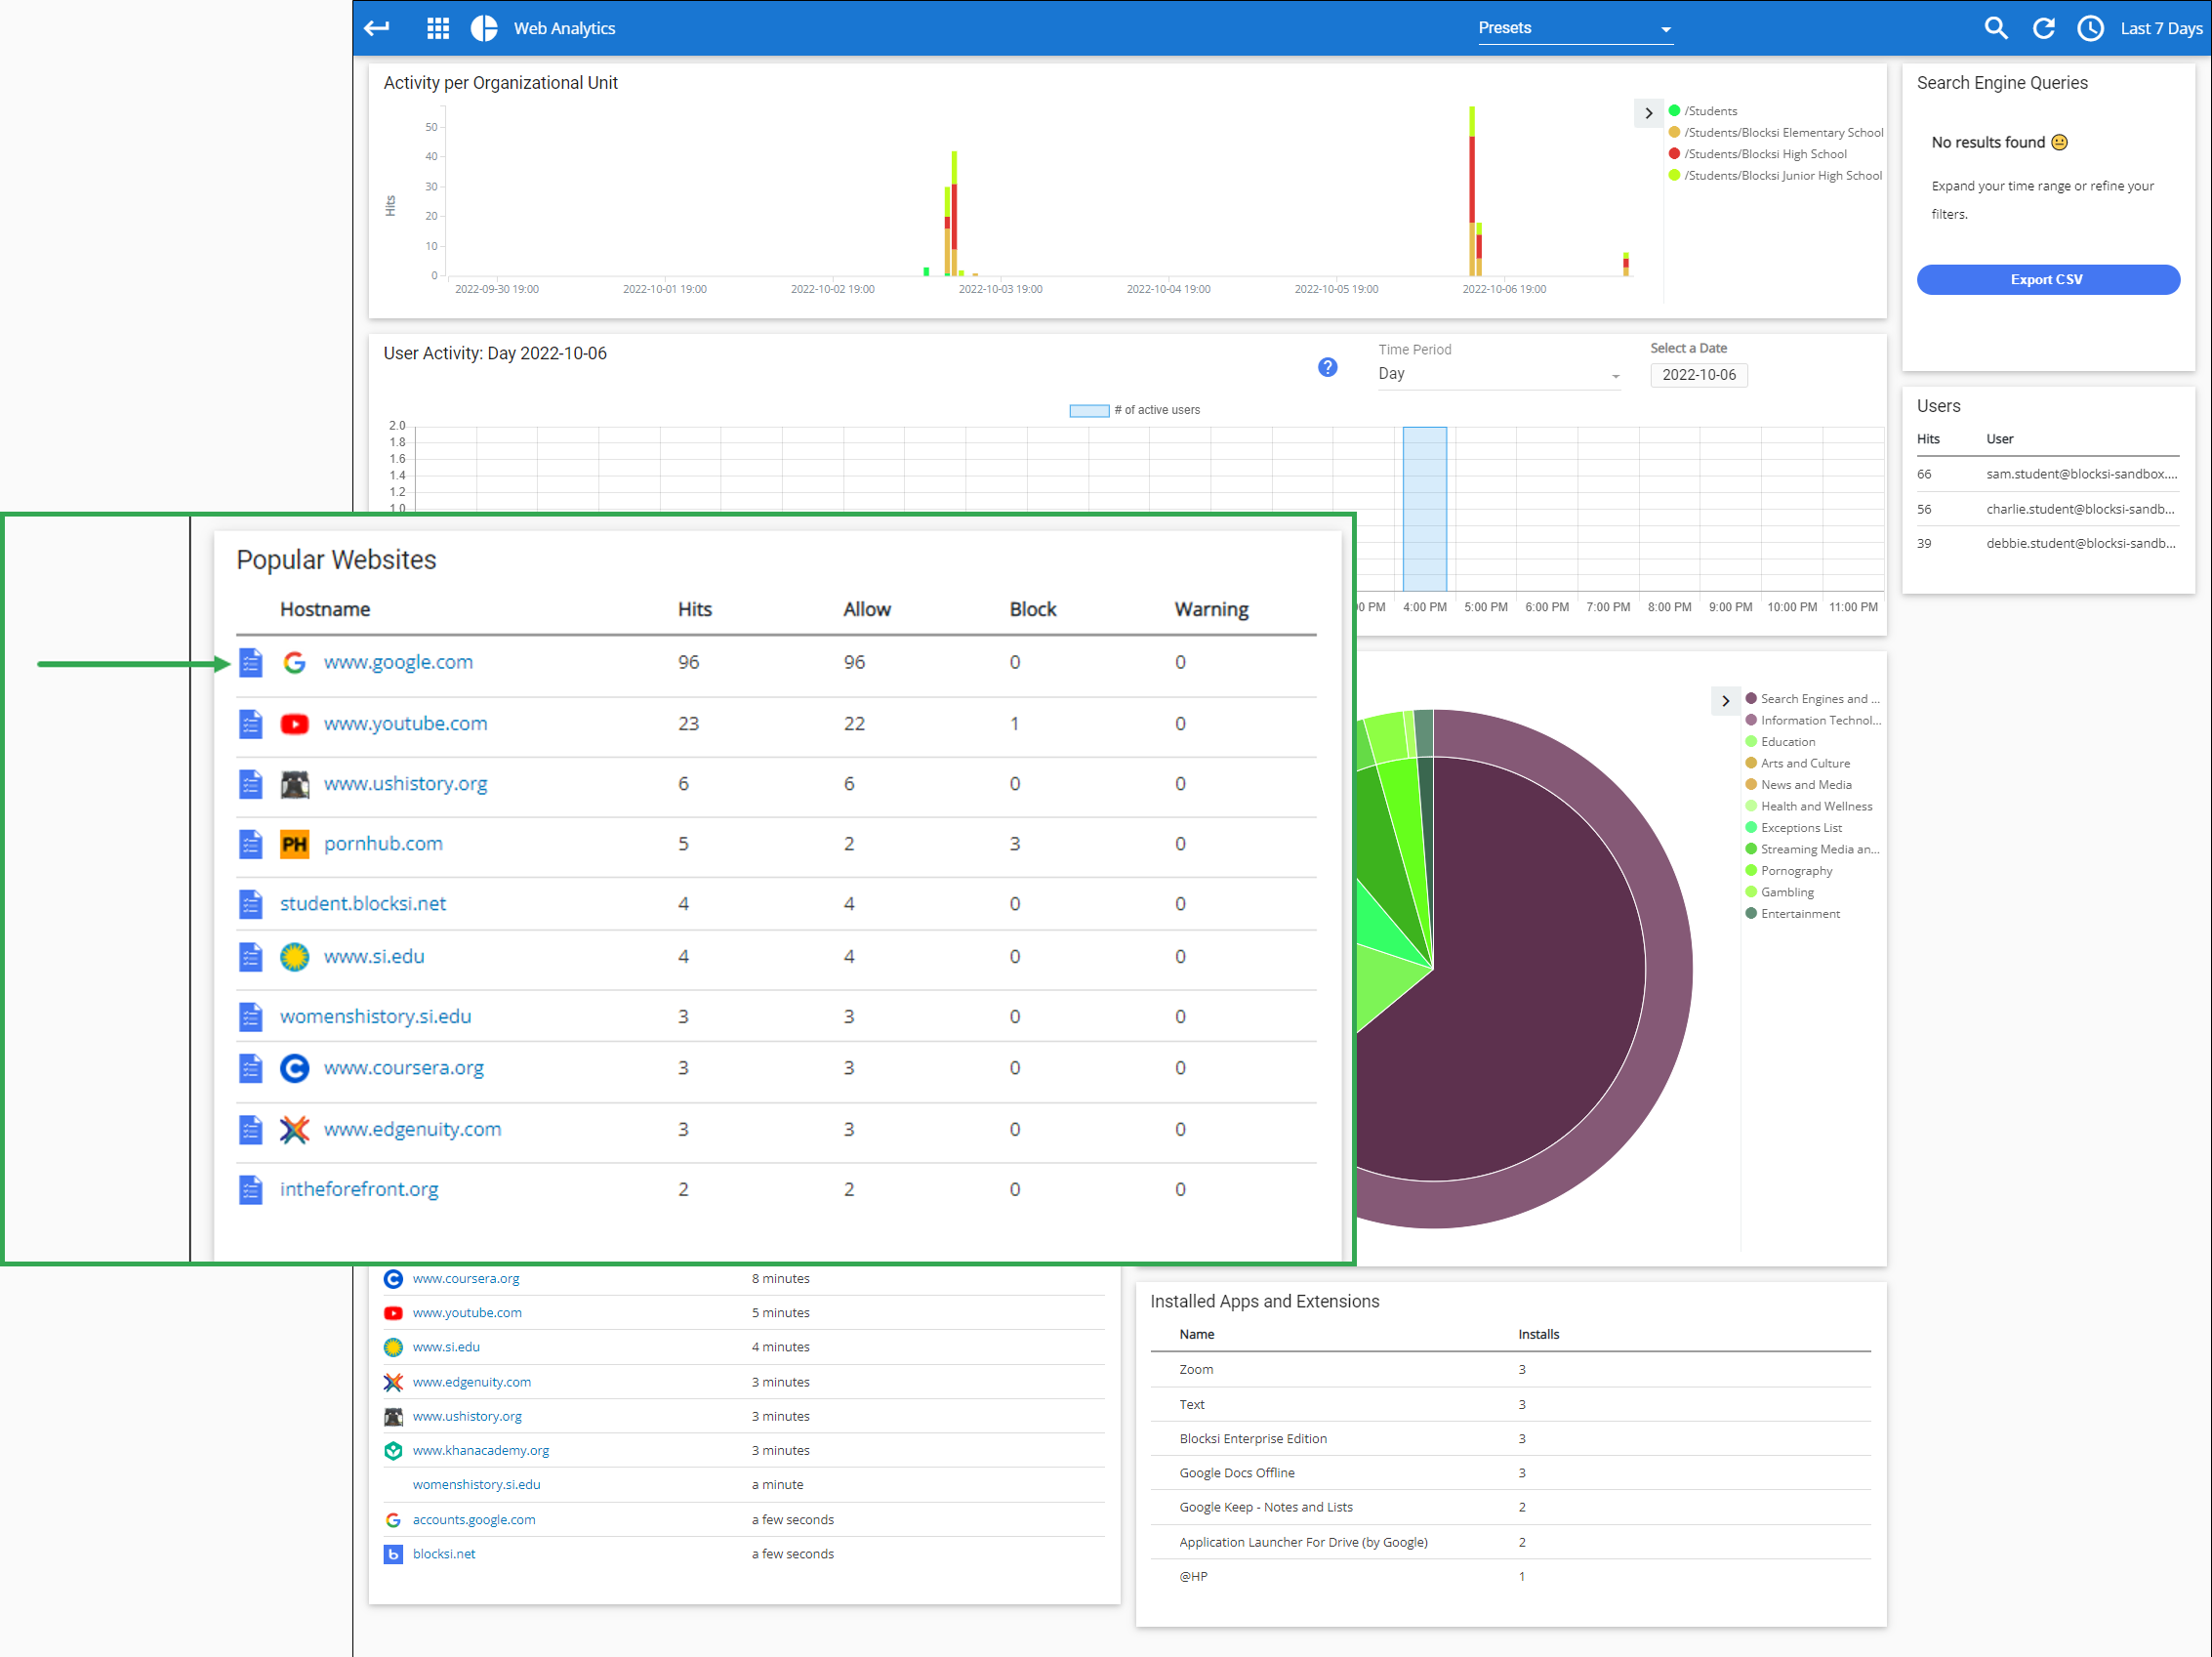
Click the blue document icon to the left of a website name in the Popular Websites section. The Add Website to an Exception List window opens.
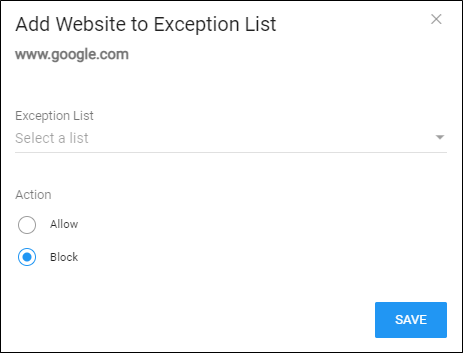
Select the desired list from the Exception List drop-down list.
Click Allow or Block to indicate whether to block or allow the website.
Click SAVE to add the website and close the window. Blocksi adds the website to the selected exception list.
The order in which URLs appear on the exception list determines how the list functions - entries higher on the list take priority. For example, if you add *x.com* as a blocked entry and *hbomax.com* as an allowed entry:
If
*x.com*is higher on the list,hbomax.comis not accessible.If
*hbomax.com*is higher on the list,hbomax.comis accessible.
Click Content Filtering from the Main Menu, then click Filters from its sub-menu.
Click Exception List at the top of the screen. The Exception List screen expands.
Locate the name of the list to modify, then click the
icon to the right of the list name. The Edit screen appears.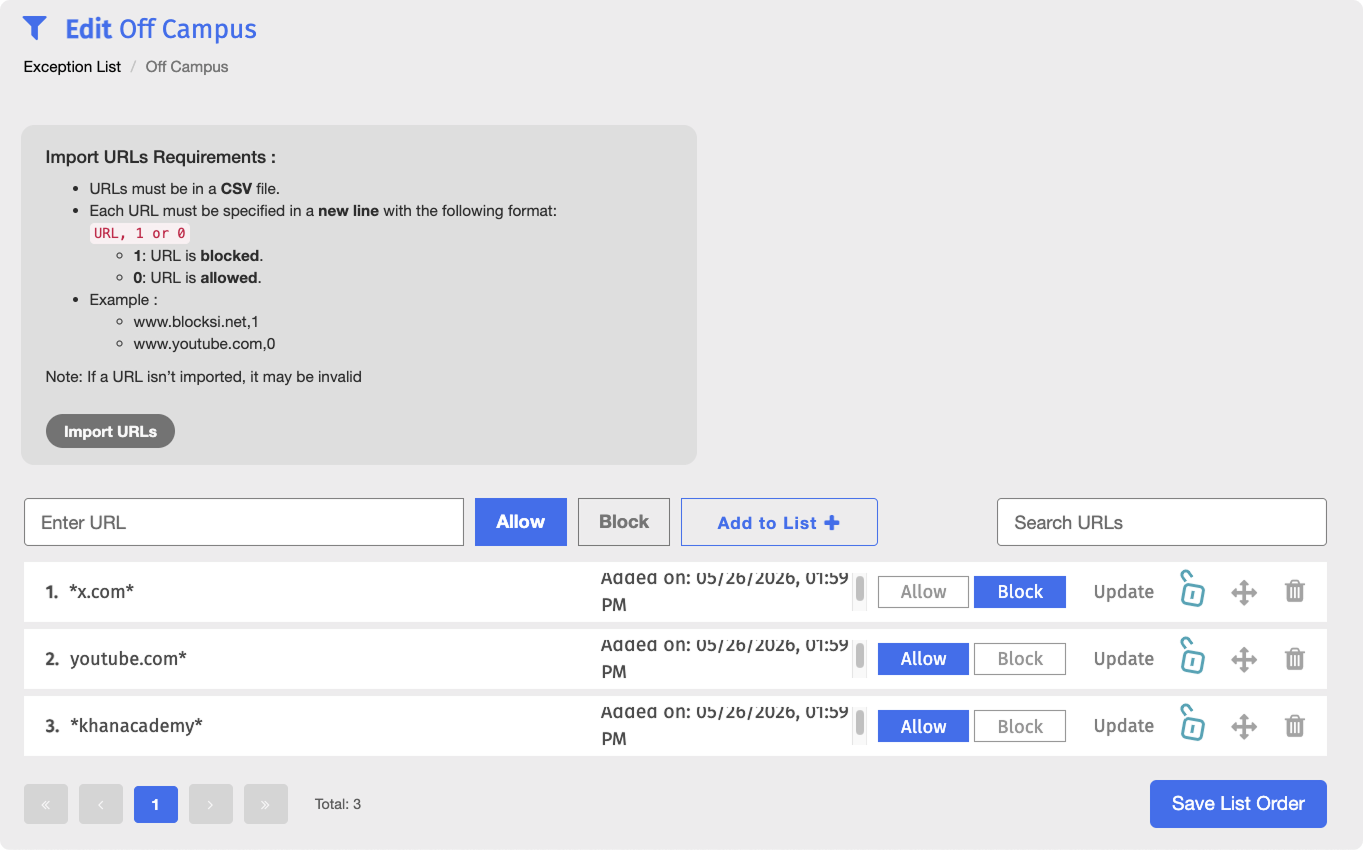
Click and drag a URL to the desired position on the list.
Click the Save List Order button to apply the changes.
Note
Alternatively, you can specify a position numerically. Click the
 button to open the Move URL window. Enter the desired position of the URL and click the Move button.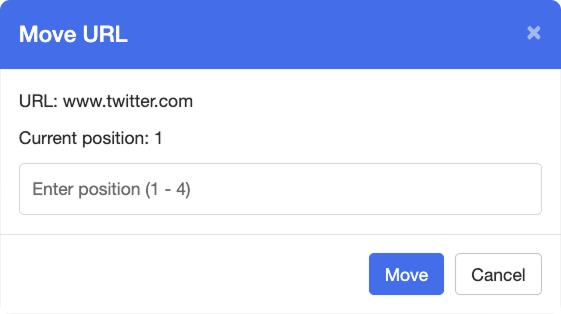
Edit a URL in an exception list.
Click Content Filtering from the Main Menu, then click Filters from its sub-menu.
Click Exception List at the top of the screen. The Exception List screen expands.
Look for the list that contains the URL to edit and click the
icon. The Edit screen appears.Click the name of the desired URL. A box opens to allow you to edit the URL.
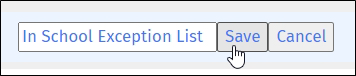
Edit the URL and click the Save button.
Locking a URL prevents delegates from assigning to organizational units any exception lists that contain this URL.
Click Content Filtering from the Main Menu, then click Filters from its sub-menu.
Click Exception List at the top of the screen. The Exception List screen expands.
Look for the list that contains the URL to lock and click the
icon. The Edit screen appears.Click the
 icon to the right of the desired URL.
Delete a URL from an exception list when you no longer need it.
Click Content Filtering from the Main Menu, then click Filters from its sub-menu.
Click Exception List at the top of the screen. The Exception List screen expands.
Look for the list that contains the URL to delete and click the
icon. The Edit screen appears.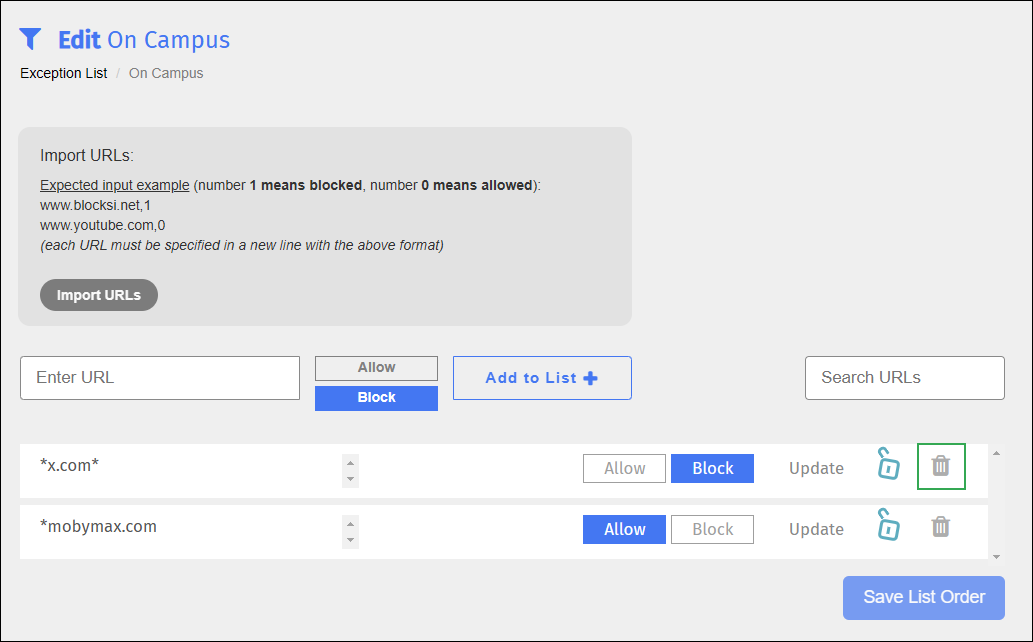
Click the
icon to the right of the desired URL. A confirmation appears.Click OK to delete the URL.
Search for URLs in an exception list.
Click Content Filtering from the Main Menu, then click Filters from its sub-menu.
Click Exception List at the top of the screen. The Exception List screen expands.
Locate the name of the exception list to search, and click the
icon to the right of the exception list name. The Edit screen appears.Type the URL in the Search URLs box. The URL appears as you type.
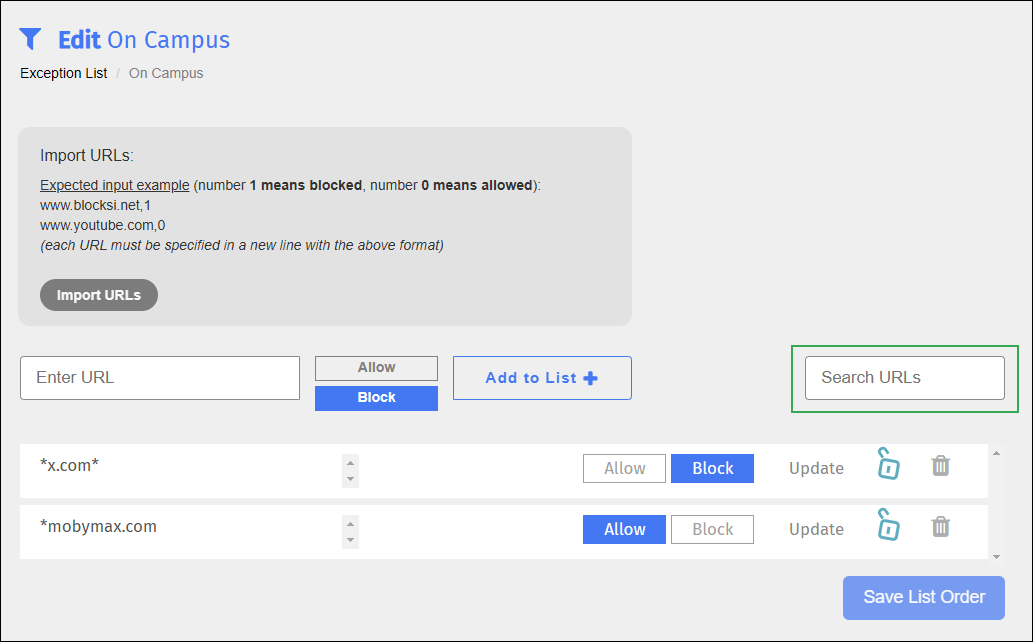
Rename an exception list as needed.
Click Content Filtering from the Main Menu, then click Filters from its sub-menu.
Click Exception List at the top of the screen. The Exception List screen expands.
Locate the list to rename, and click the list name. A box opens to allow you to rename the list. Note that Blocksi added Save and Cancel buttons to the right of the name, as shown below.
Rename the list, and click the Save button.
Modify an exception list as needed.
Click Content Filtering from the Main Menu, then click Filters from its sub-menu.
Click Exception List at the top of the screen. The Exception List screen expands.
Locate the name of the list to modify, and click the
icon to the right of the list name. The Edit screen appears.Make the necessary changes to the list.
Merge two or more exception lists into one new exception list.
Click Content Filtering from the Main Menu, then click Filters from its sub-menu.
Click Exception List at the top of the screen. The Exception List screen expands.
Click each one of the lists to merge. The lists you select turn blue.
Click Merge Lists. The New Merged List window opens.
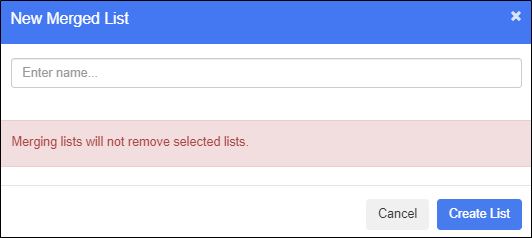
Type the name of the new list in the Enter name text box.
Click Create Filter to save the new list and close the window.
Use an existing exception list to create a new one.
Click Content Filtering from the Main Menu, then click Filters from its sub-menu.
Click Exception List at the top of the screen. The Exception List screen expands.
Locate the list to duplicate, and click the
 icon. The Duplicate List window opens.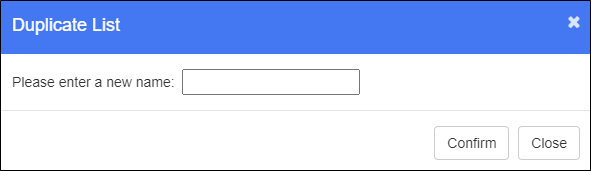
Type the name of the new list in the text box.
Click OK to add the list and close the window. The duplicated list appears at the bottom of the list. It contains the same URLs as the original list.
Make any desired changes to the new list and save it.
Import exception lists from an Excel or CSV file.
Click Content Filtering from the Main Menu, then click Filters from its sub-menu.
Click Exception List at the top of the screen. The Exception List screen expands.
Click the Import Lists button to import the list. The Open dialog opens.
Navigate to the desired folder, select the file, and click Open. The lists are imported and appear at the bottom of the exception lists.
Important information about importing exception lists.
Importing Exception Lists From an Excel File
If you are importing exception lists from an Excel file, ensure that the Excel file appears as in the image below.
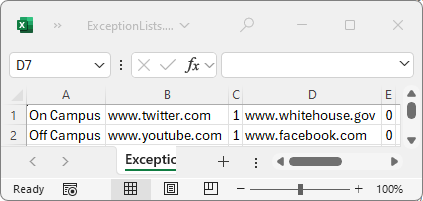
In the spreadsheet, blocked URLs are indicated by a 1; allowed URLs are represented by a 0. Note that the exception list name appears in Column A, the first website name appears in Column B, the Exception indicator appears in Column C, and so on. Also note that each exception list appears in a separate row.
Importing Exception Lists From a CSV File
If you are importing exception lists from a CSV file (for example, Notepad), ensure that the text file appears as in the image below.
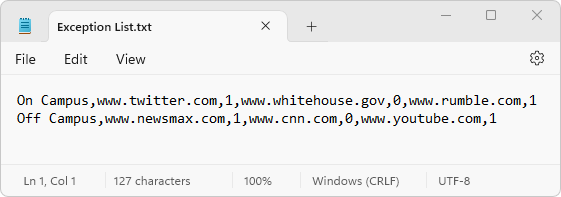
In the text file, blocked URLs are indicated by a 1; allowed URLs are represented by a 0. Note that the exception list name appears first, the first website name appears second, and the Exception indicator appears third, and so on, and all are separated by commas. Also note that each exception list appears on a separate line.
Import URLs into exception lists from an Excel or CSV file.
Click Content Filtering from the Main Menu, then click Filters from its sub-menu.
Click Exception List at the top of the screen. The Exception List screen expands.
Look for the list to which to import URLs and click the
icon. The Edit screen appears.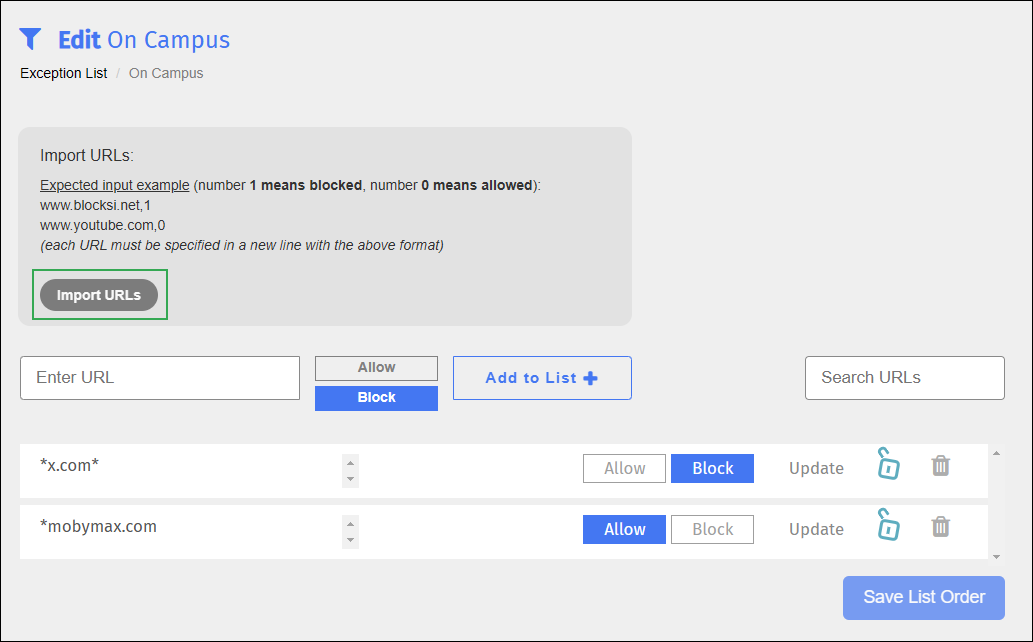
Click the Import URLs button to import the list. The Open dialog opens.
Navigate to the desired folder, select the file, and click Open. Blocksi imports the URLs and they appear at the bottom of the list of URLs.
Important information about importing URLs.
Importing URLs From an Excel File
If you are importing URLs from an Excel file, ensure that the Excel file appears as in the image below.
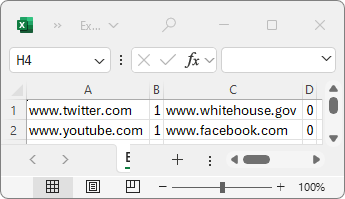
In the spreadsheet, Column A contains the domains and Column B contains a 1 or a 0 ( 1 means Blocked and 0 means allowed). Each new domain is added to the next row.
Importing URLs From a CSV File
If you are importing URLs from a CSV file (for example, Notepad), ensure that the text file appears as in the image below.
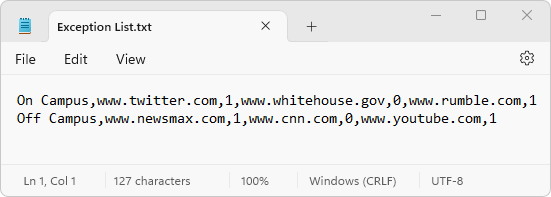
In the CSV file, the exception list name appears first, followed by the domain, which is followed by a comma and then either a 1 or a 0 ( 1 means Blocked and 0 means Allowed). Also note that each domain appears on a separate line.
Export exception lists individually or in single file to keep for your records.
Click Content Filtering from the Main Menu, then click Filters from its sub-menu.
Click Exception List at the top of the screen. The Exception List screen expands.
Do one of the following:
To export an individual list to a single file, click the
 icon. The file appears in the lower left-hand corner of your screen in your spreadsheet program. Click it to open and save it.
To export all lists to a single file, click the Export Lists button. The file appears in the lower left-hand corner of your screen in your spreadsheet program. Click it to open and save it.
The following is an image showing an example of exported exception lists.
Note
In the spreadsheet, blocked URLs are indicated by a 1; allowed URLs are represented by a 0. Note that the exception list name appears in Column A, the first website name appears in Column B, the Exception indicator appears in Column C, and so on. Also note that each exception list appears in a separate row.
Delete exception lists when you no longer need them.
Click Content Filtering from the Main Menu, then click Filters from its sub-menu.
Click Exception List at the top of the screen. The Exception List screen expands.
Locate the list to delete, and click the
icon to the right of the list. A confirmation prompt appears.Click OK to delete the list and close the prompt.