Delegate Dashboard Settings
Manage account access and role configuration for the Delegate Dashboard to provide role-based access to specific sites, OUs, or buildings within the domain.
Add as many delegate accounts as you need.
To add a delegate account
Click Dashboard Settings from the Main Menu and then click Delegate Dashboard from its sub-menu. The Delegate Accounts screen appears.
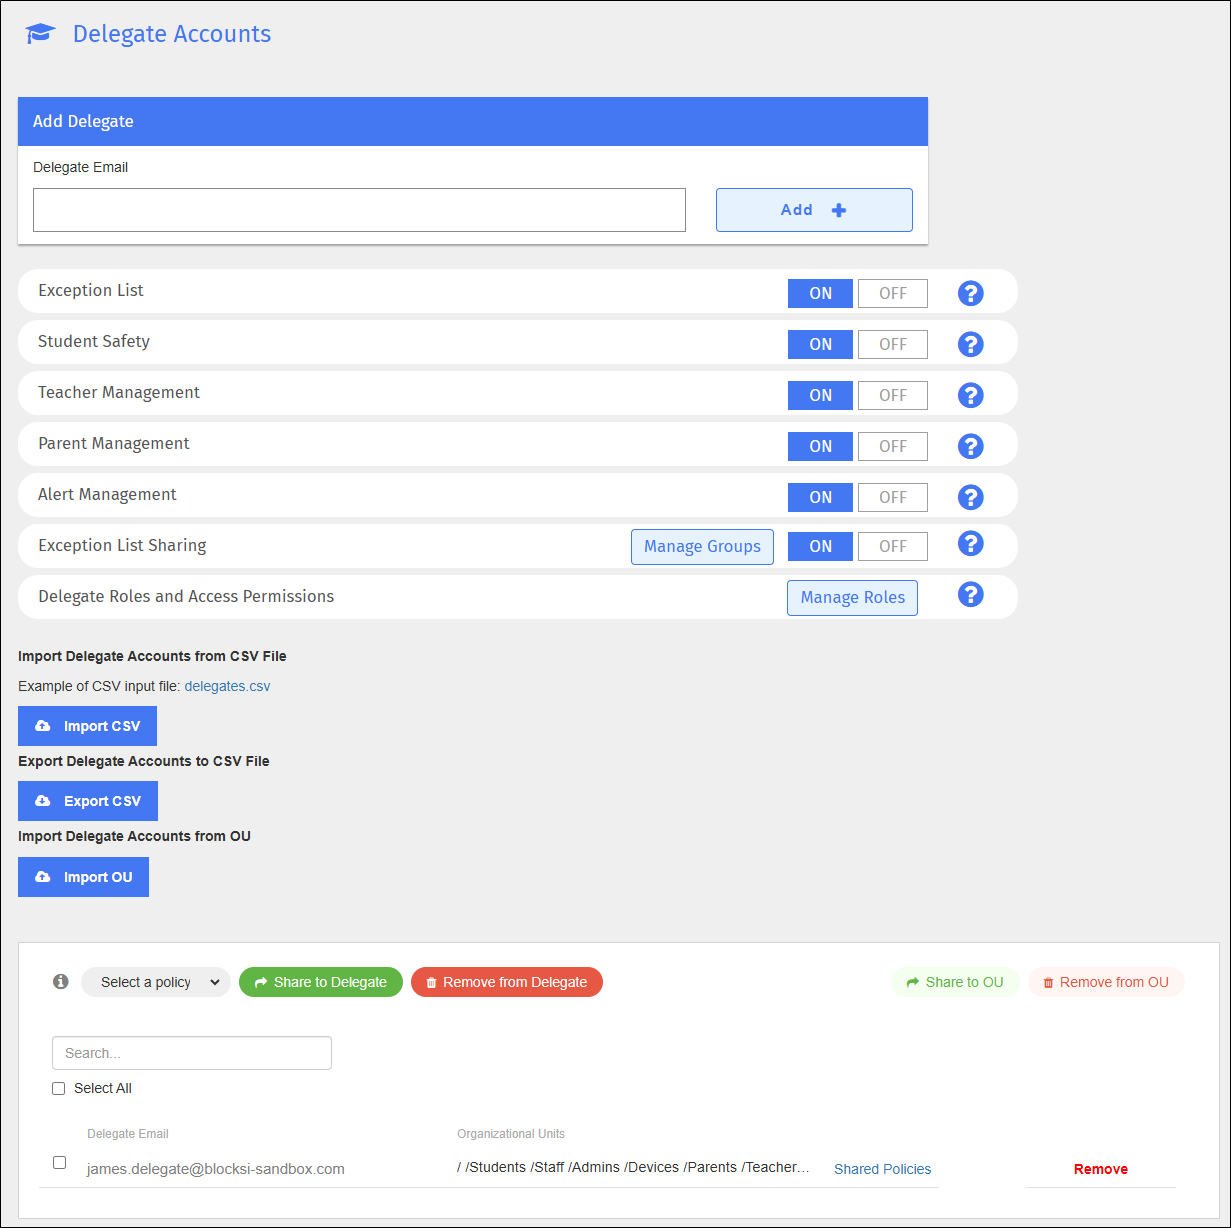
Type the email address of the delegate account to add in the Delegate Email text box in the Add Delegate section.
Click Add + to add the delegate account. The following window opens.
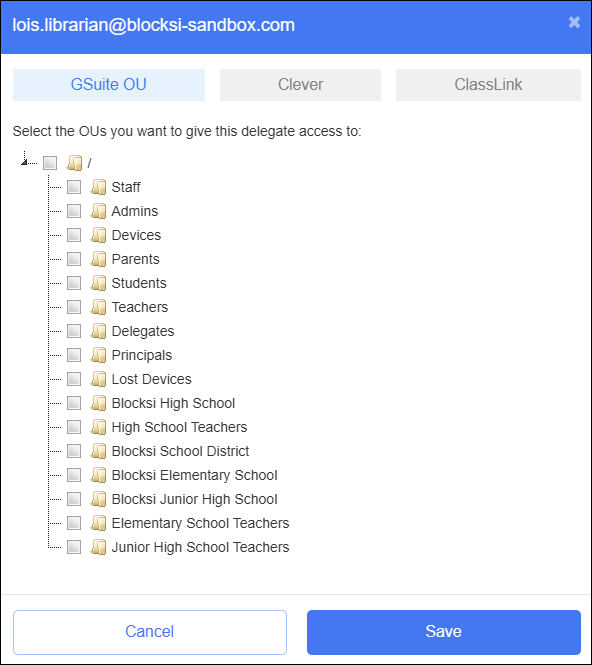
Select the checkboxes to the left of the OUs that this delegate account can manage.
Click Save. The delegate account is added to the bottom of the page.
Import delegates accounts from an OU or a CSV file, and export delegate accounts to a CSV file to keep for your records.
Import delegate accounts from an organizational unit (OU).
To import delegate accounts from an OU
Click Dashboard Settings from the Main Menu and then click Delegate Dashboard from its sub-menu. The Delegate Accounts screen appears.

Click the Import OU button. The Import Delegates window opens.
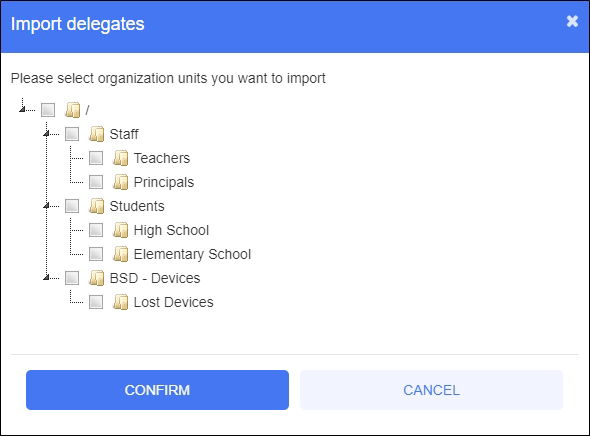
Navigate to the desired OU and click Confirm. Blocksi imports the delegate accounts from the selected OU.
Import delegate accounts from a CSV file.
To import delegate accounts from a CSV file
Click Dashboard Settings from the Main Menu and then click Delegate Dashboard from its sub-menu. The Delegate Accounts screen appears.

Click the Import CSV button to import the file. The Open dialog appears.
Navigate to the desired file and click Open. Blocksi imports the delegate accounts from that spreadsheet.
Example Delegate Import File
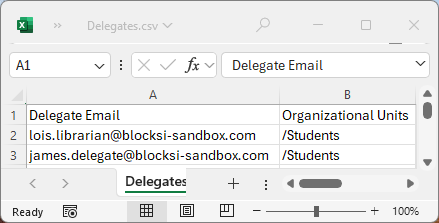
Export delegate accounts to a CSV file to keep for your records.
To export delegate accounts to a CSV file
Click Dashboard Settings from the Main Menu and then click Delegate Dashboard from its sub-menu. The Delegate Accounts screen appears.

Click the Export CSV button to export the file. The file appears in the lower left-hand corner of your screen in your spreadsheet program. Click it to open and save it.
Example Delegate Export File

There are different kinds of access to give delegates.
To set delegate dashboard settings
Click Dashboard Settings from the Main Menu and then click Delegate Dashboard from its sub-menu. The Delegate Accounts screen appears.

Make your selections in the following section of the Delegate Accounts screen. Selections you make here apply to all delegate accounts within the domain.
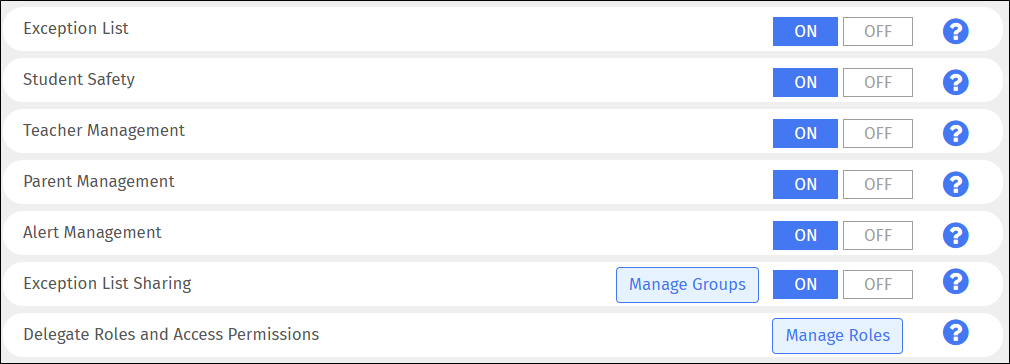
See the following descriptions for information on the delegate dashboard settings.
Option | Description |
|---|---|
Set whether to allow delegates to create exception lists. If set to OFF, the Exception List option is removed from the Main Menu on the Delegate Dashboard. | |
Set whether to allow delegates to access Student Safety. If set to OFF, the Student Safety option is removed from the Main Menu on the Delegate Dashboard. | |
Set whether to allow delegates access to teacher management. If set to OFF, the Teacher Accounts option is removed from Settings on the Main Menu on the Delegate Dashboard. | |
Set whether to allow delegates access to parent management. If set to OFF, the Parent Accounts option is removed from Settings on the Main Menu on the Delegate Dashboard. | |
Set whether to allow delegates access to Alert management. If set to OFF, the Alerts option is removed from the Main Menu on the Delegate Dashboard. | |
Set whether to allow users in the same OU to share exception lists. Use the Manage Groups button to create groups of more than one OU so delegates can share exception lists with users outside their OU. | |
Set whether to allow or prevent delegates from accessing specific areas of Blocksi by assigning roles and permissions to them. |
Before a delegate can see student data on the Delegate Dashboard, you must first assign the delegate to the correct organizational unit (OU).
To assign a delegate to an OU
Click Dashboard Settings from the Main Menu and then click Delegate Dashboard from its sub-menu. The Delegate Accounts screen appears.

Click the desired link in the Delegate Email column. The following window opens.
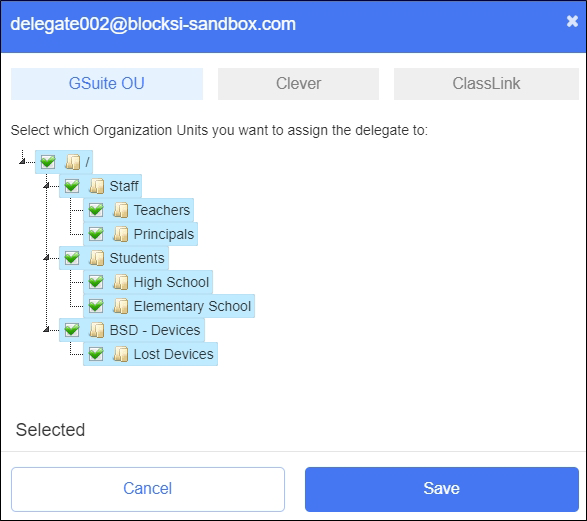
Select the checkboxes for the OUs to which to assign the principal.
Click Save when you have finished.
Create custom roles within the Delegate Dashboard to further customize access for each delegate account.
To manage delegate roles
Click Dashboard Settings from the Main Menu and then click Delegate Dashboard from its sub-menu. The Delegate Accounts screen appears.

Click Manage Roles to the right of Delegate Roles and Access Permissions. The Delegate Roles and Access Permissions window opens.

Managing roles consists of creating new roles and assigning them to delegates.
To create a new role
Click Create Role. The window expands to include the following fields, as shown below.
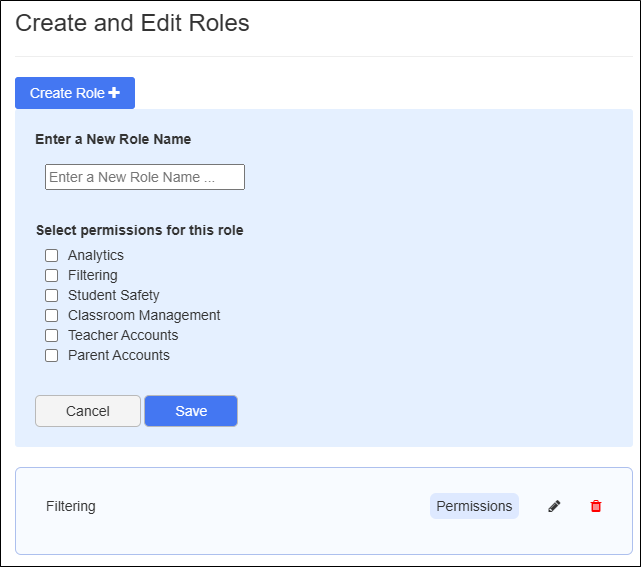
Type a name for the new role.
Select the checkboxes to the left of the permissions to include in the new role. The areas to which you do not give permission will be unavailable to delegate accounts assigned to this role. For instance, if you do not select Student Safety, then any delegate to whom this role is assigned will not have access to Student Safety on their dashboard.
Click Save to add the role. The new role appears below.
Search for a delegate, click Select OU to select OUs to which to assign the roles, or click Edit Roles to the right of a delegate name.
Select the role to assign to the OU or the individual delegate and click Assign Role. Blocksi assigns that role to the OU or the delegate.
Share policies with delegate accounts as needed.
To share a policy with delegate accounts
Click Dashboard Settings from the Main Menu and then click Delegate Dashboard from its sub-menu. The Delegate Accounts screen appears.

Select the policy to share from the Select a policy drop-down list.
Click the Share to OU button. The following window opens.
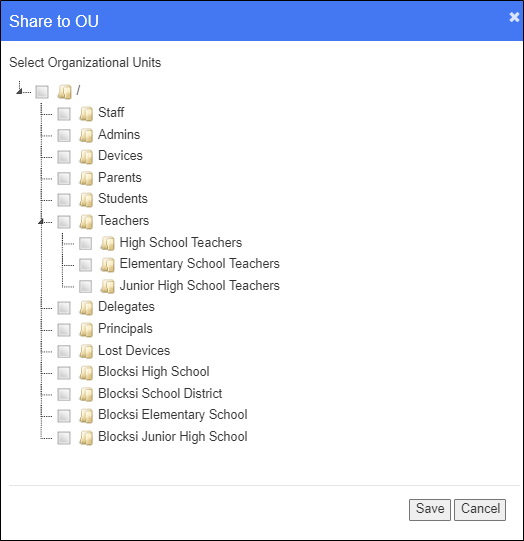
Select the checkboxes to the left of the OUs with which to share the policy and click Save. All delegates in the OUs you selected receive the policy.
Select the checkboxes to the left of the delegate accounts with which to share the policy, or select the Select All checkbox to select all the delegate accounts.
Click the Share to Delegate button. Blocksi shared the policy with the delegate accounts you selected.
Remove policies from delegate accounts at any time.
To remove a policy from delegate accounts
Click Dashboard Settings from the Main Menu and then click Delegate Dashboard from its sub-menu. The Delegate Accounts screen appears.

Select the policy to remove from the Select a policy drop-down list.
Remove the policy from all delegates in selected OUs or from selected delegates.
Click the Remove from OU button. The following window opens.
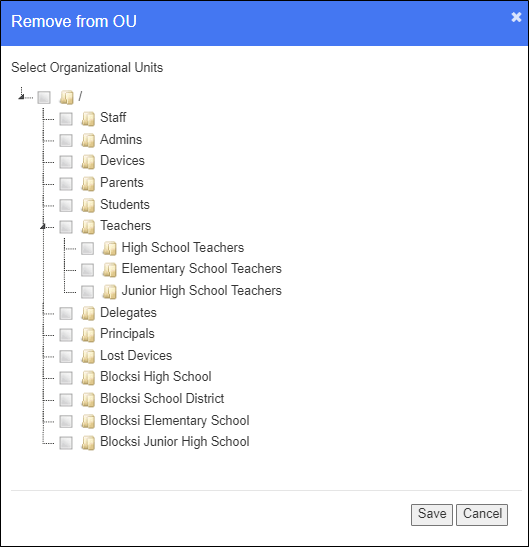
Select the checkboxes to the left of the OUs from which to remove the policy and click Save. Blocksi removes the policy from all delegates in the OUs you selected.
Select the checkboxes to the left of the delegate accounts from which to remove the policy, or select the Select All checkbox to select all the delegate accounts.
Click the Remove from Delegate button. Blocksi removes the policy from the delegate accounts you selected.
Remove a delegate account when you no longer need it.
To remove a delegate account
Click Dashboard Settings from the Main Menu and then click Delegate Dashboard from its sub-menu. The Delegate Accounts screen appears.

Locate the delegate account to remove and click the Remove link to the right. A confirmation prompt appears.
Click OK to remove the delegate account.