Assessments
Assessment mode creates a secure testing environment by locking students to a defined set of websites for the duration of an Assessment. While an Assessment is running, students cannot access any sites or searches other than those enforced or allowed.
You can run an Assessment for an entire class, individual student, or for specific groups of students within a class. Live timers on the Teacher Dashboard show how much time each group has left, and if students are still working when the period ends, the Assessment continues into the next class without stopping.
Because each group can have its own timer, you can give one group more time than the others - for example, students with approved accommodations that entitle them to additional time. Place those students in their own group and set a longer duration for that group. All groups take the same Assessment with the same enforced and allowed URLs; only the duration differs. When a group's timer expires, the students in that group leave Assessment mode, and groups with time remaining continue working.
Note
Pushing out an Assessment will close all the students’ current open tabs and lock them down to the selected Assessment only.
Click the
 button in the class action bar, or click the
  button under a student's tile. The Create Assessment window opens on the Content tab.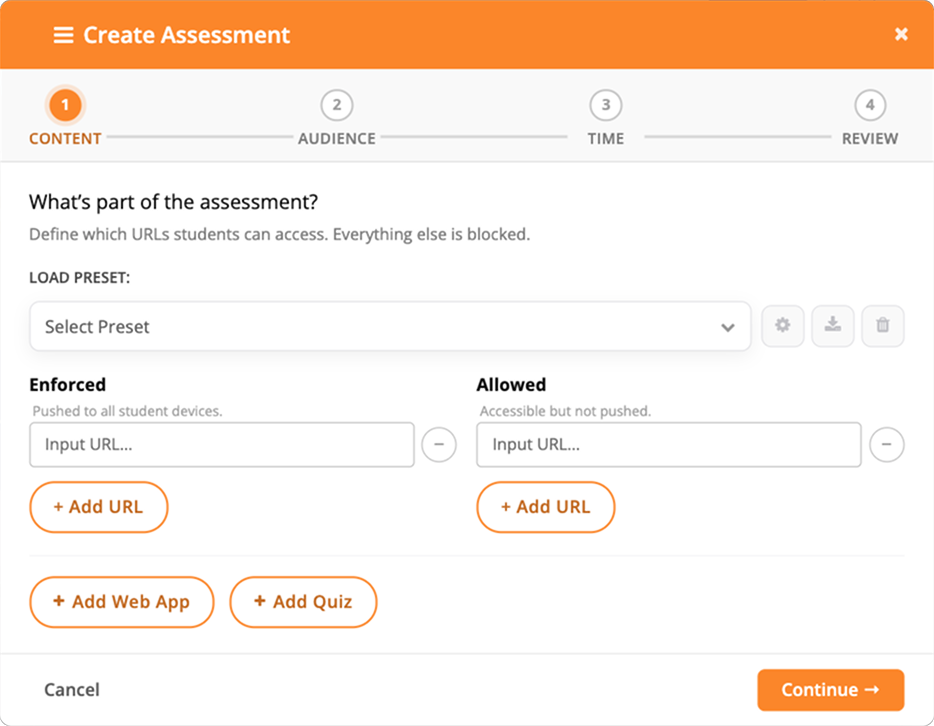
You have three different options of configuring an assessment:
Tip
You can combine multiple options for creating an Assessment. For example, load a preset, then manually add URLs or an LMS to the set of already configured URLs.
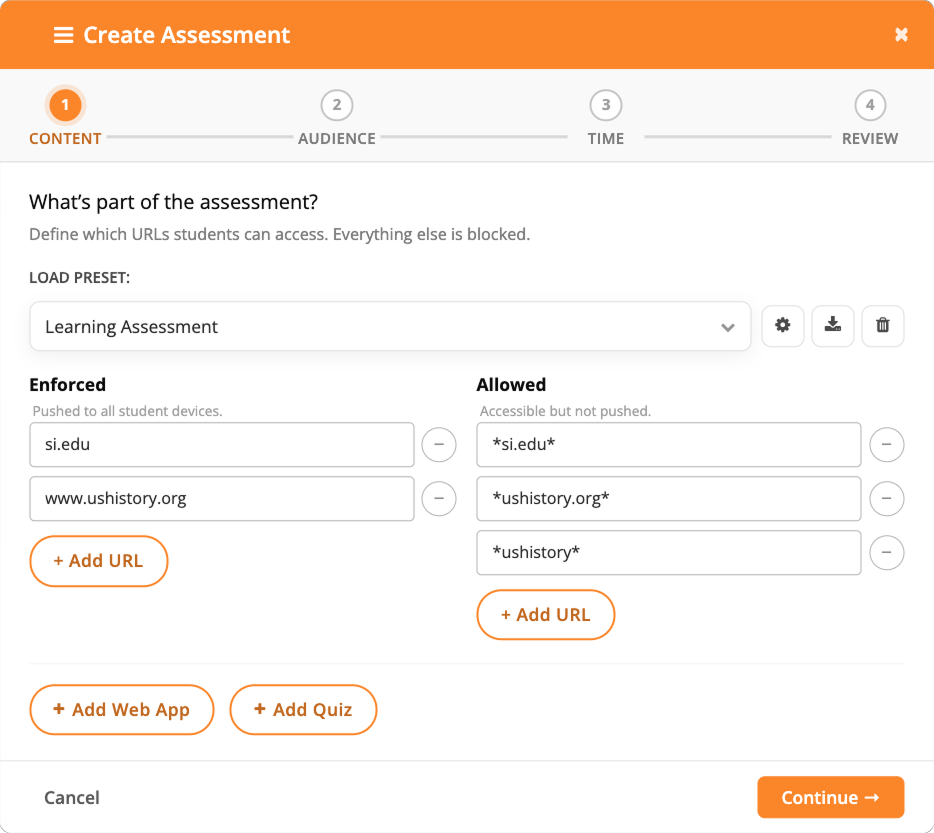
Manually Entering URLs:
In the Enforced URLs section on the left, enter the full URL of the web page you want to push out. Click the
 button to push out multiple sites simultaneously.
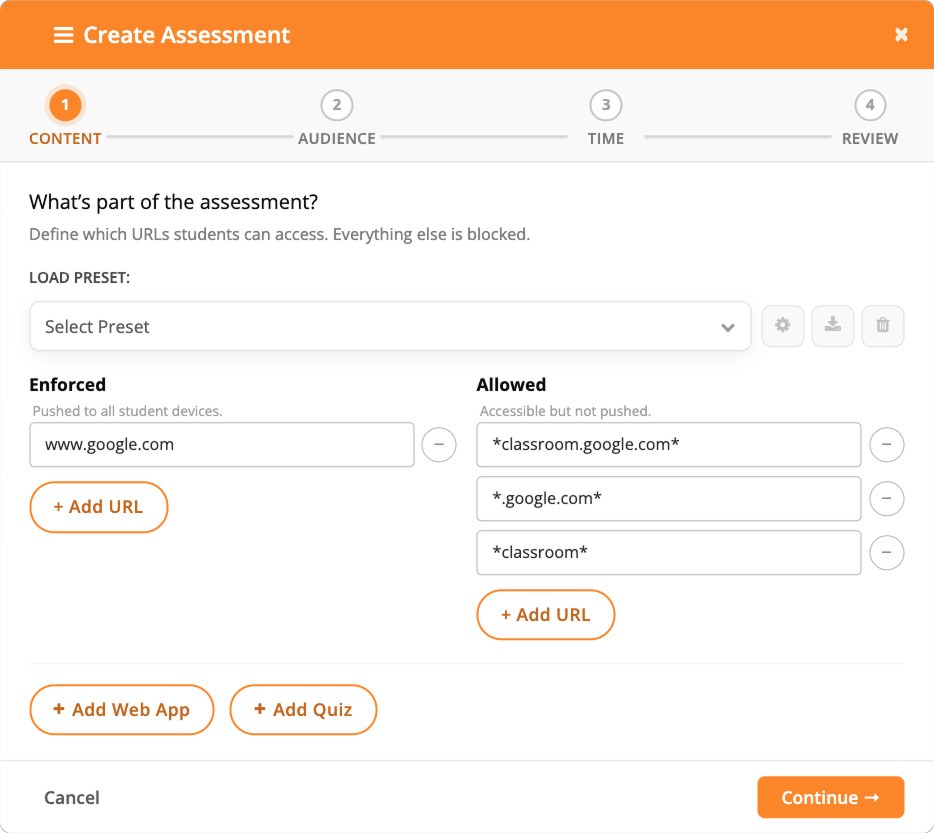
In the Allowed URLs section on the right, allow the domain of the URLs by using an asterisk before and after the domain name, for example
*edgenuity*,*classroom*, or*mathxl*. Click the button to add multiple allowed URLs.
Important
Some domains require additional URLs to be added as allowed URLs. Single sign-on providers are the most common example - if students sign in with Google, allow the Google sign-in domain as well as the assessment site.
Adding a Web App or a Quiz:
To add a Web App, click the
 button and select an LMS environment or tool from the Web Apps Library.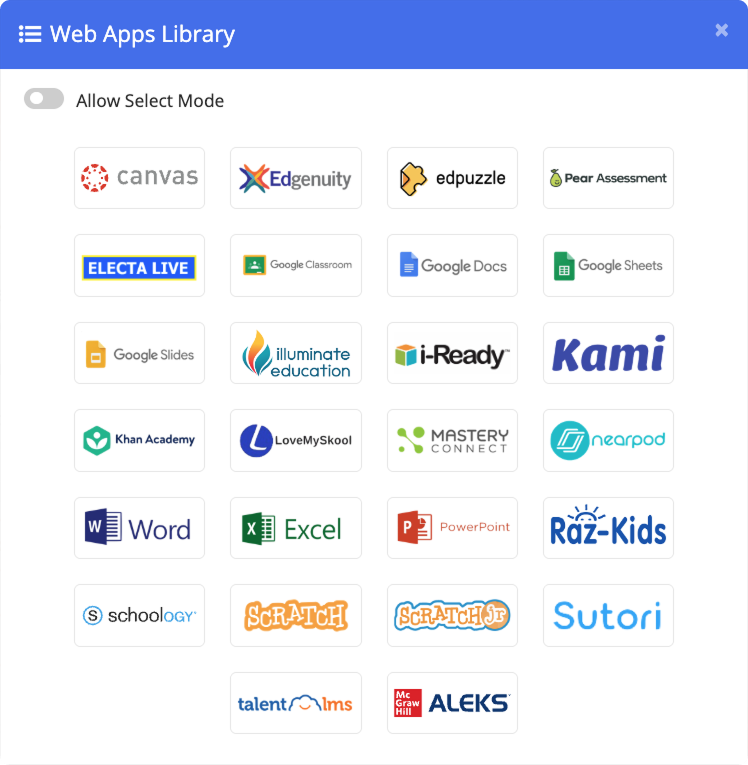
Tip
You can use multiple Web App presets in the same Assessment if you toggle the Allow Select Mode button in the top left. This allows you to select as many of the Web App presets as you like.
To add a Quiz, click the
 button, select an Assessment from the Assessment/Quiz Library, paste the quiz URL or code into the field, then click Confirm.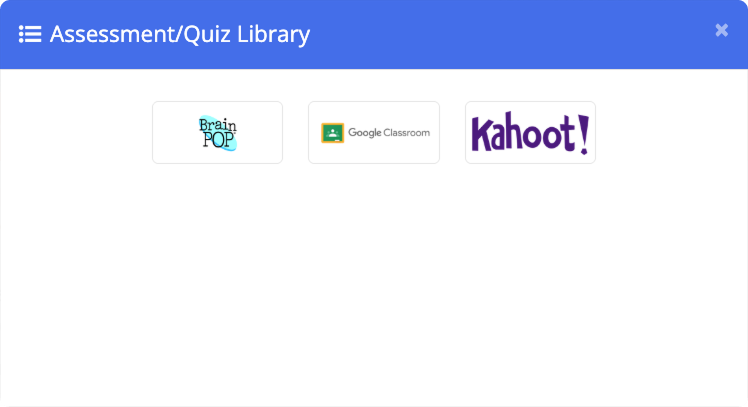
Loading a Preset:
To start from a saved configuration, select a preset from the Load Preset drop-down list. The enforced and allowed URLs, audience, and duration from that preset are applied. Refer to Assessment Presets for more information.
Click the
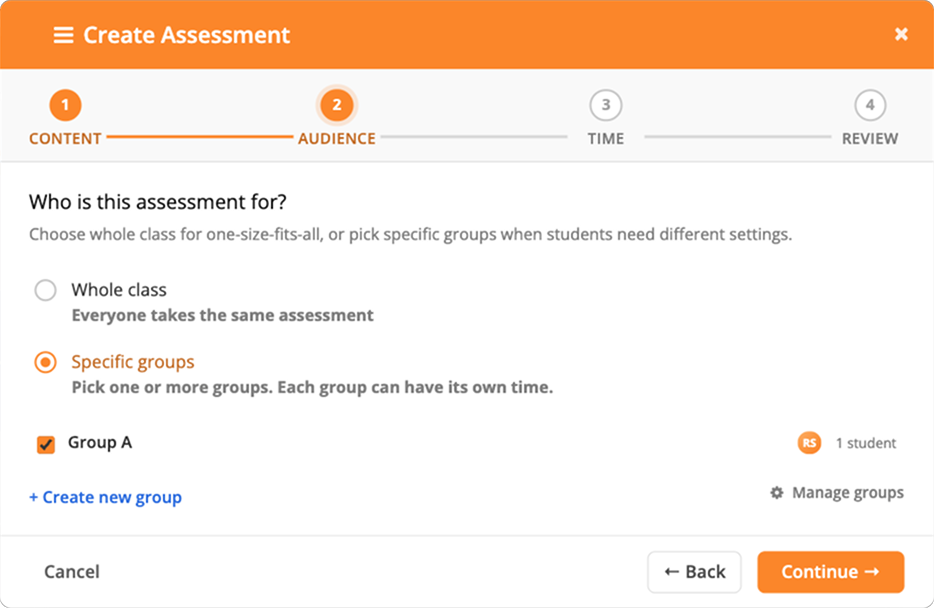
 button. On the Audience tab, select who the Assessment is for:
Whole class - Every student in the class takes the same Assessment.
Specific groups - Only the groups you select take the Assessment.
For a group-based Assessment, select the groups to include. To create a group, click + Create new group and refer to Creating an Assessment Group. You can also manage groups from this screen, including adding or removing members, renaming the group, and deleting the group altogether.
Important
An Assessment can also be started for an individual student from that student's tile by clicking the
icon. Note that this specific student needs to be selected on the Audience tab.Click the
button to proceed to the Time tab, select a duration for each group from the drop-down list beside the group name. Duration cannot be set if you selected Whole class as an Audience option.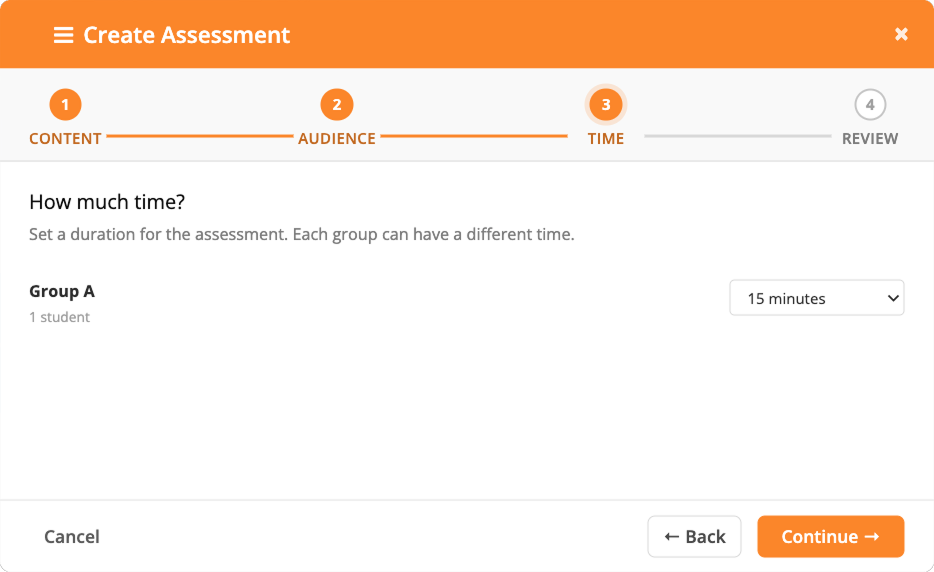
Note
If allowed by your Blocksi administrator, the Assessment can be extended beyond the class duration.
Click the
button to proceed to the Review tab. Check the summary of your configuration and click Edit beside the Content or Audience & Time sections to make changes if needed.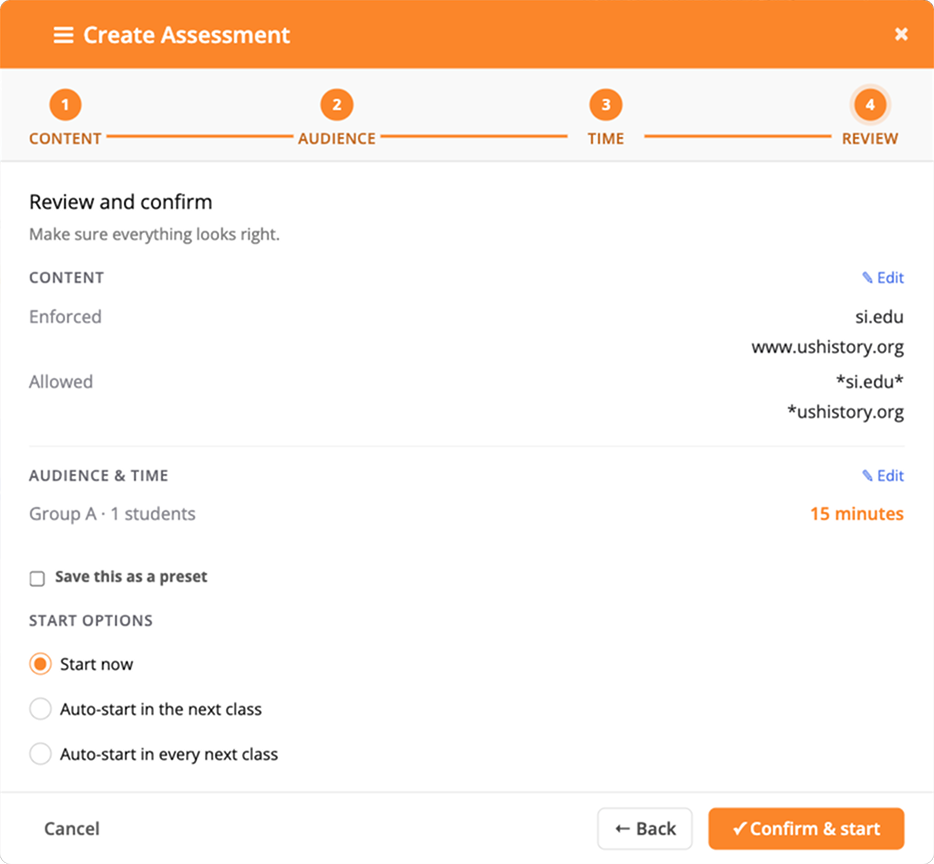
Tip
To reuse this Assessment configuration, select the Save this as a preset checkbox and enter a name in the Preset name field.
In the Start Options at the bottom of the configuration window, choose one of the options:
Start now - Starts the Assessment straight away. This is the default option.
Auto-start in the next class - The Assessment starts automatically when the class is started.
Auto-start in every next class - Schedules the Assessment to start whenever a new class is started unless canceled.
Click the
 button.
Monitor an active Assessment, modify its URLs or duration, stop it early, and schedule an Assessment to start automatically in your next class.
While an Assessment is running, the button in the class action bar appears with a green dot instead:  .
.
While an Assessment is running for specific groups or for an individual student, an Assessment banner also appears below the class action bar with a live timer for each group.
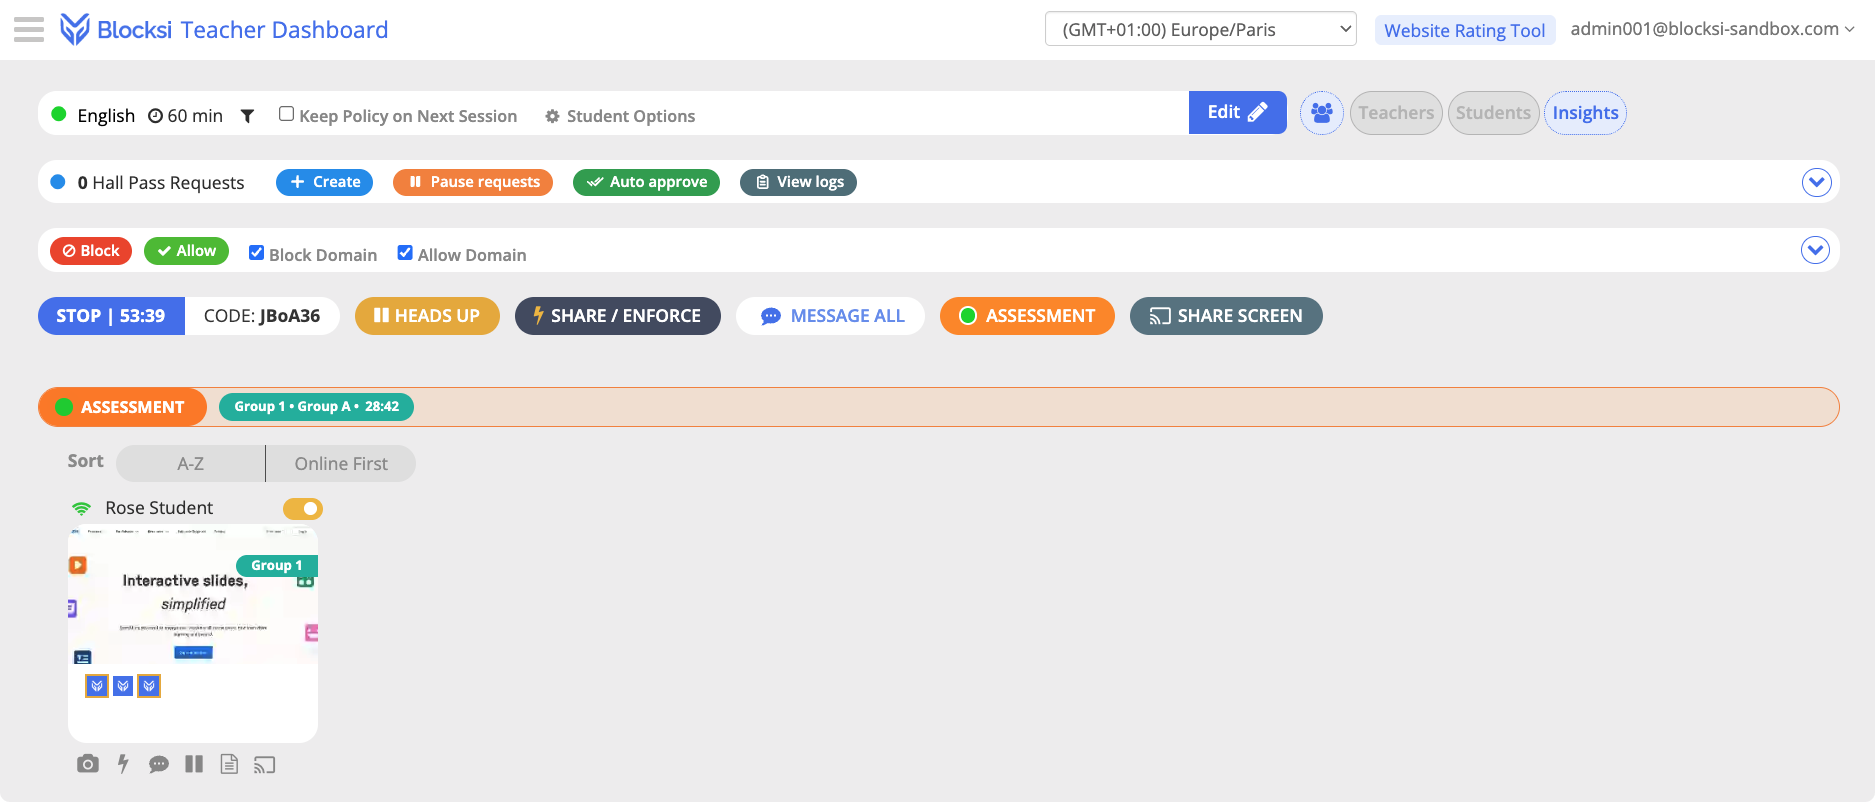
You can change the enforced and allowed URLs, and add time to specific groups, while an Assessment is running. This is especially useful when students need a site you did not anticipate, such as a sign-in page or a reference tool that the Assessment site links out to.
Whole class - The updated URLs are applied to every student in the Assessment.
A specific group - The updated URLs are applied only to the students in that group. All other groups continue with the URLs they started with.
An individual student - The updated URLs are applied only to that student. Other students continue with the URLs they started with.
Click the
button to open the Assessment window.Add or remove URLs in the Enforced URLs and Allowed URLs sections. You can add a Web App or a Quiz, or load a preset from the Shared presets drop-down list.
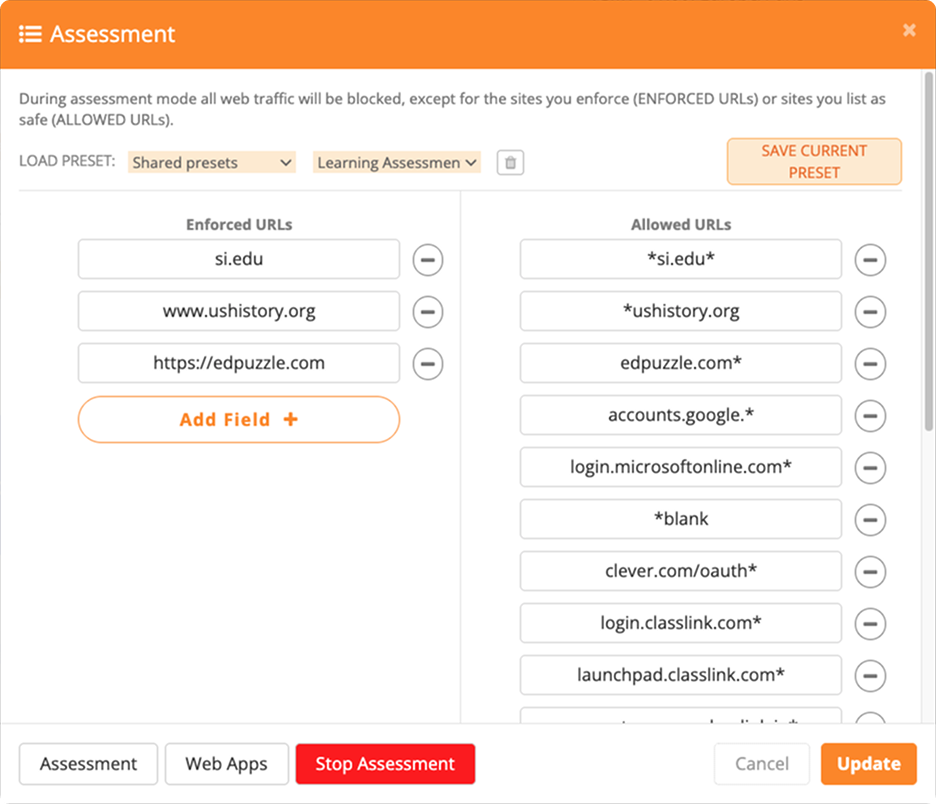
Click the
 button to apply the changes.
Click the
 button to open the Edit Assessment window.
In the Add Time section, select additional time from the drop-down list, then click the
 button.
Add or remove URLs in the Enforced URLs and Allowed URLs sections. You can also add a Web App or a Quiz to the existing configuration.
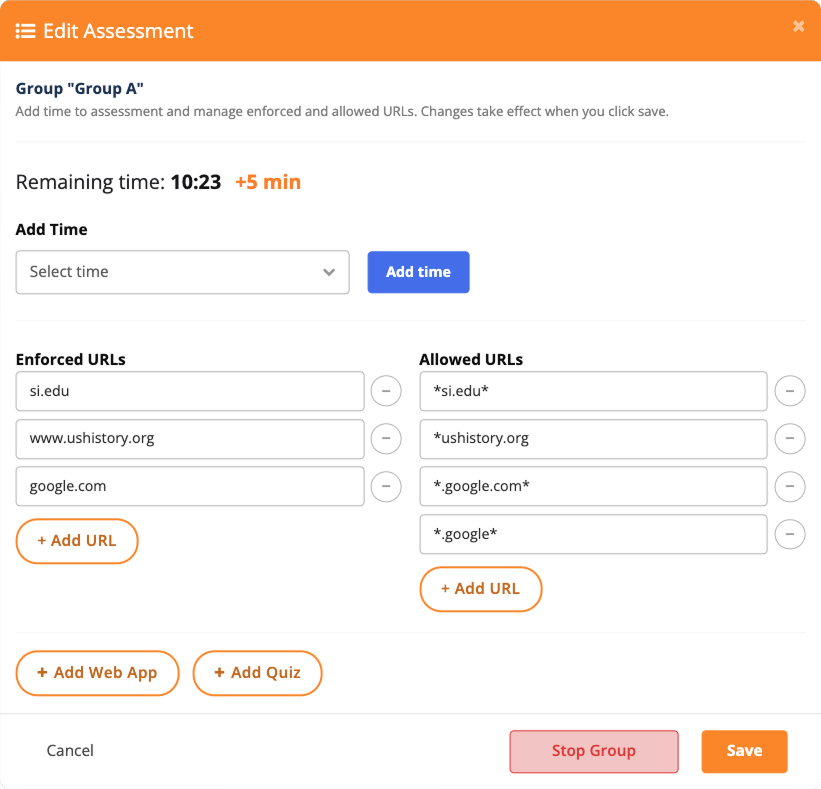
Click the
 button to apply the changes.
Click the
 button displaying student's name and remaining Assessment time to open the Edit Assessment window.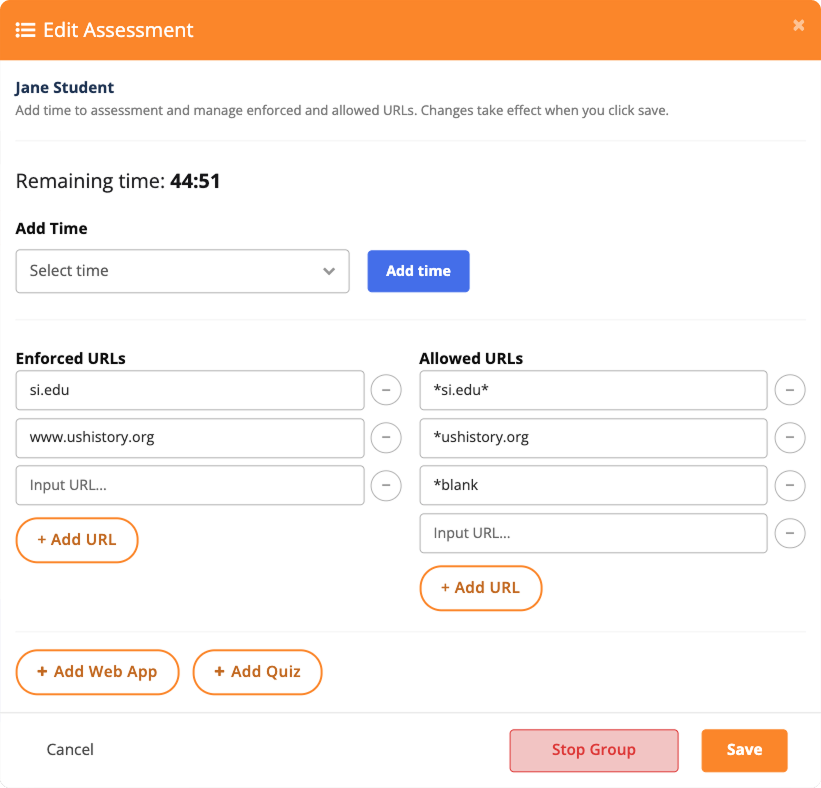
In the Add Time section, select additional time from the drop-down list, then click the
button.Add or remove URLs in the Enforced URLs and Allowed URLs sections. You can also add a Web App or a Quiz to the existing configuration.
Click the
button to apply the changes.
Tip
If you only need to change URLs without adding time, you can also click the  icon under the student's tile. The Assessment window opens for URL changes only.
An Assessment ends automatically as follows:
Whole class - The Assessment ends when the class session ends.
A specific group - The Assessment ends when that group's timer expires. All other groups continue until their own timers expire.
An individual student - The Assessment ends when that student's timer expires.
You can also end an Assessment early at any point, or carry them over to your next class if allowed by your Blocksi administrator.
Click the
button to open the Assessment window.Click the
 button at the bottom of the window to stop the Assessment.
Click the
button to open the Edit Assessment window.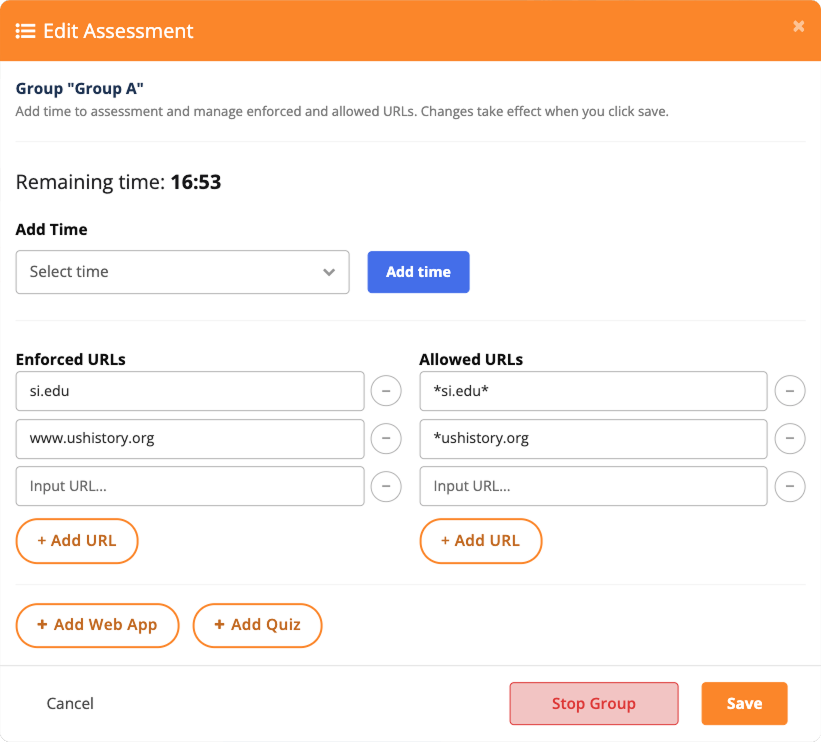
Click the
 button at the bottom of the window to stop the Assessment for the selected group.
Click the
button under a student's tile to open the Assessment window.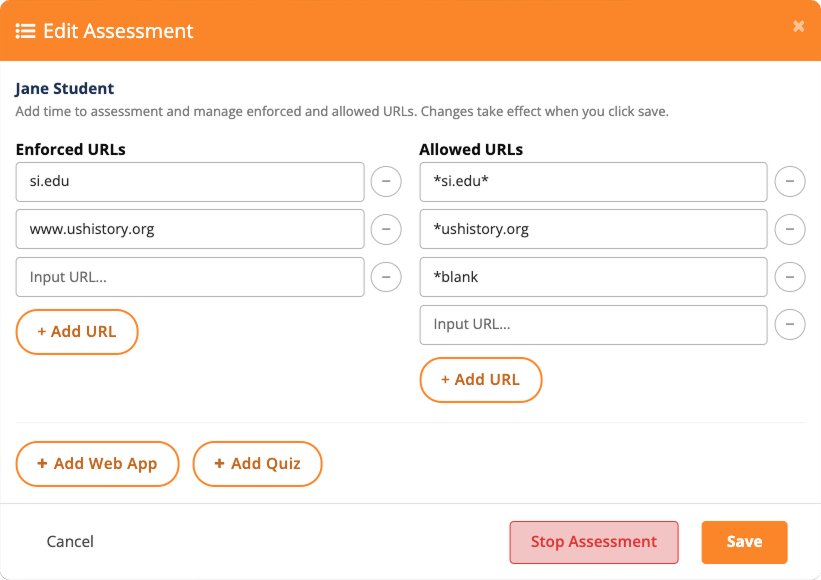
Click the
 button at the bottom of the window to stop the Assessment.
A group or an individual student whose timer runs past the end of the period is still in Assessment mode when the class ends. Rather than ending the Assessment for those students, you can continue monitoring them in the current class or transfer them into another one of your classes and keep monitoring them there. Because a student can only be in one Assessment at a time, students already in another teacher's Assessment cannot be transferred into your class.
Important
Extending an Assessment past the class session may be disabled. Contact your Blocksi administrator if you need it enabled.
When the class ends while an Assessment is still running, the Transfer students window opens. Transferring moves the students who are still in Assessment mode into a class of your choice.
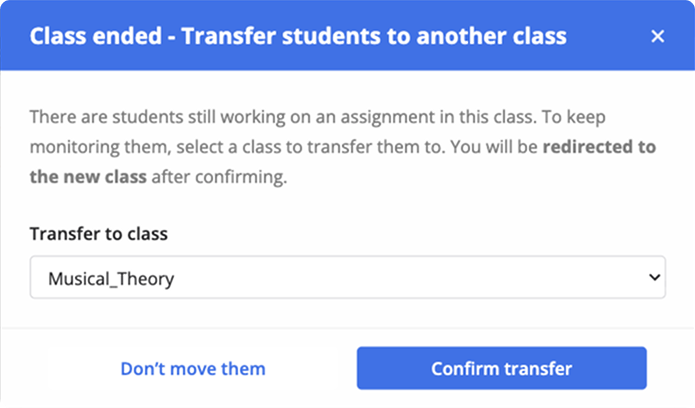
In the Transfer students window, select a class from the Transfer to class drop-down list, then click Confirm transfer. The students are moved into the selected class, and you are taken to the destination class automatically so you can continue monitoring them. The transferred students appear in a separate section at the top of the class view, above the class's own students.
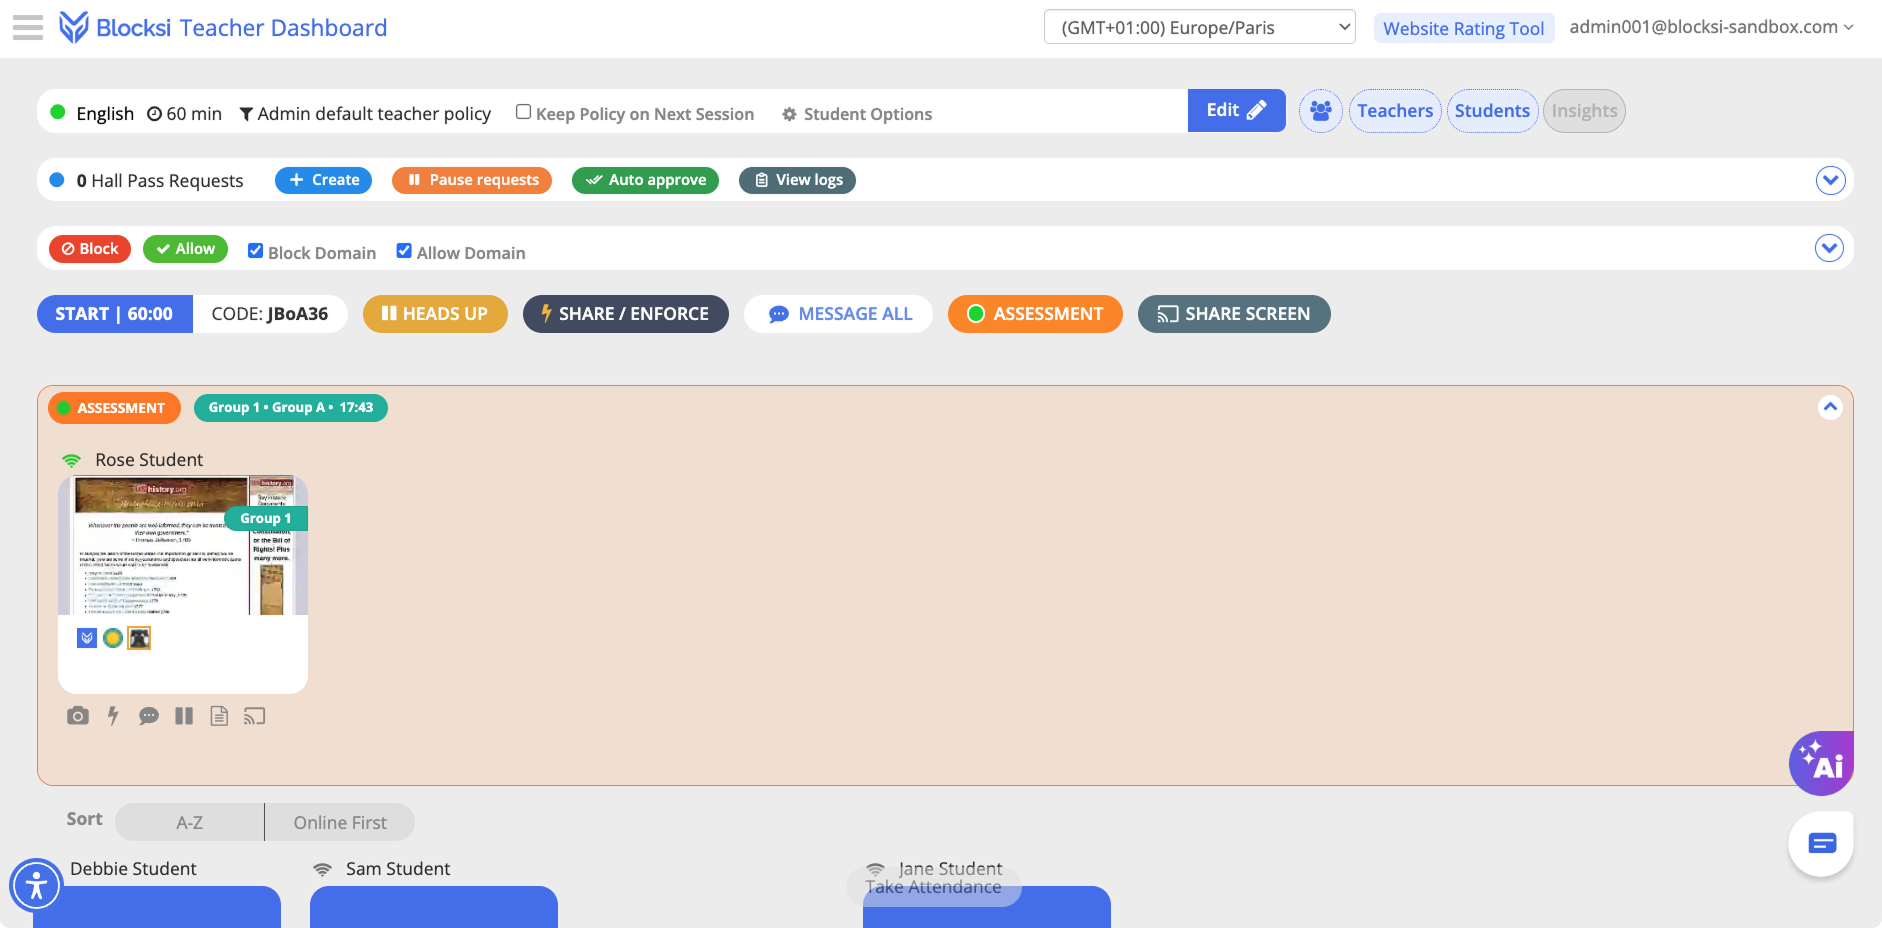
To leave the students where they are, click Don't move them instead. The students remain in the original class and stay in Assessment mode, and the Assessment banner and their tiles remain visible in that class even though the class is no longer running.
Note
You do not have to start the destination class to monitor transferred students. Their tiles and screens are visible as soon as the class opens, and their Assessment timer continues to run.
A student can only be in one Assessment at a time. If a student in your class is already in an Assessment started by another teacher, that Assessment continues to run and takes precedence in your class.
The student's tile displays the Student is in assessment, transferring to this class is unavailable overlay. The tile's action icons are unavailable while another teacher's Assessment is running.
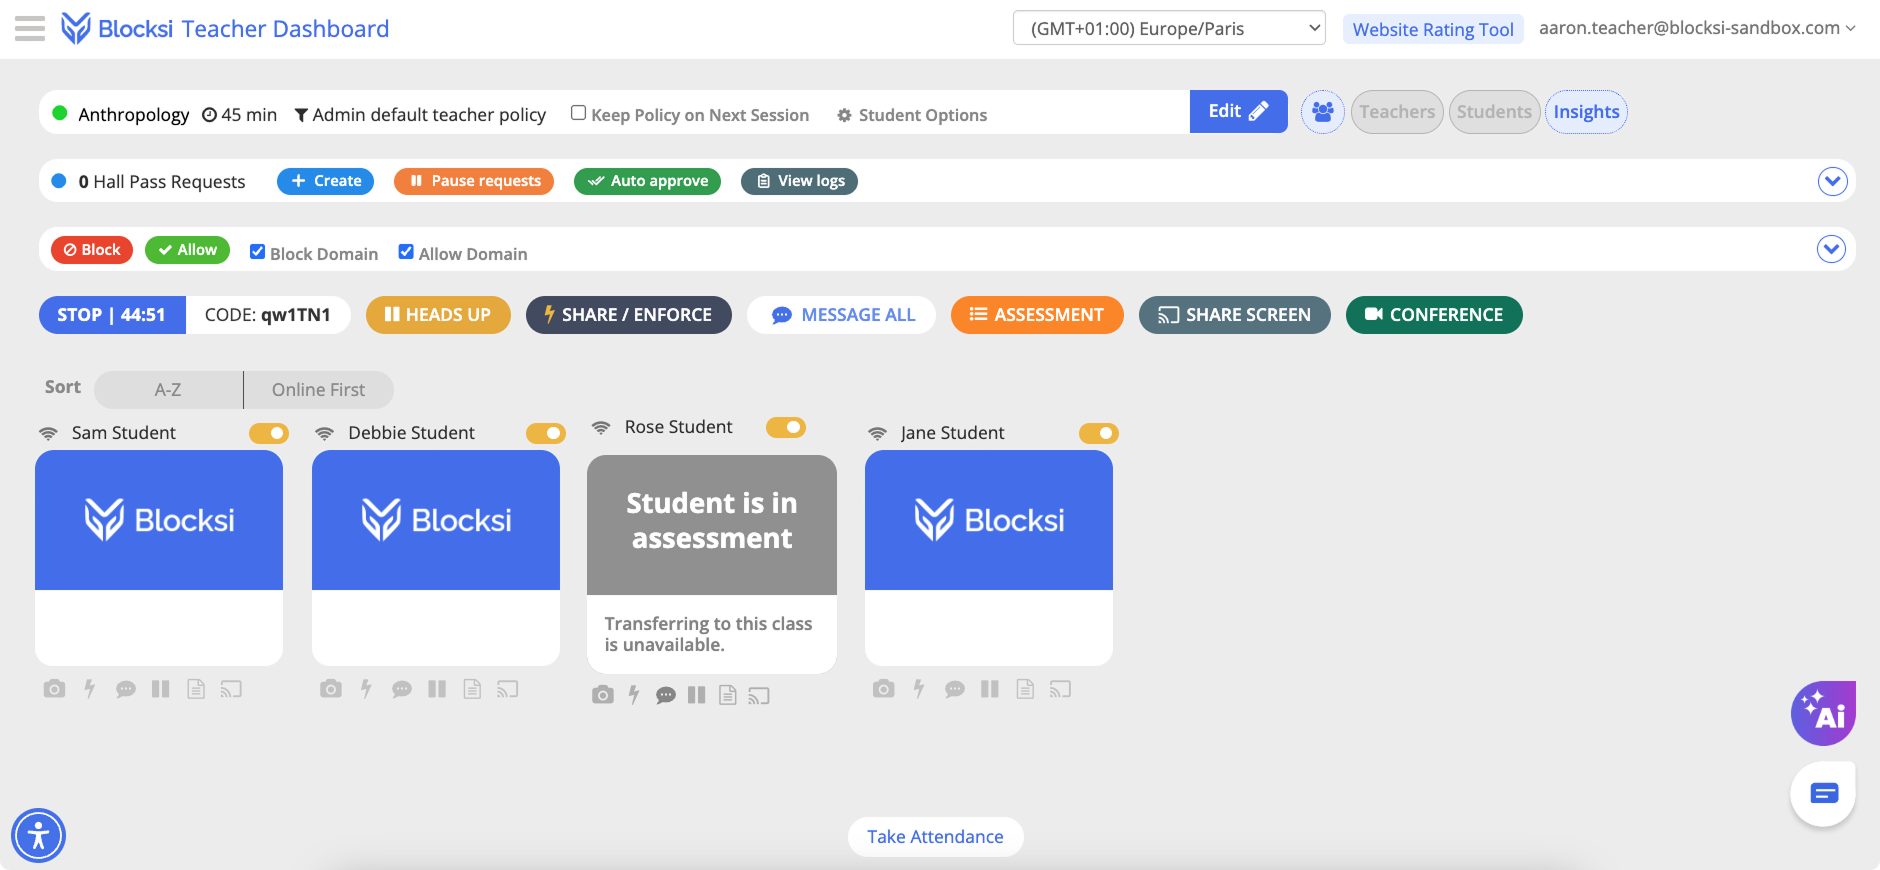
See the student's screen
Modify or stop the Assessment
Start a new Assessment for the student
Transfer the student into your class
The tile returns to normal when the other teacher's Assessment ends. If the student needs to be released from the Assessment, contact the teacher running it or your administrator.
An Assessment preset is a saved Assessment configuration you can reuse in any of your classes.
The enforced and allowed URLs
The audience - whole class, or the Assessment groups you selected
The duration set for each group
Note
Duration can only be set for specific groups.
Presets are especially useful for Assessments you run repeatedly, such as a weekly quiz on the same platform, or a standing configuration that includes a group for students with approved accommodations. You can also share presets with colleagues and import presets they share with you.
Once a preset is selected in the Load Preset drop-down list, use the following controls to rename, download, or delete it:
| Edit Preset | Renames the selected preset. |
| Save Preset | Downloads the selected preset to your computer as a file. Downloaded presets can be imported into Blocksi again, including by another teacher. Refer to Importing Presets. |
| Delete Preset | Deletes the selected preset. |


Important
Presets shared by your Blocksi administrator appear in the Load Preset drop-down list alongside your own, but unlike your own they store only the enforced and allowed URLs, so you configure the audience and duration yourself.
You save a preset as part of pushing out an Assessment, on the Review tab.
Configure an Assessment as described in Pushing Out an Assessment, then continue to the Review tab.
Select the Save this as a preset checkbox.
Enter a name in the Preset name field.
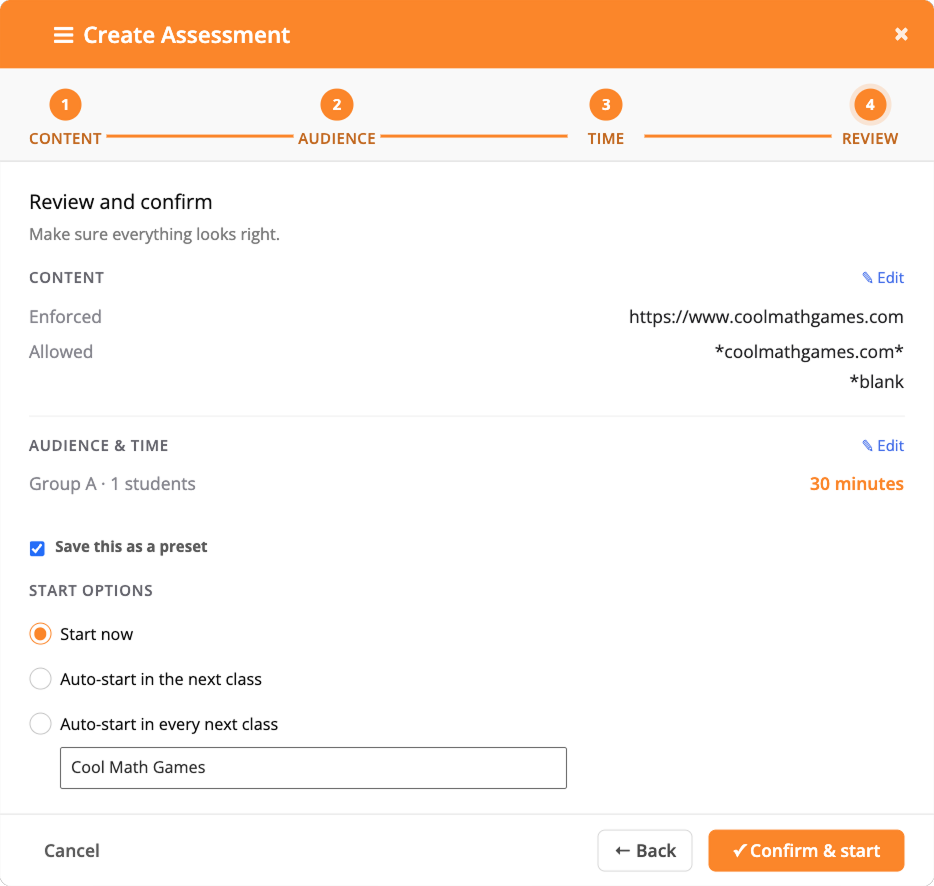
Click the
button. The Assessment preset is saved to your Load Preset drop-down list.
Note
The Save this as a preset checkbox is selected by default when you select either Auto-start in the next class or Auto-start in every next class under Start Options, and cannot be cleared.
You can import a preset that a colleague shared with you, or one you saved from another class. Importing is how teachers share presets directly with each other. Presets shared by an administrator appear in your Load Preset list automatically and require no import.
Click the
button in the class action bar. The Create Assessment window opens on the Content tab.Open the Select Preset drop-down list under Load Preset and select + Import new preset.
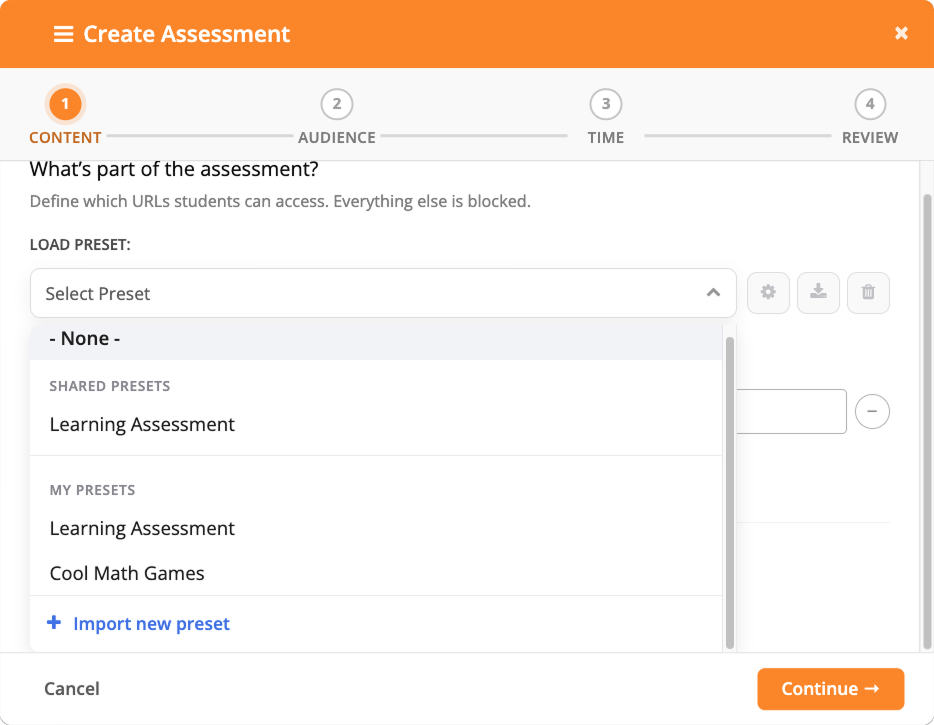
Select the preset file on your computer and confirm.
Continue the configuration as described in Pushing Out an Assessment.
Click the
button in the class action bar. The Create Assessment window opens on the Content tab.Select a preset from the Load Preset drop-down list.
Continue the configuration as described in Pushing Out an Assessment.
Presets shared by your Blocksi administrator appear in the Load Preset drop-down list alongside your own, but store only the enforced and allowed URLs, leaving you to configure the audience and timing.