AI Hub
Blocksi’s AI Hub provides a comprehensive suite of AI-powered tools designed specifically for educators. Maintain academic integrity with our Plagiarism Checker, which scans both text and files for copied material and potential AI-generated content. For seamless documentation, our Class Notes feature offers powerful classroom transcription and real-time recording. Additionally, the Learning Hub AI Shortcuts grant teachers quick access to industry-leading AI tools, including Google Gemini, MagicSchool AI, Knowt, SchoolAI, and Brainfreeze.
Other AI Tools
To access the AI Hub, open any class from the Teacher Dashboard. Then click the  in the lower-right corner of the screen.
Important
At least one student must be added to the class for the AI Hub icon to show on your Teacher Dashboard.
Plagiarism Checker
Blocksi's Plagiarism Checker ensures that students are not passing off published content and AI-generated text as their own. Using this tool helps to ensure that students are evaluated based on their own writing abilities. This tool compares writing submitted by a student against a vast database of existing content to analyze and identify similarities in structure, syntax, and semantics to detect any instances of plagiarism.
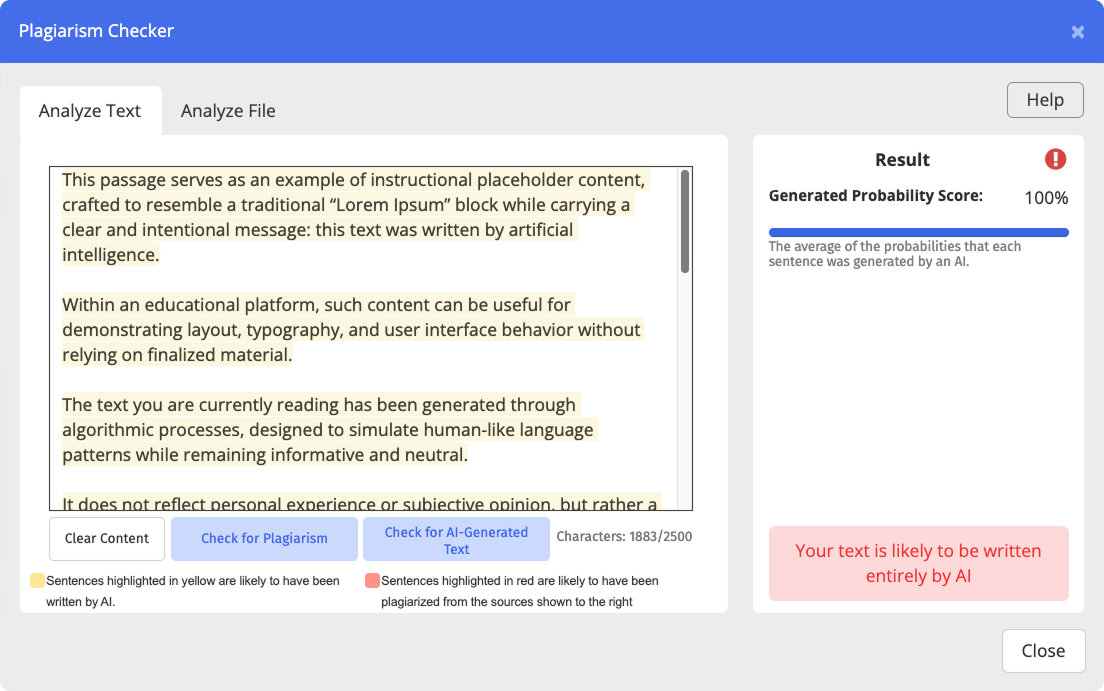
In seconds, the checker displays the results in percentages. When detecting plagiarism of published content, the sources plagiarized appear with links to the websites from which the student may have copied content. When detecting plagiarism of AI-generated text, the plagiarized text is highlighted in yellow.
Navigate to one of your classes by clicking on the class tile from the Teacher Dashboard.
Click the
button in the lower right corner of the screen, and click the  button.
Select your input method:
To check text: Stay on the Analyze Text tab and enter the text you want to check in the text box.
To check a document: Click the Analyze File tab, click in the Choose file field, and navigate to the desired file.
Important
Only .docx and .pdf formats are available for file analysis.
Click the Check For Plagiarism or Check For AI-generated Text button.
The results appear in the Result section to the right.
All possible sources from which the student may have copied the content appear to the right.
All text deemed likely written by AI is highlighted in yellow.
Quiz Generator
Blocksi's Quiz Generator uses AI to create quizzes.
Multiple choice
True/False
Short answer
Mixed answer
Each quiz can have 3, 5, 8, 10, 15, or 20 questions.
Navigate to your class by clicking on the class tile from the Teacher Dashboard.
Click the
button in the lower right corner of the screen, and click the  button.
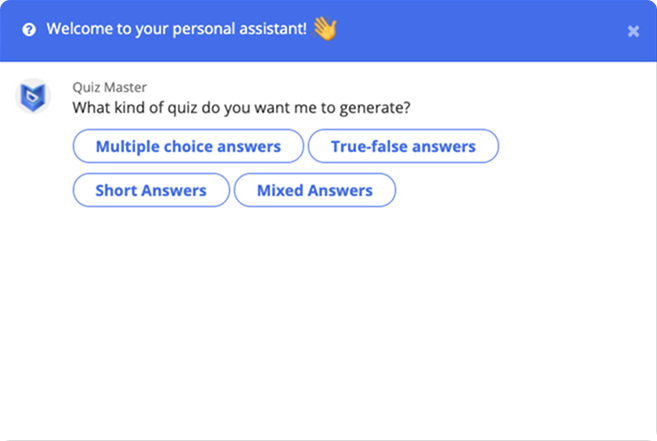
Configure your quiz by selecting the type of quiz, question count, grade level (1st–12th), and typing in your specific topic and subject the quiz is for.
Click the Generate Quiz button and wait for the content to populate.
Click Preview Quiz to review the material, then select Create Quiz in Google Forms.
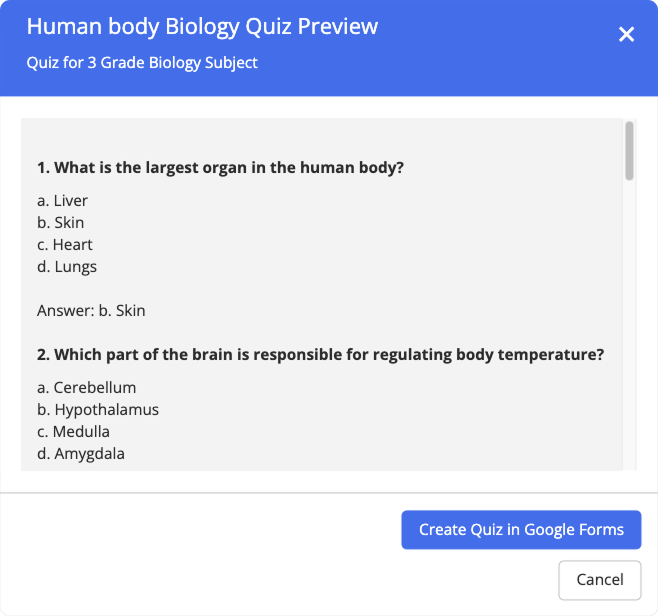
Click View Quiz to see your final options, such as opening the form, copying the link, or creating a live assessment.
Tip
If you plan to push the quiz out as a live assessment, your class must be running in Blocksi.
Class Notes
Blocksi Class Notes is an AI-powered classroom transcription and documentation tool, designed to reduce administrative burden, enhance learning accessibility, and provide comprehensive classroom record-keeping through automatic lesson transcription and summarization.
Teachers can configure Class Notes, start and end recordings, and export historically created notes through the Blocksi Teacher Dashboard.
Note
The Class Notes feature requires the teacher to have the Blocksi Teacher Extension deployed. The extension is available for Google Chrome and other Chromium-based browsers. To install the extension, contact your district administrator.
Class Notes can be enabled for each class separately through the AI hub.
Navigate to the class in which you want to enable Class Notes by clicking on the class tile.
Click the
button in the lower right corner of the screen, then click the  button.
Important
You must agree to the privacy and security notice before configuring Class Notes for the first time. This notice only appears upon first configuration and only needs to be accepted once, as it applies to all classes.
On first use, clicking Class Notes opens a voice recognition setup modal. Allow teacher.blocksi.net to use the microphone when prompted.
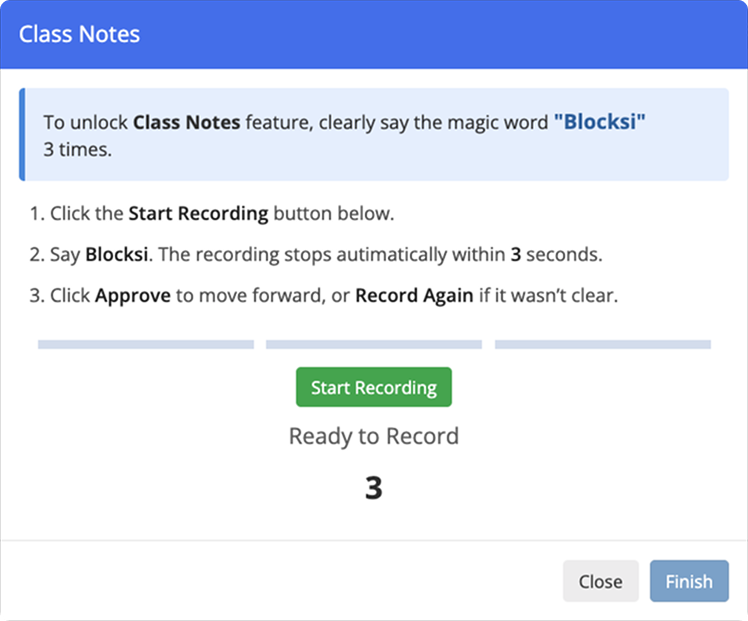
Click Start Recording and say "Blocksi." The recording stops automatically after 3 seconds. You can listen to each recording and confirm it before proceeding to the next.
Repeat the process until you have recorded yourself saying "Blocksi" three times in total, then click Enable Class Notes Feature.
Tip
If you want the recording to start automatically when the class starts, check the Begin Class Notes Immediately When Class Starts option.
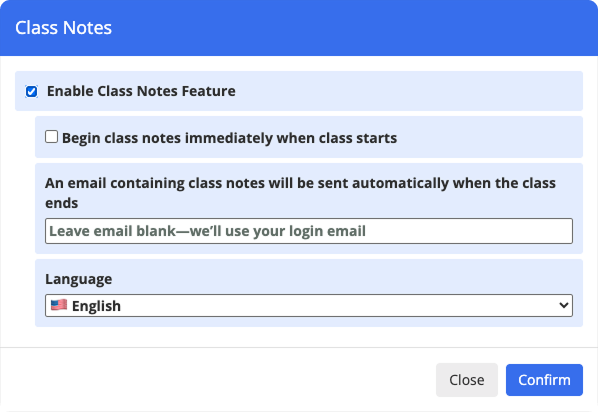
Class Notes are sent to the email address you are signed in with by default. To send them to a different recipient, enter their email address in the email box.
Select the language the class is taught in from the Language drop-down menu. This is required for the AI to accurately transcribe the audio recording.
Note
The following languages are currently supported: English, French, Spanish, Portuguese, German, Dutch, and Italian.
Click Confirm.
Class Notes are automatically generated during class sessions and compiled into PDF reports containing summaries, keywords, and key points. After audio is captured using the Teacher Extension, it is transcribed and analyzed by the AI. This typically takes a few minutes after the class session ends, after which the PDF is automatically sent to the configured email address.
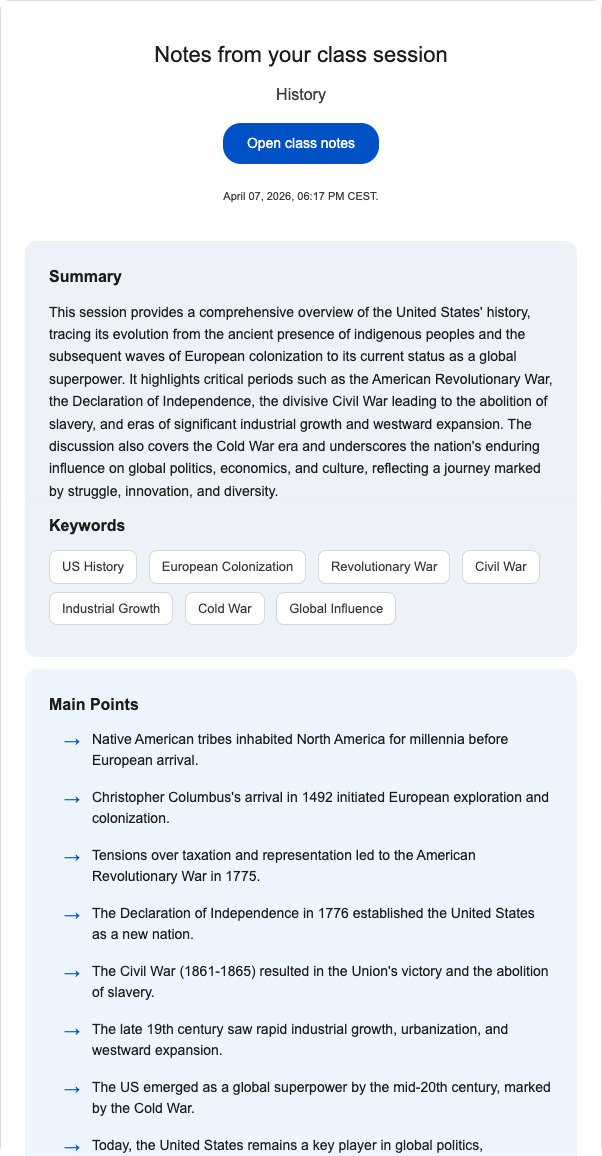
The Class Notes PDF is sent to the teacher's email address with the subject line "Your Class Notes are Ready." The body of the email includes a short summary of the lesson and an attached PDF.
Class Notes title in the header
Date and time of the class session
Class name
A summary
Keywords
Bulleted main points
Note
The email is typically delivered within 5 minutes of the class session ending.
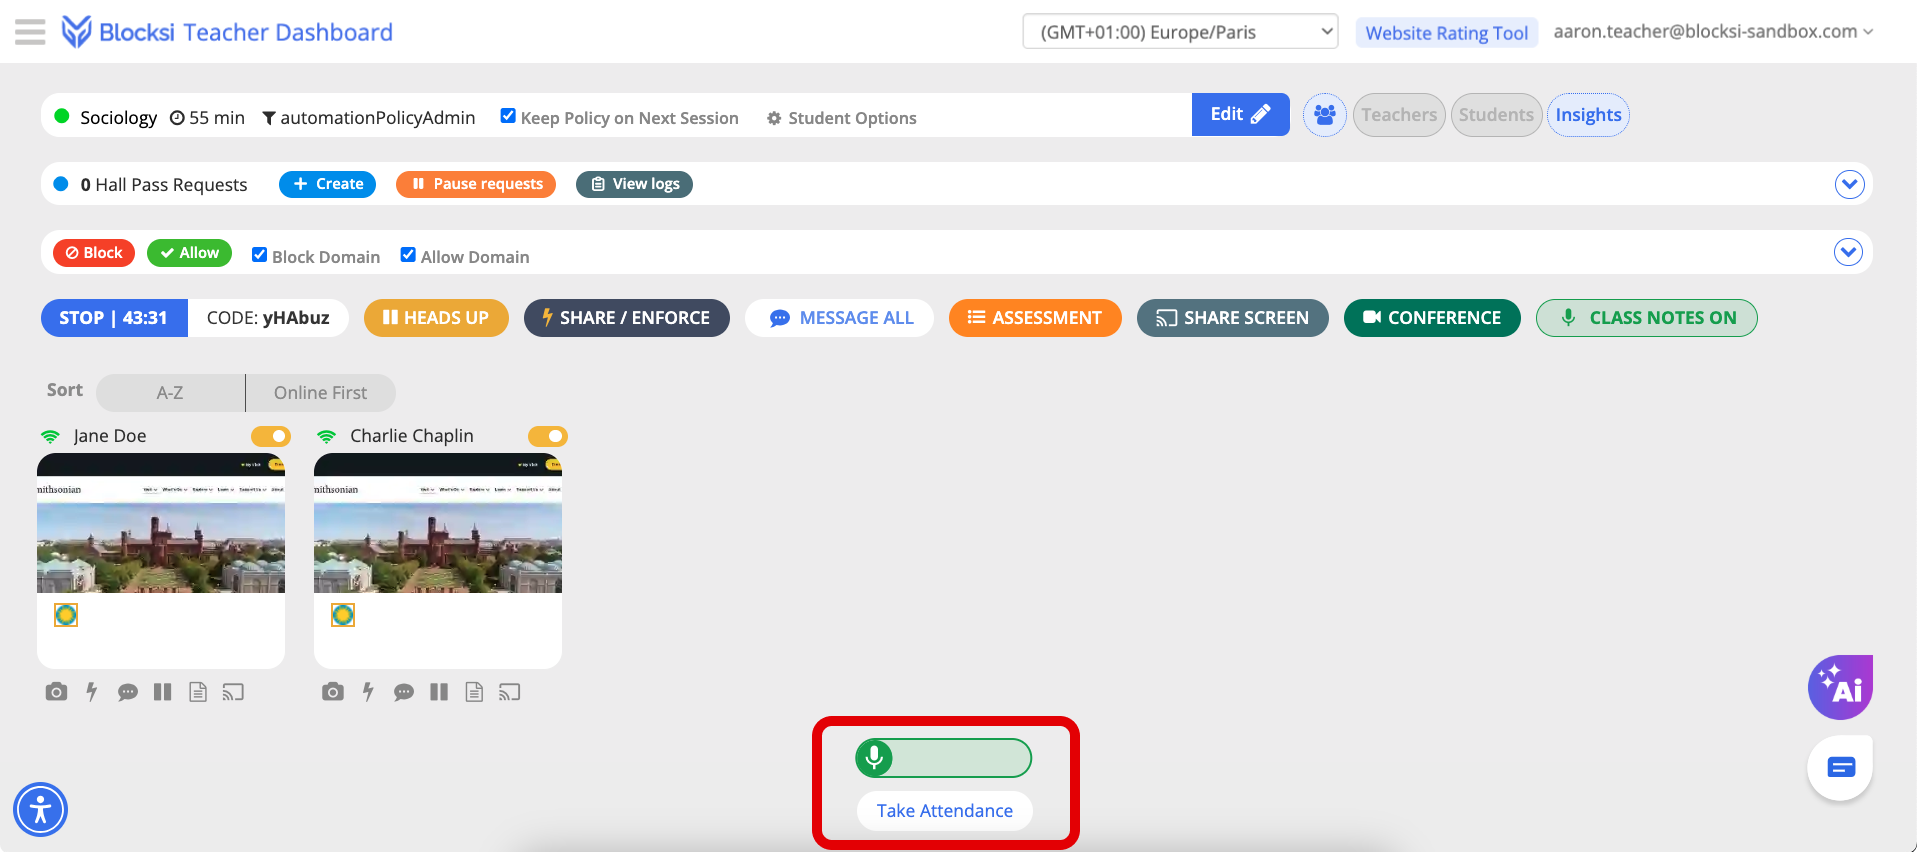
After the Class Notes feature is enabled (refer to the Enabling Class Notes section for help) a Class Notes button appears in the quick actions section of the Teacher Dashboard.

Note
When Class Notes is enabled, a voice input bar appears above the Take Attendance button at the bottom of the class view, indicating whether your microphone is currently muted or unmuted.
Ensure the class session is currently active.
Click the
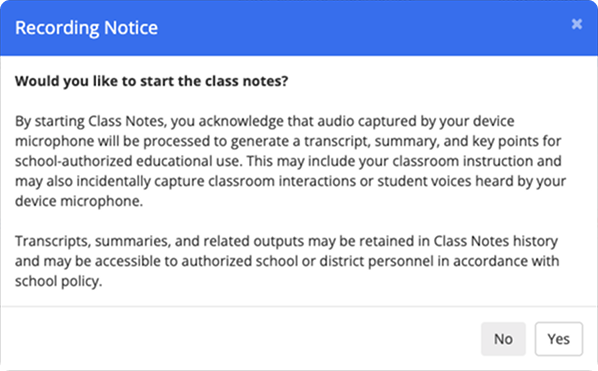
 button. A confirmation prompt appears.
Click Yes to start recording.
Important
You will be presented with a recording notice each time you activate Class Notes (once per active class session).
Ensure the class session is currently active and that Class Notes is currently recording.
Click the
 button. A confirmation prompt appears.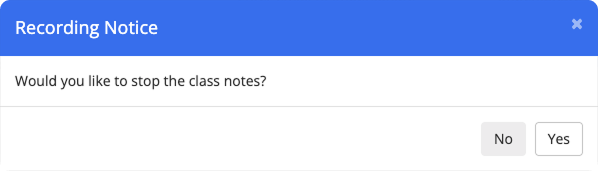
Click Yes to stop recording.
Important
Class Notes are linked to individual class sessions.
Teachers can access their Class Notes history directly from the class tile on the Teacher Dashboard.
On your Teacher Dashboard, click the Notes button inside the class tile.
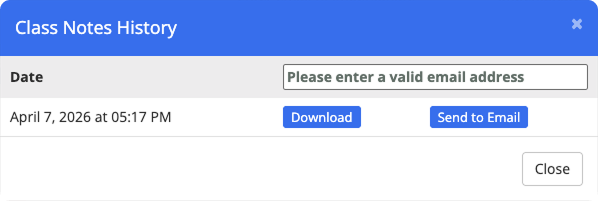
The Class Notes history modal opens, showing the following information:
Date and time of recording.
An option to download the selected Class Notes to PDF.
An option to send the selected Class Notes to email.
Note
If no Class Notes are available, the modal will display a "Class notes history is empty" message.