Creating Alert Profiles
Accessing the Alerts screen.
Giving the alert profile a name.
Selecting the severity of the alert and the duplicate notification delay.
Adding the recipients to notify of the alert.
Setting the conditions for the alert.
Optional Steps
Setting a schedule for the alert.
Indicating whether alerts about specific OUs, students, or locations should be sent.
Setting student alert thresholds.
Important
You must complete both the Notifications and Alerting Conditions sections to save the alert profile.
Warning
Blocksi recommends that you click the Save Changes button at the bottom of the screen frequently to ensure that your changes are saved. If you leave the configuration page, some or all your changes may be lost.
Click Student Safety from the Main Menu and then click Alerts from its sub-menu. The Alerts screen appears.
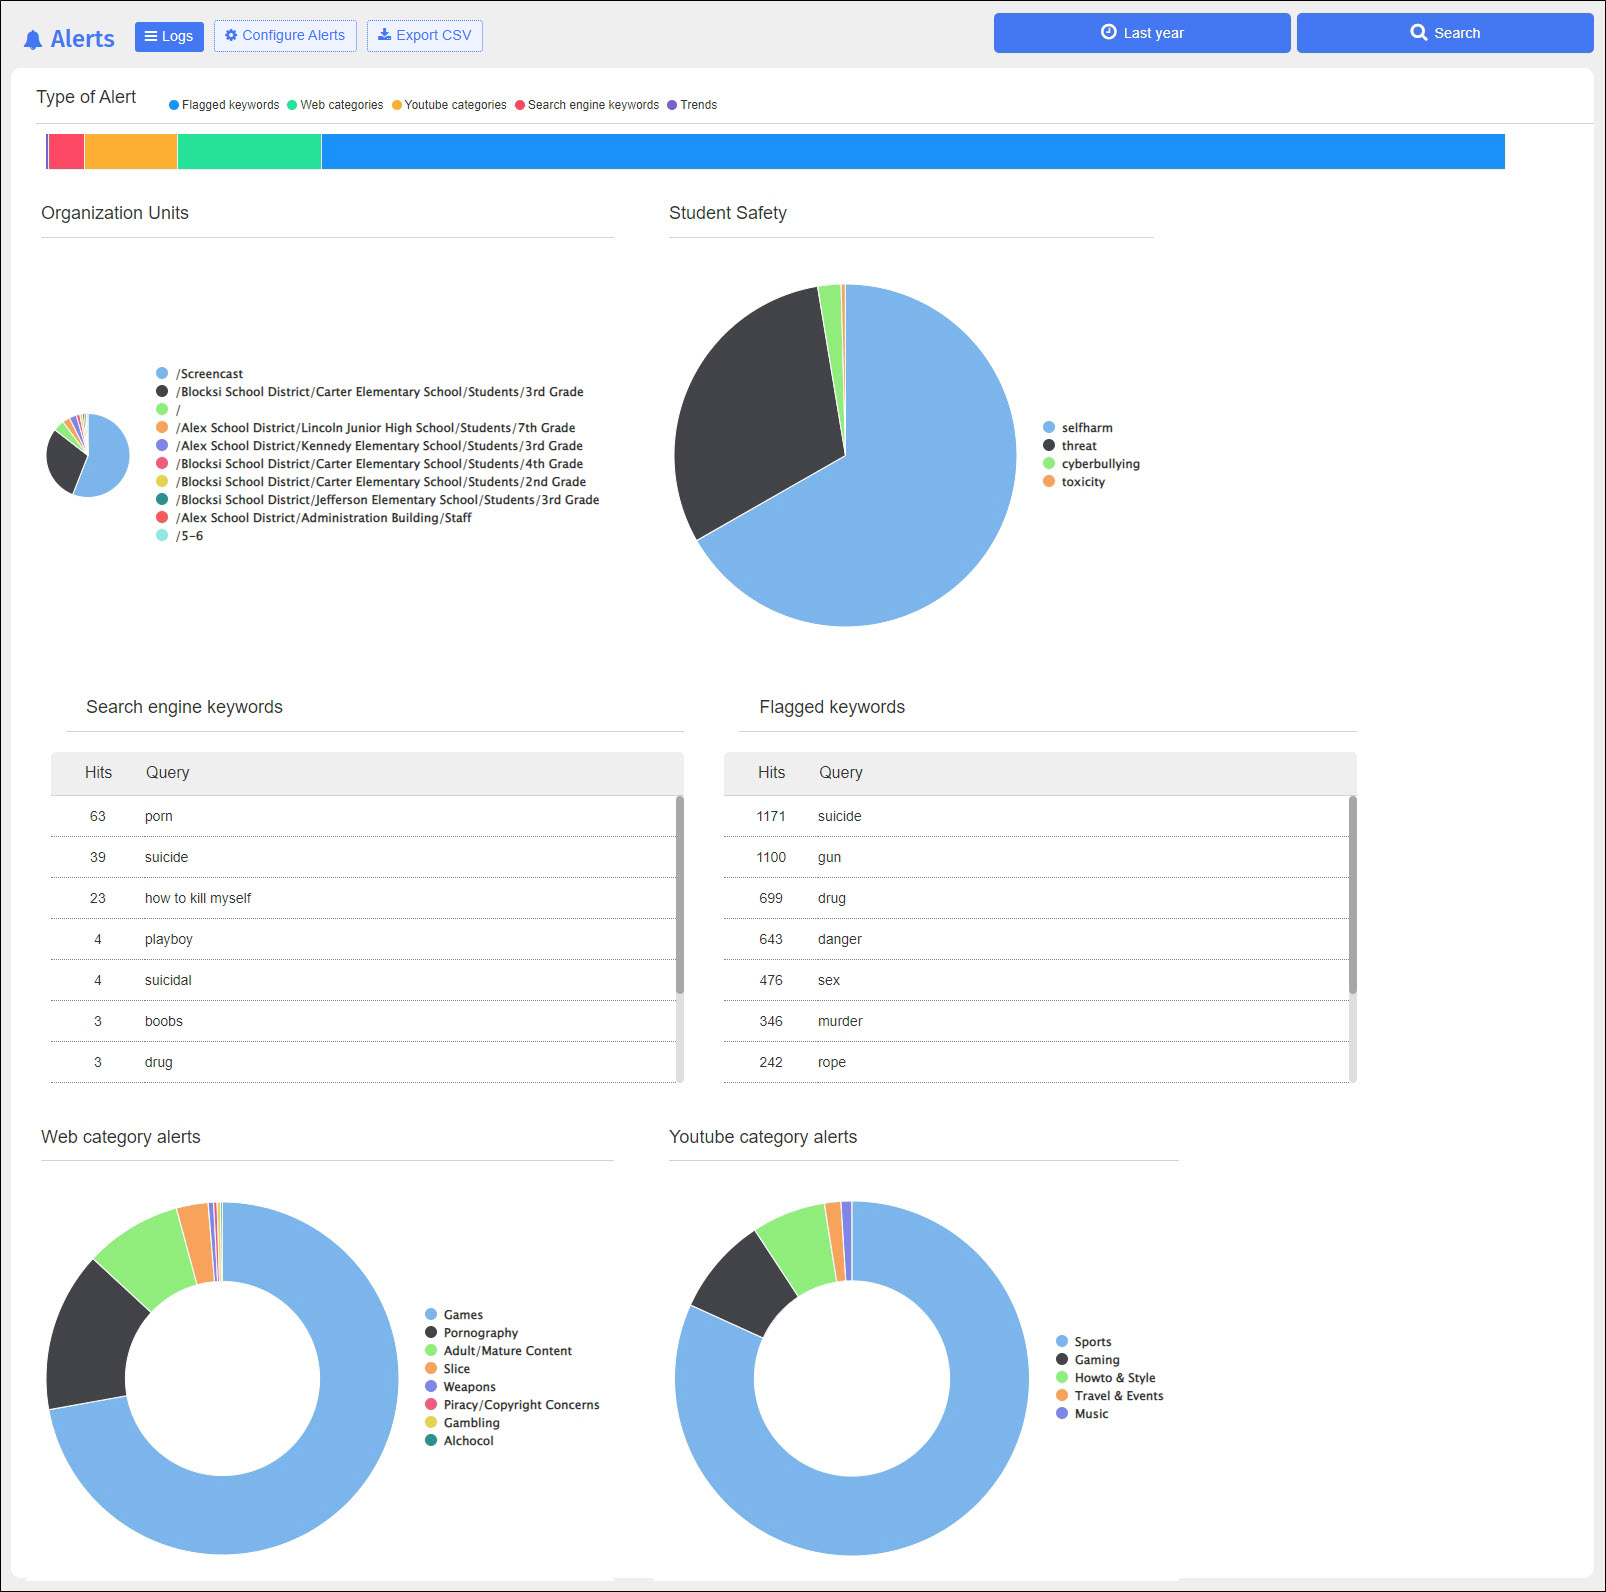
Click Configure Alerts. The Alerts > Configure Alerts screen appears.
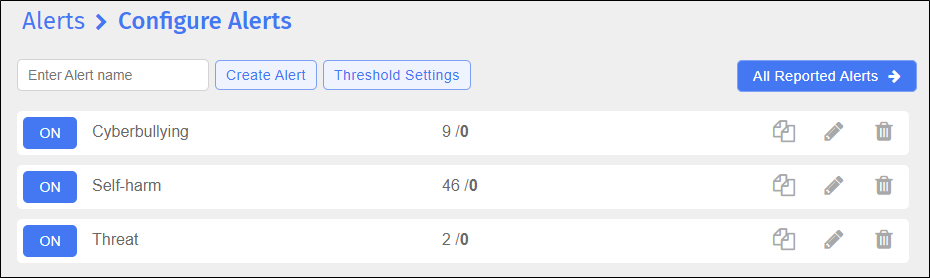
Type the name of the alert profile in the Enter Alert name text box.
Click Create Alert. The following page appears. Change the name of the alert profile on this page, if needed.
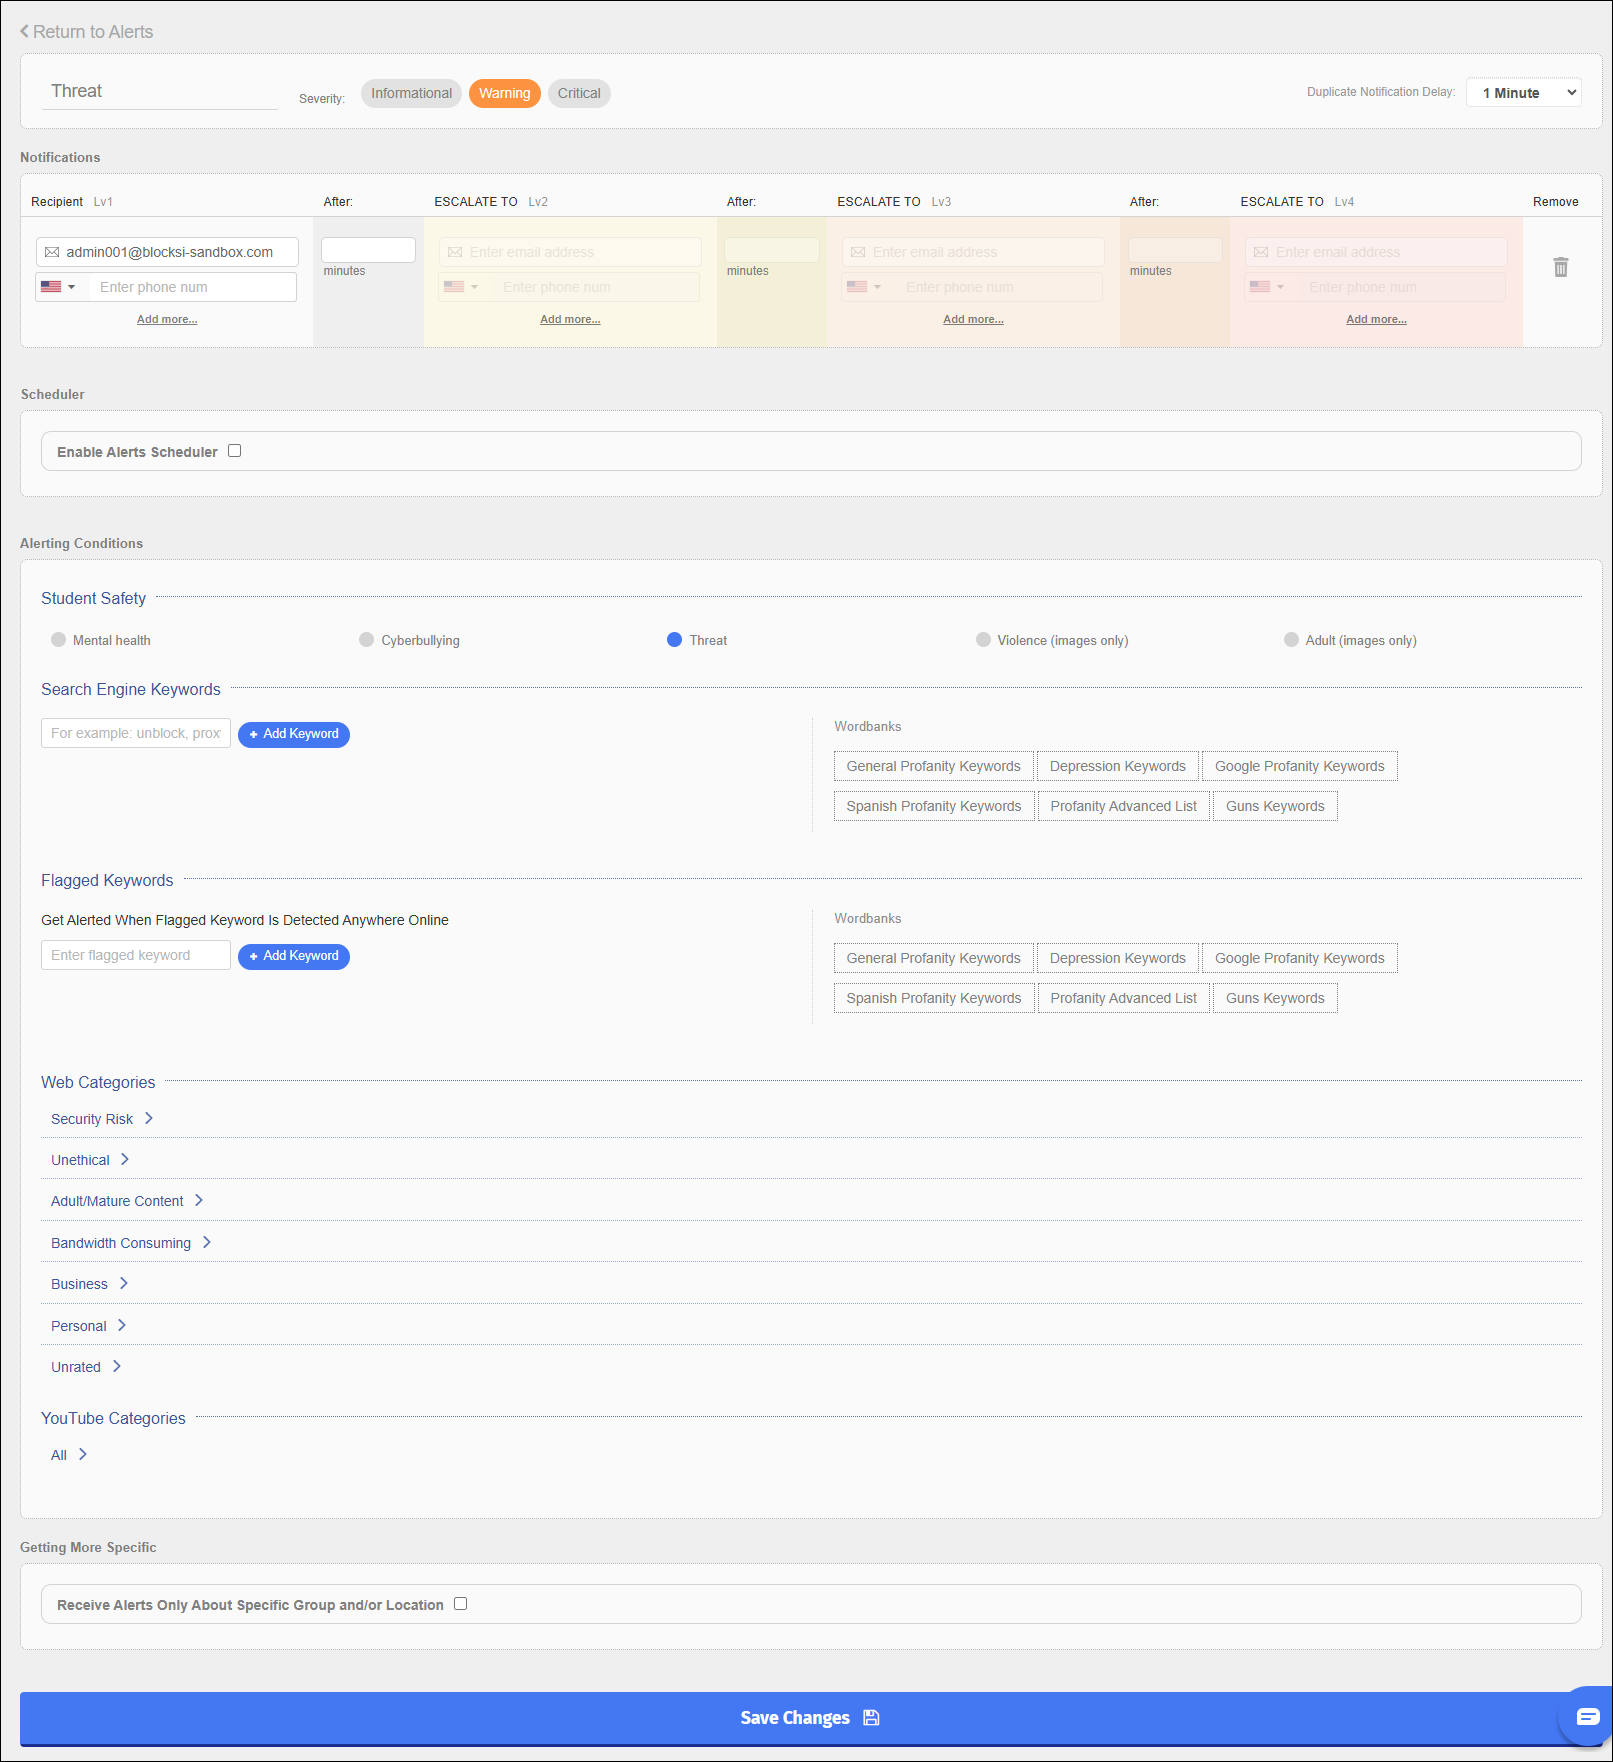
Select the severity of the alert. The choices are Informational, Warning, and Critical. These alert severities are user-defined.

Select the number of minutes from the Duplicate Notification Delay drop-down list during which notifications for this alert are deemed duplicate alerts. After this time period elapses, notifications for this alert are no longer considered duplicates.
You add the recipients of the alert in the Notifications section. These are the individuals who are contacted in real time when an alert is generated. Add up to four levels of notification.
When the alert is triggered, attempts are made to reach each of the recipients in the Level 1 section in the order you have entered them. To ensure that someone is contacted in the event no one in Level 1 responds, enter additional recipients in up to three more levels of notification. Define a time, in minutes, that must expire for each level before escalating the alert to the next level.
Click inside the email or phone number text box in the Recipient Lv1 section and type the email address or phone number of the first person to notify when this alert is triggered. You do not have to enter both, but you must enter one or the other. Click the Add more... link to add more than one individual to Level 1. Recipients in each level are called sequentially. Add an unlimited number of recipients to each level.

Type the number of minutes that the person or persons you added in Level 1 have to respond before escalating the notification to Level 2. As mentioned earlier, add up to four levels of recipients.
To generate an alert, you must set conditions for the alert. Click a topic below to see more about that section. You must select at least one classifier in the Student Safety section to generate alerts.
Select from the following classifiers to generate an alert.

Mental health
Cyberbullying
Threat
Violence (images only)
Adult (images only)
Enter keywords that generate an alert when they are searched for in a search engine.

Enter your own keywords or select words from six different wordbanks.
Type the keyword to generate the alert in the text box.
Click Add Keyword +. The word appears below the text box.
Click one of the six wordbank buttons: General Profanity Keywords, Depression Keywords, Google Profanity Keywords, Spanish Profanity Keywords, Profanity Advanced List, or Guns Keywords. A list of words appears.
Select the checkboxes for the words to monitor. You can select multiple words from multiple lists for the same alert.
When you have finished, click Close.
Enter keywords that generate an alert when they appear on websites.

Enter your own keywords or select words from six different wordbanks.
Type the keyword to generate the alert in the text box.
Click Add Keyword +. The word appears below the text box.
Click one of the six wordbank buttons: General Profanity Keywords, Depression Keywords, Google Profanity Keywords, Spanish Profanity Keywords, Profanity Advanced List, or Guns Keywords. A list of words appears.
Select the checkboxes for the words to monitor. You can select multiple words from multiple lists for the same alert.
When you have finished, click Close.
You can select one or more web categories that generate an alert when a student attempts to or visits a site in that category.
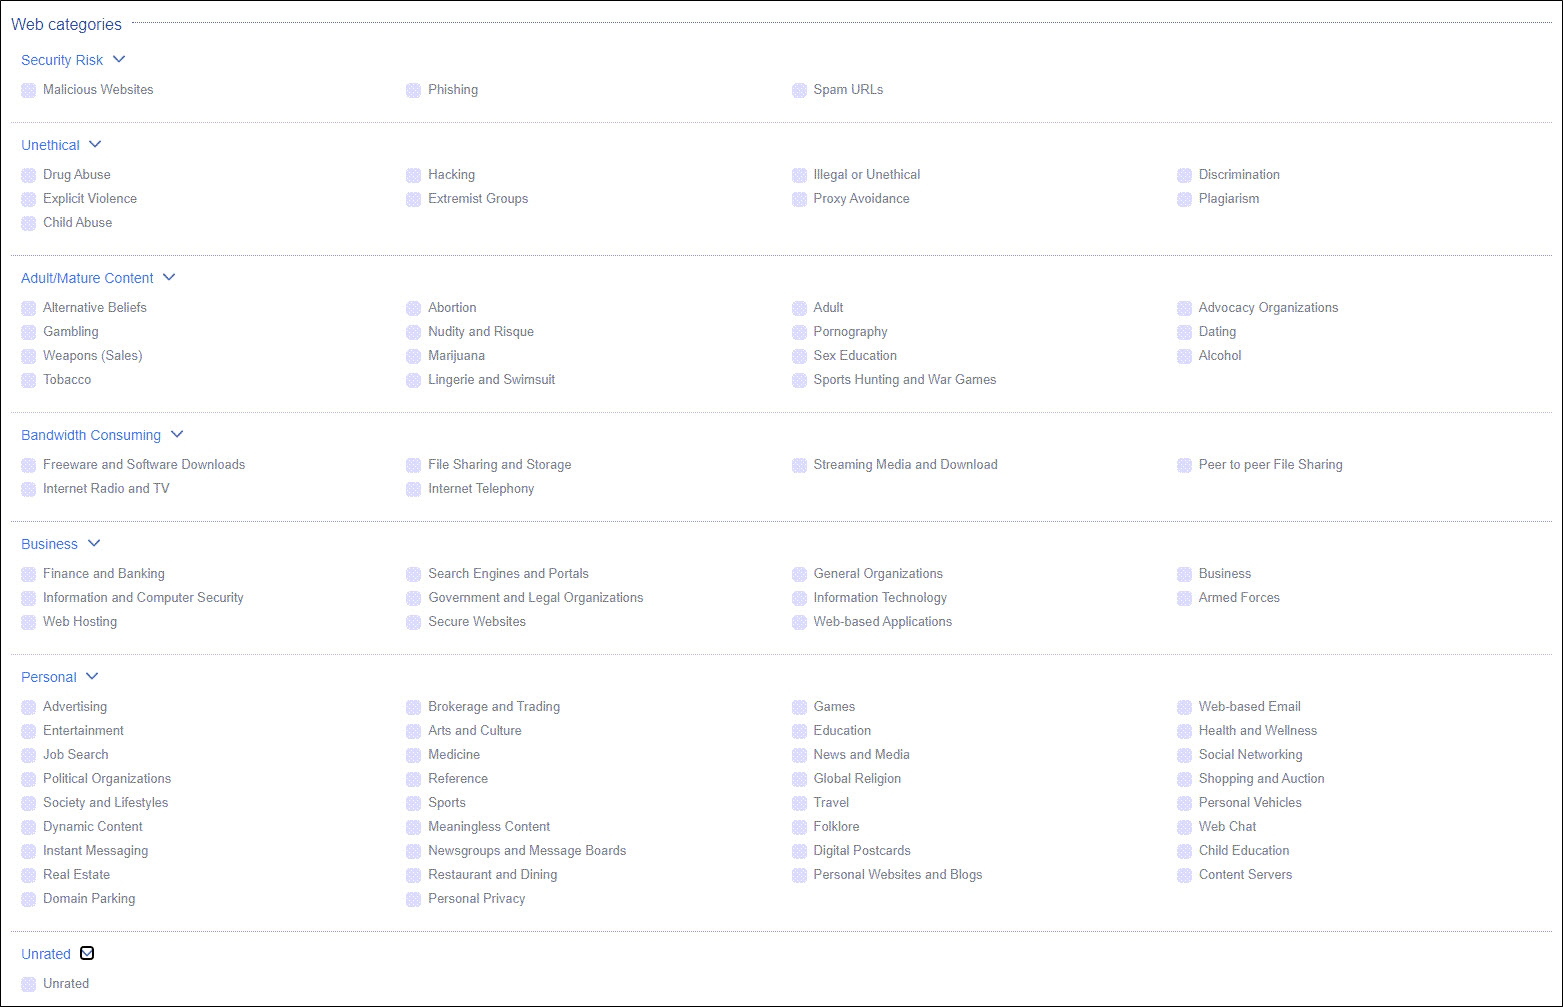
Click the arrow to the right of the web category types. The listing of categories for that website type appears. Select all web category types to depict the range of website categories that you can search with Blocksi.
Select the checkboxes for the website categories to monitor. You can select multiple categories from multiple types for the same alert.
When you have finished, click Close.
You can select one or more YouTube categories that generate an alert when a student attempts to or watches a video from that category.

Click the arrow to the right of the YouTube category types. The listing of categories for that YouTube category type appears. Select all YouTube category types to depict the range of YouTube categories that you can search with Blocksi.
Select the checkboxes for the YouTube categories to monitor. You can select multiple categories from multiple types for the same alert.
When you have finished, click Close.
When you have finished configuring your alert, click the Save Changes button at the bottom of the page.
Add up to three emergency contacts. Emergency contacts are the people called when a student is in danger.
Add emergency contacts to a master list or to an individual alert.
Click Student Safety from the Main Menu and then click Alerts from its sub-menu. The Alerts screen appears.
Click Configure Alerts. The Configure Alerts page appears.
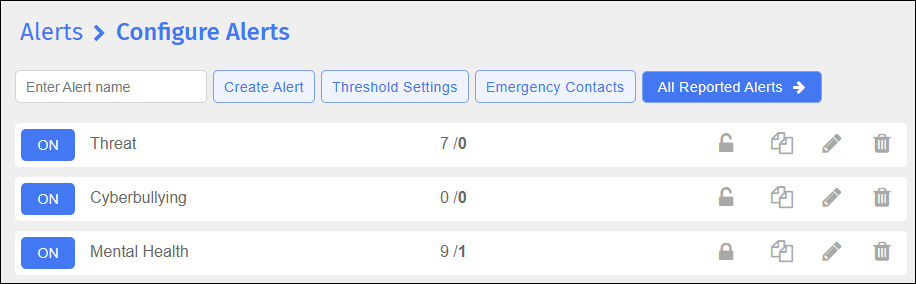
Click Emergency Contacts. The Emergency Contacts window opens.
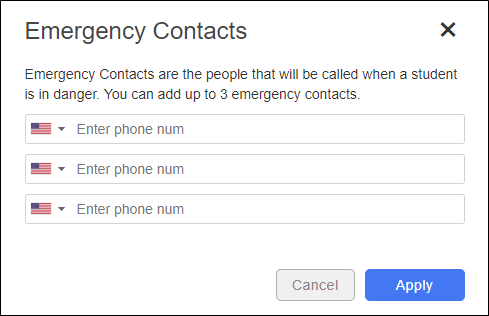
Type up to three emergency contacts in the fields provided.
Click Apply when you are done.
When you have finished, click the Save Changes button at the bottom of the page.
Click Student Safety from the Main Menu and then click Alerts from its sub-menu. The Alerts screen appears.
Click Configure Alerts. The Configure Alerts page appears.
Look for the alert to which to add the contacts, and click the
 icon (or create a new alert). The Edit screen appears.
Type up to three emergency contacts in the fields provided in the Emergency Contacts section. These apply to this specific alert. Click the Copy from Master button to copy the contacts from the master list of emergency contacts.
When you have finished, click the Save Changes button at the bottom of the page.
Use the Alerts Scheduler to set up notification days and times for alerts.
Regular Alert Schedule
After Hours Alert Schedule
Alert Schedule Exceptions
Click Student Safety from the Main Menu and then click Alerts from its sub-menu. The Alerts screen appears.
Click Configure Alerts. The Alerts > Configure Alerts screen appears.
Locate the alert to schedule, and click the
icon. The Edit screen appears.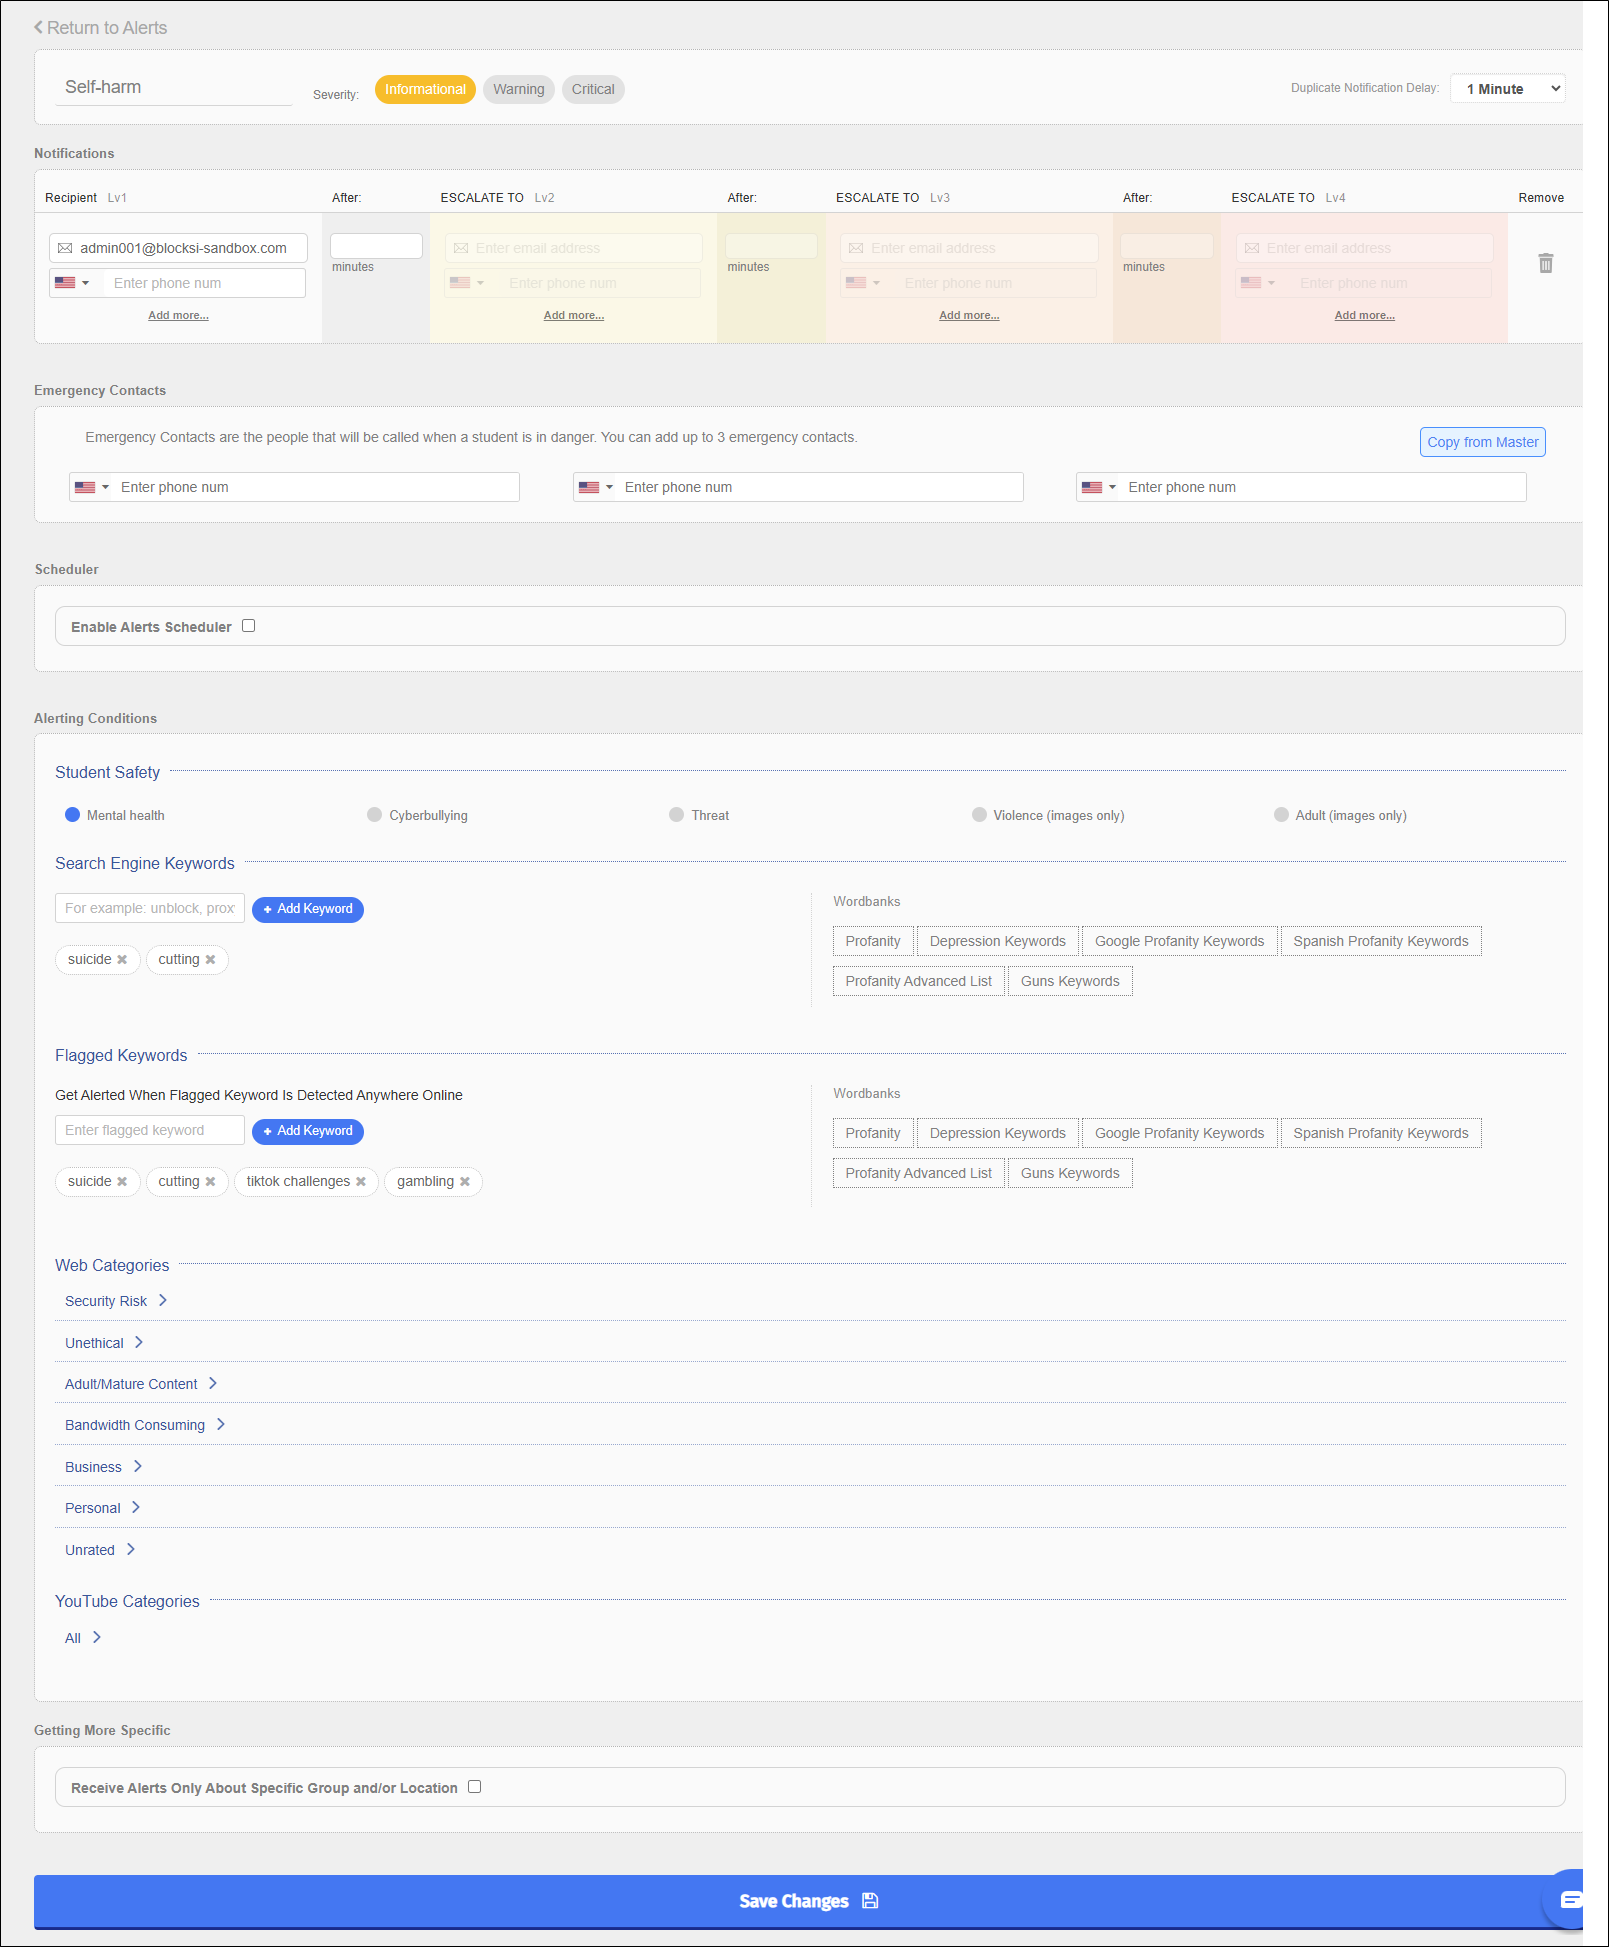
Select the Enable Alerts Scheduler checkbox. The screen expands to display the scheduler.
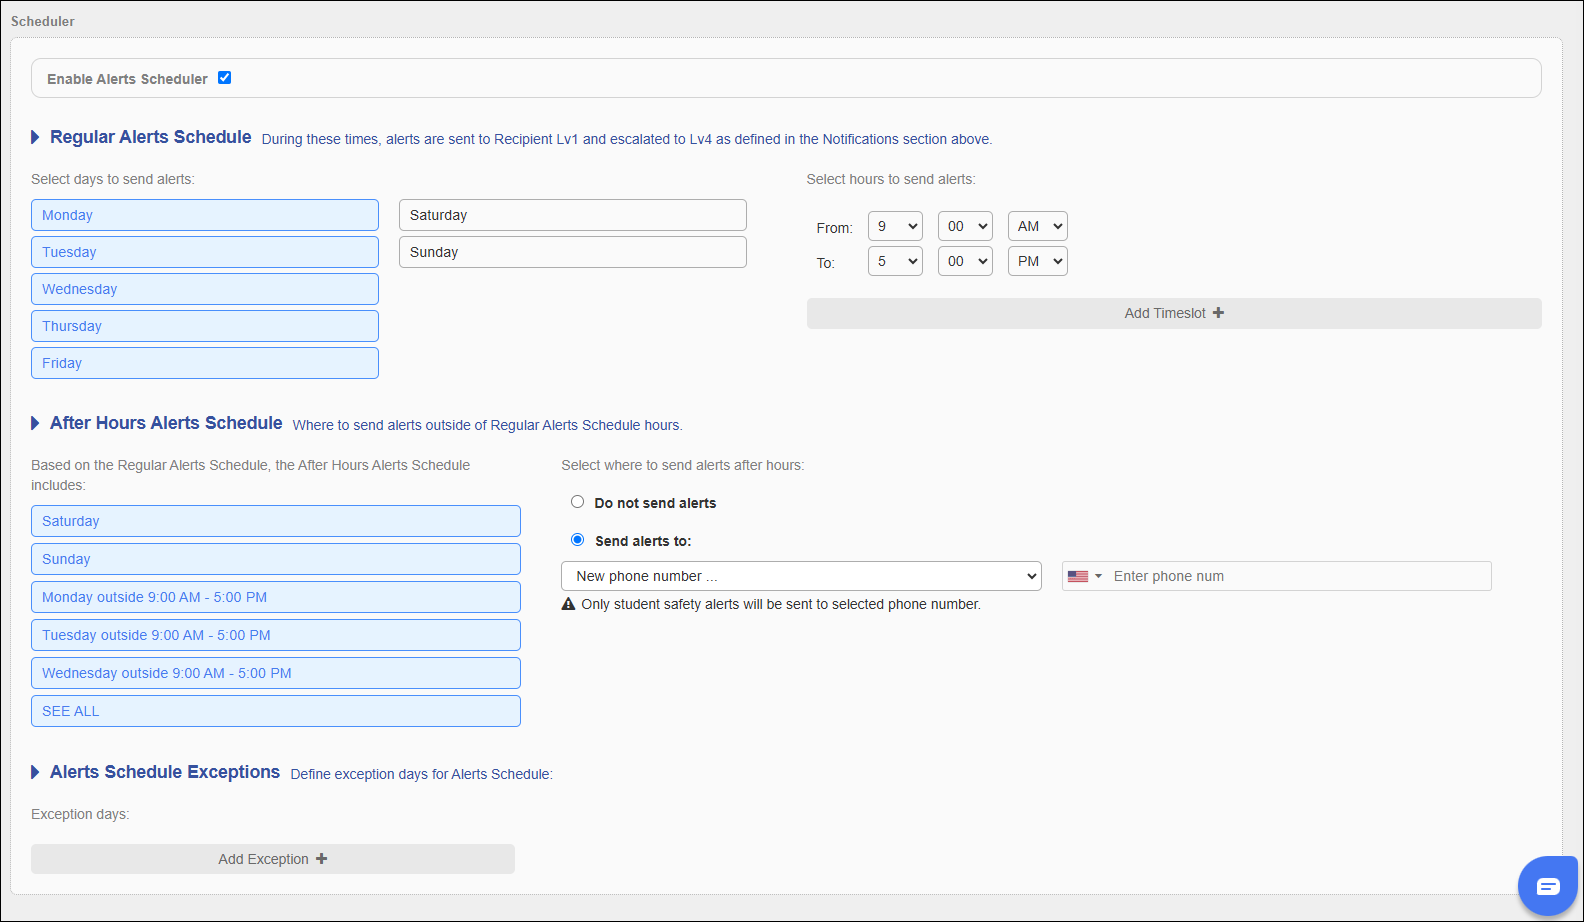

Select the alerting days.
Select the alerting hours. Click Add Timeslot + to add an additional timeslot. On the days and during the times you select in this section, alerts are sent to the recipients defined in the Notifications section.
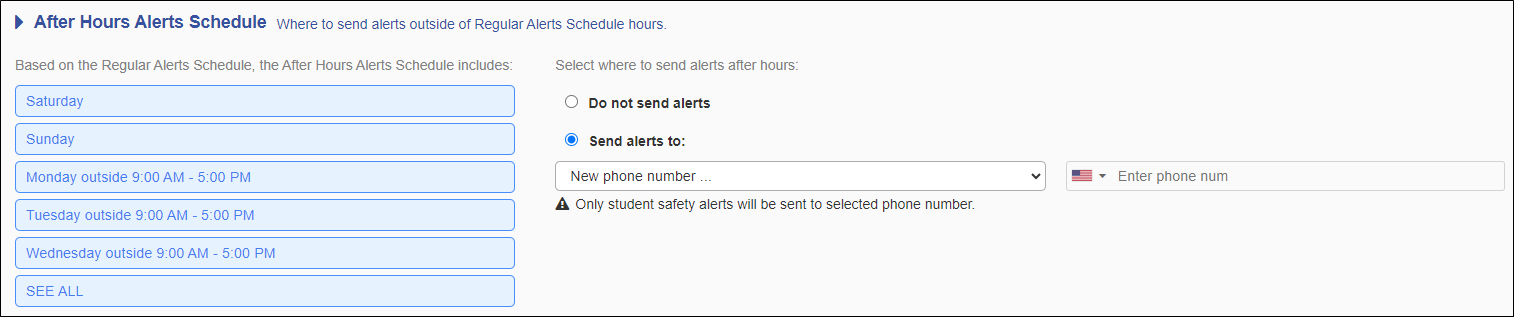
The days and hours available here depend on the days and times you selected in the default alert schedule. For instance, if you selected Monday, Wednesday, and Friday between the hours of 9am to 5 pm, then the selections available here include the following: Tuesday, Thursday, Saturday, and Sunday, and Monday, Wednesday, and Friday outside the hours of 9am to 5pm.
Select the after hours alerts schedule.
Select where the alerts should be sent after hours. Designate a new phone number, new email address, or a specific parent.
Click Add Exception +. The following window opens.
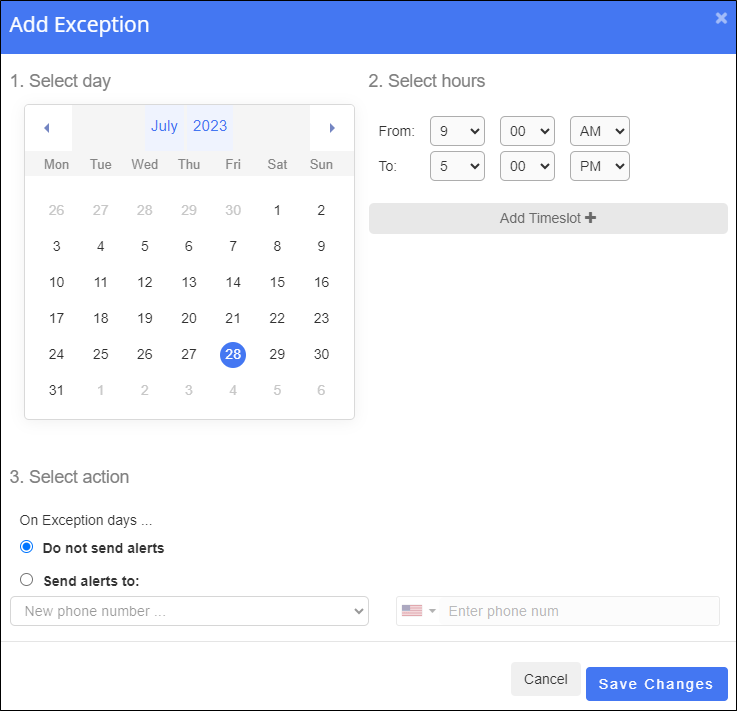
Select the exception day.
Select the exception hours. Add a timeslot if needed.
Select what happens during the selected times on the selected days. Choose to whom to send alerts or choose not to send any at all.
When you have finished, click the Save Changes button at the bottom of the page.
Request that alerts are sent when triggered from within specific OUs, for specific students, or occur when students are in or out of school.
Select the Receive Alerts Only About Specific Group and/or Location checkbox in the Getting More Specific section at the bottom of the page. The section expands to display the following options.
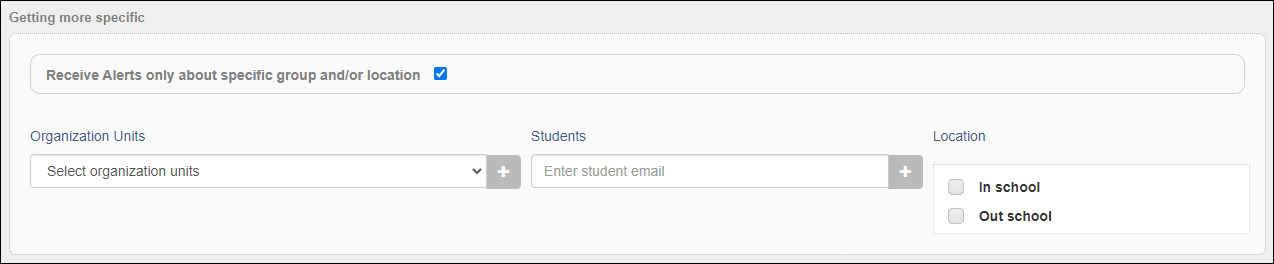
Click Select organizational unit to specify that alerts occurring within selected OUs be generated. The Click and Select Organizational Units window opens.
Select the desired OUs from the tree and click the >> button to move them to the right pane. Select as many OUs as you need. Select one or more checkboxes to the left of any OU names and click the << button if you choose to remove one or more OUs.
Click the Close button. The window closes and the OU or OUs you selected appear in the Organizational Unit column.
Type the email address of a student and click the + sign to the right of the search box. The student is added to the Students column.
Select the In-School or Out-of-School checkbox. You can select one or both.
When you have finished, click the Save Changes button at the bottom of the page.
Students at risk displays the number of times students have exceeded alert thresholds.
Click the Threshold Settings button. The following window opens.
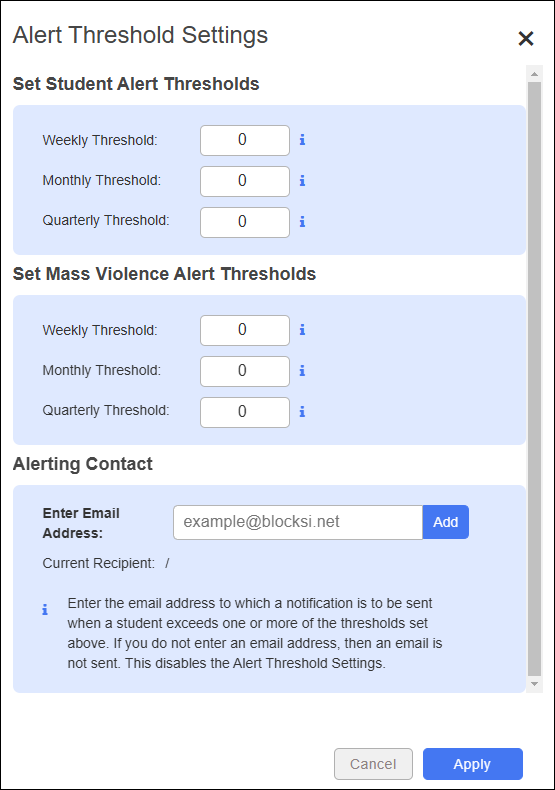
Set the weekly, monthly, and quarterly thresholds that must be exceeded before an email notification is sent to you. Enter 0 to disable these settings.
Enter the email address of the person to whom to send notifications when a student exceeds one or more of the thresholds set above. If you do not enter an email address, then an email is not sent, and the scoring is used to draw the chart below.
When you have finished, click Apply.