Mosyle - Guide de configuration iOS
Note
Blocksi est compatible avec iOS 13.1 et versions supérieures.
Vous devez télécharger le BlocksiForOSX.pkg application.
Les utilisateurs LDAP et les unités d'organisation doivent être synchronisés avec Blocksi
Créez une politique de filtrage iOS sur le tableau de bord d'administration Blocksi.
Fournissez l'ID et le nom de l'organisation à Blocksi Support pour autoriser l'utilisation de l'application de filtrage iOS.
Pour obtenir l'identifiant et le nom de votre organisation
Connectez-vous à votre Directeur de l'école Apple compte avec vos informations d'identification d'administrateur.
Cliquez sur le nom de votre compte dans le coin inférieur gauche, puis sur Préférences depuis le menu contextuel.
Accédez à Informations sur l'organisation.
Localisez votre Identifiant de l'organisation et Nom de l'entreprise.
Envoyez ces informations à Blocksi et nous ajouterons ensuite votre organisation à la liste approuvée des clients pouvant utiliser notre application de filtrage.
Pour configurer les achats en volume
Connectez-vous au compte de votre entreprise à l'adresse entreprise.apple.com (Apple Business Manager) ou school.apple.com (Directeur de l'école Apple).
Cliquez sur le nom de votre compte dans le coin inférieur gauche, puis sur Préférences depuis le menu contextuel.
Cliquez Paiements et facturation.
Cliquez Télécharger dans le Jetons de contenu section à côté du jeton de localisation du serveur correct sous le Apps et livres onglet. Le jeton est téléchargé sur Téléchargements dossier sur votre ordinateur.
Téléchargez le jeton téléchargé sur le Mosyle Contenu (achats en volume) charge utile. Blocksi pour iPad l'application devrait désormais être disponible pour attribution dans la bibliothèque d'applications Mosyle et apparaître sous la forme App personnalisée.
Pour configurer l'extension de proxy DNS
Note
Si l'extension DNS Proxy n'est pas répertoriée, cliquez sur Activer un nouveau type de profil pour ajouter ce type de profil à votre Profils de gestion à Mosyle.
Accédez à Profils de gestion et cliquez Extension de proxy DNS depuis le menu de gauche.
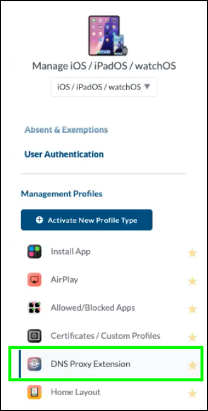
Cliquez Ajouter un nouveau profil pour créer un nouveau profil d'extension de proxy DNS.
Donnez un nom au profil. Par exemple, Blocksi pour iPad DNS Proxy Ext.
Ajouter com.blocksi.dnsproxy dans le ID du pack d'applications champ.
Ajouter com.blocksi.dnsproxy.ext dans le ID du bundle du fournisseur champ.
Tapez la configuration suivante dans Configuration du fournisseur boîte.
<plist>
<dict>
<key>organizationId</key>
admin@blocksi-super-admin.com
<key>adminPassword</key>
Exemple de mot de passe 123
<key>ttl</key>
<string>60</string>
<key>Authentification utilisateur activée</key>
<string>faux</string>
</dict>
</plist>
Note
Tu dois changerBlocksiSuperAdmin@domain.compour correspondre à votre compte de super-administrateur principal pour Blocksi. Vous pouvez également modifier 123Blocksi à n'importe quel mot de passe de votre choix ou conservez-le 123Blocksi comme mot de passe standard pour accéder aux détails de l'application.
Note
Assurez-vous que la configuration de ce fournisseur correspond à Liste AppConfig configuration de l'application. Vous allez configurer cela dans la section suivante de ces instructions.
Assurez-vous que Configuration du DNS par application la case à cocher est désactivée ; si ce n'est pas le cas, désactivez-la maintenant.
Sélectionnez le Activer les variables pour ce profil case à cocher maintenant, si elle n'est pas déjà sélectionnée.
Configurez Affectation de profil pour cibler les appareils.
Cliquez Enregistrer. Le profil doit ressembler à ceci :

Pour configurer l'application
Accédez à Profils de gestion et cliquez Installer l'application depuis le menu de gauche.
Cliquez Ajouter un nouveau profil.
Donnez un nom au nouveau profil. Par exemple, Application Blocksi pour iPad.
Sélectionnez votre préférence Méthode d'attribution.
Cliquez sur + Ajouter une application bouton et ajoutez le Blocksi pour iPad application au profil.
Cliquez sur l'icône de l'application une fois que l'application est ajoutée au Affichage de la grille d'applications. La fenêtre suivante s'ouvre. Ici, vous devez configurer Configuration par application.
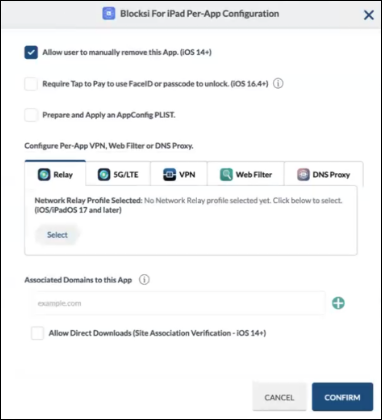
Effacez le Autoriser l'utilisateur à supprimer manuellement cette application case à cocher.
Sélectionnez le Préparer et appliquer un PLIST AppConfig case à cocher. Une nouvelle zone de texte apparaît en dessous.
Ajoutez la configuration XML/PLIST suivante dans la zone de texte :
<plist>
<dict>
<key>ID de l'organisation</key>
<string>BlocksiSuperAdmin@domain.com</string>
<key>Mot de passe administrateur</key>
<string>123Bloquers</string>
<key>ttl</key>
<string>60</string>
<key>Authentification utilisateur activée</key>
<string>faux</string>
</dict>
Note
Tu dois changerBlocksiSuperAdmin@domain.compour correspondre à votre compte de super-administrateur principal pour Blocksi. Vous pouvez également modifier 123Blocksi à n'importe quel mot de passe de votre choix ou conservez-le 123Blocksi comme mot de passe standard pour accéder aux détails de l'application.
Note
Assurez-vous que Liste AppConfig la configuration correspond à Configuration du fournisseur du profil d'extension du proxy DNS.
Cliquez Configurer un VPN par application, Filtre Web ou Proxy DNS.
Cliquez sur Proxy DNS onglet et sélectionnez Extension de proxy DNS profil que vous avez créé pour l'application Blocksi.
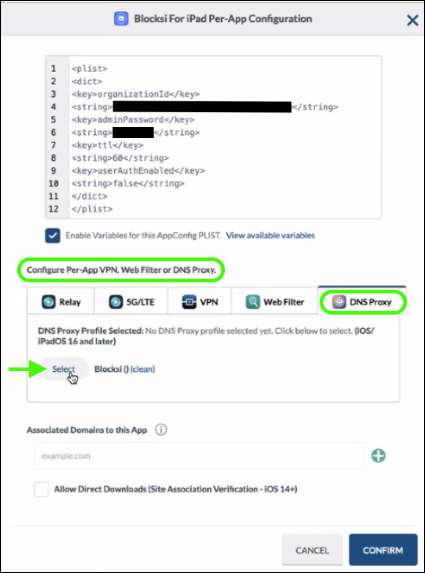
Cliquez Confirmer.
La configuration du déploiement est maintenant terminée. Il ne vous reste plus qu'à vérifier que la configuration est correctement installée sur les appareils cibles inscrits.
Pour valider l'installation de l'application
Vérifiez que l'application est installée sur l'appareil cible.
Ouvrez l'application. Vous devriez voir une page avec une coche verte et le texte suivant : Tout va bien.
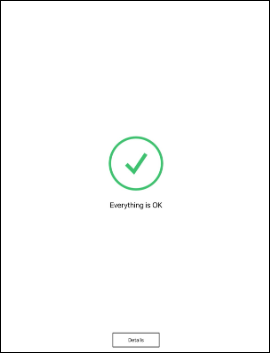
Cliquez sur Détails bouton et saisissez le mot de passe administrateur configuré dans plist pour vérifier les valeurs configurables.
Ouvrez un navigateur sur l'appareil iPad (Safari ou Chrome) et vérifiez que la politique de filtrage que vous avez créée fonctionne correctement.
Accédez à un site configuré pour Autoriser sur la politique de filtrage : le site s'ouvre.
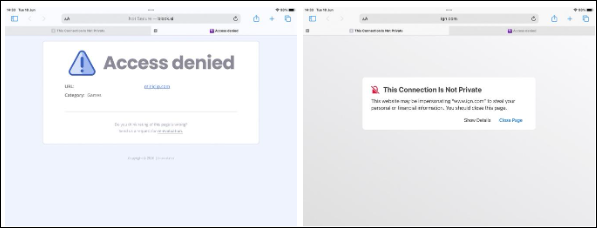
Accédez à un site configuré pour Bloquer sur la politique de filtrage. Le Blocksi vous est présenté Accès refusé page ou Cette connexion n'est pas privée page.
Pour créer la politique de filtrage, consultez Configuration de la politique de filtrage iOS sur le tableau de bord d'administration BMEE