Mosyle - Guía de configuración de iOS
Nota
Blocksi es compatible con iOS 13.1 y versiones posteriores.
Debes descargar el BlocksiForOSX.pkg solicitud.
Todos los dispositivos iOS deben estar inscritos en el modelo supervisado.
Crea una política de filtrado de iOS en el panel de administración de Blocksi.
Proporcione el ID de la organización y el nombre de la organización al soporte de Blocksi para autorizar el uso de la aplicación de filtrado de iOS.
Para obtener el nombre y el identificador de tu organización
Inicia sesión en tu Apple School Manager cuenta con tus credenciales de administrador.
Haga clic en el nombre de su cuenta en la esquina inferior izquierda y, a continuación, haga clic Preferencias desde el menú emergente.
Ir a Información de la organización.
Localiza tu ID de organización y Nombre de la empresa.
Envía esta información a Blocksi para añadir tu organización a la lista aprobada de clientes que pueden usar la aplicación de filtrado de Blocksi.
Para configurar las compras por volumen
Inicie sesión en la cuenta de su empresa en business.apple.com (Apple Business Manager) o school.apple.com (Director de Apple School).
Haga clic en el nombre de su cuenta en la esquina inferior izquierda y, a continuación, haga clic Preferencias desde el menú emergente.
Haga clic Pagos y facturación.
Haga clic Descargar en el Tokens de contenido sección situada junto al token de ubicación del servidor correcto, debajo del Aplicaciones y libros pestaña. El token se descarga en la Descargas carpeta en tu ordenador.
Sube el token descargado al Mosyle Contenido (compras por volumen) carga útil. El Blocksi para iPad la aplicación ahora debería estar disponible para su asignación en la biblioteca de aplicaciones de Mosyle y aparece como Aplicación personalizada.
Para configurar la extensión de proxy DNS
Nota
Si la extensión de proxy DNS no aparece en la lista, haga clic Activar un nuevo tipo de perfil para agregar este tipo de perfil a su Perfiles de gestión en Mosyle.
Ir a Perfiles de gestión y haga clic Extensión de proxy DNS desde el menú de la izquierda.
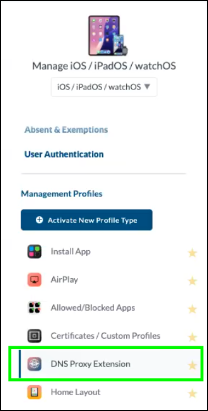
Haga clic Añadir nuevo perfil para crear un nuevo perfil de extensión de proxy DNS.
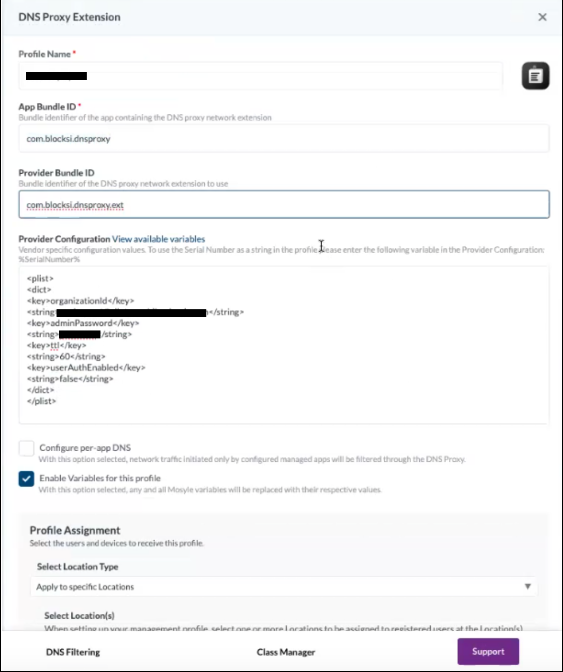
Asigne un nombre al perfil. Por ejemplo, Blocksi para iPad DNS Proxy Ext.
Añadir com.blocksi.dnsproxy en el ID del paquete de aplicaciones campo.
Añadir com.blocksi.dnsproxy.ext en el ID del paquete del proveedor campo.
Escriba la siguiente configuración en Configuración del proveedor caja.
<plist>
<dict>
<key>organizationId</key>
admin@blocksi-super-admin.com
<key>adminPassword</key>
Ejemplo de 123Password
<key>ttl</key>
<string>60</string>
<key>Autenticación de usuario activada</key>
<string>falso</string>
</dict>
</plist>
Nota
Tienes que cambiarBlocksiSuperAdmin@domain.compara que coincida con tu cuenta principal de superadministrador de Blocksi. También puedes cambiar 123Blocksi a cualquier contraseña de su elección o conservación 123Blocksi como contraseña estándar para acceder a los detalles de la aplicación.
Nota
Asegúrese de que la configuración de este proveedor coincida con LISTA DE AppConfig configuración de la aplicación. La configurará en la siguiente sección de estas instrucciones.
Hacer clic Guardar.
Seleccione el Habilite las variables para este perfil casilla de verificación ahora, si aún no está seleccionada.
Configurar Asignación de perfiles a dispositivos de destino.
Haga clic Guardar. El perfil debería tener este aspecto:
Para configurar la aplicación
Ir a Perfiles de gestión y haga clic Instalar la aplicación desde el menú de la izquierda.
Haga clic Añadir nuevo perfil.
Asigne un nombre al nuevo perfil. Por ejemplo, Aplicación Blocksi para iPad.
Selecciona tu preferido Método de asignación.
Haga clic en el + Agregar aplicación botón y añada el Blocksi para iPad aplicación al perfil.
Haga clic en el icono de la aplicación una vez que la aplicación se haya agregado al Vista de cuadrícula de aplicaciones. Se abre la siguiente ventana. Aquí tiene que configurar el Configuración por aplicación.
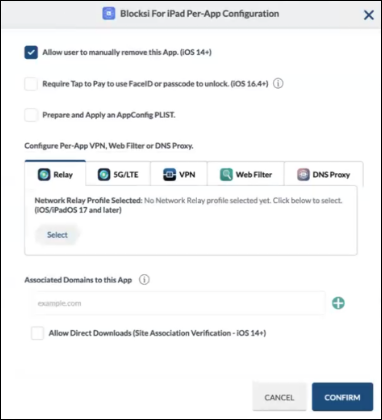
Borra el Permitir al usuario eliminar manualmente esta aplicación casilla de verificación.
Seleccione el Prepare y aplique un PLIST de AppConfig casilla de verificación. Debajo de ella aparece una nueva área de cuadro de texto
Añada la siguiente configuración de XML/PLIST en el área del cuadro de texto:
<plist>
<dict>
<key>ID de organización</key>
admin@blocksi-super-admin.com
<key>adminPassword</key>
Ejemplo de 123Password
<key>ttl</key>
<string>60</string>
<key>Autenticación de usuario activada</key>
<string>falso</string>
</dict>
Nota
Tienes que cambiarBlocksiSuperAdmin@domain.compara que coincida con tu cuenta principal de superadministrador de Blocksi. También puedes cambiar 123Blocksi a cualquier contraseña de su elección o conservación 123Blocksi como contraseña estándar para acceder a los detalles de la aplicación.
Nota
Asegúrese de que esto LISTA DE AppConfig la configuración coincide con configuración del proveedor del perfil de extensión de proxy DNS.
Haga clic Configure la VPN por aplicación, Filtro web o Proxy DNS.
Haga clic en el Proxy DNS pestaña y selecciona el Extensión de proxy DNS perfil que creaste para la aplicación Blocksi.
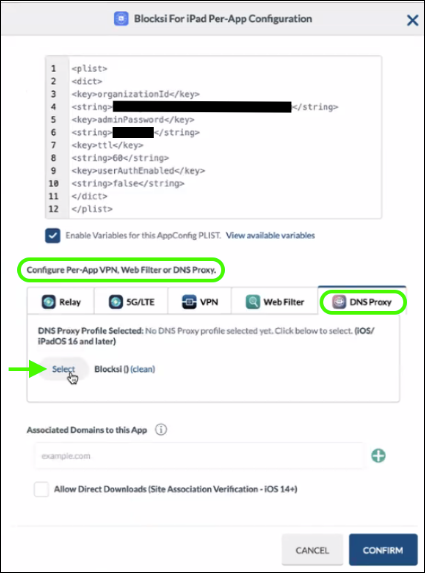
Haga clic Confirmar.
La configuración de implementación ya está completa. Todo lo que tiene que hacer ahora es comprobar que la configuración está correctamente instalada en los dispositivos de destino inscritos.
Para validar la instalación de la aplicación
Compruebe que la aplicación esté instalada en el dispositivo de destino.
Abre la aplicación. Deberías ver una página con una marca de verificación verde y el siguiente texto: Todo está bien.
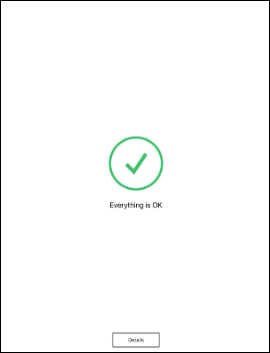
Haga clic en el Detalles botón y escriba la contraseña de administrador configurada en lista para verificar los valores configurables.
Abre un navegador en el dispositivo iPad (Safari o Chrome) y comprueba que la política de filtrado que has creado funciona correctamente.
Navega a un sitio que esté configurado en Permitir en la política de filtrado: se abre el sitio.
Navega a un sitio que esté configurado en Bloquear en la política de filtrado. Se le presentan los Blocksi Acceso denegado página o un Esta conexión no es privada página.
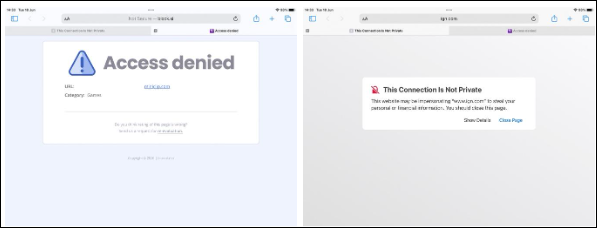
Para crear la política de filtrado, consulte Configuración de la política de filtrado de iOS en el panel de administración de BMEE